Connecting
5.1 Wiring
SIMOTION C
118
Operating Instructions, 02/2012
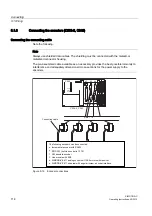
Procedure for front connector wiring
Proceed as follows for the terminal strip:
1.
Strip 6 mm of insulation off the cable. It may be necessary to fit a connector sleeve.
2.
Open the front cover. Move the front connector into position for wiring.
To do this, push the front connector into the module until it locks into position. In this
position the front connector will still protrude from the module.
The connector is locked in position, without electrical contact to the module.
3.
If you route the wires out downwards, start the wiring at the bottom. If this is not the case,
start at the top. Also screw in terminals that are not assigned.
The tightening torque is 0.4 to 0.7 Nm.
4.
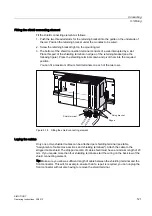
Fit the cable strain relief provided around the wiring loom and the front connector.
5.
Tighten the strain relief for the cable harness. Push in the strain relief to the left to
increase cable space.
6.
Tighten the mounting screw to move the front connector into operating position.
Note: When the front connector is moved into operating position, a front connector keying
engages in the front connector. The front connector will then fit only this module type.
7.
Close the front cover.
8.
You can fill out the labeling field provided and insert it in the front cover.
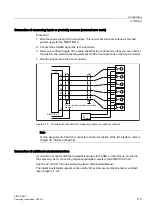
Shielded cables
If a shielded cable is used, the following additional actions are required:
1.
Attach the cable shield to a grounded shielding bus immediately after the cable entry
point in the cabinet (strip the insulation off the cable for this purpose).
You can use the shield connecting element. This is mounted on the rail and can
accommodate up to eight shielding terminals.
2.
Continue routing the shielded cable as far as the module but do not make a connection to
the shield there.
Shield connecting element
This element can be inserted in the mounting rail to provide screening for shielded cables. It
can accommodate up to eight shielding terminals.
See chapter Connecting shielded cables via a shield connecting element (Page 120).

