Installation
5.5 Installing the CPU
Automation system
118
System Manual, 12/2017, A5E03461182-AE
Installing the CPU
Watch video sequence (
http://www.automation.siemens.com/salesmaterial-as/interactive-
manuals/getting-started_simatic-s7-1500/videos/EN/mount/start.html
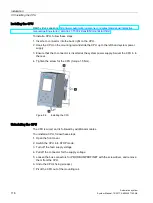
To install a CPU, follow these steps:
1.
Insert a U-connector into the back right on the CPU.
2.
Hook the CPU on the mounting rail and slide the CPU up to the left-hand system power
supply.
3.
Ensure that the U-connector is inserted at the system power supply. Swivel the CPU in to
the rear.
4.
Tighten the screw for the CPU (torque 1.5 Nm).
Figure 5-6
Installing the CPU
Uninstalling the CPU
The CPU is wired, and is followed by additional modules.
To uninstall a CPU, follow these steps:
1.
Open the front cover.
2.
Switch the CPU into STOP mode.
3.
Turn off the feed supply voltage.
4.
Pull off the connector for the supply voltage.
5.
Loosen the bus connectors for PROFIBUS/PROFINET with the screwdriver, and remove
them from the CPU.
6.
Undo the CPU's fixing screw(s).
7.
Pivot the CPU out of the mounting rail.
Содержание Simatic S7-1500/ET 200MP
Страница 1: ......

