background image

38

6.2 Recording 

6.2.1 Recording Colors 

Table 6.1 shows the recording colors for each channel in analog recording. 

㩷 㩷 㩷 㩷 㩷 㩷 㩷 㩷

Table 6.1

Recording Colors 

 Channel No. 

Color 

Red

Green 

6.2.2 Printing Color 

Various digital prints are recorded in purple. 

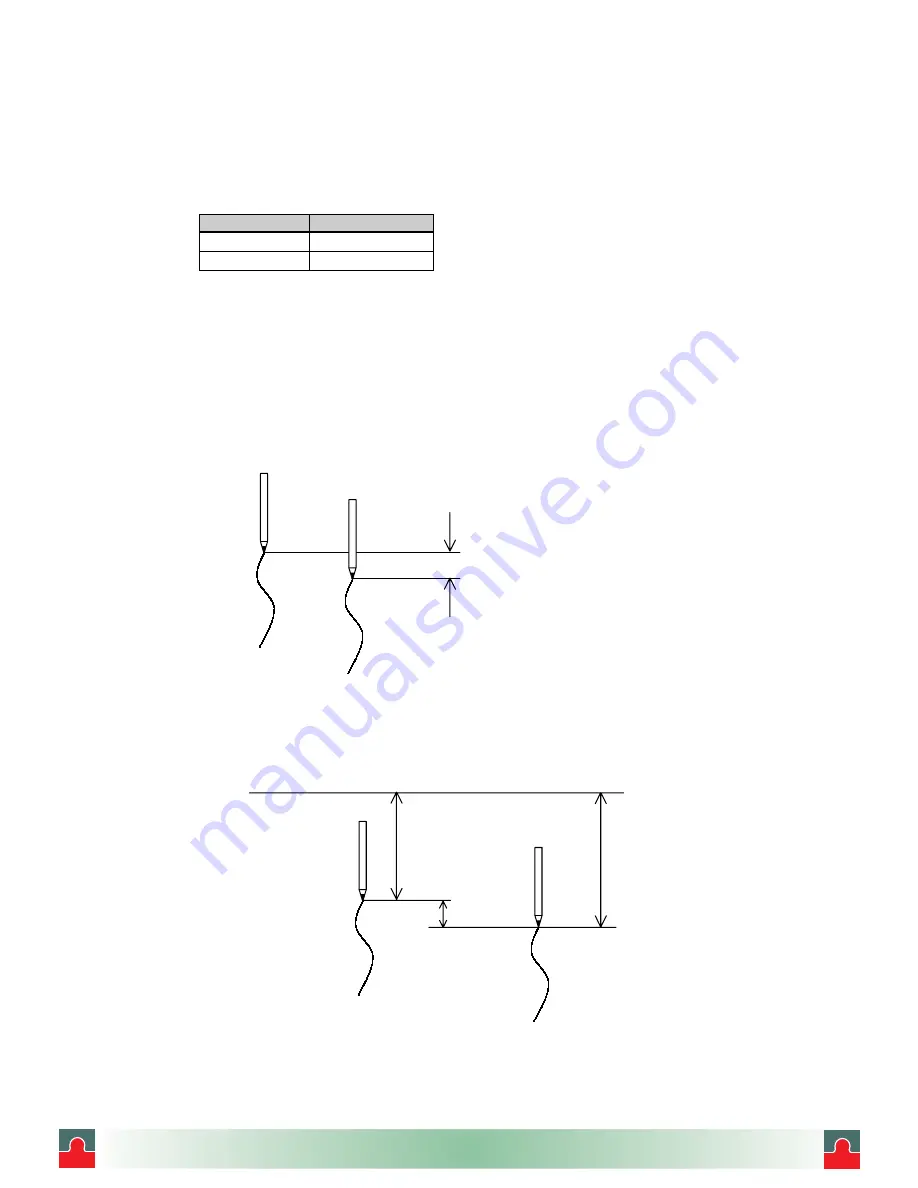
6.2.3 Pen Gap 

Fig.6.2 shows the gap between No.1 and No.2 pens. 

Fig. 6.2

Gap between Pens 

6.2.4  Gaps between Pens and Printer 

Fig. 6.3 shows the gaps between the No.1/No.2 pen and print. 

Fig. 6.3

Gaps between Pens and Printer 

䌃䌈䋲

Green

䌃䌈䋱

Red

䋲䋘

䋲䋰䋮䋵䋘

䋲䋲䋮䋵䋘

䋲䋘

䌃䌈䋲

Green

䌃䌈䋱

Red

Print

㩷 㩷 㩷 㩷 㩷 㩷 䋰䋰㩷 䌁䌂䌃

i

i

Tel: (01943) 602001 Fax: (01943) 816796

Содержание HR-701

Страница 1: ... 㩷 Systems Services PO Box 1 Ilkley West Yorkshire LS29 8EU PO Box 1 Ilkley West Yorkshire LS29 8EU Phone 01943 602001 Fax 01943 816796 Phone 01943 602001 Fax 01943 816796 Ltd instrumentation n Website www issltd co uk Email sales issltd co uk i i Tel 01943 602001 Fax 01943 816796 ...

Страница 2: ...Be sure to observe the following warnings cautions and those written in this manual in order to secure safety in handling the instrument WARNING In order to prevent electric shock be sure to disconnect this instrument from the main power source when wiring it 1 In order to prevent an electric shock be sure to provide protective grounding prior to turning on this instrument 2 Do not cut a protectiv...

Страница 3: ...nt 5 When the manual is lost or stained contact our sales representative 6 It is prohibited to copy or reproduce this manual without our permission 1 When installing this instrument put on a protective gear such as safety shoes helmet etc for your safety 2 Do not put your foot on the installed instrument or get on it because it is dangerous Only our servicemen or people authorized by Shinko are al...

Страница 4: ...n the warning and cautioning information in this manual Symbols used in this manual WARNING Failure to observe this information could result in death or injury Be absolutely certain to read this CAUTION Failure to observe this information could damage the instrument Be certain to read it 㨇Note㨉 This is cautionary information for correct use of the instrument Be certain to read it 㨇Reference㨉 This ...

Страница 5: ... 6 3 3 Print Sample 40 6 4 Digital Print 41 6 4 1 Manual Print 41 6 4 2 List Print 42 6 4 3 Engineering List Print 44 6 5 Changing the Display 46 6 5 1 Auto Display㧨 㧪 46 6 5 2 Manual Display㧨 㧪 46 6 5 3 Date Display㧨 㧪 46 6 5 4 Time Display㧨 㧪 46 6 5 5 Display Off㧨 㧪 46 7 DEVICE SETTING 47 7 1 Setting the Setup Mode 47 7 1 1 Setting the Range 50 1 Setting method 50 2 Current Voltage 㧘 Thermocoupl...

Страница 6: ... Reference Junction Compensation 101 10 TROUBLESHOOTING 102 10 1 Troubleshooting 102 10 1 1 Trouble Items 102 10 1 2 When the Recorder Does not Work at All 102 10 1 3 When There is a Big Error 103 10 1 4 When the Pen Recording Deflected 103 10 1 5 When Prints Nothing 104 10 1 6 When Printing is Faint 104 10 1 7 When the Chart Paper is not Fed at All 105 10 1 8 When the Chart Paper is not Fed Prope...

Страница 7: ...n ԛMounting bracket ԜInstruction manual ԝPacking Fig 1 1㩷 Accessories 㩷 㩷 㩷 㩷 㩷 㩷 㩷 㩷 㩷 Table 1 1㩷 List of Accessories Quantity No Part Name Type 1 pen 2 pen Remarks 㧝 Chart paper H 10100 㧝 㧝 100 equal divisions 㧞 Ribbon Cassette HPSROO1H0002C 㧝 㧝 WPSR196A000001A 㧝 㧝 For 1 pen Red 㧟 Cartridge Pen WPSR196A000002A 㧝 For 2 pen Green 㧠 Mounting H4A14175 㧞 㧞 Panel mounting bracket 㧡 Instruction HR72E 㧝...

Страница 8: ...is instrument is shipped with the ribbon cassette in the back of the chart holder Chart Guide Chart Cover 䌛Note䌝 Ԙ This instrument is equipped with the ribbon cassette in back of the chart holder Open the door and pull out the chart holder to check it See Section 5 1 about taking out the chart holder ԙ The chart paper and the cartridge pen are contained in the chart holder Take the chart holder ou...

Страница 9: ...iddle far side of the instrument Make sure that this instrument meets your requested specification seeing the following tables Table 1 2 㩷 Type 㧴㧾 㧣㧜 غ 㧘 غغغ 㧝㧠㧠 㨃 㧝㧠㧠 㧴 㧝㧡㧜 㧰 mm 㧝 㧝 points Measuring point 㧞 㧞 points 㧯㧡 Communication function RS 485 㧾㧱㧝 DI function 㧲㧸 Out of paper detection function Options 㧸㧴㧟 Alarm output function i i Tel 01943 602001 Fax 01943 816796 ...

Страница 10: ...d it may damage the door or mounting part 㩷 CAUTION㩷 Storage in a poor environment may damage the appearance functions and service life of the instrument Storage Environment 䊶A place with little dust 䊶A place free from combustible explosive or corrosive gases SO2 H2S etc 䊶A place free from vibrations or shocks 䊶A place free from water or steam or high humidity 95 RH max 䊶A place free from direct s...

Страница 11: ...㵪 10 㵪 CONSTRUCTION Appearance Fig 2 1 Appearance Cartridge pen Door Chart Holder Display keyboard Terminal block Case Mounting bracket Indication card i i Tel 01943 602001 Fax 01943 816796 ...

Страница 12: ...O P Q R S T U V W X Y Z Alarm Type Display Indicates alarm type in red H is lit when the alarm is High And L is illuminated when the alarm is Low Neither of them is illuminated when there is no alarm Channel No Display Indicates channel number in orange Data Display Indicates the process variable time setting screen etc in orange Operation Keys Use these keys for setting and other operations Statu...

Страница 13: ...ing list print and changes the mode to the setting mode 㵰ESC㵱 key ESC function Exits that menu halfway while selecting a function 㵰PRINT㵱 key PRINT function Used to perform manual print or list print 㵰䂦㵱 key 䂦 function Used to select a setting parameter numeral or built in command ascending direction 㵰FEED㵱 key FEED function The chart paper is fed while the key is pressed and stopped when released...

Страница 14: ...sions and panel cutout 㩷 CAUTION㩷 For maintenance and using the instrument safely it is recommended that spaces larger than the size written in the bracket be secured per unit Dimension required when the door is fully opened 135ࠑ Wall on the left side 㧔 㧕 㧔 㧕 OCZ 㧔2CPPGN VJKEMPGUU 㧔 㧕 OKP OKP 0 5 4 6 1 i i Tel 01943 602001 Fax 01943 816796 ...

Страница 15: ... the instrument in a place exposed to a combustible explosive or corrosive gas SO2 H2S etc 㩷 CAUTION㩷 Install the instrument in the following places㩷 㩷 䊶A place without rapid humidity change 䊶A place of normal temperature 25㷄 or so 䊶A place exposed to as little mechanical vibrations as possible 䊶A place with as little dusts as possible 䊶A place affected by the electromagnetic field as little as po...

Страница 16: ...ing the instrument to the panel attach packing to the position shown in the figure The rest of the procedure is the same Fig 3 4㩷 Mounting to the Panel䋨in compliance with the IP65䋩 Panel Mounting Screw Mounting of Packing Packing Panel Mounting bracket Packing Panel Screw i i Tel 01943 602001 Fax 01943 816796 ...

Страница 17: ...ms to the voltage of the supply source 㽵㩷 Attach a transparent protective cover prior to turning on the POWER of the instrument 㽶㩷 Any interruption of the protective conductor inside or outside the instrument or disconnection of the protective grounding terminal is likely to make the instrument dangerous under some fault conditions Intentional interruption is prohibited 0 5 4 6 1 Power source term...

Страница 18: ...stance 100 㱅 or lower a minimum diameter of a grounding conductor 1 6mm to the protective grounding terminal 㽵㩷 If other instrument shares the protective grounding conductor there may be an effect caused by noise coming from the grounding conductor It is recommended not to share it with other instrument 㽶㩷 In order to comply with the requirements of safety standard EN61010 the recorder shall have ...

Страница 19: ... 㩷 㩷 㩷 㩷 For Pt 100 JPt 100 䋻50m 㱅max 㩷 䊶When it is likely to be affected by induction noise particularly when wiring near the high frequency 㩷 㩷 power source it is recommended a shielded twisted wire be used 㩷 㩷 䊶Attach a round press fitting terminal with insulated sleeve for M3 5 to the end of the electric wire 㽳Precautions for wiring 㩷 䊶The wiring between the instrument and measurement point sh...

Страница 20: ...put accuracy Use the following recommended resistor Resistance䋺250 㱅 㩷 Rated power䋺1 4W Tolerance䋺㫧0 1 max 㩷 Temperature coefficient䋺㫧50ppm max 0 5 4 6 㧗 㧙 1 Shielded wire 3 core cord Identical wire diameter length Ground Resistance temperature detector Input terminal block Shielded wire Ground DC current input Input terminal block 0 5 4 6 㧗 㧙 1 Shunt resistor Connecting lead wire i i Tel 01943 60...

Страница 21: ... Inductive load 㽳 Attach an anti surge protective circuit surge absorbers etc to an output terminal when required 㽴 Attach a round press fitting terminal with insulated sleeve for M3 5 to the end of an electric wire 㽵 Keep alarm output wiring away from input wiring 㽶 Do not use unused terminals as relay terminals 㩷 WARNING㩷 㽲 Be sure to wire after turning off the POWER 㽳 When the power source has ...

Страница 22: ...ig 4 8 Fig 4 8㩷 Alarm Output Wiring 4 3 3 DI function Wiring Procedure Wire the DI function option RE1 referring to Fig 4 9 Fig 4 9㩷 DI function Wiring 0 3 Relay output 䋳䌃 䋳䌁 㪩㪼㫃㪸㫐㩷㪥㫆㪅㪊㩷 㩿㪥㫆㫉㫄㪸㫃㫃㫐㩷㫆㫇㪼㫅㪀 0 5 4 6 1 DI1 DI2 DI3 DI COM COMMON for DI1 to DI3 i i Tel 01943 602001 Fax 01943 816796 ...

Страница 23: ...noise particularly when wiring near the high frequency power source it is recommended a shielded twisted wire be used 䊶Attach a round press fitting terminal with insulated sleeve for M3 5 to the end of the electric wire 䊶Be sure to ground the shield of a connecting wire 䌛Note䌝 Cable length is a maximum of 15m 䌛Note䌝 㽲Be sure to attach terminating resistance Rt 200 㱅 to a host computer side 㽳Connec...

Страница 24: ... side approx 85 respectively Fig 5 2㩷 Automatically moves the 2 Pens and Printer CAUTION㩷 It is recommended our original chart paper be used to ensure proper recording If the chart holder is taken out with recording operation being activated the ink ribbon may be damaged To replace the chart paper be sure to press the 㵰REC㵱㩷 key to stop recording Be sure to move up the cartridge pen Otherwise it w...

Страница 25: ... the chart paper Move up the pen Fig 5 4㩷 Moving up the Pen Door Hook Push the door hook in the arrow direction to unlock The pen up lever is located at the right end inside the case Push it up with a finger Pen up lever CAUTION Maximum angle of the door is 135 degrees when the door is fully open Do not open the door further or the hinge will be broken i i Tel 01943 602001 Fax 01943 816796 ...

Страница 26: ...art Holder 5 Opening the Chart Cover and Chart Guide Open the chart guide and the chart cover outward Fig 5 6㩷 Opening the Chart Cover and Chart Guide Pull out the chart holder Lever Chart Guide Transparent Chart Cover Black Open the chart guide in the arrow direction Open the chart cover in the arrow direction i i Tel 01943 602001 Fax 01943 816796 ...

Страница 27: ... Fig 5 7㩷 Loosening the Chart Paper 7 Setting the Chart Paper into the Storage Chamber Unfold the 2 sections of chart paper Holding the printing surface upward set it in the storage chambe Fig 5 8㩷 Setting the Chart Paper Square Holes to Left Sprocket Drum Storage Chamber Rectangular Holes to Right i i Tel 01943 602001 Fax 01943 816796 ...

Страница 28: ...with Sprocket Drum Chart Holder Sectional View 9 Closing the Chart Cover and the Chart Guide Close the chart cover and the chart guide in the arrow directions Fig 5 10㩷 Closing the Chart Cover and Chart Guide Make the left and right holes parallel with each other Chart Paper Chart Paper Chart Receiver Storage Chamber Align the holes in the paper properly with the sprocket drum teeth Sprocket Drum ...

Страница 29: ...per be fed out Fig 5 11㩷 Checking Paper Feed 11 Putting Back the Chart Holder Insert in the chart holder horizontally into the case until it is locked Fig 5 12㩷 Putting Back the Chart Holder Turn the gear at the left end of the sprocket drum in the arrow direction Chart Receiver Chart Guide When inserting it push the chart receiver i i Tel 01943 602001 Fax 01943 816796 ...

Страница 30: ...er Feed Press the 㵰FEED㵱 key on the display keyboard to feed the chart paper Fig 5 13㩷 Pressing the 㵰FEED㵱 key 14 Pressing the 㵰REC㵱 key to Restart Operation The chart paper is fed while pressing the key Releasing the key stops paper to feed 㩷The paper is initially fed slowly in the beginning when the key is pressed Prior to the operation of the instrument be sure to confirm that the chart paper i...

Страница 31: ...Opening the Door Push the door hook to unlock the door Pull the door to open it See Fig 5 3 on Page 24 3 Detaching the Cartridge Pen Pull out the cartridge pen Fig 5 14㩷 Detaching the Cartridge Pen 4 㩷 CAUTION㩷 To replace the cartridge pen be sure to press the 㵰REC㵱 key to stop recording Pen Holder Cartridge Pen Hold here with your finger Pen Pipe 㩷 Note㩷 When pulling out the cartridge pen do not ...

Страница 32: ...eattach the cartridge pen to the pen holder Push it in firmly until it clicks Fig 5 16㩷 Reattaching the Cartridge Pen 6 Pressing the 㵰REC㵱 Key to Restart Operation Pen Cap Pen Holder Cartridge Pen Hold here with your finger Pen Pipe Reattach the No 1 pen red above and No 2 pen green below respectively i i Tel 01943 602001 Fax 01943 816796 ...

Страница 33: ...e up the pen see Fig 5 4 on Page 24 4 Pulling out the Chart Holder Put your fingers onto the levers at both sides of the chart holder and pull it out See Fig 5 5 on Page 25 The guide shaft printer and the main shaft are laid out as shown in the figure below The main shaft is invisible if the ribbon cassette has been set Fig 5 17㩷 Layout of Guide Shaft Printer and Main Shaft 㩷 CAUTION㩷 If the chart...

Страница 34: ...in Shaft Viewing from the right side section the hook of the ribbon cassette has been engaged with the main shaft Fig 5 20㩷 Ribbon Cassette Sectional View Ribbon Guide Shaft Lower both sides of the ribbon cassette Detach it from the guide shaft one side in turn Main Shaft Guide Shaft Ribbon Cassette Detach the hook of the ribbon cassette in such a manner as disengaging it from the main shaft Ribbo...

Страница 35: ...on cassette horizontally If the gear of the ribbon cassette touches the printer move the printer to the right further 9 Unslacking the Ink Ribbon Set the new ink ribbon Turn the gear in the arrow direction to unslack the ink ribbon Fig 5 22㩷 Unslacking the Ribbon Lower the hook of the ribbon cassette Ribbon Main Shaft Hook Gear Ink Ribbon Turn the gear in the arrow direction i i Tel 01943 602001 F...

Страница 36: ...the hook of the ribbon cassette will be engaged with the main shaft Fig 5 24㩷 Reattaching to the Main Shaft Ribbon Cassette Sectional View Main Shaft Guide Shaft Ribbon Cassette 䌛Note䌝㩷 Your hands may be stained by ink when replacing the cartridge pen or ribbon cassette Use soap to clean them Insert it horizontally Ribbon Cassette Main Shaft Slantly Upward to Engage with the main shaft Slantly Upw...

Страница 37: ... Putting the Chart Holder back Put the chart holder back horizontally into the case until it is locked See Fig 5 12 on Page 28 14 Moving the Pen down to Close the Door Use the pen up lever to move the pen down Close the door and make sure that it is locked 15 Pressing the 㵰REC㵱 key to resume Operation Ribbon Guide Shaft Attach both sides to the guide shaft one side at one time It clicks if properl...

Страница 38: ...e power is turned off during printout 㽴㩷 When power is turned on 0 is indicated on the display until the data is retrieved The number of digits indicated differ depending on the setting 㩷 WARNING㩷 Prior to turning on the power make sure that the supply voltage meets the specifications for the instrument and the instrument is properly grounded 㩷 CAUTION㩷 Prior to turning on the power make sure that...

Страница 39: ...ting Color Various digital prints are recorded in purple 6 2 3 Pen Gap Fig 6 2 shows the gap between No 1 and No 2 pens Fig 6 2㩷 Gap between Pens 6 2 4 Gaps between Pens and Printer Fig 6 3 shows the gaps between the No 1 No 2 pen and print Fig 6 3㩷 Gaps between Pens and Printer 䌃䌈䋲 䋨Green䋩 䌃䌈䋱 䋨Red䋩 䋲䋘 䋲䋰䋮䋵䋘 䋲䋲䋮䋵䋘 䋲䋘 䌃䌈䋲 䋨Green䋩 䌃䌈䋱 䋨Red䋩 Print㩷 㩷 㩷 㩷 㩷 㩷 䋰䋰㩷 䌁䌂䌃 i i Tel 01943 602001 Fax 01943 81...

Страница 40: ...ing press the 㵰REC㵱 key To stop press the 㵰REC㵱 key for 3 seconds or more 㵰REC lamp is unlit when recording stops 6 3 2 Feed the Chart Paper The chart paper is fed while the 㵰FEED㵱 key is pressed and stops when released 䌛Note䌝 㽲㩷 When the power is turned on the previous status continues 㽳㩷 When controlling a start stop of recording through Digital Input DI function option RE1 start stop cannot be ...

Страница 41: ...inting see next page Priority in Reference 䌛Note䌝 Logging print will not be the wait printing state At the start time of Logging print if the prior Logging print is printing the next one cannot print Prolong the printing interval of Logging print in this case C ٕ ً ً 㧖 OO J㩷 Alarm Print Prints alarm occurrence reset channel number alarm type and level 䂥 denotes alarm occurrence and 䂯 denotes alarm...

Страница 42: ...㩷 If an alarm is activated while manual print is running alarm print is performed when manual print is finished 䌛Reference䌝 Printing is actuated in following priority See following Priority Order When multiple types of printing are activated simultaneously higher priority printing takes effect first following the priority order The Synchronous printout synchronizes with analog recording and prints...

Страница 43: ... value engineering unit z Setting alarm type z Comment Others 1 㩷 List print operating procedure 㩷 㩷 㽲Press the 㵰PRINT㵱 key 㩷 㩷 㽳Use the 㵰PRINT㵱 key to display and press the 㵰ENT㵱 key 㩷 㩷 㽴Use the 㵰PRINT㵱 key to select Pressing the 㵰ENT㵱 key executes list print Once list print starts the display is automatically returned to the Data Display screen When the list print is terminated it is returned t...

Страница 44: ...6 7㩷 List Print CT 46 OO J 52 OO J 6 RG 6 014 O 5 O 8 4 6 10 OO 10 1 2 46 1 06 4 2 0 Digital print ON OFF zone record and partial compression expansion setting value for each channel Prints Input range Tag Measurement range and Scaling value for each channel If skipped the channel number is prefixed by 䋪 Set values of the comment print Effective with the DI function option Print alarm setting valu...

Страница 45: ...to select Pressing the 㵰ENT㵱 key executes engineering list print Once engineering list print starts the display is automatically returned to the Data Display screen When the engineering is terminated it is returned to the status prior to starting engineering list print 䌛Note䌝 㽲㩷 Analog recording is continued while engineering list print is running 㩷 Chart paper is fed forcibly 㽳㩷 If an alarm is ac...

Страница 46: ... 5612 DKV 1 06 0A24 06 6 24 06 Alarm Print Setting Value ON 1 occurrence recovery Logging Print Set value ON OFF Start Time Interval Printout Sync ASync PG_ADJ ON OFF Logging Print ON Start 00 00 Interval 1h Printout ASync PG_ADJ OFF Channel Number Tag Number Setting Value CH RUN STOP Internal External Switch Setting Value INT key Setting of RJC constant value in external RJC Burnout Protection Of...

Страница 47: ...ta renewal period 120ms 6 5 2 Manual Display 㧨 㧪 Indicates the Process variable of the specific channel it updates every measurement cycle 120ms The data is the same as Auto display Pressing the 㵰ENT㵱 key changes the indicated channel number it increments 6 5 3 Date Display 㧨 㧪 Indicates the month and day Leap year adjustment is automatic 㩷 Example of October 18 6 5 4 Time Display 㧨 㧪 Indicates ho...

Страница 48: ... 7 1 2 㩷 Setting the Alarm Setting Channel Current Voltage Input Thermocouple Input Resistance temperature detector Input Scaling Square Root Decade Difference Sum Average Skip Mode Setting Channel ON䋯OFF Level Set Value Type Relay ON OFF Relay No 㩷 Option 㵰 㩷 㩷 㩷 㩷 WARNING When calibrating data connect the equipment written in the Section 9 5 of the instruction manual Data calibration must be per...

Страница 49: ... z Setting the password Input the password to enter the engineering mode Zone Recording Partial Compression Expansion 㩷 㩷 Digital Print Tag Comment Words Setting Mode Setting Copy from Channel 㩷 㩷 㩷 㩷 㩷 㩷 㩷 Copy to Channel Setting 1st 2nd Chart speed Chart speed Time Setting Year 㩷 㩷 Month Day See the key operation in page 74 Setting Password 㩷 㩷 㩷 㩷 㩷 㩷 㩷 㩷 㩷 㩷 㩷 㩷 㩷 Setting Channel Code No Char ...

Страница 50: ...channels 䍀㷄䍁 BF 43 00 䃨Chart feed speed 䋨1䋩㩷20mm h 䋨2䋩㩷20mm h 䃨Time 2000 01 01 00 00 Sets up the present time Japan standard time GMT䋫09 00 䃨Zone setting all channels 0 to 100 䃨Partial compression expansion 㩷 㩷 㩷 㩷 all channels OFF 䃨Digital print all channels ON 䃨Tag print character all channels Blank up to the 5th character 䃨Comment print word 1 to 3 㵰Blank up to the 12th character i i Tel 01943 ...

Страница 51: ...mode 㽻 Setting Channel Mode Key 㽲 䋨 Current Voltage Input䋩 㽳 䋨Thermocouple Input䋩 㽴 䋨Resistance temperature detector Input䋩 㽵 䋨Scaling䋩 㽶 䋨Square Root䋩 㽷 䋨Decade䋩 㽸 䋨Difference䋩 㽹 䋨Sum䋩 㽺 䋨Average䋩 㩷 㩷 㽻 䋨Skip䋩 䂦Key 㸣 㸣 㸣 㸣 㸣 㸣 㸣 㸣 㸣 Setting for all channels Note A decimal point arbitrary position can be set only in the scaling and square root modes When you want to alter the decimal point positio...

Страница 52: ...se the key to shift a digit Press the 㵰ENT㵱 key Use the 䂦 key to select a sign and numeral Use the key to shift a digit Press the 㵰ENT㵱 key Press the 㵰ENT㵱 key Setting is completed To return to the user mode press the 㵰MENU㵱 key for 3 seconds or more 䌛Note䌝 㽲㩷 㩷 When an incorrect numeral is input or Press the 㵰ENT㵱 key and re enter a correct numeral 㽳㩷 㩷 For the range setting When especially don t...

Страница 53: ...select the range Use the 䂦 key you can select the type out of the range 㩷 㩷 㩷 㩷 㩷 㩷 㩷 㩷 㩷 㩷 㩷 㩷 㩷 㩷 㩷 㩷 㩷 㩷 㩷 㵰ENT㵱Key 㫧䋱䋰㫄㪭 䋰㩷㫋㫆㩷䋲䋰㫄㪭 䋰㩷㫋㫆㩷䋵䋰㫄㪭 㫧䋲䋰䋰㫄㪭 㫧䋱䌖 䋰 㫋㫆㩷䋵䌖 㫧䋱䋰䌖 䋴㩷㫋㫆㩷䋲䋰䌭䌁 Range Mode 䌂 䌒 䌓 䌋 䌅 䌊 䌔 䌃 䌁䌵䋭䌆䌥 䌎 䌐䌒䋴䋰䋭䋲䋰 䌐䌌㸈 䌕 䌌 䌐䌴䋱䋰䋰 䌊䌐䌴䋱䋰䋰 i i Tel 01943 602001 Fax 01943 816796 ...

Страница 54: ...ey to select a range 50 mV Press the 㵰ENT㵱 key Use the 䂦 key to select a numeral Use the key to shift a digit Press the 㵰ENT㵱 key Use the 䂦 key to select a numeral Use the key to shift a digit Press the 㵰ENT㵱 key 䌛Note䌝 In the case of TC and RTD input set the Span input value equal to the Span side scale value But set a decimal point position to the standard position 䋪2 next page 䌛Note䌝 In the cas...

Страница 55: ...ct a numeral Use the key to shift a digit Press the 㵰ENT㵱 key Press the 㵰ENT㵱 key Setting is completed To return to the user mode press the 㵰MENU㵱 key for 3 seconds or more FEED PRINT ENT FEED PRINT FEED PRINT ENT ENT 䋨Decimal point䋩 䋨Span side scale value䋩䋨䋪2䋩 䌛Note䌝 When an incorrect numeral is input or is displayed Press the 㵰ENT㵱 key and re enter a correct numeral 䋨Zero side scale value䋩䋨䋪1䋩 i...

Страница 56: ...o shift a digit Press the 㵰ENT㵱 key Use the 䂦 key to select a numeral Use the key to shift a digit Press the key again in the lowest digit right end to blink a decimal point Use the 䂦 key to select a decimal point position Press the 㵰ENT㵱 key Use the 䂦 key to select a numeral Use the key to shift a digit Press the 㵰ENT㵱 key Press the 㵰ENT㵱 key Setting is completed To return to the user mode press ...

Страница 57: ...more 1 to 100 㩷 㩷 㩷 㩷 㩷 㩷 㩷 㩷 㩷 㩷 㩷 㩷 㩷 㩷 㩷 㩷 㩷 㩷 㩷 㩷 㩷 㩷 OUT䋽䋨SCALR䋭SCALL䋩㬍㩷 㩷 㩷 㩷 㩷 㩷 㩷 㩷 㩷 㩷 㩷 㩷 㩷 㩷 㩷 㩷 䋫㩷 SCALL z When an input value is less than 1 OUT䋽㩷 㩷 㩷 㩷 㩷 㩷 㩷 㩷 㩷 㩷 㩷 㩷 㩷 㩷 㩷 㩷 㩷 㩷 㬍䋨IN䋭SPAN L䋩䋫 SCAL L Example When setting as in previous the page the display is as following table Input voltage mV 䋰 䋱䋰 䋲䋰 䋳䋰 䋴䋰 Display 䋰䋮䋰䋰 䋵䋰䋮䋰䋰 䋷䋰䋮䋷䋱 䋸䋶䋮䋶䋳 䋱䋰䋰䋮䋰䋰 䌉䌎䋭䌓䌐䌁䌎䌌㩷 䌓䌐䌁䌎㪩䋭䌓䌐䌁䌎㪣 㪈㪇㬍䋨㪪㪚㪘㪣㪩䋭㪪㪚㪘㪣㪣...

Страница 58: ...ey Use the 䂦 key to select a numeral Use the key to shift a digit Press the 㵰ENT㵱 key Use the 䂦 key to select a numeral Use the key to shift a digit Press the 㵰ENT㵱 key Use the 䂦 key to select a numeral Use the key to shift a digit Press the 㵰ENT㵱 key Press the 㵰ENT㵱 key Setting is completed To return to the user mode press the 㵰MENU㵱 key for 3 seconds or more MENU ESC 3 sec PRINT ENT PRINT ENT PR...

Страница 59: ... 㩷 䋫 OUT 䋽 10OUT1 LGSCALL 䋺Log10䋨SCALL䋩 LGSCALR 䋺Log10䋨SCALR䋩 Example When setting as in previous the page the display is as following table Input voltage V 䋰䋮䋰 䋱䋮䋰 䋲䋮䋵 䋳䋮䋰 䋵䋮䋰 Display 䋱䋮䋰䌅䋰 䋱䋮䋰䌅䋱 䋳䋮䋲䌅䋲 䋱䋮䋰䌅䋳 䋱䋮䋰䌅䋵 䌘䌘䌅䌙䌙 㩷 㩷 䌘䌘䋺Mantissa section 1 0 to 9 9 㩷 㩷 䌙䌙䋺Exponent section 19 to 19 㩷 㩷 Up to 5 decades 㩷 㩷 Scaling upper limit 㩷 㩷 䋭 Scaling lower limit is 1 0E5 or less 䌛Note䌝 Decade output is ...

Страница 60: ...ing is completed To return to the user mode press the 㵰MENU㵱 key for 3 seconds or more About Difference Sum and Average z The setting channel must be larger than the one on which computes the difference sum or average Set up only Channel 2 z The range and scale of the setting channel is the same as the channel on which computes the difference sum and average z A range value after the computation c...

Страница 61: ...NT㵱 key Setting is completed To return to the user mode press the MENU key for 3 seconds or more About Skip The skip channel measures but does not provide display print or assess alarms If input is not connected short circuit a measurement terminal The pen keeps zero point position Remove the cartridge pen 䌛Note䌝 Setting all the channels to Skip indicates an error 㩷 㩷 㩷 㩷 㩷 㩷 㩷 At least one channe...

Страница 62: ...nd alarm output relay No 1 Press the 㵰MENU㵱 key for 3 seconds or more to enter the setup mode Use the 䂦 key to indicate Press the 㵰ENT㵱 key Use the 䂦 key to select the channel you want to set Press the 㵰ENT㵱 key Use the 䂦 key to select an alarm level Press the 㵰ENT㵱 key Up to 4 levels can be set Use the 䂦 key to select alarm setting ON Press the 㵰ENT㵱 key Setting indicates and completes setting Us...

Страница 63: ...ut is set to ON set the relay number Use the 䂦 key to select the relay number out of 1 to 3 and press the 㵰ENT㵱 key Press the 㵰ENT㵱 key Setting is completed When you want to continue to set for other channel press the 䂦 key to select the channel and start setting To return to the user mode press the 㵰MENU㵱 key for 3 seconds or more 䌛Note䌝 When the 㵰ENT㵱 key is pressed during the alarm point settin...

Страница 64: ...t characters is less than 6 enter a code to end Press the 㵰ENT㵱 key Press the 㵰ENT㵱 key Setting is completed To return to the user mode press the 㵰MENU㵱 key for 3 seconds or more 䌛Note䌝 If you change the unit in the range of or set the range to MENU ESC 3 sec PRINT ENT PRINT ENT FEED PRINT ENT FEED PRINT ENT FEED PRINT ENT ENT Display Operation Keys Description 㩷 㩷 㩷 㩷 㩷 㩷 㩷 㩷 䋨Code No 䋩 䌛Note䌝 Th...

Страница 65: ...㱠 䋪䋴 䋥 䋴 䌄 䌔 䌤 䌴 䋴 䋴 㰱 㱁 㱐 㱡 䋪䋵 䋦 䋵 䌅 䌕 䌥 䌵 䋵 䋵 㰲 㱂 㱑 㱢 䋪䋶 䋧 䋶 䌆 䌖 䌦 䌶 䋶 䋶 㰳 㱃 㱒 㱣 䋪䋷 㶅 䋷 䌇 䌗 䌧 䌷 䋷 䋷 㰴 㱄 㱓 㱤 䋪䋸 䋨 䋸 䌈 䌘 䌨 䌸 䋸 䋸 㰵 㱅 㱔 㱥 䋪䋹 䋩 䋹 䌉 䌙 䌩 䌹 䋹 䋹 㰶 㱕 䋪䌁 䋪 䋺 䌊 䌚 䌪 䌺 㰷 㱖 䋪䌂 䋫 䋻 䌋 䌛 䌫 䌻 䋫 䋫 㰸 㱗 䋪䌃 䋬 䋼 䌌 䎂 䌬 䌼 㫧 㰹 㱘 䋪䌄 䋭 䋽 䌍 䌝 䌭 䌽 㰺 㱙 䋪䌅 㩷 䋮 䋾 䌎 䌞 䌮 䎁 䋭 䋭 㰻 㱚 䋪䌆 䋯 䋿 䌏 䌟 䌯 䌯 䌯 㰼 㱛 Setting example The code number for C is 43 i i Tel 01943 602001 Fax 01943 816796 ...

Страница 66: ...y to indicate and press the 㵰ENT㵱 key Use the 䂦 key to select the 1st chart feed speed and press the 㵰ENT㵱 key Use the 䂦 key to set the 1st chart feed speed and press the 㵰ENT㵱 key Press the 㵰ENT㵱 key To return to the user mode press the 㵰MENU㵱 key for 3 seconds or more 䌛Note䌝 When altering the chart feed speed with the DI function option RE1 set the 2nd chart feed speed If the DI function option ...

Страница 67: ...ng by chart feed speed When the chart feed speed is 0 䋘 h it s printed with forcible chart feed When the chart speed is more than 120 䋘 h the Table shown above is not printed List Print Engineering List Print Manual Print key DI Comment print Asynchronous DI Date and Time print Asynchronous DI Manual print Asynchronous and Logging print Asynchronous is printed regardless of the chart feed speed Pr...

Страница 68: ...icate and press the 㵰ENT㵱 key Use the 䂦 key to select the original channel Use the 䂦 key to select the channel to be copied and press the 㵰ENT㵱 key Press the 㵰ENT㵱 key To return to the user mode press the 㵰MENU㵱 key for 3 seconds or more MENU ESC 3 sec PRINT ENT ENT PRINT ENT PRINT ENT Display Operation Keys Description 㩷 㩷 㩷 㩷 Setting Copy from Channel 㩷 㩷 㩷 㩷 㩷 Copy to Channel 䌛Note䌝 Copy the se...

Страница 69: ...r each channel is to be printed or not 㽵 䋨Tag䋩 Sets the tag which is to be printed instead of a channel number for logging print or manual print Setting the tag up to 5 characters See Page 64 for Character Code Table for each channel is possible 㽷 䋨Comment words䋩 Sets the comment words to be printed by DI function option RE1 There are 3 kinds of comment words and setting up to 12 characters See Pa...

Страница 70: ...ct a numeral and use the key to shift a digit Press the 㵰ENT㵱 key Set a span printing position in percentage Operate in the same manner as setting the zero point printing position Press the 㵰ENT㵱 key Setting is completed To return to the user mode press the 㵰MENU㵱 key for 3 seconds or more MENU ESC 3 sec PRINT ENT PRINT ENT PRINT ENT FEED PRINT ENT ENT Display Operation Keys Description 㩷 㩷 䋨Setti...

Страница 71: ...meral and use the 㩷 key to shift a digit Press the 㵰ENT㵱 key Set a boundary point position to 0500 0 Use the 䂦 key to select a numeral and use the key to shift a digit Press the 㵰ENT㵱 key Press the 㵰ENT㵱 key Setting is completed To return to the user mode press the 㵰MENU㵱 key for 3 seconds or more 䋰㷄㩷 㩷 䋵䋰䋰䋮䋰㷄㩷 㩷 㩷 㩷 㩷 㩷 㩷 㩷 㩷 㩷 㩷 㩷 㩷 㩷 䋱䋰䋰䋰䋮䋰㷄 䋨䋰䋦䋩㩷 䋨䋳䋰䋦䋩㩷 㩷 㩷 㩷 㩷 㩷 㩷 㩷 㩷 㩷 㩷 㩷 㩷 㩷 㩷 䋨䋱䋰䋰䋦䋩 ENT M...

Страница 72: ...t the channel you want to set and press the 㵰ENT㵱 key Use the 䂦 key to switch from to and press the 㵰ENT㵱 key Press the 㵰ENT㵱 key Setting is completed To return to the user mode press the 㵰MENU㵱 key for 3 seconds or more 㩷 㩷 㩷 㩷 Repeat setting for each channel ENT MENU ESC 3 sec PRINT ENT PRINT ENT PRINT ENT PRINT ENT PRINT ENT ENT Display Operation Keys Description 㩷 㩷 㩷 䌛Note䌝 When the channel w...

Страница 73: ...ENT㵱 key Set the 2nd character in the same manner Set as the 3rd character and press the 㵰ENT㵱 key Press the 㵰ENT㵱 key Setting is completed To return to the user mode press the 㵰MENU㵱 key for 3 seconds or more MENU ESC 3 sec PRINT ENT PRINT ENT PRINT ENT ENT FEED PRINT ENT FEED PRINT ENT FEED PRINT ENT Display Operation Keys Description 䋨Setting of 1st Character䋩 䋨Setting of 2nd Character䋩 䋨Settin...

Страница 74: ...etting for each channel Press the 㵰ENT㵱 key Setting is completed To return to the user mode press the 㵰MENU㵱 key for 3 seconds or more ENT MENU ESC 3 sec PRINT ENT PRINT ENT PRINT ENT FEED PRINT ENT FEED PRINT ENT FEED PRINT ENT Display Operation Keys Description 䋨Setting of 1st Character䋩 䋨Setting of 2nd Character䋩 䋨Setting of 3rd Character䋩 䋨Setting of 9th Character䋩 䋨Setting of 10th Character䋩 ...

Страница 75: ...2 3 㩷 Channel Offset z 7 2 4 㩷 Reference Junction Compensation Setting ON OFF Sets the hysteresis width Cancels the hysteresis width Setting Channel ON OFF Sets burnout Cancels burnout 㩷 Enter an offset value Setting Channel OFFSET 㩷 㩷 㩷 㩷 Internal Compensation External Compensation 㩷 㩷 㩷 㩷 㩷 External channel Input Compensation Setting Channel Function WARNING When calibrating data connect the equ...

Страница 76: ...䋩 Comment 1 print䋨Asynchronous䋩 Comment 2 print䋨Asynchronous䋩 Comment 3 print䋨Asynchronous䋩 Manual print䋨Asynchronous䋩 Date and time print䋨Asynchronous䋩 Setting DI㩷 No 㩷 Function Setting Recording start stop INT EXT selection Tag channel print selection Alarm print ON OFF Logging print ON OFF Logging print Synchronous Asynchronous print selection Print gap correction ON OFF Function Setting Settin...

Страница 77: ...c Print gap correction INT Ch OFF ON 6H 00 00 SYNC synchronous OFF Use the REC key 䃨COM communication Address Baud rate Data length Parity bit Stop bit 01 9600 8bit None 1bit 䃨DI function 1 to 3 channel OFF 䃨Temperature unit Setting 㩷 㩷 㩷 Zero point calibration 㩷 㩷 㩷 Span point calibration Function 㩷 䌛Note䌝 When terminating the Engineering mode if you select and turn off the power without carrying...

Страница 78: ...NT㵱 key 7 2 2 Burnout ON OFF Setting Burnout High to deflect the recording over the span for each channel is possible Example Setting Burnout High for Channel 2 Enters the engineering mode See the key operation in page 74 Use the 䂦 key to indicate and press the 㵰ENT㵱 key Use the 䂦 key to indicate and press the 㵰ENT㵱 key Usethe䂦keytoselect andpressthe㵰ENT㵱key ENT PRINT ENT PRINT ENT Display Operati...

Страница 79: ...4 Reference Junction Compensation The following describes how to set the method for compensating an electromotive force generated between a thermocouple wire or compensation lead wire and a terminal There are the following three compensating methods z A method of compensation by the built in temperature sensing element INT Internal compensation z A method of compensation by keeping an external com...

Страница 80: ... a digit Once the numerical value is decided press the 㵰ENT㵱 key Setting is completed Returns to the channel setting Example When Channel 1 input compensates Channel 2 reference junction Enters the engineering mode See the key operation in page 74 Use the 䂦 key to indicate and press the 㵰ENT㵱 key Use the 䂦 key to select and press the 㵰ENT㵱 key Use the 䂦 key to select and press the 㵰ENT㵱 key Use th...

Страница 81: ... tag channel print or setting alarm print and logging print are possible 1 Trigger setting for recording start stop Set whether the trigger of recording start stop should be 㵰REC㵱 key or DI Example When setting DI as the recording start stop trigger Enters the engineering mode See the key operation in page 74 Use the 䂦 key to indicate and press the 㵰ENT㵱 key Use the 䂦 key to select and press the 㵰...

Страница 82: ...tting the alarm print ON OFF When ON1 prints the alarm occurring and the alarm recovering When ON2 prints only the alarm occurring Example Setting both the alarm occurring and the alarm recovering Enters to the engineering mode See the key operation in page 74 Use the 䂦 key to indicate 㵱 and press the 㵰ENT㵱 key Use the 䂦 key to select 㵱 and press the 㵰ENT㵱 key Use the 䂦 key to indicate 㵱 and press...

Страница 83: ...n 20min 30min 1H 2H 3H 4H 6H 12H 24H Setting is completed Returns to the Logging Print Setting screen 5 Logging print Synchronous Asynchronous Sets logging print to synchronous print asynchronous print 㩷 㩷 㩷 Example Setting logging print to asynchronous print Enters the engineering mode See the key operation in page 74 Use the 䂦 key to display and press the 㵰ENT㵱 key Use the 䂦 key to select and pr...

Страница 84: ...to ON Enters the engineering mode See the key operation in page 74 Use the 䂦 key to display and press the 㵰ENT㵱 key Use the 䂦 key to select and press the 㵰ENT㵱 key Use the 䂦 key to display and press the 㵰ENT㵱 key Setting is completed Returns to the print gap correction Setting screen ENT PRINT ENT PRINT ENT ENT PRINT Display Operation keys Description i i Tel 01943 602001 Fax 01943 816796 ...

Страница 85: ...d press the 㵰ENT㵱 key Select from EVEN ODD and NONE䋩 Use the 䂦 key to indicate and press the 㵰ENT㵱 key Select from 1 bit 2 bit Setting is completed Returns to the Communication Function Setting screen 7 2 8 Initializing the Setup Data Initializes the setup data to the status when it was shipped Initializes all the setup data please be careful Calibration data is not initialized Example Initializin...

Страница 86: ...urns to the Temperature Unit Setting screen ENT PRINT ENT ENT PRINT PRINT ENT Display Operation Keys Description 䌛Note䌝 㽲 Although DI synchronous print is not printed in RUN OFF DI asynchronous print prints also 㩷 㩷 in RUN OFF 㽳 The setting is OFF without the DI option Do not set any setting except for OFF No function Manual print Sync Positive edge running start Manual print ASync Positive edge r...

Страница 87: ...alue Setting is completed Returns to the Zero Point Calibration screen Example Calibrating the span point of 1 channel pen recording Enters the engineering mode See the key operation in page 74 Use the 䂦 key to indicate 㩷 and press the ENT key Use the 䂦 key to select and press the 㵰ENT㵱 key Use the 䂦 key to select and press the 㵰ENT㵱 key The instrument starts to feed and trace the chart paper With...

Страница 88: ...NT㵱 key Enter 25 mV After 10 seconds make sure that the ALM lamp is unlit and press the 㵰ENT㵱 key Enter 35 mV After 10 seconds make sure that the ALM lamp is unlit and press the 㵰ENT㵱 key Enter 55 mV After 10 seconds make sure that the ALM lamp is unlit and press the 㵰ENT㵱 key Enter 200 mV After 10 seconds make sure that the ALM lamp is unlit and press the 㵰ENT㵱 key Enter 1 V After 10 seconds make...

Страница 89: ...r 300 㱅 After 10 seconds make sure that the ALM lamp is unlit and press the 㵰ENT㵱 key If the calibration is correct select with the 䂦 key and if incorrect select respectively Then press the 㵰ENT㵱 key Display Operation Keys Description ENT ENT PRINT PRINT ENT ENT PRINT ENT 㩷 ENT ENT ENT PRINT 䌛Note䌝 During calibration ALM lamp indicates following conditions below 㽲 When the ALM lamp is unlit 㽳 When...

Страница 90: ... select with the 䂦 key and if incorrect select respectively Then press the ENT key 7 3 Terminating the Engineering Mode Example The following figure describes how to save the setting data Use the 䂦 key to display and press the 㵰ENT㵱 key Use the 䂦 key to select and press the 㵰ENT㵱 key The settings of the engineering mode have been saved Recording starts under the new settings 1 Display Operation Ke...

Страница 91: ...ransmission Specifications 1 㩷 Communication system 䋺Start stop synchronous half duplex communications 2 㩷 Connection 䋺One to one RS 232C One to N RS 485 N 1 to 32 3 㩷 Communication speed 䋺1200 2400 4800 or 9600 bps 4 㩷 Start bit 䋺1 bit 5 㩷 Stop bit 䋺1 or 2 bits 6 㩷 Parity 䋺Even Odd or None 7 㩷 Data length 䋺7 or 8 bits 8 1 3 Data structure 1 㩷 Character structure In order to send 1 data byte in st...

Страница 92: ... text data together with the LF data This code cannot be treated as part of the text data 㩷 㩷 8 2 Opening Closing the Link To communicate with the recorder you must establish a connection between the host computer and the recorder In the case of one to N communications it is necessary to inform each recorder to which recorder the text is being sent If a link open command is sent to multiple record...

Страница 93: ...nsmission buffer 8 3 3 Specifying the Process Variable Data Output Order At BINARY Mode Output 㩷 䌂䌏䋰䋨䌃䌒䋩䋨䌌䌆䋩㩷 㩷 Outputs start from the upper byte 㩷 䌂䌏䋱䋨䌃䌒䋩䋨䌌䌆䋩㩷 㩷 Outputs start from the lower byte The recorder outputs starting from the lower byte unless specified 8 3 4 Outputting the Data 㩷 䌆䌍䋰䋬䌓䌟䌃䌈䋬䌅䌟䌃䌈㩷 㩷 㩷 㩷 Specifies the ASCII mode output 㩷 㩷 㩷 㩷 䌆䌍䋱䋬䌓䌟䌃䌈䋬䌅䌟䌃䌈㩷 㩷 㩷 㩷 Specifies the BINARY mode ...

Страница 94: ...䋹䋹 㩷 䌓䋺Skip All the data is space 2 䌄䌓䋲 䋺Data information 2 1 byte 㩷 㩷 㩷 䌅 䋺Final data 㩷 㩷 㩷 䌟䋨Space䋩 䋺Other data 3 䌁䌌䌍䋱 to 䋴 䋺Alarm information 1 byte each 4 bytes in total 㩷 㩷 㩷 䌈䋺High limit alarm 䌌䋺Low limit alarm 㩷 㩷 㩷 䌟䋨Space䋩䋺Alarm OFF or alarm setting OFF 4 䌕䌎䌉䌔䋱 to 䋶 䋺UNIT 6 bytes 㩷㩷㩷㩷Returns the setting unit in terms of code When sending the 7 bit data the higher 1 bit is missing 5 䌃䌈䌎䌯䋮 ...

Страница 95: ...2L 㩷 㩷 㩷 LEVEL1L 㩷 㩷 㩷 LEVEL4L 㩷 㩷 㩷 㩷 LEVEL3L 㩷 㩷 㩷 LEVEL䌸䌈䋺High limit alarm bit at the alarm level x 㩷 㩷 㩷 LEVEL䌸䌌䋺Low limit alarm bit at the alarm level x 䌄䌁䌔䌁䋱䇮䋲䋨䋲䌂䌙䌔䌅䋩䋺Process variable 㩷 㩷 㩷 㩷 㩷 䋭䋳䋲䋰䋰䋰䌾䋫䋳䋲䋰䋰䋰㩷 䋨2 byte hexadecimal data䋩 㩷 㩷 㩷 㩷 㩷 The higher and lower bytes can be reversed by the BO command 㩷 㩷 㩷 㩷 㩷 If Skip is specified 䋸䋰䋸䋰H will be output Output bytes Date and time Process v...

Страница 96: ...䌈 䌓䌟䌃䌈㩷 䋺Output start channel 䋰䋱 to 䋰䋲 䌅䌟䌃䌈㩷 䋺Output end channel 䋰䋱 to 䋰䋲 㩷 㶎㩷 When the number of channel is 1 specify S_CH E_CH 䌟 Space 8 4 4 Data Format 㩷 䋨䌄䌓䋱䋩䋨䌄䌓䋲䋩䋨䌃䌈䌎䌯䋮䋩䋨䌕䌎䌉䌔䋱䌾䋶䋩䋨䌄䌐䋩 䋨䋱䋩 䌄䌓䋱 Data information 1 1 byte N Normal D Difference computation data S Sum computation data M Average computation data R Square root computation data C Decade computation data O Over range Data 㫧99999 S Skip ...

Страница 97: ...us 㩷 㩷 㩷 㩷 㩷 㩷 㩷 㩷 㩷 㩷 㩷 factor Status output A D END Syntax error Running out of chart paper 䌅䌒㩷 䋰䋰㩷 䌃䌒䌌䌆 䌅䌒㩷 䋰䋱㩷 䌃䌒䌌䌆 䂾 䌅䌒㩷 䋰䋲㩷 䌃䌒䌌䌆 䂾 䌅䌒㩷 䋰䋳㩷 䌃䌒䌌䌆 䂾 䂾 䌅䌒㩷 䋰䋴㩷 䌃䌒䌌䌆 䌅䌒㩷 䋰䋵㩷 䌃䌒䌌䌆 䂾 䌅䌒㩷 䋱䋶㩷 䌃䌒䌌䌆 䂾 䌅䌒㩷 䋱䋷㩷 䌃䌒䌌䌆 䂾 䂾 䌅䌒㩷 䋱䋸㩷 䌃䌒䌌䌆 䂾 䂾 䌅䌒㩷 䋱䋹㩷 䌃䌒䌌䌆 䂾 䂾 䂾 㩷 㩷 㩷 㩷 㩷 㩷 㩷 㩷 㩷 㩷 㩷 㩷 㩷 㩷 㩷 䂾䋺The factor from which status is ENABLE A D END 䋺When carring out AD conversion end it occurs Syntax error 䋺It occurs d...

Страница 98: ...t request command FM Sends the update data Process variable output order designation BO BINARY mode only Determines the process variable output order Close command Closes the link Send once to the recorder Then you need not send it any more Send it to the recorder every time Sends the command when you want to send to other recorder Send the command to the recorder to which you want to start data t...

Страница 99: ...ecording indication done properly 䊶 Are there any big errors in indicated values or pen recording position 䊶 Is there improper pen recording 䊶 Are there any blurred pen recording or printout 䊶 Is printout proper 䂹Is the chart paper fed properly 䊶 Is the chart paper fed properly 䊶 Aren t the feed holes in the chart paper torn off or broken 䊶 Is the chart speed normal 䂹Is there any abnormal sound 9 ...

Страница 100: ...ave the recorder as it is and adjust it according to the instructions in 7 2 11 Point calibration See Page 86 9 5 Calibration Data Calibration Calibrate a process variable input anually in order to keep measurement accurate Devices required to calibrate z Precision voltage current generator Jointly use a digital voltmeter with accuracy of 0 02 or less as required z Precision dial resistor 䌛Note䌝 㽲...

Страница 101: ...o the instructions in 7 2 12 Data Calibration Calibration of the resistance temperature detector See Page 88 Precision Dial Resistor HR 701 702 Recorder Input Terminals Wiring 䃢 䌁 䃢 䌂 䃢 䌂 Wiring Precision Voltage Current Generator 䃢 䋫 䃢 䋭 Digital Voltmeter HR 701 702 Recorder Input Terminals 䃢 䋫 䃢 䋭 䃢 䋫 䃢 䋭 䌛Note䌝 The dispersion of resistance for each wire must be 6m㱅 or less 䌛Note䌝 㽲㩷 Calibrate a...

Страница 102: ... as the right RJC temperature 㩷 㩷 㩷 㩷 㩷 㩷 㩷 㩷 㩷 㩷 㩷 㩷 24 5 0 5 25 0㷄 Calibrate RJC according to the instructions in 7 2 12 Data Calibration Calibration of reference junction compensation See Page 89 Precision Voltage Current Generator HR 701 702 Recorder Input Terminals Digital Voltmeter Freezing Point Cold Junction Compensator Iced Water 䋫 䋫 䋭 䋭 䋭 䋭 䋫 䋫 Be sure to attach a terminal cover Thermoco...

Страница 103: ...edy Trouble Dose not work at all Big error Recording error Pen recording is deflected Nothing is printed Faint printing Chart paper feeding error Chart paper is not fed at all Improper feeding Inaccurate feeding rate Flow chart 1 Dose not work at all Power terminal connected properly Power supplied properly Power turned on Turn on the power Connect properly See 4 1 on Page 16 Supply the power prop...

Страница 104: ...Pen recording position of Zero Span properly 䌎䌏 䌙䌅䌓 䌙䌅䌓 䌙䌅䌓 䌙䌅䌓 䌎䌏 䌎䌏 䌎䌏 Calibrate again See 7 2 11 on Page 86 䋨Recording error䋩 Flow chart 3 Pen recording is deflected 0 or 100 Input value and Signs are correctly Range and Scaling set properly Input signal wired correctly Contact our dealer where you purchased the instrument or our sales representative Wire correctly See 4 2 on Pages 18 19 䌎䌏 䌎䌏 ...

Страница 105: ...epresentative Follow 10 2 on Page 106 䌎䌏 䌎䌏 䌎䌏 䌙䌅䌓 䌙䌅䌓 Select the RUN mode Set it properly See 5 3 on Page 32 Ribbon fed properly 䌙䌅䌓 䌙䌅䌓 䌎䌏 Replace the ribbon cassette See 5 3 on Page 32 Flow chart 5 Faint printing Ribbon fed properly Ribbon ink shortage Contact our dealer where you purchased the instrument or our sales representative 䌎䌏 䌙䌅䌓 䌎䌏 䌙䌅䌓 Replace the ribbon cassette See 5 3 on Page 32 i...

Страница 106: ...on OFF Change Chart speed Turn on the DI contact See㩷 7 2 9 on Page 85 䌙䌅䌓 䌎䌏 䌎䌏 Flow chart 7 Chart paper feeding improper Chart cover locked properly Chart paper set properly Chart guide attached properly Attach it properly See 5 1 on Page 23 䌎䌏 䌎䌏 䌎䌏 䌙䌅䌓 䌙䌅䌓 䌙䌅䌓 Lock it properly See 5 1 on Page 23 Used in adequate environment Attach it properly See 5 1 on Page 23 䌎䌏 䌙䌅䌓 Contact our dealer where ...

Страница 107: ...or EEP READ3 Non volatile memory Reading error ADC Calibration data Contact our dealer where you purchased the instrument or our sales representative Area error Input value is beyond the setting range Time error Clock time setting error Setting range error Setting the channel CH1 which cannot set the sum difference average operation Area error Span L 㻢 Span R Area error Scale L 㻢 Scale R Area erro...

Страница 108: ...eir error serial numbers are displayed automatically z When an error is recovered an error display can be cancelled by inputting the REC key 㩷 CAUTION㩷 While an error is indicated Auto Manual and Data Time are not indicated i i Tel 01943 602001 Fax 01943 816796 ...

Страница 109: ...e 䋺10k 㱅max in mV TC input without burnout 100 㱅max in mV TC input with burnout 1k 㱅max in Voltage input 10 㱅max per line in Resistance temperature detector input Normal mode reduction ratio 䋺60dB min 50 60 0 1Hz Common mode reduction ratio 䋺140dB min 50 60 0 1Hz Isolation resistance㩷 䋺0 5kVdc 20M 㱅min between the each terminal and㩷 grounding terminal Withstand Voltage㩷 㩷 䋺1 5kVac for 1 minute bet...

Страница 110: ...㪘㪹㫆㫌㫋㩷㪉㪇㪭㪘㩷 㪘㪹㫆㫌㫋㩷㪊㪇㪭㪘㩷 㪉㩷㫇㪼㫅㩷 㪘㪹㫆㫌㫋㩷㪉㪌㪭㪘㩷 㪘㪹㫆㫌㫋㩷㪊㪌㪭㪘㩷 11 1 5 Normal Operating Conditions Ambient temperature 0 to 50㷄 Ambient humidity 20 to 80 RH Supply voltage 85 to 264Vac Supply frequency 45 to 65Hz Vibration 10 to 60Hz 0 2m s2 max Shock Unacceptable Magnetic field 400A m max DC and AC 50 60Hz Noise Normal mode 50 60Hz DC current Thermocouple Peak value lower than the span width of the measur...

Страница 111: ... Hysteresis width 0 5 Setting accuracy Digital display accuracy 11 1 7 Safety Standard and EMI Standard Electrical safety IEC1010 1 UL3101 1 Installation category 㸈 and pollution degree 2 Emissions EN55011 Group1 Class A Immunity EN50082 2 11 1 8 DI Function Option RE1 A maximum of 3 points can be set 11 1 9 Running out of paper Detecting Function Option FL Detects the Running out of paper and out...

Страница 112: ... 㩷 㩷 Table 11 2㩷 Measurement Range Measurement Indication Digital Recording Analog Type RANGE Measurement range Accuracy Max resolution Accuracy 10 to 10mV 0 2 of rdg 3digits 10 㱘 V 0 to 20mV 0 2 of rdg 3digits 10 㱘 V 0 to 50mV 0 2 of rdg 2digits 10 㱘 V 200 to 200mV 0 2 of rdg 3digits 100 㱘 V 1 to 1V 0 1 of rdg 3digits 1mV 0 to 5V 0 2 of rdg 2digits 1mV 10 to 10V 0 3 of rdg 3digits 10mV DC voltage...

Страница 113: ...rdg 1 8䍽F 200 0 to 300 0㷄 0 15 of rdg 0 3㷄 㶎 200 to 100㷄 0 15 of rdg 1㷄 K3 328 0 to 572 0䍽F 0 15 of rdg 0 5䍽F 㶎 328 to 148䍽F 0 15 of rdg 1 8䍽F 200 0 to 800 0㷄 0 15 of rdg 0 5㷄 E1 328 0 to 1472 0䍽F 0 15 of rdg 0 9䍽F 200 0 to 300 0㷄 0 15 of rdg 0 4㷄 E2 328 0 to 572 0䍽F 0 15 of rdg 0 7䍽F 200 0 to 150 0㷄 0 15 of rdg 0 3㷄 E3 328 0 to 302 0䍽F 0 15 of rdg 0 5䍽F 200 0 to 1100 0㷄 0 15 of rdg 0 5㷄 㶎 200 to ...

Страница 114: ...5 of rdg 1 3䍽F 200 0 to 400 0㷄 0 15 of rdg 0 5㷄 㶎 200 to 100㷄 0 15 of rdg 0 7㷄 U 328 0 to 752 0䍽F 0 15 of rdg 0 9䍽F 㶎 328 to 148䍽F 0 15 of rdg 1 3䍽F 200 0 to 900 0㷄 0 15 of rdg 0 5㷄 㶎 200 to 100㷄 0 15 of rdg 0 7㷄 Thermocouple L 328 0 to 1652 0䍽F 0 15 of rdg 0 9䍽F 㶎 328 to 148䍽F 0 15 of rdg 1 3䍽F 200 0 to 650 0㷄 㫧 0 15 of rdg 0 3㷄 Pt100 1 328 0 to 1202 0䍽F 㫧 0 15 of rdg 0 6䍽F 200 0 to 200 0㷄 㫧 0 15...

Страница 115: ...䋽㫧10 digits 㩷 㩷 㩷 㩷 㩷 㩷 㩷 㩷 㩷 㩷 㩷 㩷 䋽㫧0 01V Example 2䋩When Type K is 0 0 to 200 0㷄 and Scaling is 0 00 to 200 00 㩷 㩷 Range accuracy rating 䋽0 15 200 0䋫0 3㷄 䋨Input 200㷄䋩 䋽0 6㷄 䋽6 digits 㩷 㩷 Scaling factor 䋽㩷 㩷 㩷 㩷 㩷 㩷 㩷 㩷 䋽10 Therefore Scaling accuracy 䋽㫧䋨6 10䋫2䋩 䋽㫧62 digits 䋽㫧0 62㷄 2 Square root computation The square root computation is shown as following formula Display value䋽10㩷 㩷 Process varia...

Страница 116: ...play value Normally the accuracy rating is less than 1 digit and you cannot read by significant digit 4 Difference Sum and Average The accuracy rating of Difference Sum and Average is shown as following formula Difference and Sum 䋺Reference channel accuracy rating 2 Average 䋺Reference channel accuracy rating Example䋩When Reference channel VOLT is 00 00 to 10 00V and Difference is 䋭10 00 to 10 00 㩷...

Страница 117: ... Time 1 0 s max 95 response to IEC 1143 Chart Paper Length 16m Width 114 䋘 Folding width 40 䋘 The length of the Clean Chart is 12 m Chart feed Speed 5 㩷 10 㩷 15 㩷 20 㩷 25 㩷 30 㩷 40 㩷 50 㩷 60 㩷 75 㩷 80 㩷 90 㩷 100 㩷 120 㩷 150 㩷 160 㩷 180 㩷 200 㩷 240 㩷 300 㩷 360 㩷 375 㩷 450 㩷 600 㩷 720 㩷 750 㩷 900 㩷 1200 㩷 1500 1800 2400 3000 3600 4500 4800 5400 6000 7200 9000 10800 12000 䋘 h Recording Color 1 pen Re...

Страница 118: ...ogging print ON OFF Reference time Interval Logging print Sync ASync Print gap correction ON OFF Alarm hysteresis Burn out DI function Option Manual print Prints Measurement result by the key input Programming Programs Chart feed speed Alarm setting value Logging Date and Time Memory Back Up A built in lithium battery protects the clock function The battery life is 10 years total power off period ...

Страница 119: ...tive number to indicate and print Alarm Print Prints Occurrence time Occurrence channel Setting No and Alarm type in purple when alarm activates Alarm Recovery Print Prints Recovery time Recovery channel Setting No and Alarm type in purple when alarm recovers Computation Computes Square root Interchannel Computation Computes Sum Difference and Average between channels Alarm Hysteresis Width Sets a...

Страница 120: ...Distributed by Systems Services PO Box 1 Ilkley West Yorkshire LS29 8EU PO Box 1 Ilkley West Yorkshire LS29 8EU Phone 01943 602001 Fax 01943 816796 Phone 01943 602001 Fax 01943 816796 Ltd instrumentation n Website www issltd co uk Email sales issltd co uk ...

Отзывы: