background image

SHR-1000 User Manual 2014 Copyright © 

85 

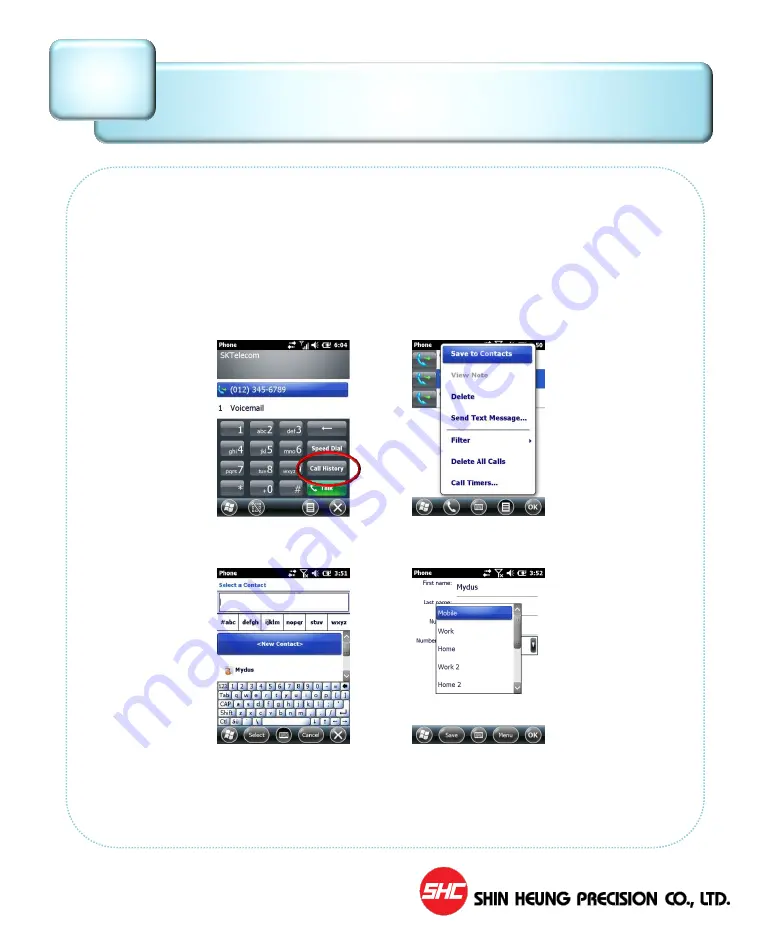
 Save a phone number to Contacts by using call history 

• You  can  save  the  phone  numbers  of  incoming  and  outgoing  calls  to  your 

contacts, or create a new contact from a recently dialed call.  

 
1. Tap 

Start

, tap 

Phone

, and then tap 

Call History

2. Scroll to the phone number you want to save and tap 

Menu

, and then tap 

Save to Contacts


3. To  add  a  new  contact,  press  ENTER  or  scroll  to the  contact to  which  you 

want to add the phone number and press ENTER. 


4. Enter contact information. In the 

Number type 

field, select the phone type 

for  the  number  you  are  saving  (for  example, 

Work

Mobile

,  or 

Home

), 

enter additional information as needed, and then tap Save. 


Notes: 

You cannot save a call to 

Contacts

 while you are on a call. 


Recent Call List Management 

VI-7 

Содержание SHR-100

Страница 1: ...SHR 1000 USER MANUAL COPYRIGHT SHC 2014 ALL RIGHTS RESERVED...

Страница 2: ...ds 17 8 Keypad Numeric 18 9 Keypad Qwerty 20 10 Initialization 23 II Getting Started 24 1 Power On 25 2 How to use the Stylus Pen 27 3 Screen Description 28 4 Configuring the device 31 5 Locking and u...

Страница 3: ...ne Number 80 5 Entering Phone Numbers in the Directory 82 6 Phone Directory Viewing Deleting Entries 84 7 Recent Call List Management 85 8 Message Management 86 9 Compose Message 87 10 Preferences 88...

Страница 4: ...wners Picture screens features used herein may vary slightly with the actual product depending on the product version Shin Heung Precision reserves the right to change modify this user s manual withou...

Страница 5: ...the manufacturer for any repair and maintenance needs Counterfeit mobile phone This product is identified through its unique phone number ESN Electronic Serial Number Illegally reproducing or changin...

Страница 6: ...storms Keep this product out of reach of children and animals In places where wireless radio communication is restricted air flights near medical equipments or similar places follow the instructions...

Страница 7: ...e harmful interference in which case the user will be required to correct the interference at his own expense FCC Part 15 21 statement Any changes or modifications not expressly approved by the party...

Страница 8: ...ere impact from dropping any battery operated device on a hard surface could cause the battery to overheat Do not short circuit a battery or allow metallic or conductive objects to contact the battery...

Страница 9: ...the device 1 Product Configuration 2 Specifications Device Cradle 3 Charging the Battery 4 Mounting the Gun Handle 5 Mounting the Handstrap 6 Inserting the Micro SD Card 7 Inserting the SAM SIM Cards...

Страница 10: ...SHR 1000 User Manual 2014 Copyright 10 2 Additional Product Configuration 1 Basic product configuration Product Configuration 1 SHR 1000 Cradle Adapter Power cord GUN USB Cable Handstrap...

Страница 11: ...1 Mobile Device Description 1D 2D Scanner Phone Receiver Power LED Display Scan Button Camera Scan Button Bracket of Hand Strap Speaker Battery Battery Locker I O Connector USB port DC Jack Reset But...

Страница 12: ...Cradle is sold with either USB A Type or Ethernet connector It could not have both connectors at the same time DC Jack Connector USB Cable Connector USB A Type OPTIONAL USB Cable Connector USB B Type...

Страница 13: ...e device Place the battery at the back of the device Place the device on the cradle and connect the power adapter with cord to the cradle to charge the battery 2 Separately charging the battery To cha...

Страница 14: ...the Gun Handle 4 1 Insert the Gun Handle s notch to the appropriate hole in the PDA in the direction of the arrow as shown below 2 After the Gun Handle is mounted on the PDA turn the Gun Handle screw...

Страница 15: ...ounting the Handstrap 5 1 Use a screwdriver to remove the Handstrap Bracket on PDA 2 Put the bracket with Handstrap on the PDA and tighten the screws by a screwdriver Mount the Handstrap by attaching...

Страница 16: ...ting the Micro SD Card 6 1 Remove the battery Pull the connector cover of the Micro SD Card in the direction of the arrow 2 Open the connector cover insert the Micro SD Card and close the connector co...

Страница 17: ...SHR 1000 User Manual 2014 Copyright 17 Inserting the SAM SIM Cards 7 1 SAM Insert the SAM Eject the SAM 2 SIM Insert the SIM Eject the SIM...

Страница 18: ...y to end the phone program Scan Activates the scanner or imager Soft Access the command or menu above it on the screen Arrow Left Right when pressed with Orange Key moves Left Right one item Arrow Up...

Страница 19: ...uppercase is entered Press the Shift key twice to lock this mode Press the Shift key a third time to unlock Function Orange Use this key to access the secondary layer shown on the keypad in orange Fu...

Страница 20: ...the phone program End Press End key to end the phone program Soft Left Right Access the command or menu above it one the screen Arrow Move Left Right Up Down one item Scan Activates the scanner or im...

Страница 21: ...1 Key Description Backspace Produces a backspace Enter Executes a selected item TAB Produces a Tab Space Produces a space OK OK or Close key Backlight On Off Turns the display backlight on and off Res...

Страница 22: ...characters from lowercase to uppercase Press the Shift key once and then an alpha character key the uppercase is entered Press the Shift key twice to lock this mode Press the Shift key a third time to...

Страница 23: ...imultaneously b Long press Reset button More than 1 seconds To press Reset button insert the stylus into the Reset button hole which can be found at the keypad of the device please see illustration be...

Страница 24: ...SHR 1000 User Manual 2014 Copyright 24 Getting Started 1 Power On 2 How to use the stylus pen 3 Screen description 4 Configuring the device 5 Locking and unlocking the device 6 Manage battery life...

Страница 25: ...on to turn ON the power When the device is powered ON pressing the Power button for more than 3 seconds will display the Power OFF message box Clicking Yes button in the message box will power OFF the...

Страница 26: ...artup screen will display Tap the screen using the stylus to continue 3 From the align screen use your stylus to calibrate the touch accuracy of the screen by both accurately and firmly tapping the ce...

Страница 27: ...n Scroll Moving the stylus pen scrolls the page How to use the stylus pen This section describes the basic use of the stylus pen in running or moving programs on the touch screen Only use stylus pen t...

Страница 28: ...e is connected and communicating with your computer via ActiveSync or Windows Mobile Device Center Cellular Data Sending Receiving Data service is transmitting and receiving data Cellular Data Unavail...

Страница 29: ...Your device s speaker is set to vibrate only Tap this icon to access the onscreen Volume slider and adjust the volume level Silence All Your device has the ringer deactivated and the vibrate option un...

Страница 30: ...Copyright 30 Icon Icon Description No SIM No SIM card is installed Text Message Your device received new text message Voice Mail Your device received new voice mail E Mail Your device received new e...

Страница 31: ...Settings and describes how you can configure them Configuring the device 4 Icon Settings Bluetooth Set up Bluetooth connections with other Bluetooth enabled devices Clock Alarm Set the time date and...

Страница 32: ...Settings Description About Displays information about the operating system and the hardware configuration Backlight Adjust the brightness and power usage of the screen backlight Certificates Manage n...

Страница 33: ...t are currently running on device Device Setting Select USB mode of Cradle set wakeup by Scan button Wi Fi connect and set the Wi Fi Icon Connection Settings Description Beam Choose to receive all inc...

Страница 34: ...larm alerts will be accurate 1 Tap Start tap Settings you may need to scroll the page and then tap Clock Alarms you may need to scroll the page 2 On the Time tab select the correct time zone and set t...

Страница 35: ...eed to scroll the page tap System you may need to scroll the page and then tap Regional Settings you may need to scroll the page 2 On the Region tab select your language and region The region you sele...

Страница 36: ...R 1000 User Manual 2014 Copyright 36 Locking Your Device 1 Tap Start tap Lock left softkey Unlocking Your Device 1 Tap Unlock button and tap the onscreen Unlock button Locking and unlocking the device...

Страница 37: ...ger You can do several things to make the battery in your device last longer 1 Adjust power management settings to configure how long the backlight and screen displays stay on 2 Synchronize your devic...

Страница 38: ...and to adjust settings that extends battery life For example setting brief backlight and display time outs will extend battery life 1 Tap Start Settings System tab Power 2 Tap the Advanced tab 3 Sele...

Страница 39: ...SHR 1000 User Manual 2014 Copyright 39 Use File Explorer 1 Run and use the File Explorer...

Страница 40: ...he folder list labeled My Documents by default and tap the folder that you want to explore To find the folder that you want you may have to tap a folder from the folder list or one listed in the main...

Страница 41: ...ight 41 Terminal settings how to optimize 1 Background image 2 Brightness 3 Volume and Sounds 4 Screen 5 Bluetooth 6 Pictures and Videos 7 How to set the Cradle and the Scan Button using Device Settin...

Страница 42: ...ground pictures can make it harder to read text on the Today screen Note 1 When you use the camera to take a picture you can tap Menu Set as Today Background When you do this you can select the degree...

Страница 43: ...ote 2 To revert to the default background tap Start Settings Home Under Select a theme for your device tap Windows Default Clear the Use this picture as the background check box and then tap OK Note 3...

Страница 44: ...Power and External Power Tabs specify how long the backlight will stay on Also specify if pressing a button or tapping the screen turns on the backlight 3 In the Brightness Tab set the brightness lev...

Страница 45: ...how long the backlight and screen displays stay on 1 Tap Brightness On the Brightness tab moving the power mode slider bar will change brightness level 2 Check the Auto adjust backlight The brightnes...

Страница 46: ...have a distinctive sound to help you identify the event by its sound 1 Tap Start tap Settings and then tap Sounds Notifications 2 On the Sounds tab select the check box for each type of item for which...

Страница 47: ...SHR 1000 User Manual 2014 Copyright 47 Set up volume Tap the Speaker On icon to access the onscreen Volume slider and adjust the volume level Volume and Sounds 3...

Страница 48: ...gure the touch points in the General Tab 3 Tap on the Align Screen button to start calibrating the touch points 4 Using the stylus pen tap the target firmly and accurately at each location on the scre...

Страница 49: ...luetooth on or off using the Bluetooth Settings screen If the wireless carrier enables Bluetooth on your device you can establish a Bluetooth partnership with other Bluetooth enabled devices and acces...

Страница 50: ...t or clear the Turn on Bluetooth check box 4 Tap OK Note 1 When you turn your device on it can detect other devices that use Bluetooth but other devices will be unable to detect your device unless you...

Страница 51: ...SHR 1000 User Manual 2014 Copyright 51 Turn Bluetooth on or off by using Wireless Manager 1 Tap icon bar on top of LCD display and tap Wireless Manager 2 Tap Bluetooth Bluetooth 5...

Страница 52: ...ct it and to establish Bluetooth partnerships For improved security leave your device set to invisible unless you are establishing new partnerships and turn off visibility after partnerships have been...

Страница 53: ...the accessory and position them within several feet from one another 2 Tap Start Settings Bluetooth 3 Tap the Devices tab 4 Tap Add new device Your device searches for other Bluetooth enabled devices...

Страница 54: ...elete the partnership 1 Make sure both Bluetooth devices are set to Visible and are within range 2 Tap Start Settings Bluetooth 3 Tap the Devices tab 4 Tap Add new device Your device searches for othe...

Страница 55: ...a passcode a numbers only password if you want to use one and then tap Next Using a passcode helps improve security If a passcode is required on the device requesting the partnership you must both use...

Страница 56: ...u can give each partnership a unique name to identify it such as My PC or Bob s Phone 1 Tap Start Settings Bluetooth 2 Scroll to the device that you want to rename tap and hold the device name until y...

Страница 57: ...apping on Start and then Pictures Videos Easily capture find view and manage pictures and videos on your device 1 Activate the Camera Application Capture pictures and video with the camera application...

Страница 58: ...photo you want to view The photo will become larger to fit the screen 3 Play a video clip a The Pictures Videos folder displays thumbnails of your saved photos and videos b Tap the video you want to p...

Страница 59: ...HR 1000 User Manual 2014 Copyright 59 4 View a slide show a From Pictures Videos folder tap Menu Play Slide Show b To end the slide show tap the screen and then tap the close icon Pictures and Video 6...

Страница 60: ...cture or video that you want or run camera application 2 Tap Menu Options and then do one of the following a To change the picture size for sending in e mail or to rotate a picture 90 degrees tap the...

Страница 61: ...tart Settings System Device Setting Set the Wakeup Source Turn On Off the Scan Button 1 If you want to use the SCAN button for waking up source choose the On radio button and tap OK button in message...

Страница 62: ...Mode radio button 2 USB Bypass Mode This is the default mode of SHR 1000 that have the internal modem You cannot use the Ethernet or USB port of Cradle in this mode because in this mode USB port of cr...

Страница 63: ...ion System Information shows the device s OS version Eboot version H W board version Platform type and Modem information 1 Tap Start Run System Information 2 If the modem is not installed on the SHR 1...

Страница 64: ...SHR 1000 User Manual 2014 Copyright 64 Using Add on Devices 1 BCR 2 WLAN 3 GPS V...

Страница 65: ...eed to program the Barcode Scanner commands and functions in your application code for you to be able to use the Scanner To use the Barcode Scanner without needing to modify your application s source...

Страница 66: ...the BCR Press any one of the three 3 BCR buttons Use App Mode a After you click the icon in taskbar Click the App Mode Select either User Message or WM_COPYDATA Click the BCR Sample to open the Mydus...

Страница 67: ...Technologies Summit provides for a connection management and monitoring tool called the Summit Client Utility SCU that allows users to view all radio and security settings and status and enables users...

Страница 68: ...000 User Manual 2014 Copyright 68 WLAN The SCU has five tabbed windows which may be accessed from the bottom of the screen V 2 1 Main Window 2 Profile Window 3 Status Window 4 Diags Window 5 Global Wi...

Страница 69: ...er select existing profile to edit or tap on the New button to create a new profile 2 In the Radio ComboBox select SSID and enter the Access Point name 3 Also enter the appropriate information for Cli...

Страница 70: ...ure that the radio is enabled The radio is enabled when the button label is Disable Radio When the button label is Enable Radio tap the button to enable the radio 2 Select the desired Active Profile a...

Страница 71: ...SHR 1000 User Manual 2014 Copyright 71 Connect to the network using the Scan function 1 Tap Scan in the Profile tab 2 Select AP Access Point Tap Configure to create a new Profile WLAN V 2...

Страница 72: ...yright 72 3 If a password is required set a password and then click the Commit button 4 Change the Active Profile with new profile at Main tab After the change SHR 1000 will be connected to the AP set...

Страница 73: ...SHR 1000 User Manual 2014 Copyright 73 5 The connection status can be check in the Status tab or WiFi tray or running the Internet Explorer Status tab WiFi Tray Internet Explorer WLAN V 2...

Страница 74: ...le Wi Fi using Wireless Manager 1 Choose Start choose Settings choose the Connections tab and then choose Wireless Manager 2 Choose the Wi Fi button If it is turned off the button will appear as a lig...

Страница 75: ...GPS Test run and settings 1 Tap Start run GPS Test Select a GPS type S GPS or A GPS installed in the SHR 1000 2 Tap Connect button GPS NMEA data should appear on the screen 3 Tap GPS button GPS signa...

Страница 76: ...2 Phone Application Screen 3 Making Accepting Calls 4 Telephone Number 5 Entering Phone Numbers in the Directory 6 Phone Directory Viewing Deleting Entries 7 Recent Call List Management 8 Message Mana...

Страница 77: ...SHR 1000 User Manual 2014 Copyright 77 Running the phone application 1 Tap Start 2 Then tap Phone Running the Phone Application VI 1...

Страница 78: ...all the phone application screen displayed below can be use to make the necessary connections The phone comes with a built in receiver speaker phone and microphone A headset earphones with microphones...

Страница 79: ...number or perform a phone directory search 2 Tap Talk 3 When the receiving party answers the phone call begins 4 Tap End to terminate the call Accepting a Call 1 When the phone rings indicating an inc...

Страница 80: ...Tap Call History 3 Scroll to the phone number or contact name that you want to call and then tap TALK Note If call history appears to be empty you may have turned on a filter and no calls fitting that...

Страница 81: ...y using a recently dialed phone number 1 Start the phone application 2 In the list above the keypad scroll to the recently dialed number and then tap TALK button You can scroll down the list To see mo...

Страница 82: ...ing name work phone number e mail address company address and birthday For contacts kept on the SIM card you can save only the contact s name and phone number If you move the SIM card to another devic...

Страница 83: ...nter the necessary information for the contact and then tap OK Notes You can synchronize Outlook contacts by using Microsoft Exchange Server or Microsoft Outlook on your computer You cannot synchroniz...

Страница 84: ...contact you want to view or edit 3 Tap Menu Edit 4 Make the changes that you want and then tap OK Delete a contact You can delete contact information from your phone 1 Tap Start Contacts 2 Scroll to...

Страница 85: ...he phone number you want to save and tap Menu and then tap Save to Contacts 3 To add a new contact press ENTER or scroll to the contact to which you want to add the phone number and press ENTER 4 Ente...

Страница 86: ...mbols An MMS message is a text message that includes any of the following Color background Attachments of any kind Subject line Note Text messaging is an option that your mobile service provider might...

Страница 87: ...e To field enter the recipient s phone number or to insert a number from your contacts tap Menu Add Recipient and then select a name 4 Scroll to or tap the message area and enter your message 5 Tap Se...

Страница 88: ...options You can set up call options for your device This includes ring type ring tone and a PIN that must be entered to use the phone 1 Tap Start Phone 2 Tap Menu Options Phone tab 3 Change the option...

Страница 89: ...her use Windows Mobile Device Center WMDC Synchronization compares the data on your PDA with your personal computer and updates both devices with the most recent information To establish a partnership...

Страница 90: ...c installation program Please click the Next button if you are ready to Set up ActiveSync 2 You re prompted to select the installation folder for ActiveSync Click the Next button to install ActiveSync...

Страница 91: ...yright 91 Microsoft ActiveSync installation 3 Click on the Next button 4 ActiveSync installation is finished Please turn on and put the SHR 1000 unit on to the cradle with USB cable connected to the P...

Страница 92: ...e Device through ActiveSync Using the cab files 1 Download the installation program to the PC or insert the installation CD in the PC s CD drive 2 Connect the Mobile Device to the PC via ActiveSync 3...

Страница 93: ...SHR 1000 User Manual 2014 Copyright 93 Appendix 1 Troubleshooting 2 Initialize to factory default 3 Terminal maintenance 4 Product specifications 5 Others VIII...

Страница 94: ...y regularly charging it Q2 Battery Power consumption is too fast Turning OFF the backlight when the Mobile Device is not being used no touch screen action tap and scroll is made after a specified peri...

Страница 95: ...before the Mobile device switches to the state of suspend See section about Manage Battery Life Q4 The Mobile Device would not Turn ON When the Mobile Devices battery power is fully drained the devic...

Страница 96: ...those information data and programs that are present when the Mobile Device was delivered It is advisable to periodically backup the Mobile Device and keep the backup file in the PC or copy important...

Страница 97: ...e USB cable is properly connected to the connectors on both the PC and the Mobile Device Cradle If the Mobile Device is connected to the PC using the USB cable make sure that ActiveSync is configured...

Страница 98: ...ilure with Windows 7 or 8 According to enhanced network security on Windows 7 and Windows 8 PC doesn t allow synchronization with Windows Mobile devices To solve this problem please uncheck Enable adv...

Страница 99: ...if a folder called Storage Card is present Access the contents of the SD card from this folder Make sure that you use the SDHC type SD Card and formatted using FAT or FAT32 file systems SDXC is too b...

Страница 100: ...S you need to re format your SD Card with FAT file system for use with SHR 1000 as shown in the pictures below Select the Format option in File Explorer then when the warning dialog shows up click OK...

Страница 101: ...py of it in the SD card before performing a hard reset Restore the information after the hard reset process to recover the information As said earlier all information stored in the Mobile Device s RAM...

Страница 102: ...power off the Mobile Device Use small amount of glass cleaner on a soft cloth when cleaning the touchscreen Do not spray the glass cleaner directly on the touchscreen Use cotton swabs or soft cloths w...

Страница 103: ...PA 850 900 1800 1900 2100MHz Optional WLAN IEEE 802 11 a b g n WPAN Bluetooth v2 1 EDR Optional S GPS GPS Glonass Optional A GPS Optional RFID HF ISO 14443 A B Mifare ISO 15963 UHF ISO18000 6C EPC Gen...

Страница 104: ...er 3 edge 6 face IP67 Operating Temperature 20 50 4F 122F Storage Temperature 40 70 40F 158F Humidity 95 non condensing ESD Contact 4Kv Air 8Kv Physical Characteristics Dimension 80 W 160 L 38 H mm We...

Страница 105: ...ing the wireless technology the security of information cannot be guaranteed by the manufacturer Users should take necessary precautions to safeguard their information Environmental factors 3rd party...

Страница 106: ...SHR 1000 User Manual 2014 Copyright 10 SHR 1000 USER MANUAL...

Отзывы: