background image

Basic Operation

-26

Basic Operations

Using the Menu Screen

On-screen Display

INPUT 3 or 4 (VIDEO) mode

INPUT 1 (COMPONENT) or 2 (COMPONENT or analog
RGB) mode

Press 

MENU

. The Picture menu screen for the

selected INPUT mode appears.

Press 

/

 to display the other menu screen, if

you want. The icon for the selected menu screen 
will be highlighted.

Press 

/

 to select a specific adjustment item.

Press 

ENTER

 after selecting the item if you want

to display a single adjustment item. Only the
selected adjustment item will appear.

Press 

/

 to adjust the item.

Press 

UNDO

 to return to the previous screen.

To exit the menu screen, press 

MENU

.

¥ For details on items on the menu screen, see the tree charts

on pages 27 and 28.

This projector has two sets of menu screens that allow
you to adjust the image and various projector settings. 
These menu screens can be operated fr

om the projector

or the remote control with the following procedure.


Downloaded From projector-manual.com Sharp Manuals

-28

Items on the INPUT 3 or 4 Mode Menu Bar

Main menu

Main menu

Sub menu

Menu Bars

Sub menu

¥

¥

¥

Downloaded From projector-manual.com Sharp Manuals

-30

Adjusting the Picture

Adjusting the Colour Temperature

Description of Colour Temperature

MENU

ENTER

MENU

¥

On-screen Display

Emphasising the Contrast

Description of White Emphasis

MENU

MENU

On-screen Display

Description

Selected item

ON (

)

OFF (

)

Downloaded From projector-manual.com Sharp Manuals

-32

Picture Setting Function

¥

PICTURE SETTING

Description of Picture Setting

Memory 1-5

Memory
OFF

Selecting ÒMemory 1-5Ó or ÒMemory
OFFÓ Using the PICTURE SETTING
Button

PICTURE SETTING

PICTURE

SETTING

Storing the Adjustment Values for
each Memory Number

MENU

ENTER

MENU

On-screen Display

Selected item

Description

Adjusting the Picture

Downloaded From projector-manual.com Sharp Manuals

-36

Turning On/Off the On-screen Display

This function allows you to turn on or off the on-screen
messages that appear during input select.

2

Press 

MENU

. The “Picture” menu screen appears.

3

Press 

/

 to display the “Options” menu screen.

4

Press 

/

 to select “OSD Display”.

1

Press 

/

 to select “ON” (

) or “OFF” (

).

5

To exit the menu screen, press 

MENU

.

On-screen Display

Description

Selected item

ON (

)

OFF (

)

Description of OSD Display

3 4 1

2 5

3 4 1

2 5

On-screen Display

2

MENU

3

4

1

5

MENU

RGB/COMP.

Selecting the Signal Type

Downloaded From projector-manual.com Sharp Manuals

-38

Adjustments for the Screen Position and Size

On-screen Display

Description of Adjustment Items

Digital Shift Setting

Description of Digital Shift

2

MENU

3

4

1

5

MENU

3 4 1

2 5

Digital Shift

Subtitle

Reset

Description

Selected item

 button

 button

Downloaded From projector-manual.com Sharp Manuals

-40

Selecting the Menu Screen Position

Description of Menu Position

2

MENU

3

4

1

5

ENTER

MENU

3 4 1

2

5

On-screen Display

Center

Upper Right

Lower Right

Upper Left

Lower Left

Description

Selected
item

3 4 1

2 5

Selecting the Menu Colour

Description of Menu colour

2

MENU

3

4

1

5

MENU

Opaque (

)

Translucent

(      )

Description

Selected item

On-screen Display

Downloaded From projector-manual.com Sharp Manuals

-42

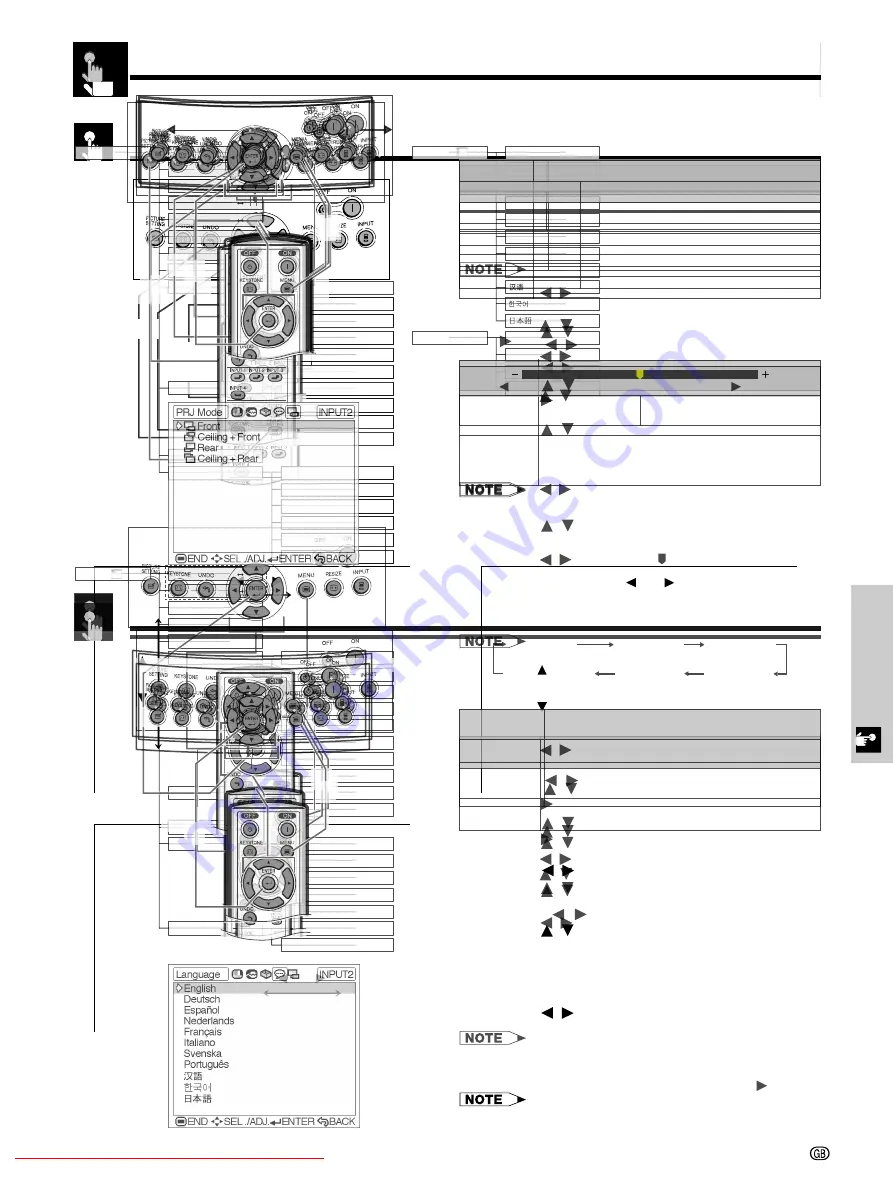
Reversing/Inverting Projected Images

This projector is equipped with a reverse/invert image
function which allows you to reverse or invert the pro-
jected image for various applications.

Description of Projected Images

1

Press 

MENU

. The “Picture” menu screen appears.

2

Press 

/

 to display the “PRJ Mode” menu

screen.

3

Press 

/

 to select the desired projection mode.

4

Press 

ENTER

 to save the setting.

5

To exit the menu screen, press 

MENU

.

• This function is used for the reversed image and ceiling-

mount setups. See page 23 for these setups.

On-screen Display

2

,

3

1

5

4

Selecting the On-screen Display Language

English is the preset language for the On-screen
Display; however, this can be changed to German,
Spanish, Dutch, French, Italian, Swedish, Portuguese,
Chinese, Korean or Japanese.

1

Press 

MENU

. The “Picture” menu screen appears.

2

Press 

/

 to display the “Language” menu

screen.

3

Press 

/

 to select the desired language.

4

Press 

ENTER

 to save the setting. The On-screen

Display is now programmed to display in the
language selected.

5

To exit the menu screen, press 

MENU

.

2

,

3

1

5

4

On-screen Display

Selected item

Front

Ceiling

Front

Rear

Ceiling

Rear

Description

Normal image

Inverted image

Reversed image

Reversed and inverted image

Downloaded From projector-manual.com Sharp Manuals

Содержание XV-Z90E

Страница 1: ...PROJECTEUR PROJEKTOR PROYECTOR PROIETTORE PROJECTOR ENGLISH DEUTSCH FRANÇAIS SVENSKA ESPAÑOL ITALIANO NEDERLANDS Downloaded From projector manual com Sharp Manuals SHA Printed in Japan In Japan gedruckt Imprimé au Japon Triykt i Japan Impreso en Japón Stampato in Giappone Gedrukt in Japan TINS A326WJZZ Downloaded From projector manual com Sharp Manuals ...

Страница 2: ...e emendata dalla direttiva 93 68 EEC Η εγκατάσταση αυτή ανταποκρίνεται στις απαιτήσεις των οδηγιών της Ευρωπαϊκής Ενωσης 89 336 ΕΟΚ και 73 23 ΕΟΚ πως οι κανονισµοί αυτοί συµπληρώθηκαν απ την οδηγία 93 68 ΕΟΚ Este equipamento obedece às exigências das directivas 89 336 CEE e 73 23 CEE na sua versão corrigida pela directiva 93 68 CEE Este aparato satisface las exigencias de las Directivas 89 336 CEE...

Страница 3: ...ay occur To fit an appropriate plug to the mains lead follow the instructions below IMPORTANT The wires in the mains lead are coloured in accordance with the following code Blue Neutral Brown Live As the colours of the wires in the mains lead of this product may not correspond with the coloured markings identifying the terminals in your plug proceed as follows The wire which is coloured blue must ...

Страница 4: ...ortant Information IMPORTANT SAFEGUARDS ATTENTION Please read all of these instructions before you operate your Projector for the first time Save these instructions for future reference Downloaded From projector manual com Sharp Manuals 5 Important Information IMPORTANT SAFEGUARDS Temperature Monitor Function Lamp Monitor Function Using the Terminal Cover Attaching the Terminal Cover Removing the ...

Страница 5: ...touch these areas until they have sufficiently cooled down Allow at least 30 cm of space between the exhaust ventilative hole and the nearest wall or obstruction If the cooling fan becomes obstructed a protection device will automatically turn off the projector lamp This does not indicate a malfunction Remove the projector power cord from the wall outlet and wait at least 10 minutes Then turn on t...

Страница 6: ...nd Macintosh from 13 compatible computers without the need for any additional hardware Downloaded From projector manual com Sharp Manuals Setup Connections To S video output terminal To video output terminal To component output terminals Component cable commercially available Connect each RCA connector of a component cable to the corresponding RCA INPUT 1 terminals on the projector Connect the oth...

Страница 7: ...will return the projector to the normal operating condition This caution is found at the bottom of the projector See Caution Concerning the Lamp Replacement on page 2 for its location LAMP REPLACEMENT BEFORE REMOVING THE SCREW DISCONNECT POWER CORD HOT SURFACE INSIDE ALLOW 1 HOUR TO COOL BEFORE REPLACING THE LAMP REPLACE WITH SAME SHARP LAMP UNIT TYPE BQC XVZ90 1ONLY UV RADIATION CAN CAUSE EYE DAM...

Страница 8: ...ble computers without the need for any additional hardware Downloaded From projector manual com Sharp Manuals Setup Connections 1 2 To S video output terminal 2 To video output terminal 1 2 To component output terminals 1 Component cable commercially available 1 Connect each RCA connector of a component cable to the corresponding RCA INPUT 1 terminals on the projector 2 Connect the other end of th...

Страница 9: ... to the normal operating condition This caution is found at the bottom of the projector See Caution Concerning the Lamp Replacement on page 2 for its location WARNING High brightness light source Do not stare into the beam of light or view directly Be especially careful that children do not stare directly into the beam of light Downloaded From projector manual com Sharp Manuals Important Informati...

Страница 10: ...deo cable commercially available Video cable Connect the 3 RCA to 15 pin D Sub cable to INPUT 2 COMPONENT RGB port on the projector Use the above cables to connect the DTV decoder or DVD player When connecting this projector to analog RGB output of the DTV decoder select Component for Signal Type on the OSD menu or press on the remote control See page 36 Make sure to turn both the projector and th...

Страница 11: ...nual com Sharp Manuals 10 Part Names Inserting the batteries 1 3 Pull down the tab on the battery cover and remove the cover towards the direction of the arrow 2 Insert two AA size batteries making sure the polarities match the and marks inside the battery compartment Insert the lower tab of the battery cover into the opening and press the cover until it clicks in place Top View Remote Control LIG...

Страница 12: ...lens cap strap on the lens cap pass the other end of the strap through the hole under the projector next to the lens Downloaded From projector manual com Sharp Manuals Supplie Remote control Power cord For U K Hong Kong and Singapore Depending on the region projectors are shipped with only one power cord see above Use the power cord that corresponds to the wall outlet in your country Computer RGB ...

Страница 13: ...t Names Inserting the batteries 1 3 Pull down the tab on the battery cover and remove the cover towards the direction of the arrow 2 Insert two AA size batteries making sure the polarities match the ⴐ and ⴑ marks inside the battery compartment Insert the lower tab of the battery cover into the opening and press the cover until it clicks in place Top View Remote Control LIGHT button 16 24 35 36 19 ...

Страница 14: ...rom projector manual com Sharp Manuals Supplie Remote control Power cord For U K Hong Kong and Singapore Depending on the region projectors are shipped with only one power cord see above Use the power cord that corresponds to the wall outlet in your country Computer RGB cable 21 pin RCA conversion adaptor Terminal cover Lens cap Video cable Two AA size batteries Lens cap strap For Australia and Ne...

Страница 15: ... Press POWER OFF again while the confirmation message is displayed Then message Terminating Please wait will appear If you accidentally pressed POWER OFF and do not want to turn off the power wait until the confirmation message disappears When POWER OFF is pressed twice the POWER indicator will illuminate in red and the cooling fan will run for about 90 seconds The projector will then enter standb...

Страница 16: ...T 1 Connecting to a DVD player and DTV decoder with component output for INPUT 2 1 Connect the 3 RCA to 15 pin D Sub cable to INPUT 2 COMPONENT RGB port on the projector 2 Use the above cables to connect the DTV decoder or DVD player When connecting this projector to analog RGB output of the DTV decoder select Component for Signal Type on the OSD menu or press RGB COMP on the remote control See pa...

Страница 17: ... Press POWER OFF again while the confirmation message is displayed Then message Terminating Please wait will appear If you accidentally pressed POWER OFF and do not want to turn off the power wait until the confirmation message disappears When POWER OFF is pressed twice the POWER indicator will illuminate in red and the cooling fan will run for about 90 seconds The projector will then enter standb...

Страница 18: ...cting to a DVD player and DTV decoder with component output for INPUT 2 1 Connect the 3 RCA to 15 pin D Sub cable to INPUT 2 COMPONENT RGB port on the projector 2 Use the above cables to connect the DTV decoder or DVD player When connecting this projector to analog RGB output of the DTV decoder select Component for Signal Type on the OSD menu or press RGB COMP on the remote control See page 36 CAU...

Страница 19: ... again while the confirmation message is displayed Then message Terminating Please wait will appear If you accidentally pressed POWER OFF and do not want to turn off the power wait until the confirmation message disappears When POWER OFF is pressed twice the POWER indicator will illuminate in red and the cooling fan will run for about 90 seconds The projector will then enter standby mode Wait unti...

Страница 20: ...onnecting to a DVD player and DTV decoder with component output for INPUT 2 1 Connect the 3 RCA to 15 pin D Sub cable to INPUT 2 COMPONENT RGB port on the projector 2 Use the above cables to connect the DTV decoder or DVD player When connecting this projector to analog RGB output of the DTV decoder select Component for Signal Type on the OSD menu or press RGB COMP on the remote control See page 36...

Страница 21: ...ve hole This odor will soon disappear with use When the power is on the LAMP REPLACEMENT indicator illuminates indicating the status of the lamp Green Lamp is ready Green blinking Warming up Cooling down Red Change the lamp Press POWER OFF Press POWER OFF again while the confirmation message is displayed Then message Terminating Please wait will appear If you accidentally pressed POWER OFF and do ...

Страница 22: ...ojector 2 Use the above cables to connect the DTV decoder or DVD player When connecting this projector to analog RGB output of the DTV decoder select Component for Signal Type on the OSD menu or press RGB COMP on the remote control See page 36 CAUTION Make sure to turn both the projector and the video equipment off before connecting Projector 3 RCA to 15 pin D sub cable sold separately AN C3CP DVD...

Страница 23: ...FF again while the confirmation message is displayed Then message Terminating Please wait will appear If you accidentally pressed POWER OFF and do not want to turn off the power wait until the confirmation message disappears When POWER OFF is pressed twice the POWER indicator will illuminate in red and the cooling fan will run for about 90 seconds The projector will then enter standby mode Wait un...

Страница 24: ...tput for INPUT 2 Connect the 3 RCA to 15 pin D Sub cable to INPUT 2 COMPONENT RGB port on the projector Use the above cables to connect the DTV decoder or DVD player When connecting this projector to analog RGB output of the DTV decoder select Component for Signal Type on the OSD menu or press RGB COMP on the remote control See page 36 CAUTION Make sure to turn both the projector and the video equ...

Страница 25: ...enter standby mode Wait until the cooling fan stops running before disconnecting the power cord The power can be turned on again by pressing When the power is turned on the POWER indicator and the LAMP REPLACEMENT indicators illuminate in green POWER ON OFF buttons The picture can be zoomed in or out and focused by the Zoom knob and the Focus ring Slide the Zoom knob The image can be adjusted to t...

Страница 26: ...nd Macintosh from 13 compatible computers without the need for any additional hardware Downloaded From projector manual com Sharp Manuals Setup Connections To S video output terminal To video output terminal To component output terminals Component cable commercially available Connect each RCA connector of a component cable to the corresponding RCA INPUT 1 terminals on the projector Connect the oth...

Страница 27: ...nter standby mode Wait until the cooling fan stops running before disconnecting the power cord The power can be turned on again by pressing When the power is turned on the POWER indicator and the LAMP REPLACEMENT indicators illuminate in green POWER ON OFF buttons The picture can be zoomed in or out and focused by the Zoom knob and the Focus ring Slide the Zoom knob The image can be adjusted to th...

Страница 28: ...p Connections Downloaded From projector manual com Sharp Manuals Setup Connections Downloaded From projector manual com Sharp Manuals Setup Connections Downloaded From projector manual com Sharp Manuals Setup Connections Selected item Description Downloaded From projector manual com Sharp Manuals Setup Connections Downloaded From projector manual com Sharp Manuals 23 Setup Connections Rear Project...

Страница 29: ...ion of Picture Setting Memory 1 5 Memory OFF Selecting Memory 1 5 or Memory OFF Using the PICTURE SETTING Button 1 PICTURE SETTING PICTURE SETTING Storing the Adjustment Values for each Memory Number 1 MENU 2 3 4 ENTER 5 MENU On screen Display 1 Selected item Description Adjusting the Picture 2 3 4 1 5 Downloaded From projector manual com Sharp Manuals Turning Thisfunctionallowsyoutoturnonoroffthe...

Страница 30: ...te Emphasis see Description of White Emphasis on page 30 For details on Picture Setting see Picture Setting Function on page 32 Press MENU The Picture menu screen appears Press to select a specific adjustment item Press to move the mark of the selected adjustment item to the desired setting To exit the menu screen press MENU To reset all adjustment items select Reset on the Picture menu screen and...

Страница 31: ...creen press MENU On screen Display Description Selected item For emphasizing the bright portions of images For disabling White Emphasis ON OFF Downloaded From projector manual com Sharp Manuals Picture This function stores all items set in Picture Five settings can be stored separately in Memory 1 to Memory 5 Each stored setting is reassigned to each input mode INPUT 1 to INPUT 4 Even when the inp...

Страница 32: ...setting 4 To exit the menu screen press MENU To reset all adjustment items select Reset on the Picture menu screen and press ENTER Tint cannot be used with PAL SECAM PAL M PAL N or PAL 60 Downloaded From projector manual com Sharp Manuals Gamm Gamma is an image quality enhancement function Four gamma settings are available to allow for differences in the brightness of the room Description of Gamma...

Страница 33: ... ON OFF Downloaded From projector manual com Sharp Manuals Picture This function stores all items set in Picture Five settings can be stored separately in Memory 1 to Memory 5 Each stored setting is reassigned to each input mode INPUT 1 to INPUT 4 Even when the input mode or signal is changed you can easily select optimal settings from the stored settings This function can be operated using the PI...

Страница 34: ... differences in the brightness of the room Description of Gamma Modes Description Selected Mode Standard Black Detail White Detail Brighten Standard picture without gamma correction Gives greater depth to darker portions of images for a more exciting theatre experience Emphasizes the gradation of the intermediate to high brightness portions of the image for more detailed expression Brighten the da...

Страница 35: ... ON OFF Downloaded From projector manual com Sharp Manuals Picture This function stores all items set in Picture Five settings can be stored separately in Memory 1 to Memory 5 Each stored setting is reassigned to each input mode INPUT 1 to INPUT 4 Even when the input mode or signal is changed you can easily select optimal settings from the stored settings This function can be operated using the PI...

Страница 36: ...the on screen image by moving it up or down All computer image adjustment items are returned to the factory preset settings Clock Phase H Pos V Pos Reset Description of Adjustment Items 2 Description Selected item Adjusting the Computer and DVD DTV Images 3 2 3 4 1 5 Downloaded From projector manual com Sharp Manuals Adjusting the Auto S Used to automatically adjust a computer image Select whether...

Страница 37: ...he setting 6 To exit the menu screen press MENU Avoid displaying computer patterns which repeat every other line horizontal stripes Flickering may occur making the image hard to see When inputting DTV 1080I signal select the corresponding type of signal in step 4 above When inputting 720P RGB signal select the corresponding type of signal in step 4 above On screen Display On screen Display Checkin...

Страница 38: ... Pos V Pos Reset Description of Adjustment Items 2 Description Selected item Adjusting the Computer and DVD DTV Images 3 2 3 4 1 5 Downloaded From projector manual com Sharp Manuals Adjusting the Auto S Used to automatically adjust a computer image Select whether the image is to be synchronized automatically when switching the signal with ON or OFF OFF Synchronized adjustment is not automatically ...

Страница 39: ... the remote control only in INPUT 2 Selecting the Signal Type RGB COMP button Downloaded From projector manual com Sharp Manuals Adjustm On screen Di You can adjust settings according to the position and size of the screen Description of Adjustment Items Digital Shift Setting This function allows you to adjust the vertical position of the image Description of Digital Shift 1 Press MENU The Picture...

Страница 40: ...for PAL M and PAL N input signals 2 3 4 1 6 5 On screen Display Downloaded From projector manual com Sharp Manuals 1 Press MENU The Picture menu screen appears 2 Press to display the Options menu screen 3 Press to select Subtitle 4 Press to move the mark of the Subtitle setting 5 To exit the menu screen press MENU When changing the screen with the Subtitle setting not only the bottom of the screen...

Страница 41: ...NPUT 2 Selecting the Signal Type RGB COMP button Downloaded From projector manual com Sharp Manuals Adjustm On screen Di You can adjust settings according to the position and size of the screen Description of Adjustment Items Digital Shift Setting This function allows you to adjust the vertical position of the image Description of Digital Shift 1 Press MENU The Picture menu screen appears 2 Press ...

Страница 42: ...for PAL M and PAL N input signals 2 3 4 1 6 5 On screen Display Downloaded From projector manual com Sharp Manuals 1 Press MENU The Picture menu screen appears 2 Press to display the Options menu screen 3 Press to select Subtitle 4 Press to move the mark of the Subtitle setting 5 To exit the menu screen press MENU When changing the screen with the Subtitle setting not only the bottom of the screen...

Страница 43: ...NPUT 2 Selecting the Signal Type RGB COMP button Downloaded From projector manual com Sharp Manuals Adjustm On screen Di You can adjust settings according to the position and size of the screen Description of Adjustment Items Digital Shift Setting This function allows you to adjust the vertical position of the image Description of Digital Shift 1 Press MENU The Picture menu screen appears 2 Press ...

Страница 44: ...ion and Size On screen Display 3 4 1 2 5 Subtitle Setting Description of Subtitle Setting button button Downloaded From projector manual com Sharp Manuals Automa 2 3 4 1 5 On screen Di When no input signal is detected for more than 15 minutes the projector will automatically shut off The on screen message on the left will appear five minutes before the power is automatically turned off Description...

Страница 45: ...On screen Display Description Selected item ON OFF Description of OSD Display 3 4 1 2 5 3 4 1 2 5 On screen Display 2 MENU 3 4 1 5 MENU RGB COMP Selecting the Signal Type Downloaded From projector manual com Sharp Manuals Adjustm On screen Di Description of Adjustment Items Digital Shift Setting Description of Digital Shift 2 MENU 3 4 1 5 MENU 3 4 1 2 5 Digital Shift Subtitle Reset Description Sel...

Страница 46: ...appears 2 Press to display the Options menu screen 3 Press to select Auto Power Off 4 Press to select or 5 To exit the menu screen press MENU Auto Power Off is factory preset to When the Auto Power Off function is set to On 5 minutes before the power turns off the message Power OFF in X min will appear on the screen to indicate the remaining minutes Power automatically shuts off after 15 minutes w...

Страница 47: ...problem occurs either the TEMPERATURE WARNING indicator or the LAMP REPLACEMENT indicator will illuminate in red After turning off the power follow the procedures given below If the TEMPERATURE WARNING indicator lights up follow the above possible solutions and then wait until the projector has cooled down completely before turning the power back on At least 5 minutes If the power is turned off an...

Страница 48: ...ayed in Lamp Timer 3 To exit the menu screen press MENU It is recommended that the lamp be replaced after approximately 2 400 cumulative hours of use See page 46 for lamp replacement On screen Display Problem Lamp has been used for over 2 400 hours Lamp has been used for over 2 500 hours Possible Solution Purchase a replacement lamp unit lamp cage module of the current type BQC XVZ90 1 from your n...

Страница 49: ...ast 5 minutes If the power is turned off and then turned on again for example during a brief rest the LAMP REPLACEMENT indicator may be triggered preventing the power from going on Should this occur unplug the power cord from the wall outlet and plug it back in again TEMPERATURE WARNING indicator POWER indicator LAMP REPLACEMENT indicator Downloaded From projector manual com Sharp Manuals 46 Repla...

Страница 50: ...n off the power Unplug the power cord 4 6 Loosen the user service screw that secures the lamp cage cover 5 Slide the lamp cage cover in the direction of the arrow 1 3 Turn off the power 2 Unplug the power cord Remove the Swivel Stand See page 17 Loosen and remove the three securing screws from the lamp cage Press POWER OFF Wait until the cooling fan stops running 7 Remove the lamp cage User servic...

Страница 51: ...o allow for proper focus See pages 21 and 22 OSD Display is set to OFF preventing to display some or all On screen Displays See page 36 If the picture is normal the sound is due to cabinet shrinkage caused by temperature changes This will not affect operation or performance of the projector Refer to Lamp Maintenance Indicators on page 44 Adjust the Phase setting See page 33 Change the input signal...

Страница 52: ...n off the power Unplug the power cord 4 6 Loosen the user service screw that secures the lamp cage cover 5 Slide the lamp cage cover in the direction of the arrow 1 3 Turn off the power 2 Unplug the power cord Remove the Swivel Stand See page 17 Loosen and remove the three securing screws from the lamp cage Press POWER OFF Wait until the cooling fan stops running 7 Remove the lamp cage User servic...

Страница 53: ...o allow for proper focus See pages 21 and 22 OSD Display is set to OFF preventing to display some or all On screen Displays See page 36 If the picture is normal the sound is due to cabinet shrinkage caused by temperature changes This will not affect operation or performance of the projector Refer to Lamp Maintenance Indicators on page 44 Adjust the Phase setting See page 33 Change the input signal...

Страница 54: ...directional data 13 Horizontal sync signal 14 Vertical sync signal 15 Data clock Component Input Pin No Signal 1 Video input PR CR 2 Video input Y 3 Video input PB CB 4 Not connected 5 Not connected 6 Ground PR 7 Ground Y Pin No Signal 8 Ground PB 9 Not connected 10 Not connected 11 Not connected 12 Not connected 13 Not connected 14 Not connected 15 Not connected Downloaded From projector manual c...

Страница 55: ...de format Normal response O K Return code 0DH Problem response communication error or incorrect command E R R Return code 0DH Command 4 digits Parameter 4 digits Command format When more than one code is being sent send each command only after the OK response code for the previous command from the projector is verified When using the computer control function of the projector the projector operati...

Страница 56: ... wide images with an aspect ratio of 16 9 and 21 9 Auto Sync Optimises projected computer images by automatically adjusting certain characteristics Background Initial setting image projected when no signal is being input Clock Clock adjustment is used to adjust vertical noise when clock level is incorrect CLR Temp Colour temperature Function that can be used to adjust the colour temperature to sui...

Страница 57: ...zoom lens F3 0 f 32 5 44 0 mm 150 W SHP lamp RCA Connector VIDEO INPUT 4 composite video 1 0 Vp p sync negative 75 Ω terminated 4 pin Mini DIN connector INPUT 3 Y luminance signal 1 0 Vp p sync negative 75 Ω terminated C chrominance signal Burst 0 286 Vp p 75 Ω terminated RCA Connector Y 1 0 Vp p sync negative 75 Ω terminated PB 0 7 Vp p 75 Ω terminated PR 0 7 Vp p 75 Ω terminated 15 pin connector...

Страница 58: ... _ _ _ _ _ _ _ _ _ _ _ _ _ _ _ _ _ _ 1 0 1 2 3 4 BUTTONS REMOTE CONTROL BUTTONS Downloaded From projector manual com Sharp Manuals 55 327 153 8 118 368 Dimensions Units mm Front View Bottom View Side View Top View Side View Rear View Downloaded From projector manual com Sharp Manuals 57 Glossary Aspect ratio Auto Sync Background Clock CLR Temp Colour temperature Composite sync Digital keystone cor...

Страница 59: ... Burst 0 286 Vp p 75 Ω terminated RCA Connector Y 1 0 Vp p sync negative 75 Ω terminated PB 0 7 Vp p 75 Ω terminated PR 0 7 Vp p 75 Ω terminated 15 pin connector Analog 0 7 Vp p 75 Ω Y 1 0 Vp p sync negative 75 Ωterminated PB 0 7 Vp p 75 Ω terminated PR 0 7 Vp p 75 Ω terminated 15 pin connector RGB separate sync on green type analog input 0 0 7 Vp p positive 75 Ωterminated HORIZONTAL SYNC SIGNAL T...

Страница 60: ... by automatically adjusting certain characteristics Background Initial setting image projected when no signal is being input Clock Clock adjustment is used to adjust vertical noise when clock level is incorrect CLR Temp Colour temperature Function that can be used to adjust the colour temperature to suit the type of image input to the projector Decrease the colour temperature to create warmer redd...

Страница 61: ...TL level positive negative or composite sync Apple only VERTICAL SYNC SIGNAL Same as above 12 110 MHz 43 75 Hz 15 70 kHz 9 pin D sub connector RS 232C Port AC 100 240 V 2 1 A 50 60 Hz 200 W 750 BTU hour 5 C to 35 C 20 C to 60 C Plastic 38 kHz 368 W 153 8 H 327 D mm including swivel stand 368 W 118 H 327 D mm main body only 4 3 kg including swivel stand 3 8kg main body only Remote control Two AA si...

Страница 62: ...PROJECTEUR PROJEKTOR PROYECTOR PROIETTORE PROJECTOR ENGLISH DEUTSCH FRANÇAIS SVENSKA ESPAÑOL ITALIANO NEDERLANDS Downloaded From projector manual com Sharp Manuals SHA Printed in Japan In Japan gedruckt Imprimé au Japon Triykt i Japan Impreso en Japón Stampato in Giappone Gedrukt in Japan TINS A326WJZZ Downloaded From projector manual com Sharp Manuals ...

Отзывы: