background image

24

Calendar

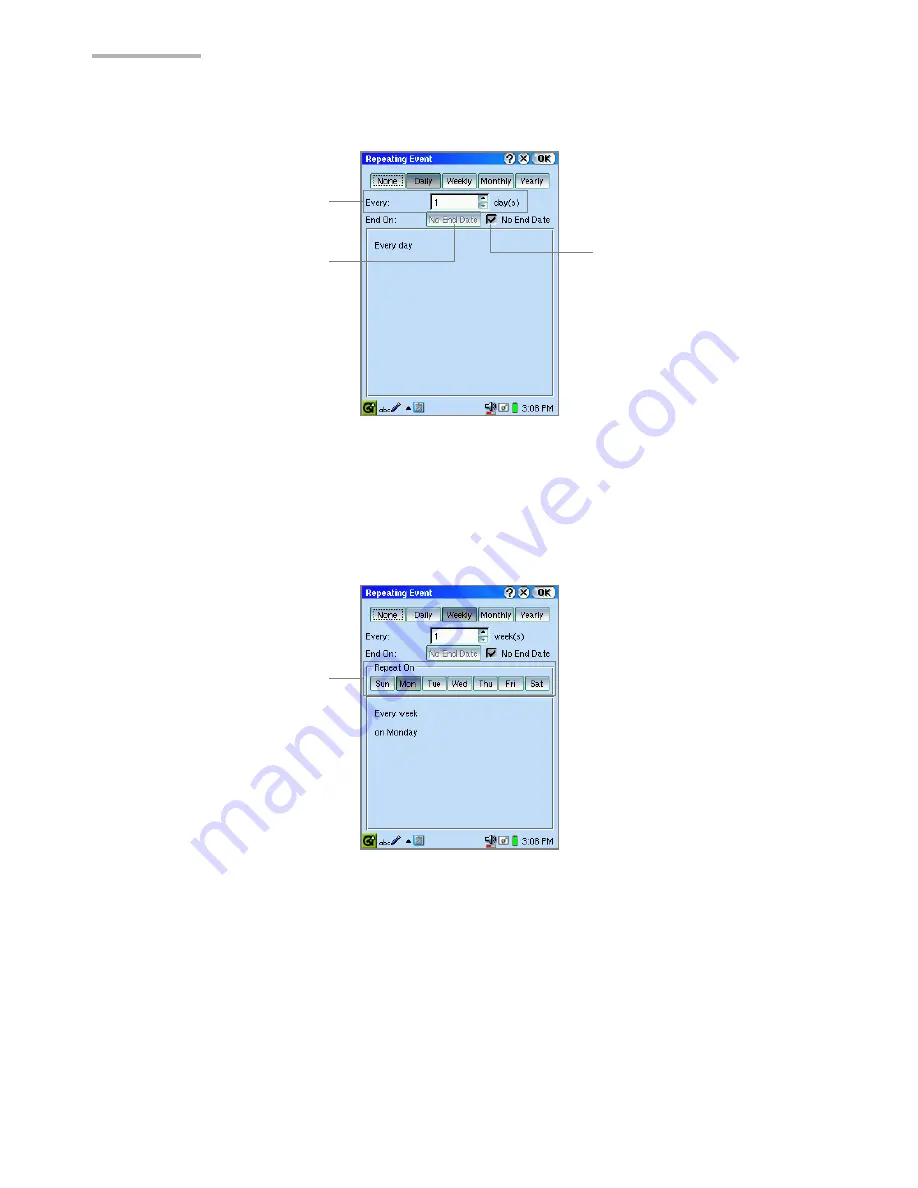
Daily Events 

1.

Tap the Every spinbox to set the number of days between each repeat.

2.

If the event has an end date, uncheck the “No End Date”, then tap the End Date 
button, and choose an end date from the mini-calendar that pops up.

Weekly Events 

1.

Tap the Every spinbox to set the number of weeks between each repeat.

2.

If the event has an end date, uncheck the “No End Date”, then tap the End Date 
button, and choose an end date from the mini-calendar that pops up.

3.

To add day(s) of the week the event should repeat, tap the relevant Repeat On 
button(s).
To clear the added day(s) of the week, tap the same Repeat On button(s) again.

Repeating Event screen 
(Daily)

Every spinbox

No End Date checkbox

End Date button

Repeating Event screen 
(Weekly)

Repeat On buttons

Содержание SL-5600

Страница 1: ......

Страница 2: ...he Index screen 9 Changing the sort order of the entry 10 Registering Editing your personal information Owner Information 11 Calendar 12 Overview 12 Viewing the link files 20 Selecting the link option for the memory card 20 Changing the date to link files 21 Adding Events 22 Modifying an Event entry 26 Duplicating an Event entry 26 Deleting an Event entry 27 Calendar Setup 28 Todo List 30 Overview...

Страница 3: ...ngs and the Cancel key actions 45 Switching the view mode on the Index Screen 47 Text Editor 48 Overview 48 Creating a new text file Text Index screen 52 Creating a new note entry Notes Index screen 52 Modifying a text file note entry 53 Deleting a text file note entry 53 Duplicating a text file to from a note entry 53 Setting up the wrap lines 54 Renaming a text file 54 Defining the Cancel key fu...

Страница 4: ...5 EMail 86 Overview 86 E mail accounts 93 Creating an e mail message 96 Sending e mail messages 99 Receiving e mail messages 100 Opening an e mail message 102 Opening or arranging attachments 103 Replying Forwarding to an e mail message 104 Editing an e mail message 104 Deleting e mail messages 105 Registering the e mail address of the sender in the Address Book application 106 Changing the view p...

Страница 5: ...9 Asteroids 129 Go 129 Mindbreaker 129 Mine Hunt 130 Patience 130 Snake 130 Word Game 130 Settings 131 Add Remove Software 131 Setting the Appearance Appearance 140 Using the Application Key Application Key 142 Backup Restore Using memory card 143 Beam Receive 145 Adjusting the date and time Date Time 149 Managing power Light Power 151 Adjusting the touch panel Recalibrate 153 Setting the security...

Страница 6: ...Setting 162 PC Link 166 Network Settings Network 168 Overview 168 Creating settings using the Wizard screen 169 Creating a new setting without using the Wizard 184 Connecting disconnecting to the Network 195 ...

Страница 7: ...e you purchase this product The screens on the unit may differ from the screens in the manuals If you would like to change the screen appearance on the unit please use the Appearance application See the Setting the Appearance Appearance section on page 140 The information and screens provided in the manuals of the SL 5600 are subject to change without notice Copyright It is the intent of Sharp tha...

Страница 8: ...ribes the stylus operation Button or key operations are included if they make it easier to carry out the function Keys This manual represents keys with the following Screen Buttons and Menu Names Screen buttons and menu names such as OK File Edit etc are indicated using quotation marks HOME key Cancel key OK key Cursor key Left cursor key Right cursor key Up cursor key Down cursor key SELECT key ...

Страница 9: ...create your own categories E mail addresses entered in the Address Book application can be used to easily address e mails in the EMail application Overview The Address Book application has three major screens New Edit Address screen Index screen and Detail screen New Edit Address screen 1 On the Applications Home screen tap the Address Book application icon The Index screen appears 2 Tap The New A...

Страница 10: ...tton Tap to sort the entries by full name in ascending or descending order Column button Tap to list the items for each entry then tap the desired item The selected item for each entry will be displayed Data area Displays the contents of the entry Full Name column displays the First Name Middle Name and Last Name Tap an entry to open the Detail screen Scroll bar for L R Tap to scroll to the right ...

Страница 11: ...s press the Address Book key on the sliding cover Tapping an e mail address colored in blue opens the EMail application to the New mail screen using the address as the recipient See page 96 Tapping a URL colored in blue launches the Web browser application and displays the destination if you are connected to the Internet This function works only with URLs beginning with http and https By the right...

Страница 12: ... a note See page 7 If you want to assign one or more category names see the separate Start up Guide for details 3 Tap or press to save the new entry The New Address screen returns to the Index screen If you tap the new entry is canceled Note An Address Book entry cannot be saved if only the Gender field and Category field are completed You can enter multiple e mail addresses in the Emails field by...

Страница 13: ...en If you tap on the Enter Note screen the attached note is canceled To save the entry with a note attached tap on the New Address or Edit Address screen Modifying an Address Book entry 1 On the Index screen highlight the entry you want to modify by using 2 Tap The Edit Address screen appears 3 Tap any field requiring change and modify the entry 4 Tap to save the modification The Edit Address scre...

Страница 14: ...then tap Delete A confirmation message appears before the entry is deleted If you want to delete all entries from the Address Book application tap the Data menu and then tap Delete all 3 Tap Yes to complete the deletion The entry will be deleted Arranging the entry fields You can change the order of the fields and hide unnecessary fields on the New Edit Address screen Note The first three fields F...

Страница 15: ...s or to move the selected field upwards or downwards to the desired position 4 Tap to save the settings The Field Settings screen returns to the previous screen Your setting will be displayed on the New Edit Address screen If you tap the setting is canceled Arranging the display items on the Index screen The display items of the center and right columns can be changed to other items Scroll to the ...

Страница 16: ... 2 Tap the desired item The entry of the item selected will be displayed If you select Home Address or Work Address the contents for Home or Work Street City State Zip and Country fields will be displayed Changing the sort order of the entry You can sort the entries by Full Name center or right column item on the Index screen 1 On the Index screen tap the Sort menu The menu displays sorting order ...

Страница 17: ...n enter your information on Edit Owner Information screen that appears 3 Tap to save the settings Owner Information screen appears listing your information 4 Tap Or tap the Data menu and then tap Owner Information The display returns to the Index screen Note On the Owner Information screen you will not be able to select or enter the category name The personal information registered during the init...

Страница 18: ... Today from the View menu you can display a view including today To switch views you can use the view icons from the Menu bar Today Day Week Month and Year on the Menu bar for switching views Day view 1 On the Applications Home screen tap the Calendar application icon 2 Tap the Day view icon The Day view has three tabs Event tab Displays the Event screen in the timetable for the event of the day A...

Страница 19: ...ation Focused status Event with an Alarm setting Repeating events Events of less than one hour indicated in red on the left of the schedule title Event screen Agenda screen File link screen Indicates the files are linked to the Calendar date Column buttons These four columns can change their position by tap and holding them to the desired direction ...

Страница 20: ...r today Day Displays the Day view Week Displays the Week view Month Displays the Month view Year Displays the Year view Date button Tap to select the desired day from the mini calendar that appears Previous button Moves to the previous date Next button Moves to the next date Time buttons Tap or drag time buttons to open the New Event screen with the Start and End time entered Event indication Focu...

Страница 21: ...events of the week Tap the event to open its Detail screen Event tab Week spinbox Agenda tab Date button Event indication Green bar All day event Red bar Event with an Alarm setting Blue bar Event with Start and End time setting Next button Focused day in amber Press or to move the focus Then press or the SELECT key to open the Day view Event screen Agenda screen Day of the week buttons Previous b...

Страница 22: ... Tap to select the desired day from the mini calendar Week spinbox Select the week of the year Tap to move to the next week or tap to move to the previous week Day of week buttons Tap to open the Day view of the selected day Previous button Moves to the previous week Next button Moves to the next week Event indication Tap to display the detailed contents of the event for a few seconds ...

Страница 23: ...en tap Month View and then select Text or Graph Text view Graph view Date with a Link file Date cell Year spinbox Next button To December button Focus frame Today amber Date cell Agenda of the day focused To January button Previous button Month drop down list button Colored events mean green Schedule spanning days which starts and ends at different day blue Schedule starting before noon or schedul...

Страница 24: ...e selected year Date cell Tap to focus on a day Tapping the focused day again displays the Day view of that day Focus frame Press to move the focus Then press or the SELECT key to open the Day view Agenda of the day focused Displays the event list of the day focused Previous button Moves to the previous year Next button Moves to the next year Year drop down list button Tap to select the desired ye...

Страница 25: ...w Selects the display format of the File link screen in the Day view List or Thumbnails Month View Selects the display format of the Month view Text or Graph Option menu Alarm and Start Time Sets the starting time on the event screen in the Day view or Week view mode and the Alarm setting when creating a New event Link File With the memory card inserted selects whether link files on the memory car...

Страница 26: ... the transfer dates Files created or modified in the SL 5600 on the creation or modification dates To change the view mode of the File link screen 1 On the File link screen tap the View menu and then select Day File View 2 Tap Thumbnails or List To change the dates that are linked to a file see page 21 Selecting the link option for the memory card You can select to link files on the memory cards t...

Страница 27: ...dule of events 1 Open the File link screen with a file of the date you want to change 2 Tap and hold the stylus on the file to display the pop up menu 3 Select Move The mini calendar will be displayed 4 Tap the new date you wish the file to be linked to from the mini calendar displayed The date information of the file will be changed and the file will appear on the File link screen of the new date...

Страница 28: ...ly if you tap and drag the time buttons on the Event screen the Day view to specify the time To change the time enter the time directly or tap Start End time combobox buttons For the All day schedule select the All day checkbox With this box checked you cannot specify the Start End time nor the time zone etc You can change the time zone by tapping the City Time button See page 121 To change cities...

Страница 29: ...Alarms checkbox is not selected Tap the Sound volume icon on the taskbar You can make the Email LED indicator flash at an alarm pre set time See pages 28 and 29 Note With the stereo headphone connected you hear a sound from the headphone not from the built in speaker To repeat an event 1 On the New Event screen tap the Repeat button The Repeating Event screen appears 2 Tap the appropriate repetiti...

Страница 30: ...o set the number of weeks between each repeat 2 If the event has an end date uncheck the No End Date then tap the End Date button and choose an end date from the mini calendar that pops up 3 To add day s of the week the event should repeat tap the relevant Repeat On button s To clear the added day s of the week tap the same Repeat On button s again Repeating Event screen Daily Every spinbox No End...

Страница 31: ... repeats by day of week i e every first Thursday tap the Repeat By Day button If the event repeats by date i e every 6th tap the Repeat By Date button Annual Events 1 Tap the Every spinbox to set the number of years between each repeat 2 If the event has an end date uncheck the No End Date then tap the End Date button and choose an end date from the mini calendar that pops up Repeating Event scree...

Страница 32: ...e If you modify a repeating event all of other occurrences of the event will be modified You can perform the same operation in step 1 from the Agenda screen of the Day view Weekly view You cannot modify the time zone If necessary delete the entry and create it afresh Duplicating an Event entry 1 Highlight the event you want to duplicate from the Event screen of the Day view by using 2 Tap the Data...

Страница 33: ...peration in step 1 from the Agenda screen of the Day view Weekly view Deleting Daily Weekly or Monthly events You can delete all the events for a given day week or month except for repeating events at one time 1 Open the Calendar screen in the Day Week or Month view in which you want to delete events 2 Tap the Data menu and then tap Delete period 3 Tap the drop down list button on the screen that ...

Страница 34: ...tap Delete all A confirmation message appears before the events are deleted 2 Tap Yes to delete all events Note Deleting all events cannot delete their link files Event entries cannot be deleted from the File link screen Calendar Setup You can change the starting time on the event screen in the Day view or Week view mode and the Alarm settings on the New Edit Event screen etc 1 In any view mode of...

Страница 35: ...when you open the Event screen in the Day or Week view mode Alarm Settings Alarm Preset checkbox Check to set the Alarm preset time Alarm Preset spinbox Set the Alarm preset time If you set the preset time to 5 minutes for example the alarm sounds five minutes before the event This setting will be the default alarm setting on the New Event screen Email LED Blink checkbox When checked the Mail ligh...

Страница 36: ...asily Entries can be organized into categories such as Business Personal or you can create your own Overview New Edit Task screen 1 On the Applications Home screen tap the Todo List application icon The Index screen will be displayed 2 Tap The New Task screen will be displayed Start Date button Description combobox Due Date button Priority drop down list button Edit Categories button Completed Dat...

Страница 37: ...due date Completed Date checkbox Completed Date button Check if the task has been completed To change the completed date tap the completed date button to select the desired date Priority drop down list button Tap to display the list of choices and then tap your choice Category drop down list button Tap to display the list of choices and then tap your choice If you want to create a new category nam...

Страница 38: ...ask has a start date or due date check the Start date or Due date checkbox Tap the Start Date or Due Date button and then tap the date from the mini calendar Checked status button Tap to sort the entries by checked status completed or incomplete Completed checkbox When unchecked the task is not completed when checked the task is completed Priority button Tap to sort the entries by priority Descrip...

Страница 39: ...d Modifying a Todo List entry 1 On the Index screen tap and hold the entry you want to modify The pop up menu will be displayed 2 Select Edit task Or instead of performing steps 1 and 2 tap on the Detail screen The Edit Task screen will be displayed 3 Modify the entry Check the Completed checkbox if the task is completed If you change the completed date tap the Completed Date button and select the...

Страница 40: ...e Or instead of performing steps 1 and 2 tap on the Detail screen A confirmation message will be displayed before the entry is deleted 3 Tap Yes to delete the entry The entry will be deleted Deleting all Todo task entries 1 On the Index screen select All from the Category menu 2 Tap the Data menu and then tap Delete all A confirmation message will be displayed before the entries are deleted 3 Tap ...

Страница 41: ...n tap the Completed checkbox of the completed entry To remove the check tap the Completed checkbox again To view only the incomplete completed entries 1 On the Index screen tap the Option menu and then tap View 2 Tap Hide completed tasks or Only completed tasks Only incomplete or completed entries will be displayed See the description on the title bar To show all entries in both status select Show...

Страница 42: ...plications Home screen tap the ImagePad application icon An Index screen will be displayed If the Detail screen is displayed instead of the Index screen press to switch to the Index screen Folder menu Tap to change folders when you want to view files in another folder or on a memory card History button Tap to list the files you have previously opened Folder menu Indicates the current folder name F...

Страница 43: ... be displayed on the Index screen See page 47 Refresh Icons Updates icons of the image files modified in the thumbnail view Option menu Rotate Left Rotates the selected image 90 degrees counterclockwise and saves it See page 43 Slideshow Displays a slideshow of image files in the current folder See page 44 Preferences Configures the slideshow settings Changes how the Image view screen will be disp...

Страница 44: ...t memory when attempting to display rotate or otherwise manipulate large image files View menu Fullscreen Displays the image on the full screen with no Menu bar or taskbar on it Images larger than the display will be reduced Press to return to the normal screen Flip Horizontal Flips the image horizontally Flip Vertical Flips the image vertically Rotate by 180 Rotates the image by 180 Rotate by 90 ...

Страница 45: ...rtcut icons on the Menu bar Line Color Specifies the line color Fill Color Specifies the background color for a Square Circle Line Width Specifies the line width Small Medium or Large Image Flip Rotate Flip Horizontal Flips the image horizontally Flip Vertical Flips the image vertically Rotate by 180 Rotates the image by 180 Rotate by 90 Rotates the image by 90 counterclockwise Rotate by 45 Rotate...

Страница 46: ...he SL 5600 the screen for selecting the destination will be displayed 4 Select the destination The memo will be saved in the Image_Files folder with the filename showing the date and time as follows Date_Time MMDD_HHMM If the file is saved on the memory card it will be saved in CF Card SD Card Documents Image_Files Note The filename can be changed using the Rename function in the File menu on the ...

Страница 47: ... color and square or circle line color 1 Tap on the new image screen On the color palette select the color by tapping it Selecting the Fill Color You can select the interior color for squares and circles 1 On the new image screen tap the Edit menu and then tap Fill Color 2 Tap the color palette to select the color Selecting the line width 1 On the new image screen tap the Edit menu and then tap Li...

Страница 48: ...ted Deleting a memo image file 1 On the Index screen highlight the file you want to delete by using Or open the Image view screen of the file 2 Tap the File menu and then tap Delete A confirmation screen will be displayed 3 Tap Yes to delete Caution When you select a folder in step 1 above all files including non image files are deleted Check that no important files of any type are in the folder s...

Страница 49: ...ed Viewing a single image 1 On the Index screen tap the image file you want to view The selected image will be displayed 2 Tap or press to return to the Index screen Magnifying or reducing the image You can zoom in or out of a large size image file on the Image view screen 1 In the Image view screen tap Zoom In or Zoom Out The image will be magnified or reduced Viewing the full screen display 1 On...

Страница 50: ...e with 01 or 02 beforehand 1 On the Index screen tap the Folder menu and select the folder including image files you want to display a slideshow 2 Tap the Option menu and then tap Slideshow When the slideshow is finished the display returns to the Index screen If the Auto play option is unchecked the first file on top of the list will be opened For information on the Auto play option and others se...

Страница 51: ...den the Image view screen by displaying it without the scroll bar Show statusbar Place a checkmark to display the status bar on the Image view screen showing information like the image size of the opened file Show fullscreen Place a checkmark to always open files in the full screen mode Cancel Key Function Use cancel as close When is pressed on the Index screen this application will be closed Use ...

Страница 52: ...save them Slideshow settings Auto play checkbox If checked files will be automatically opened after the present file has displayed a preset amount of time Repeat checkbox If checked files will be automatically opened repeatedly after the present file has displayed a preset amount of time Delay time slider If the Auto play option is checked move the slider to adjust the delay time before the next f...

Страница 53: ...ng the Items displayed on the list screen The display items of the center and right columns can be changed to other items 1 On the Index screen tap the View menu and then tap List View Settings The List View Settings screen will be displayed 2 Tap each drop down list button and select the item to be displayed 3 Tap to save the settings Column buttons Tap to sort the files by the column item List v...

Страница 54: ...ou can synchronize with the Microsoft Outlook on a PC using synchronization software provided in the CD ROM The files in the Text_Files folder cannot be viewed from the Notes Index screen and cannot be synchronized with a PC Overview Use the tabs to switch between Index screens Index screen Text tab 1 On the Applications Home screen tap the Text Editor application icon The Text Index screen will b...

Страница 55: ...tored in other folders or on a memory card History button Tap to list the files you have previously opened File menu Rename Renames the file name Convert to Notes Copies a text file and saves it as a Notes file Option menu Preferences Defines how the Cancel key operates on the Index screen Code Preferences Selects the character code for opening or saving files Help Displays online help ...

Страница 56: ... Notes Index screen grounded in yellow appears displaying a list of note entries for synchronizing with Microsoft Outlook on a PC Note To view a note entry tap the file and it will be opened allowing you to edit it File menu Convert to Text Copies a note entry and saves it as a text file ...

Страница 57: ...yellow File menu New Creates a new text file or note entry Save Saves the current file entry Save As Saves the current file as a new file for Text tab only View menu Font Changes the display font size Wrap lines When checked carriage return is inserted into the text according to the width of the screen Code Preferences Selects the character code for opening or saving files for Text tab only Edit a...

Страница 58: ...save a new file using Folder menu etc 5 Enter a file name in the File name entry field 6 Tap to save the new file If you tap the screen returns to the New Text before tapping in step 3 The text file has not been saved yet Creating a new note entry Notes Index screen 1 Tap the Notes tab to display the Notes Index screen 2 Tap The New Notes screen will be displayed 3 Enter text and then tap to save ...

Страница 59: ...y 1 On the Index screen highlight the text file or note entry you want to delete by using 2 Tap A confirmation message will be displayed before the text file note entry is deleted 3 Tap Yes to delete The text file note entry will be deleted Caution When you select a folder in step 1 above all files including non text files are deleted Check that no important files of any type are in the folder sel...

Страница 60: ...e file name of the text file will be the first line of the converted note entry Setting up the wrap lines 1 On the New Edit screen tap the View menu and then tap Wrap lines The wrap lines setting helps you to read texts easily To cancel the wrap lines setting follow step 1 and uncheck Wrap lines Renaming a text file 1 On the Text Index screen highlight the text file you want to rename by using 2 T...

Страница 61: ...played 2 Tap the desired radio button and then tap Use cancel as close When is pressed on the Index screen this application will be closed Use cancel as up When is pressed on the Index screen the display changes to an Index screen for the folder above the current folder Use cancel as focus When is pressed on the Index screen it cycles the focus through Folder menu History button etc In this situat...

Страница 62: ...it is used without a PC 1 On the Text Index screen tap the Option menu and then tap Code Preferences The Code Preferences screen will be displayed 2 Tap the following character code drop down list button 3 Tap to save the settings Open file as Correctly opens files transferred from a PC depending on the character code selected Save file as Saves files by specifying character code for the transfer ...

Страница 63: ...nds including screentaps and alarms from the headphone Some files such as MP3 music files of MPEG2 5 format cannot be played back with this application The Media Player application may close automatically if multiple applications are running simultaneously The media image may be distorted and the sound may be interrupted during playback if other programs are running simultaneously Do not insert or...

Страница 64: ...list Add to playlist button Adds a file to a Playlist Up button Moves the selected file up in the Playlist Down button Moves the selected file down in the Playlist Remove from playlist button Removes a file from a Playlist Title button Tap to sort files by title Media button Tap to sort files by storage media Internal Flash CF SD Size button Tap to sort files by size Video tab Music tab Size butto...

Страница 65: ... file down in the Playlist Remove from playlist Removes a file from the Playlist View menu used to play video files Fullscreen Switches the screen mode from full screen to normal screen Scale Enlarges or minimizes the image to fit the screen Option menu Repeat Repeats playback of the file in the Video Music or Playlist Index screen Random Plays files in the Playlist at random Continuous Play Plays...

Страница 66: ... previous file will start playback When only one file or the first file in the list is being played in the non repeating mode the playback stops and returns to the Index screen Press right Moves to the next file When only one file or the last file in the list is being played in the non repeating mode the playback stops and returns to the Index screen Press up Press and hold to turn the volume up P...

Страница 67: ...rent file will be played again from the beginning When tapped pressed within 2 seconds the previous file will start playback When only one file or the first file in the list is being played in the non repeating mode the playback stops and returns to the Index screen Next Press Moves to the next file if the music file is being played When only one file or the last file in the list is being played i...

Страница 68: ...or Music tab All files stored in the SL 5600 and memory card will be displayed according to the file type to be played 2 Tap the desired file in the list And then tap press or press the SELECT key The selected file will be played The playback screen varies according to the file type to be played To stop playback 1 Press or the SELECT key the playback will be stopped and the screen will return to t...

Страница 69: ...The selected file will be added to the Playlist with the same file name Tapping the Playlist tab allows you to confirm that the selection was added 4 To add multiple files repeat steps 1 through 3 above Arranging the file order in the Playlist Once you have added files in the Playlist you can change the file order playback order 1 Tap the Playlist tab 2 Tap the file you want to move 3 Tap or The s...

Страница 70: ...enu all files in the Playlist will be played continuously To stop playback 1 Press or the SELECT key and the playback will be stopped and the Index screen will be displayed To playback at random 1 Tap the Playlist tab 2 Tap the Option menu and then tap Random All files in the Playlist will be played at random To cancel the Random mode repeat step 2 Other functions Displaying the file information 1...

Страница 71: ... displayed Picture size Frame rate etc When music files are selected the following will be displayed Sampling rate Channel etc 2 Tap or to close the screen Note You can extend the use of MP3 playback using the Display off mode See the Disp OFF on the screen on page 61 ...

Страница 72: ...onts etc may not be displayed correctly in this application Some large graphics may not be displayed in this application This application may take time to open files pdf files etc including many graphics You can check incoming e mail messages while browsing Web pages Overview Browsing screen 1 On the Applications Home screen tap the Opera Browser application icon Back icon Reload icon Stop icon Fo...

Страница 73: ...L or searching for a Web page To close the screen tap the icon again Bookmarks icon Displays the Bookmarks screen to access and manage the bookmarks To close the screen tap the icon again Find icon Tap and hold to display a Find screen for searching for a word or a phrase included in the current page To search for next tap the Find icon Windows icon If multiple windows are open tap to switch open ...

Страница 74: ...ltiple windows are open switches open windows When only one window is open displays the window management screen New window Opens a new empty window on the current open window Save current Saves the current page in the SL 5600 or on the memory card To open the page use the Open local file menu Full screen shift return Displays the current page in full screen To return to the normal screen press Sh...

Страница 75: ...ile the application is receiving the data the elapse time etc is displayed under the menu bar and the Stop icon is displayed instead of the Reload icon Preferences P General Displays the screen for setting up the General preferences homepage address etc Security Displays the screen for setting up the Security preferences cookies etc File types Displays the screen for setting up the preferences for...

Страница 76: ...age copy the image URL etc by selecting the menu command in the menu Tap and hold a link to pop up the link context menu allowing you to save the links contexts directly to a file etc by selecting the menu command in the menu Opening the specified Web page 1 Tap the Go to page icon The Go to page screen will be displayed ...

Страница 77: ... in step 3 Using the Web Search function Search allows you to find information using the search engine you select 1 Tap the Go to page icon The Go to page screen will be displayed 2 Tap the Search engine drop down list button and then tap the desired search engine 3 Enter the information you want to search for in the Search field 4 Tap Search or press The search result will be displayed Search fie...

Страница 78: ...io button Deletes the bookmark selected in the bookmark list Edit radio button Displays the Edit Bookmark screen Move radio button Allows you to change the order by dragging the item in the Bookmark list Bookmark list Lists all the addresses you have registered bookmarked Add current page button Tap to register the Web page address currently displayed in the bookmark list New folder button Tap to ...

Страница 79: ...ks screen tap the Go radio button and tap the desired bookmark The selected Web page will be displayed Deleting bookmarks 1 On the Bookmarks screen tap the Del radio button and then tap the desired bookmark A confirmation message appears 2 Tap Yes to delete the bookmark Editing bookmarks 1 On the Bookmarks screen tap the Edit radio button and then tap the bookmark you want to edit The Edit bookmar...

Страница 80: ...een appears 2 Enter the folder title etc 3 Tap OK to save A new folder appears in the bookmark list To open the folder tap the Go radio button and then tap the folder Tap it again to close Note To register or move bookmarks in the folder leave the folder open Saving the current page and viewing it offline 1 Open the page you want to save 2 Tap the Menu icon and then tap Windows to select Window li...

Страница 81: ...Tap the Menu icon and then tap Open local file The screen that lists the saved page file will be displayed 8 Tap the desired file name The file will be displayed Note The pages will be saved in the Internal Flash memory or memory card You can duplicate and delete the file from the Files Home screen Managing the window In Opera Browser you may open multiple windows at the same time although you can...

Страница 82: ... on the Menu bar the active window will be switched Saving the current page 1 On the Window list screen tap Save current The screen for entering the destination and file name appears The Save to field has the default file name 2 If desired modify the file name and then tap the Storage drop down list button to change the destination 3 Tap OK to save the current page Note You can display the saved p...

Страница 83: ...t Full screen to display the window in full screen Closing window s 1 On the Window list screen tap the desired Close button Close current Close others Close all The selected window s will be closed Magnifying or reducing the page 1 Tap the Menu icon and then tap Viewing to select Scale page Or tap and hold the Scale page icon The Scale page screen appears 2 Adjust the slide bar with a stylus or s...

Страница 84: ...e on a PC and the Content column layout is designed for a small display and for more optimized connection 1 Tap the Menu icon and then tap Viewing to select Toggle small screen layout Or tap the Switch layout icon or The page layout switches between normal and small Repeating step 1 toggles the page layout Note The Switch layout icon on the Menu bar switches its design for the selected layout Sear...

Страница 85: ...word field Place the checkmark on the desired Find option 3 Tap Find to start searching If the selection is found it will be highlighted Tap the Find icon or tap the Menu icon and then tap Find next to find the next occurrence Keyword field Enter here the keyword Find icon ...

Страница 86: ... designed for a small display Tapping the Switch layout icon on the Menu bar or also switches these layout modes Popup windows Select to either accept or refuse popup windows or to open them in the background Popups opened in the background will be added to the window list Scrolling mode Select the default to either Grab and move the page will move with the stylus or Scroll with selection the page...

Страница 87: ...Note Once you tap the Apply and Reset buttons they will be dimmed Setting the Security preferences The Security preferences screen manages your certifications and security protocols for accessing the Web pages on the Internet Opera Browser also issues security warning messages You do not need to change the default settings unless you are an advanced user with special needs and technical understand...

Страница 88: ...lay a warning message when you move between the safe and unsafe Web site Enable SSL v2 Tap to enable the SSL v2 option Enable SSL v3 Tap to enable the SSL v3 option Enable TLS 1 0 Tap to enable the TLS 1 0 option Certificates Personal Authorities Personal certificates are used to identify you as the genuine user of your secure Web services while certificate authorities are used to certify a Web se...

Страница 89: ...ent file types 1 Tap the Menu icon and then tap Preferences to select File types The Filetype preferences screen appears 2 Select or enter the necessary items MIME types Select or enter the MIME type you want to assign an action to New MIME types Adds a new MIME type to the drop down list Delete MIME type Deletes a MIME type from the drop down list File extensions Enter the file extension associat...

Страница 90: ...er can display text some kinds of markup languages images and video formats Be sure that Opera Browser can display a certain file type before choosing this setting Ask for file name Opera Browser asks you to enter a name and save the page to the SL 5600 Automatic download Opera Browser downloads and saves the page to the SL 5600 with its original file name Open with other application Opera Browser...

Страница 91: ...ed after the current page H Displays the list of the pages displayed before the current page N Displays the list of the pages displayed after the current page G Displays the Go to page screen B Displays the Bookmarks screen F Displays the Find screen W Displays the Window list screen S Displays the Scale page screen L Switches the layout mode between normal and small P Displays the Preferences Gen...

Страница 92: ...lly when task is completed When sending or receiving e mail messages online the line will not be terminated upon completion To send and receive e mail messages you must Set up the communication method modem card LAN card and network preferences Set up an e mail account in the EMail application Caution Be sure to check that enough memory text message size plus at least 10 KB addition is available b...

Страница 93: ...olders are used for synchronization with a PC E mail messages to be synchronized only are saved in the Synchronization folders Inbox tab Displays received e mail messages Unread messages are displayed in blue Read messages are displayed in black Messages that downloaded titles only are displayed in red Outbox tab Displays unsent e mail messages in red Sent tab Displays sent e mail messages in blac...

Страница 94: ...il icon Send mail icon Get all mails icon New mail icon Inbox Folders tab Delete icon Sort by status button Inbox tab Storage switch button Outbox tab Sent tab Draft Draft tab Double tapping the folder in the tree displays the Index screen for the folder Created account name ...

Страница 95: ...he Outbox Get all mails Receives all e mail messages for all accounts that are saved in the mail server Get mail in Receives the e mail messages in the selected account Send Receive Sends and receives e mail messages for all accounts Cancel transfer Cancels e mail transfer New mail Opens a screen to create a new e mail message Edit mail Opens an existing e mail message to be edited Reply to mail O...

Страница 96: ...x screen See page 107 Show status Selects whether or not to display status at the bottom of the Index screen Filter Creates a filter condition by folder for received e mail messages Search Searches for received e mail messages with search conditions New mailbox Creates a new mailbox folder See page 108 Rename mailbox Renames the created mailbox folder Delete mailbox Deletes the created mailbox fol...

Страница 97: ...ns a screen to create a new e mail message Edit mail Opens an existing e mail message to be edited Reply to mail Opens a reply mail screen for the sender only Reply to all Opens a reply mail screen for all senders and receivers Forward mail Opens a screen to forward the received e mail message Add to Address Book Adds the e mail address of the sender to the Address Book application Set status Chan...

Страница 98: ...ent files you wish to attach to the e mail message Mail menu Send this mail Sends the currently displayed e mail message Put in Outbox Saves the created e mail messages to an Outbox folder Save as Draft Saves the created e mail messages to a Draft folder Refer Address Book Lists the e mail addresses registered in the Address Book application Select the e mail address es from the list Adding Attach...

Страница 99: ...tap New account The New account screen including the Outgoing and Incoming tabs will be displayed 2 Tap the Outgoing tab to set the sending options Account name Enter the account name to be set Your name Enter your name as used in the From field of the e mail message Email Enter your e mail address SMTP server Enter the server name for sending e mail messages SMTP port Enter the server port number...

Страница 100: ...d Enter password used to log into an e mail system Server field Enter name of the server used to receive e mail messages Port field Enter server port number for receiving e mail messages default setting POP3 110 IMAP4 143 Server settings Delete mail checkbox Check if you want to erase e mail messages saved in the server after you have finished downloading messages Skip large emails button Tap to s...

Страница 101: ...e account name on the Folders tab before tapping Editing the e mail account 1 On the Index screen tap the Option menu and then tap the desired account from the Edit account submenu 2 Edit in the same way as you do on the New account screen Deleting an e mail account 1 On the Index screen tap the Option menu and then tap the desired account from the Delete account submenu A confirmation message wil...

Страница 102: ...emory cards into the specified card slots Tap the Storage switch button and select the desired storage before performing step 2 2 Tap The New mail screen for the selected account will be displayed 3 Specify the recipients To select e mail addresses stored in the Address Book Tap the Address Book icon to display the Select recipients screen From the list that appears tap the desired e mail address ...

Страница 103: ...nter multiple e mail addresses repeat the procedure above When you delete the selected e mail address Select the e mail address on top of the Select recipients screen and then tap Delete Note Tap and holding the recipient displayed in the upper part of the screen will display the pop up menu Selecting Edit will display the Recipients entry screen so you may change the address destination between T...

Страница 104: ...y card leave the card in the card slot until you finish transferring the mail 7 When file attachment is finished tap The display returns to the New mail screen 8 Tap to save the new e mail message It will be saved in the Outbox of the e mail account selected in step 1 When you save the e mail as draft Tap the Mail menu and then tap Save as Draft instead of tapping Or tap and then tap Yes on the co...

Страница 105: ...mail message on the Outbox or Draft Index screen the Examine Detail screen displays the contents of the message Sending e mail messages Sending e mail messages 1 In the EMail application tap the Outbox tab 2 Tap the Send mail icon The pop up screen for network connection appears Tap Connect to start connection 3 All unsent e mail messages will be sent The sent e mail messages are saved in the Sent...

Страница 106: ...ing mail transfer Receiving e mail messages Receiving e mail messages from all e mail accounts 1 Tap the Inbox tab 2 Tap the Get all mails icon The pop up screen for network connection appears Tap Connect to start connection The received e mail messages will be displayed on the Inbox Index screen Note Tapping the Mail menu and then tapping Send Receive instead of step 2 allows you to simultaneousl...

Страница 107: ...nly the message title may be downloaded regardless of the Server settings of the same screen See page 94 To save received e mail messages to memory cards insert the memory cards into the specified card slots Tap the Storage switch button before performing step 2 and select the desired storage Please wait until all e mail messages are displayed before exiting the EMail application Downloading e mai...

Страница 108: ... sort folders by tapping the Sort by folder button and sort e mail messages by tapping the Sort by status button All Unread Read You can sort e mail messages by tapping each column button 3 Tap the desired e mail The Examine screen of the received e mail message will be displayed Sort by folder button Storage switch button Sort by status button Column buttons Deletion checkbox ...

Страница 109: ...yed 2 Tap the Attachments icon The Attachment list screen will be displayed 3 Tap the checkbox to select the attached file 4 Tap the Data menu and then tap any of the following to execute Open in Run Opens the attachment with a specified application Pressing returns to the Attachment list screen Save to Internal Flash Saves the attachment to the Internal Flash memory Save to card SD Saves the atta...

Страница 110: ...en tap Reply to mail Or tap the Reply to mail icon and then tap Reply Replying to all recipients and senders Tap the Mail menu and then tap Reply to all Or tap the Reply to mail icon and then tap Reply to all Forwarding an e mail message Tap the Mail menu and then tap Forward mail Or tap the Reply to mail icon and then tap Forward 3 Enter the message and direction etc then tap to save it in the Ou...

Страница 111: ...ou can delete read and sent e mail messages by selecting the Deletion checkbox See page 102 The checked e mail messages will be displayed in gray on the Inbox Sent Index screen You cannot check the Deletion checkbox to delete unread or unsent e mail messages 1 Perform steps 1 through 3 in Deleting an e mail message above 2 Tap the drop down list button and then tap Selected mails 3 Tap Yes to dele...

Страница 112: ... in the Inbox folder before tapping in step 3 only the selected read or unread messages will be deleted Registering the e mail address of the sender in the Address Book application You can register the e mail address of the sender in the Address Book application 1 Open the Examine screen that includes the e mail addresses you want to register in the Address Book application 2 Tap the Mail menu and...

Страница 113: ...n repeat step 1 Changing the view pattern of the Examine screen You can view the e mail message in Text or Rich text format on the Examine screen 1 On the Examine screen tap the View menu and then tap Text view The Examine screen switches between the two formats The Rich text format displays the attachment image file etc followed by the message When the e mail message includes the e mail address o...

Страница 114: ...etween Sent and Unsent Creating a new folder and organizing e mail messages You can organize e mail messages by creating new folders Creating a new mailbox folder 1 Tap the Folders tab 2 Tap the account name for which you want to create a new mailbox folder 3 Tap the Option menu and then tap New mailbox The new mailbox folder will be created for the account and will be named as New mailbox 4 Enter...

Страница 115: ... Inbox Index screen tap the Sort by folder button See page 88 The mailbox folder s of Inbox will be displayed 2 Tap the mailbox folder you want to display The e mail messages in the selected mailbox folder will be displayed Renaming a mailbox folder You can rename a created mailbox folder 1 Tap the Folders tab 2 Tap the desired mailbox folder to be renamed 3 Tap the Option menu and then tap Rename...

Страница 116: ...d then tap Filter The Filter settings screen appears New button Tap to create a new filter Edit button Tap to edit the filter conditions Delete button Tap to delete a filter Execute Filtering button Tap to start filtering received e mail messages to folders that meet the specific conditions Filtering automatically checkbox When checked incoming e mail messages will be automatically saved in the fo...

Страница 117: ...ication to save the created filter settings Resetting or restarting the SL 5600 without closing the EMail application will clear the new filter conditions Folder select drop down list button Tap and select a folder for which you want to make conditions Create folders in advance See page 108 Item Select drop down list button and field Tap the desired item and enter or select the condition for each ...

Страница 118: ...ilter you want to edit 2 Tap Edit The Edit filter screen appears 3 Modify the filter rule 4 Tap to save the modification 5 Tap to close the Filter settings screen 6 Tap to close the EMail application Caution Be sure to carry out step 6 close the EMail application to save the modified filter settings Resetting or restarting the SL 5600 without closing the EMail application will not save the modific...

Страница 119: ...e search function From combobox Searches for e mail messages by the selected or entered sender Recipient combobox Searches for e mail messages by the selected or entered recipient Subject field Searches for e mail messages including character strings entered in the Subject field Body field Searches for e mail messages including character strings entered in the Body field Arrived date option To sea...

Страница 120: ... menu to select Copy Move mail The Copy Move Mail screen appears 3 Select the desired option 4 Tap to save the settings Save option Select one or all e mail messages in the folder Copy Move option Select the option Copy or Move Destination option Select the destination to be duplicated or moved Add Replace option Select whether the e mail message is added or replaced in the destination OK button E...

Страница 121: ... Note Be aware of the volume setting Do not damage your ears Tap on the taskbar and adjust the slider before or during playback When using a headphone you can hear all sounds including screentaps and alarms from the headphone Overview Control Index screen 1 On the Applications Home screen tap the Voice Recorder application icon The Control Index screen appears Stop icon Play icon Rewind icon Forwa...

Страница 122: ... remove memory cards When turned on it may take some time until file names appear if the memory card has a large number of files Preferences Opens a screen to set up the Voice Recorder preferences Help Displays online help Record icon Starts recording Stop icon Stops recording or playback Play icon Plays back the selected file Rewind icon Rewinds for 1 10 of the total playback time by tapping once...

Страница 123: ...e Internal Flash memory it will be saved in the x wav folder within the audio folder The default file will be named as follows recording01 recording02 recording03 If you want to rename the file use the Rename on the File menu The slash period and currency symbols etc cannot be used While playing a file with the Media Player Internet browsing transferring e mail messages or communicating with a PC ...

Страница 124: ... recording 2 Tap or press the SELECT key to stop recording The recorded file will be displayed in the Index Note To prevent launching this function by mistake you can disable it while the power is turned off See page 120 When the power is turned off and the Security function is turned on the passcode has to be entered at power on After that press and hold the Calendar key again Recording is not al...

Страница 125: ... a recorded file 1 In the Index tap the recorded file you want to rename 2 Tap the File menu and then tap Rename The Rename screen will be displayed 3 Modify the current file name 4 Tap to save the new name Note Files cannot be renamed when recording or playing a file Deleting a recorded file 1 In the Index tap the recorded file you want to delete 2 Tap the File menu and then tap Delete A confirma...

Страница 126: ...n rate in voice recording mode using the drop down list button Better sound quality greater kbps reduces total recordable time Input Gain Adjustment slider Adjust the input gain sensitivity of the built in microphone Turn on by Calendar key checkbox When unchecked the SL 5600 will not turn on even if you press and hold the Calendar key To prevent the recording function from launching by mistake un...

Страница 127: ...con The City Time screen will be displayed To change cities 1 Tap the City button you want to change The Select City screen appears Regions are listed in alphabetical order on the left hand side with corresponding city names on the right Time Zone Map City buttons Date and time indicators Magnify button Night zone dark area Daytime zone bright area ...

Страница 128: ...ne map 1 Tap the City button you want to change The Select City screen appears 2 Tap the Go to Zone Map button 3 Tap and drag the stylus anywhere on the Time Zone Map or press to move the focus until the desired city name appears You can magnify the map to find an exact city name location by tapping the Magnify button Tap it again to return the image to the original size 4 When you find it press t...

Страница 129: ...t or resume the stopwatch and tap the Stop button to stop it While the stopwatch is running it displays hour minute and second When it stops a hundredth of a second is also displayed 3 Tap the Reset button to set the time back to zero 4 Tap the Clock mode radio button to return to clock mode Caution While the Stopwatch is running the options Suspend after and Screen saver are disabled Tap the Stop...

Страница 130: ...ld you enter a wrong equation x etc be sure to enter the correct equation after the wrong equation Be sure to tap C CE before performing the next calculation button Changes a positive number to a negative number and vice versa M button Subtracts a number from the memory R CM button Displays the memory s content and tapping it twice clears the memory Conv button Switches the calculation mode betwee...

Страница 131: ...Rate 1 Tap Conv The on screen keyboard changes to the conversion layout 2 Tap C CE 3 Tap Rate R will appear at the left edge of the display area 4 For example when 1 equals 125 yen enter 125 then tap Rate This registers 1 125 yen 5 After setting the rate you can perform conversions below Note When changing an already set rate proceed from Step 2 To return to the normal calculator tap Calc ...

Страница 132: ...dollars For example how many Japanese yen for 15 1 Enter 15 then tap ratemult 1875 will appear in the display area 15 equals 1875 yen Calculating the number of dollars for a certain amount of foreign currency For example how many dollars for 1500 Japanese yen 1 Enter 1500 then tap ratediv 12 will appear in the display area 1500 yen equals 12 ...

Страница 133: ... Note With the following methods you can open the context sensitive help screen of the Help Browser not available for all applications Tap for application help screen Tap the Option menu and then tap Help on the Index screen of applications Bookmarks menu Add Bookmark Adds the current page to the bookmarks Remove from Bookmarks Removes the current page from the saved bookmarks Bookmarks menu Home ...

Страница 134: ...k The title of the page will be registered Once you have registered it the title of the bookmarked page will be displayed in the Bookmarks menu Tap the bookmarked page in the Bookmarks menu to jump to that page Removing bookmarks 1 Tap the Bookmarks menu and select the bookmarked page that you want to remove from the menu The bookmarked page will be displayed 2 Tap the Bookmarks menu and then tap ...

Страница 135: ... Game menu and then New Game to start Tap an intersection on the board to place a stone Tap the Game menu and then Pass to skip a turn Tap the Game menu and then Resign to surrender Tap the Game menu and then Two player option to play against an opponent Mindbreaker Guess the sequence of the colored pegs Start at the bottom Tap and drag colored pegs to the holes in the wood block Tap a peg to remo...

Страница 136: ...Settings menu and then Snap To Position to make cards snap into position Tap the Settings menu and then Turn Three Cards to toggle between turning one or three cards at a time Patience only Snake Make the snake grow longer by eating the mice Press the SELECT key or to start a new game Use to guide the snake onto the mice Do not hit the walls edges or the snake s tail Word Game Use letters to form ...

Страница 137: ...ents then turn on the Execute with root privilege not secure checkbox on its Detail screen The root privilege is executed but the security is not guaranteed After additional software is installed using a software package ipk the package will remain in the Internal Flash memory or memory cards Deleting this package will increase the Internal Flash memory space Even if the software package ipk is de...

Страница 138: ...opy them to the SL 5600 by using this application For details on how to use the Zaurus File Transfer application refer to the online manual Zaurus File Transfer application Installing Packages 1 Copy the software packages ipk to install to the SL 5600 See the section above 2 On the Settings Home screen tap the Add Remove Software application icon The Add Remove Select screen appears 3 On the Add R...

Страница 139: ...installation The installed software icon is listed on the related Home screen and can be launched from there Note Be sure to perform step 7 above to complete installation You can change the order of the installed software icon on the Home screen using the Tab Settings application on the Settings Home Screen To install multiple software packages repeat steps 4 through 6 and then step 7 If an error ...

Страница 140: ... a connection to the Internet before installing software packages via networks See page 168 Index screen for installation via networks 1 On the Add Remove Select screen tap the Install packages via networks button The Index screen for installation via networks appears Upgrade button Updates the package information Server Setting icon Displays the Package Servers screen where you can set up the ser...

Страница 141: ...3 Select the server you want to connect to from the Servers list 4 Tap to connect to the selected server The software packages ipk on the specified Web pages which are on the network will now appear Installing packages via networks Servers list New button Remove button Removes the selected server from the list Server name field URL field Proxy server for connection field Icons intended to be insta...

Страница 142: ... to be installed without opening the Package information screen by tapping the not installed icon If you want to install several packages repeat steps 1 and 2 3 Tap The Select Install Storage screen appears 4 Tap the radio button of the storage Internal Flash CF or SD you want to install the package s and tap to execute the installation The display turns to the Add Remove Select screen 5 Tap to cl...

Страница 143: ...arch icon The Search Packages screen appears 2 Enter a word you want to find then tap Searching starts The Package information screen for packages found will be displayed If multiple matching packages are found the information screen of the first package on the Index screen will be displayed Tapping the Ignore button will display the next matching package information If you tap the display returns...

Страница 144: ...e the focus to the package file you want to uninstall and then tap the Uninstall button The confirmation message appears before the package is uninstalled 3 Tap Yes to uninstall it 4 On the confirmation screen that appears tap OK The uninstalled package disappears from the Index screen 5 Tap twice to close the Add Remove Software application to complete uninstallation The software icon will disapp...

Страница 145: ...Remove button The Package Information screen turns to the Index screen The package is now ready to be removed and the icon on the Index screen turns to Note On the Index screen tap the installed icon you want to remove instead of performing steps 1 and 2 above 3 Tap to execute the removal The Index screen turns to the Add Remove Select screen 4 Tap to close the Add Remove Software application to c...

Страница 146: ...the selected file to the wallpaper Wallpaper select button If the Use Wallpaper checkbox is selected tap to select the desired wallpaper file Shade Text checkbox Select the checkbox to shade the type style of the application names on each Home screen Style drop down list button Select the styles for the graphical display from the list TitleBar drop down list button Select the color of the title ba...

Страница 147: ...elect the desired image file for wallpaper and then tap 4 Tap to save the settings The settings will be effective immediately Note For the dark wallpaper shadow characters are recommended for easier viewing by turning the Shade Text checkbox on Image files of large size or insufficient memory may not complete the wallpaper setting Some image files may not be displayed correctly for wallpaper If yo...

Страница 148: ...gs Home screen tap the Application Key application icon The Set Application Key screen appears 2 Tap each drop down list button to select the desired key 3 Tap to save the settings The settings will be effective immediately Note If you assign the Menu key to other keys it will not be available in each application as the Menu key In this case use the tap operation for menu operation Drop down list ...

Страница 149: ...rocess cannot be carried out if the battery is exhausted Be sure to save current editing data and close all applications before carrying out the backup and restore process Do not press any key tap the screen or remove the expansion memory card during the backup and restore process The passcode entered for security will also be backed up and restored When the storage area in your SL 5600 is less th...

Страница 150: ...ansion memory card containing backup files into the card slot while the SL 5600 turned on 2 On the Settings Home screen tap the Backup Restore application icon The Backup Restore screen appears 3 In the Backup Restore options tap the Restore radio button 4 Tap the destination in the Media option as in step 1 5 Tap the drop down list button and then tap the import file 6 Tap Start The confirmation ...

Страница 151: ... SL 5600 can transfer data with SL 5500 Setting Be sure the IR ports are facing each other and are within 8 inches approximately 20 cm of each other when transferring data by infrared beam Note Avoid using mobile phones near the SL 5600 or exposing the SL 5600 to strong light such as direct sunlight during transmission Otherwise transmission errors may occur causing parts of the transmitted data t...

Страница 152: ...mode consumes more battery power than the Manual receiving mode This is because the IR port is always in receiving mode when the Automatic option is selected Beam receive mode Manual radio button The unit receives data in manual mode In this mode the unit begins receiving data when you tap the Start button Automatic radio button The unit receives data in automatic mode The unit starts receiving da...

Страница 153: ...File menu and then tap Send by beam 4 Receiving Unit The Beam Receive screen turns to the infrared receive screen within a few seconds During data reception the Receiving message appears When the unit is finished receiving data tap the Add button on the Infrared receive screen When a file is received select the destination if memory card is inserted The received data will be added to the specified...

Страница 154: ...ation 1 Tap the Automatic radio button on the Beam Receive screen 2 Perform steps 2 to 4 above of Receiving data in Manual mode to start data transfer Note To cancel sending tap Cancel on the sending screen The approximate time of file transfer is 15 seconds per 100 KB file Notes on data transfer between models SL 5500 and SL 5600 Some entry items are different or do not exist in the same applicat...

Страница 155: ...p the City Time button and set it in the City Time application 3 Tap the Time format drop down list button and tap either 12 hour or 24 hour 4 Tap the up and down arrows on the Hour and Minute spinboxes to set the correct time If you select the 12 hour format in step 3 select AM or PM by tapping the drop down list 5 Tap the Date button and then tap your current date on the mini calendar that appea...

Страница 156: ...t The selected format applies to the Date column displayed on the Index screen of the application etc M D Y example 12 26 03 D M Y example 26 12 03 Y M D example 03 12 26 D M Y example 26 12 03 8 Tap to save the new date and time setting Note To move the focus from steps 2 through 7 press the Tab key as required on the hardware keyboard You can adjust the date from January 1 1970 to December 31 20...

Страница 157: ...esired time On Battery Power Dim light after When checked the frontlight will be dimmed if no operation is performed in the specified time The frontlight will turn on again if you resume operation Light off after When checked the frontlight will turn off if no operation is performed in the specified time The frontlight will turn on again if you resume operation Suspend after The power will turn of...

Страница 158: ...les by the Media Player application During data communication by beam or with a PC While the connection to the Internet is established for browsing and e mail transfer While the Stopwatch of the Clock application is running When the battery power is used and the option Suspend after does not function the Screen saver option will be activated in the specified time for the LCD display protection Whi...

Страница 159: ... screen s contents you may occasionally need to recalibrate 1 On the Settings Home screen tap the Recalibrate application icon The screen will change and show a cross hair the bottom left of the screen 2 Tap the stylus in the center of the cross hair The cross hair will then move to another position 3 Tap the cross hair once again 4 Repeat this process until recalibration automatically finishes ...

Страница 160: ... Guide Note When you have set or changed the passcode on the SL 5600 enter and save the same passcode on the Zaurus Manager screen on your PC Otherwise you will be asked the passcode every time communication between the SL 5600 and your PC is established Zaurus File Transfer Backup Restore Intellisync for Zaurus Qtopia Desktop for Zaurus etc For details see respective online manuals for the applic...

Страница 161: ...r off 1 On the Security Settings screen tap Require passcode at power on checkbox to turn Security setting on 2 Tap on the Security Settings screen to save the setting To turn the Security setting off uncheck the Require passcode at power on option and tap Entering the passcode at startup When the Require passcode at power on checkbox is turned on you need to enter the passcode at startup 1 Enter ...

Страница 162: ...scode will be cleared 2 Enter the new passcode and then tap OK 3 Enter the same passcode again and then tap OK You will return to the Security Settings screen 4 Tap on the Security Settings screen to save the passcode Clearing the passcode 1 Tap the Clear passcode button and then tap ...

Страница 163: ...utting down Overview 1 On the Settings Home screen tap the Shutdown application icon Restart Qtopia button Restarts the Qtopia system Reboot button Resets the SL 5600 The progress bar reaches 100 and then the screen will be changed after approximately 20 seconds Terminate Qtopia button Terminates and then launches the Qtopia system automatically Cancel button Cancels the functions above Restart Qt...

Страница 164: ...ound from the list that appears To hear the assigned sound tap 4 Tap to save the settings Note Startup Sound at startup StartSync Sound for starting synchronization with a PC using the Intellisync for Zaurus or Qtopia Desktop for Zaurus SambaEvent used for additional software ReceivedMail Sound for received e mail Default button Reverts the sound setting to the default setting Sound select drop do...

Страница 165: ...n the Sound Settings screen tap the Select File button 2 On the screen for selecting WAVE files that appears tap the file you want to assign The name of the selected file will be displayed in the File Name field at the bottom of the screen 3 Tap The file will be selected on the Sound Settings screen and displayed in the Sound select drop down list button 4 Tap to save the settings ...

Страница 166: ...s If the memory is almost full the unit may not function properly and display errors may appear in the instances listed below Should such errors occur close any applications currently open or delete files no longer required particularly large volume files such as music video and image files according to the message that appears Errors that can be caused by lack of memory You are unable to create a...

Страница 167: ... you turn the unit off and then on again Alarm setting is not executed Certain other functions may also not operate properly Information on memory fragmentation Edited data will be saved in the memory where the system or application software operates of the SL 5600 Due to accumulated operations memory fragmentation may occur causing a memory shortage warning to be displayed and turning the SL 5600...

Страница 168: ...ach Home screen except the Files Home screen and rearrange the application icons on the Home screens 1 On the Tab Setting screen tap the tab or application to be moved 2 Move it to any position by tapping the Up and Down buttons 3 Tap A confirmation screen will be displayed 4 Tap Yes The new setting will be saved and the display will return to the Home screen Focus Tapping the Tab area or Applicat...

Страница 169: ... screen to select it from the list You can also select the icon by directly entering its name 4 When adding an Application icon tap the Program select button to select the program from the list You can also select a program by directly entering its name 5 Tap on the New Tab or New Application screen to save the newly set tab or icon 6 Tap A confirmation screen is displayed 7 Tap Yes The settings w...

Страница 170: ...button 3 Select Yes on the confirmation screen 4 Tap A confirmation screen will be displayed 5 Tap Yes The settings will be saved and the display will return to the Home screen Note Applications tab and Settings tab cannot be deleted Tab Setting application cannot be edited or deleted Moving an application to another screen 1 On the Tab Setting screen tap the application you want to move 2 Tap the...

Страница 171: ...uration You can return your edited Home screen and application icons back to their initial configuration Added tabs and icons will be left unchanged 1 On the Tab Setting screen tap the Default button 2 On the confirmation screen tap Yes After several seconds the settings will return to their initial configuration and the display will return to the Applications Home screen ...

Страница 172: ...aurus Manager screen on your PC if necessary 3 Tap to save the settings Note If you changed the connection method in this PC Link application also change the setting on the Zaurus Manager screen on your PC into the same method as on the SL 5600 Otherwise communication between the SL 5600 and your PC cannot be performed For details see respective online manuals for the applications Zaurus File Tran...

Страница 173: ...tional extension If USB TCP IP advanced is selected the Hostname and USB IP fields are selectable Do not change the hostname and IP address unless you need to change them Changing the preset values does not allow you to connect with the currently used PC Hostname zaurus IP address 192 168 129 201 ...

Страница 174: ... area network connection using the wireless LAN card The Wizard screen guides you through all setting screens and allows you to complete necessary network settings including EMail settings such as e mail addresses and mail server Without the Wizard screen you will make settings only for Internet connections The EMail settings can be made inside the EMail application 1 On the Settings Home screen t...

Страница 175: ...ructions The network and EMail settings are included Current tab Displays the current connection status depending on the communication device connected The MAC address is also displayed for the wireless LAN Edit menu New Select to create a new setting Edit Select to edit the selected setting Delete Select to delete the selected setting Duplicate Select to create a new setting by using a duplicate ...

Страница 176: ...ea lists the following examples depending on your settings Connection type Connection media Modem type Card modem IR Dial type Tone Pulse Telephone number of ISP IP address Proxy setting Mail settings Set None New button Opens a screen for creating a new connection Copy button Opens a screen for creating a new connection using a duplicate of the current setting in Select Connection Edit button Ope...

Страница 177: ...ion type Make mail setting checkbox Check if you want to set up e mail preferences Next button Moves to the next screen after saving settings made on the current screen Back button Moves to previous screen if available Cancel button Cancels your settings Connection Name field Enter the desired name for the current connection Telephone Number field Enter the telephone number Dial using radio button...

Страница 178: ...Speed drop down list button Tap and select the communication speed Choices are 9600 19200 38400 57600 and 115200 The default setting 115200 is recommended unless you need to change it Hardware flow control checkbox Check to perform hardware flow control default ON Leave it checked unless you need to change it Wait time slider Change the time out for connection by moving the slider if necessary Wai...

Страница 179: ...o password when dialing up Password field Enter the password Dimmed if the Save Password checkbox is unchecked Auto detect name servers checkbox Check if you want to set the DNS address assigned by the server Primary DNS field Enter the primary DNS address Dimmed if the Auto detect name servers is selected Secondary DNS field Enter the secondary DNS address Dimmed if the Auto detect name servers i...

Страница 180: ...No Proxy Select when you do not set a proxy server Set Proxy Select when you set it manually Host HTTP FTP Enter the URL for HTTP FTP proxy server Port HTTP FTP Enter the port number for HTTP FTP proxy server Tap the up or down arrow to change the port number No Proxy for Enter the URL for which the proxy server is not required Proxy drop down list button ...

Страница 181: ...f you want to save the password If checked you need no password to log in to an e mail server Password field Enter the password Dimmed if the Save Password checkbox is unchecked Account Type drop down list button Select the receiving mail server type POP or IMAP POP IMAP server field Enter the receiving mail server name SMTP server field Enter the sending mail server Authentication checkbox If you...

Страница 182: ...een Tapping the Select Connection drop down list button displays the created setting Tap to return to the Network screen The created settings are also displayed in the Network Service list on the Network screen Creating a new LAN Wireless LAN setting 1 On the Internet Setting Wizard screen tap New The New Connection screen appears Register button Connection type radio buttons Make mail setting che...

Страница 183: ...essary tap Back on the following screens to modify settings on the previous screen The first screen appears Connection type radio buttons Select the connection type Make mail setting checkbox Check if you want to set up e mail preferences Next button Moves to the next screen after saving settings made on the current screen Back button Moves to previous screen if available Cancel button Cancels you...

Страница 184: ...hecked the IP address is automatically obtained from the Dynamic Host Configuration Protocol DHCP server IP Address Enter the IP Address if necessary Dimmed if the Obtain IP address Automatically is selected Subnet Mask Enter the subnet mask if necessary Dimmed if the Obtain IP address Automatically is selected Gateway Enter the Gateway address if necessary Dimmed if the Obtain IP address Automati...

Страница 185: ...on key WEP is used for data security for wireless communications Enter the same settings as the access point ESS ID checkbox Uncheck to specify the ESS ID ESS ID field Enter the ESS ID when the ESS ID checkbox is unchecked ESS ID checkbox ESS ID field Key Type drop down list button WEP Key field WEP Key Type radio buttons Authenticationdrop down list button Detail setting button ...

Страница 186: ...h from the following Disabled 40bit 64bit 104bit 128bit WEP key WEP Key Type radio buttons Selects the encryption key format Text or Hex and enter the characters as follows Text 5 characters for 40 bit 64 bit or 13 characters for 104 bit 128 bit Hex 10 characters for 40 bit 64 bit or 26 characters for 104 bit 128 bit The character number necessary for the WEP key is displayed on the left of the ra...

Страница 187: ...step 1 Enter the Email settings No Proxy Select when you do not set a proxy server Set Proxy Select when you set it manually Host HTTP FTP Enter the URL for HTTP FTP proxy server Port HTTP FTP Enter the port number for HTTP FTP proxy server Tap the up or down arrow to change the port number No Proxy for Enter the URL for which the proxy server is not required Proxy drop down list button ...

Страница 188: ... server Password field Enter the password Dimmed if the Save Password checkbox is unchecked Account Type drop down list button Select the receiving mail server type POP or IMAP POP IMAP server field Enter the receiving mail server name SMTP server field Enter the sending mail server Authentication checkbox If your SMTP server needs sending authentication turn this checkbox on Settings button With ...

Страница 189: ...and then tap Register to save the settings The display turns to Internet Setting Wizard screen Tapping the Select Connection drop down list button displays the created setting Tap to return to the Network screen The created settings are also displayed in the Network Service list on the Network screen Register button ...

Страница 190: ...ou can only make settings for Internet connections The EMail settings will be made in the EMail application 1 On the Network screen tap New The Add Network Service screen will be displayed Creating a new Dial up Modem IrDA setting Note Specification of the IP address is not supported 1 On the Add Network Service screen tap Dial up Modem or Dial up IrDA in the Network type list and then tap Add Net...

Страница 191: ...necessary items Name field Enter the desired name for the current connection Username field Enter the username used to establish connection Password field Enter the desired password used to establish connection Phone field Enter the telephone number used to access the Internet Service Provider Name field Username field Password field Phone field Auto detect name servers checkbox Primary DNS field ...

Страница 192: ...pe Tone or Pulse These radio buttons are not displayed for IrDA settings Speed drop down list button Select the communication speed Choices are 9600 19200 38400 57600 and 115200 The default setting 115200 is recommended unless you need to change it Hardware flow control checkbox Check to perform hardware flow control default ON Leave it checked unless you need to change it Wait time slider Change ...

Страница 193: ...Select when you set it manually Host HTTP FTP Enter the URL for HTTP FTP proxy server Port HTTP FTP Enter the port number for HTTP FTP proxy server Tap the up or down arrow to change the port number No Proxy for checkbox Check if you want to use a URL that does not require a proxy server No Proxy for field Enter the URL for which no proxy server is required Dimmed if the No Proxy for checkbox is u...

Страница 194: ...N screen will be displayed consisting of four tabs Account TCP IP DNS and Proxy When the Wireless LAN is selected the Wireless LAN screen will be displayed consisting of six tabs Account Config WEP TCP IP DNS and Proxy 2 Enter the desired name for this connection in the Name field on the Account screen This name is displayed when you tap the Connection Status icon on the taskbar For Wireless LAN s...

Страница 195: ...ed Network Type drop down list button Select the Infrastructure for connection via wireless LAN access point or 802 11 Ad Hoc for ad hoc connection when the ESS ID checkbox is unchecked Channel spinbox Select the desired channel for the Ad Hoc network connection This setting cannot be used if the Infrastructure is selected for the Network Type ESS ID checkbox ESS ID field Network Type drop down li...

Страница 196: ...racters for 40 bit 64 bit or 13 characters for 104 bit 128 bit Hex 10 characters for 40 bit 64 bit or 26 characters for 104 bit 128 bit The character number necessary for the WEP key is displayed on the left of the radio buttons WEP key field Enter the encryption key set in the Key Type section If the Key type is set to Disabled this field is not used Detail Setting button Tap to set several WEP k...

Страница 197: ...tain TCP IP Information Automatically radio button When selected the IP address will be automatically obtained from the Dynamic Host Configuration Protocol DHCP server Specify TCP IP Information radio button When selected specify the following IP address etc IP Address field Input the IP address Subnet Mask field Input the subnet mask if necessary Gateway field Input the Gateway address IP Address...

Страница 198: ... selected the DNS information will be automatically assigned from the server Specify DNS Information radio button When selected specify the following DNS information Primary DNS field Input the primary DNS address Secondary DNS field Input the secondary DNS address Default domain field Input the default domain if necessary No Proxy Select when you do not set a proxy server Set Proxy Select when yo...

Страница 199: ...TP FTP proxy server Port HTTP FTP Enter the port number for HTTP FTP proxy server Tap the up or down arrow to change the port number No Proxy for checkbox Check if you want to use a URL that does not require a proxy server No Proxy for field Enter the URL for which no proxy server is required Dimmed if the No Proxy for checkbox is unchecked Proxy drop down list button ...

Страница 200: ... button and then tap the setting you want to duplicate 2 Tap Copy Without using Wizard 1 On the Network screen tap the setting you want to duplicate 2 Tap the Edit menu and then tap Duplicate The screen for new settings appears including the settings selected in step 1 3 Enter each item using the duplicated settings and save the settings For details on how to edit and save the modifications see th...

Страница 201: ...for network connection appears 3 Tap the drop down list button to select the desired connection if multiple connection are available 4 Tap Connect to start connection If the connection to the network is established the Connection Status icon turns to During wireless communication the Connection Status icon displays signal strength level Blue Excellent Green Good Yellow Average Red Poor If the conn...

Страница 202: ...196 Network Settings Network Note While the connection is established Connect turns to Disconnect in the pop up screen for network connection ...

Страница 203: ...SHARP CORPORATION ...

Отзывы: