1-66
BEFORE USING THE MACHINE
6
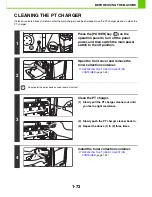
Repeat step 5 with each of the other
main chargers.
There are a total of 4 places to be cleaned in the machine as shown.
7
Replace the charger cleaner in its
original position.
Insert the tip of the charger cleaner in toward the right and then
press down on the end of the charger cleaner. The charger
cleaner will lock into place.
8
Close the main charger cover and rotate
the lock levers in the direction of the
arrows to lock the cover.
☞
REPLACING THE DEVELOPER CARTRIDGE
(page
1-55)
9
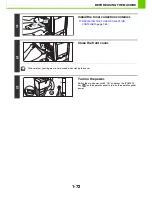
Install the toner collection container.
☞
REPLACING THE TONER COLLECTION
CONTAINER
(page 1-52)
10
Close the front cover.
11
Turn on the power.
Switch the main power switch "ON" and press the [POWER]
key (
) on the operation panel to turn on the operation panel
power.
Main charger
(1)
(2)
(1)
(2)
DATA
Содержание MX-C380P
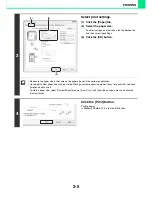
Страница 97: ...2 18 PRINTING 4 Click the Print button Printing begins ...
Страница 256: ...MXC380P EX Z1 Operation Guide MX C380P MODEL ...


