background image

Configuring the SDC 8200 system

104

Note!

The max. number of interpreter consoles per booth has to be
configured via the central unit (see “Setting the max. number of
interpreter consoles per booth” on page 98 and “Half-automatically
initializing all interpreter consoles on the central unit” on page 101).

Displaying the booth and desk number of an interpreter console

To display the booth and desk number of an interpreter console:

Press the MUTE key 

 and keep it pressed.

While keeping the MUTE key pressed, press the “MENU

” or

“MENU

” menu selection key 

.

The booth and desk number of this interpreter console appear on the
display.

Adding interpreter consoles to an existing configuration

To add individual interpreter consoles to an already existing configuration:

From the central unit’s operating menu, choose “

Interpretation

”,

Initialise Units

” and “

Add Unit

” one after the other”.

The red signal light rings


on all interpreter consoles which have not yet

been assigned a booth and desk number start flashing and the
interpreter consoles’ displays show “

01

” for both the booth and the

desk number.

On all interpreter consoles not yet initialized, manually assign the
booth number (see “Manually assigning an interpreter console an
individual booth number” on page 102) and the desk number (see
“Manually assigning an interpreter console an individual desk number
(interpreter console number)” on page 103)

If all booth and desk numbers are assigned correctly, press the ENTER
key on the central unit to save this configuration.
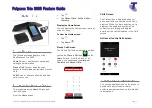
The displays of the interpreter consoles show the languages assigned
to the A-channel and the B-channel and other related information (see
example illustration on the left).

The interpreter consoles are now ready for operation.

Loading the factory-preset default configuration for the interpretation 
system

If necessary, you can load the factory-preset default configuration for the
interpretation system.

Caution!

Loading the factory-preset default configuration will delete all setting
of your current configuration! Your interpretation system then has to
be re-configured to become operational!

Press Mic to confirm

BOOTH

DESK

02

02

01 ENG

02 ARA
00

00

00

00

FLO

FLO

FLO

FLO

Содержание SDC8200

Страница 1: ...Conference System SDC 8200 System Manual...

Страница 2: ...r half a century of accumulated expertise in the design and manufacture of high quality electro acoustic equipment have made Sennheiser a world leading company in this field Please take a few moments...

Страница 3: ...Making a request to speak 28 Turning off the microphone Cancelling a request to speak 32 Adjusting the volume of the headphones connected to a conference console 32 Selecting an interpretation channel...

Страница 4: ...ernal equipment 51 Connecting external audio sources 51 Transmitting the floor channel and the interpretation channels to broadcasting and TV stations 52 Transmitting the floor channel or an interpret...

Страница 5: ...of 1 85 Setting the volume of the consoles built in loudspeakers 86 Configuring the conference system 86 Turning on the central unit for the first time 86 Automatically initializing all conference co...

Страница 6: ...the headphone outputs 108 Configuring the audio outputs for remote conferencing 109 Turning on off an external equalizer 109 Adjusting the input level of an audio input 110 Adjusting the input sensiti...

Страница 7: ...5 cable 123 Appendix A Camera control protocol 124 The syntax of the commands 124 Commands 125 Appendix B Control panel protocol 126 Commands 126 The commands sent by the central unit and received by...

Страница 8: ...materials away from the central units Caution If liquids or small parts which conduct electricity find their way into the interior or to the sockets or plug contacts of the units this can cause a sho...

Страница 9: ...damage The following are sure signs that you have been subjected to excessive noise for too long a time y You can hear ringing or whistling sounds in your ears y You have the impression even for a sh...

Страница 10: ...of connecting an infrared language distribution system SDC stands for Sennheiser Digital Conference System the new generation of mobile and expandable conference and interpretation equipment The SDC...

Страница 11: ...mits every word in excellent audio quality The red signal light ring on the microphone serves as an indicator of who is allowed to take the floor The conference consoles are available in six different...

Страница 12: ...tem and at the same time serves as an interface for additional audio systems Via the operating menu of the SDC 8200 CU central unit the conference and interpretation system can be configured for any r...

Страница 13: ...it the digital audio and status information The software control The optional software control allows a conference manager to control the entire conference via a PC In contrast to controlling the conf...

Страница 14: ...e conference manager to identify the participants who are currently speaking or those who wish to make a contribution by name It is also possible to use the information contained on the chip cards The...

Страница 15: ...well as an interpreter console are available All consoles feature y a built in loudspeaker via which the floor channel is output y a microphone key for activating the microphone y a microphone if the...

Страница 16: ...2 dots for displaying voting options voting results and other important information The interpreter console features y special interpretation functions y a muting function MUTE key y tone controls for...

Страница 17: ...hone output 3 5 mm mono jack socket Loudspeaker Red signal light ring Microphone Microphone active LED Microphone key Request to speak LED Headphone volume control for left headphone output Left headp...

Страница 18: ...RJ 45 Right headphone output 3 5 mm mono jack socket Loudspeaker Priority key Red signal light ring Microphone Microphone active LED Microphone key Request to speak LED NEXT key Left headphone output...

Страница 19: ...jack socket Loudspeaker Red signal light ring Microphone Microphone active LED Microphone key Request to speak LED Channel display with and channel selection keys Headphone volume control for left he...

Страница 20: ...utput 3 5 mm mono jack socket Loudspeaker Priority key Red signal light ring Microphone Microphone active LED Microphone key Request to speak LED NEXT key Channel display with and channel selection ke...

Страница 21: ...ket Loudspeaker Chip card slot Chip card LED and menu selection keys Red signal light ring Microphone Microphone active LED Microphone key Request to speak LED Dot matrix display Channel display with...

Страница 22: ...dspeaker Chip card slot Chip card LED and menu selection keys Priority key Red signal light ring Microphone Microphone active LED Microphone key Request to speak LED Dot matrix display Channel display...

Страница 23: ...d B Channel keys A and B ENGAGED LEDs A and B MESSAGE key MUTE key Red signal light ring Microphone Microphone active LED MIC key Initialized LED RELAY 1 to RELAY 3 keys LS CHAN key Dot matrix display...

Страница 24: ...key Air vents AUX IN 1 audio input XLR 3F AUX IN 2 audio input XLR 3F AUX OUT 1 audio output XLR 3M MASTER OUT socket RJ 45 SLAVE IN socket RJ 45 SLAVE OUT socket RJ 45 DATA OUT socket RJ 45 AUX OUT a...

Страница 25: ...o input XLR 3F AUX IN 2 audio input XLR 3F AUX OUT 1 audio output XLR 3M MASTER OUT socket RJ 45 not connected SLAVE IN socket RJ 45 not connected SLAVE OUT socket RJ 45 not connected DATA OUT socket...

Страница 26: ...the central unit and the SDC 8200 AO functions correctly FLOOR LED lights up if the floor channel is being used DIGITAL BUS OUT socket RJ 45 for connecting an additional analog output unit DIGITAL BU...

Страница 27: ...ables you can y interconnect the conference and interpreter consoles y interconnect up to 10 central units for setting up a large conference and interpretation system y connect an SDC 8200 AO analog o...

Страница 28: ...ptional PC with software control Operating the delegate units Taking the floor Making a request to speak In order to take the floor or make a request to speak you have to press the microphone key Depe...

Страница 29: ...nd the green Request to speak LED on your console starts flashing As soon as the active microphone is turned off the microphone of the first participant from the request to speak list is turned on and...

Страница 30: ...ndicating that you can now take the floor If the speaker limit has been reached you will join the waiting list and the green Request to speak LED on your console starts flashing As soon as one of the...

Страница 31: ...ing on your microphone or ignore your request to speak When the chairman or the conference manager turns on your microphone the red signal light ring and the Microphone active LED on your console ligh...

Страница 32: ...stable and the volume control has no stop At each system start up the volume is automatically reset to a medium level Attention High Volume This is a professional conference system Commercial use is s...

Страница 33: ...an choose between the floor channel and the offered interpretation channels To select an interpretation channel Connect Sennheiser mono headphones to your conference console Press the or channel selec...

Страница 34: ...ntrolled you can y make sure that only authorized delegates can participate in voting sessions y take roll call votes i e you can see the name of each conference participant and his or her voting posi...

Страница 35: ...3 or 1 of 5 by pressing the corresponding key below the display Caution If your conference system comprises conference consoles with 3 and 5 voting keys and you carry out a voting in Vote 1 of 5 mode...

Страница 36: ...election key The first three consoles from which a request to speak has been made are shown on the displays of all conference consoles If you do not use chip cards the microphone numbers are displayed...

Страница 37: ...rade association responsible Sennheiser as the manufacturer is therefore obliged to expressly point out possible health risks arising from use This system is capable of producing sound pressure exceed...

Страница 38: ...iguration of the A channel cannot be changed on the console Setting the channel to be output via the interpreter console s built in loudspeaker To set the channel e g the floor channel or an interpret...

Страница 39: ...o their respective languages Auto floor also choose the B channel The green LEDs indicate the selected channel A or B Make sure that the selected channel is not being used The red ENGAGED LED of the s...

Страница 40: ...formation Turn the jog wheel on the central unit The volume of the consoles built in loudspeaker is increased or reduced The bars on the start display indicate the set volume level Note The conference...

Страница 41: ...h the central unit s operating menu to choose settings and to enter and change values For a complete overview of all menus of the central unit see Introduction to the central unit s operating menu on...

Страница 42: ...ten possible conference modes see Selecting a conference mode on page 89 Note The selection of some of the conference modes only makes sense if your conference and interpretation system is PC controll...

Страница 43: ...f a string are supplied with sufficient voltage see Determining maximum cable lengths on page 46 Connecting cable strings to a central unit Via each of the six ports of the central unit you can connec...

Страница 44: ...s always given for the system cables between the conference consoles However it is no problem to use other cable lengths or cables of differing lengths within the same string To make sure that all con...

Страница 45: ...a single SDC 8200 CU central unit This is the maximum number of consoles that can be connected to a single central unit Calculate the maximum cable length using the Powercalc exe software see Determin...

Страница 46: ...nnecting several central units SDC 8200 CU central unit only on page 54 Calculate the maximum cable length using the Powercalc exe software see Determining maximum cable lengths on page 46 in order to...

Страница 47: ...ese are usually installed in acoustically isolated interpreter booths so that the interpreters cannot disturb each other or the audience One booth with a team of interpreters is normally required per...

Страница 48: ...target language the red signal light ring and the Microphone active LED on their consoles light up Mode between booths Override Interpreters who are seated in different booths but interpret into the...

Страница 49: ...ssing the MIC key The auto floor function If the original floor language is not a language of which all interpreters have a complete understanding and from which they work you can enable the auto rela...

Страница 50: ...ction In this case all interpreters interpret the original floor language into their respective target languages These interpretations are fed to the corresponding interpretation channels The below il...

Страница 51: ...t and that a total of four channels plus the floor channel can be output If you wish to output more channels you require the optional SDC 8200 AO analog output unit Connecting external audio sources V...

Страница 52: ...8200 AO analog output unit connected to the central unit Transmitting the floor channel or an interpretation channel via a PA system Via the central unit s XLR 3M audio output or via an audio output...

Страница 53: ...nterpretation systems with several SDC 8200 CU central units we recommend mounting the central units into a rack Mount the central unit into a 19 rack and fix it to the rack by means of four screws Ca...

Страница 54: ...CU central unit only You can only interconnect SDC 8200 CU central units The length of the system cables between the SDC 8200 CU central units must not exceed 10 m If you wish to interconnect several...

Страница 55: ...he slave mode of a central unit If several SDC 8200 CU central units are interconnected the operating controls of all slave central units are locked except for the F2 function key With the F2 function...

Страница 56: ...channels With the SDC 8200 CU M central unit guests or participants can choose between the floor channel and up to four interpretation channels Optionally you can connect an SDC 8200 AO analog output...

Страница 57: ...ng units etc Via the audio outputs you can connect e g a PA system a recording unit etc Connect the desired unit as follows The signals of the floor channel are available at the XLR 3M audio output AU...

Страница 58: ...0 AO analog output unit s transformer balanced XLR 3M audio outputs or via the unbalanced phono sockets next to the XLR 3 outputs To connect an analog output unit to the SDC 8200 CU central unit Conne...

Страница 59: ...ed from left to right as shown in the illustration on the left If you switch AC loads such as e g an electronic relay the contacts 1 and 3 will be opened or short circuited Therefore make sure that th...

Страница 60: ...to the COM 3 interface of the central unit Connect the other serial interface of the PC to the COM 1 interface of the central unit Note If you are using more than one central unit the PC has to be con...

Страница 61: ...means A cable string is connected to this port means No cable string is connected to this port see section Making a system diagnosis on page 112 To get from the start display into the central unit s o...

Страница 62: ...verview of the settings that can be adjusted in the main and submenus is given on the following pages Volume SDC 8200 Vx xx SDC 8200 Vx xx SDC 8200 Vx xx SDC 8200 Vx xx SDC 8200 Vx xx SDC 8200 Vx xx 1...

Страница 63: ...eaker 1 Volume 3 Loudspeaker ENTER EXIT Loudspeaker ENTER EXIT Conference Volume Press ENTER to Save ENTER ENTER ENTER Loudspeaker Middle 0 dB Press ENTER to Save Loudspeaker 3 Middle Loudspeaker Bass...

Страница 64: ...TER ENTER EXIT ENTER ENTER EXIT ENTER EXIT EXIT 2 Interpretation 5 Chairmen ENTER EXIT ENTER EXIT 3 Loudspeaker 1 Conference SDC 8200 Microphones Middle 0 dB Press ENTER to Save Microphones 3 Middle M...

Страница 65: ...Continue Set Chairmen ENTER ENTER EXIT ENTER ENTER EXIT ENTER EXIT Press ENTER to Save Press ENTER to Save Press ENTER to Save ENTER 4 Microphnones Conference 5 Chairmen EXIT EXIT 7 Initialise Units...

Страница 66: ...ENTER ENTER EXIT ENTER EXIT Add Unit Press ENTER to Save ENTER EXIT ENTER ENTER Manual Init 3 Delete Unit Delete Unit Mic Number 00 Press ENTER to Del ENTER EXIT ENTER Manual Init 4 Reserve Unit Rese...

Страница 67: ...Initialise Units 3 Load Defaults Automatic Init Save initialisation Press ENTER to ENTER EXIT ENTER EXIT Load Defaults Configuration will be overwritten Continue ENTER EXIT ENTER Conference 8 Reset R...

Страница 68: ...Test Tone 2 Level Test Tone Status OFF ENTER ENTER EXIT ENTER EXIT Test Tone Level LOW Test Tone Frequency HIGH ENTER EXIT Test Tone 3 Frequency ENTER EXIT Options 2 Test Units Test Units Status OFF E...

Страница 69: ...2 ENTER ENTER EXIT ENTER EXIT Vote Labels A2 Vote Labels 0 A3 ENTER EXIT Vote Labels 3 0 ENTER EXIT 8 Reset Conference 9 Options EXIT SDC 8200 Vx xx 1 Conference EXIT 2 Interpretation EXIT EXIT EXIT...

Страница 70: ...age Booth Configuration 2 B Channel Booth Configuration Language ENG Press ENTER to Save ENTER ENTER EXIT ENTER EXIT Booth Configuration B Channel 02 Press ENTER to Save Booth Configuration Auto floor...

Страница 71: ...Language Booth Configuration 2 B Channel Booth Configuration Language ENG Press ENTER to Save ENTER ENTER EXIT ENTER EXIT Booth Configuration B Channel 02 Press ENTER to Save Booth Configuration Auto...

Страница 72: ...s of the Interpretation menu part 3 of 5 Load Config 1 Press ENTER to Load ENTER ENTER EXIT 1 Conference Interpretation 1 Configuration SDC 8200 Vx xx 2 Interpretation EXIT 3 Aux In Out 2 Initialise U...

Страница 73: ...nit Press ENTER to Save ENTER ENTER EXIT EXIT Reset Press ENTER to perform Reset ENTER EXIT Add Unit Press ENTER to Save Load Defaults Configuration will be overwritten Continue ENTER EXIT ENTER EXIT...

Страница 74: ...ss ENTER to Save ENTER ENTER EXIT EXIT Max Desks Max Desks 3 Press ENTER to Save Mode between Booths Mode Override Press ENTER to Save ENTER EXIT ENTER EXIT Options 3 Mode between Booths EXIT EXIT 1 C...

Страница 75: ...ess ENTER to Save ENTER ENTER ENTER EXIT EXIT Aux Out 1 Status OFF Press ENTER to Save ENTER EXIT 2 Interpretation 3 Aux In Out EXIT 4 System 2 Aux Out 2 EXIT EXIT ENTER Aux Out 1 2 Volume XLR Aux Out...

Страница 76: ...lume Aux Out 2 2 Channel Aux Out 2 Volume 00 Press ENTER to Save ENTER ENTER EXIT EXIT Aux Out 2 Channel 00 Press ENTER to Save ENTER EXIT 2 Interpretation 1 Aux Out 1 3 Aux In Out EXIT 4 System 3 Aux...

Страница 77: ...lume Aux Out 3 2 Channel Aux Out 3 Volume 00 Press ENTER to Save ENTER ENTER EXIT EXIT Aux Out 3 Channel 00 Press ENTER to Save ENTER EXIT 2 Interpretation 2 Aux Out 2 3 Aux In Out EXIT 4 System 4 Aux...

Страница 78: ...lume Aux Out 4 2 Channel Aux Out 4 Volume 00 Press ENTER to Save ENTER ENTER EXIT EXIT Aux Out 4 Channel 00 Press ENTER to Save ENTER EXIT 2 Interpretation 3 Aux Out 3 3 Aux In Out EXIT 4 System 5 Aux...

Страница 79: ...lume Aux Out 5 2 Channel Aux Out 5 Volume 00 Press ENTER to Save ENTER ENTER EXIT EXIT Aux Out 5 Channel 00 Press ENTER to Save ENTER EXIT 2 Interpretation 4 Aux Out 4 3 Aux In Out EXIT 4 System 6 Aux...

Страница 80: ...to Save ENTER ENTER ENTER EXIT EXIT Aux Out 6 Channel OFF Press ENTER to Save ENTER EXIT 2 Interpretation 3 Aux In Out EXIT 4 System 7 Aux In 1 EXIT EXIT ENTER Aux Out 6 2 Volume Headphone Aux Out 6 V...

Страница 81: ...l Aux In 1 2 Sensitivity Aux In 1 Level 00 Press ENTER to Save ENTER ENTER EXIT EXIT Aux In 1 Sensitivity Low Press ENTER to Save ENTER EXIT 2 Interpretation 6 Aux Out 6 3 Aux In Out EXIT 4 System 8 A...

Страница 82: ...TER ENTER EXIT EXIT Aux In Out 9 External Equalizer ENTER EXIT Aux In 2 Sensitivity Low Press ENTER to Save ENTER EXIT 2 Interpretation 7 Aux In 1 3 Aux In Out EXIT EXIT 4 System EXIT ENTER ENTER Aux...

Страница 83: ...cs 2 Port Errors ENTER ENTER EXIT ENTER EXIT ENTER EXIT System 2 Camera Control Camera Control Status OFF Press ENTER to Save ENTER EXIT ENTER System 3 Control Panel Control Panel Status OFF Press ENT...

Страница 84: ...TER ENTER EXIT EXIT System 5 Version Version xx xx xx x xx ENTER EXIT Loudspeaker Switch Off Yes Press ENTER to Save ENTER EXIT 3 Aux In Out 3 Control Panel 4 System EXIT 5 Language EXIT ENTER ENTER A...

Страница 85: ...ge 1 Choose Language License 1 Serial Number Choose Language English ENTER ENTER EXIT EXIT ENTER EXIT Serial Number xxxxxxxx ENTER EXIT SDC 8200 Vx xx 6 License 4 System License 2 View License View Li...

Страница 86: ...der to assign each console an internal microphone number You can choose between two initialization modes automatic and manual initialization Note Once you have configured your conference and interpret...

Страница 87: ...e factory preset default configuration for the conference system If necessary you can load the factory preset default configuration for the conference system Caution Loading the factory preset default...

Страница 88: ...e number remains flashing Press the ENTER key You can now remove the conference console from the cable string Reserving a microphone number Before initializing the conference consoles you can reserve...

Страница 89: ...rmine the level of control of the chairman y You determine whether the conference participants can take the floor any time or if they have to apply for comments Note By pressing the microphone key of...

Страница 90: ...er the other The current volume setting is shown on the display Choose an new volume setting and press the ENTER key to save your setting To change the bass response From the central unit s operating...

Страница 91: ...is too high the gain must be reduced Limiter Gain From the central unit s operating menu choose Conference Mic rophones and Limiter Gain The current setting in dB is shown on the display Enter the de...

Страница 92: ...onfigure other conference consoles as chairman units From the central unit s operating menu choose Conference Chairmen and Clear Chairman one after the other The text Configuration will be overwritten...

Страница 93: ...he conference system Reset To reset the conference system From the central unit s operating menu choose Conference and Reset one after the other Press the ENTER key The conference system is reset Note...

Страница 94: ...and press the ENTER key If a particpant makes a request to speak the red signal light ring and the green Request to speak LED on his console start flashing To deactivate the flashing of the signal li...

Страница 95: ...The initialization of the interpreter consoles see Half automatically initializing all interpreter consoles on the central unit on page 101 You can save two different interpreter configurations in the...

Страница 96: ...uration Your interpretation system is now ready for operation Modifying the currently active interpreter configuration You can modify the following features of the currently active interpreter configu...

Страница 97: ...consoles on the central unit have already been saved in this interpreter configuration your interpretation system is immediately operational It is therefore not necessary to initialize the interpreter...

Страница 98: ...rom the central unit s operating menu choose Interpretation Options and Max Desks one after the other The current number of interpreter consoles is shown on the display Set the desired number of inter...

Страница 99: ...een the modes Mixed and Toggle Override y Choose Mixed if several interpreters in the same booth interpret into the same language When two interpreters simultaneously interpret into the same language...

Страница 100: ...t the interpreter is able to interpret into a second language the B channel has to be configured to this language Note The second target language must already be configured as the main target language...

Страница 101: ...ich the relay interpretation is to be delivered and press the ENTER key Choose Auto floor and press the ENTER key Choose Yes to enable the auto floor function and press the ENTER key to save this conf...

Страница 102: ...natively you can assign the booth and desk number of an interpreter console individually see Manually assigning an interpreter console an individual booth number on page 102 and Manually assigning an...

Страница 103: ...Initialise Units and Full Init one after the other Press the RELAY 3 key of the desired interpreter console and keep it pressed While keeping the RELAY 3 key pressed press the MENU or MENU menu selec...

Страница 104: ...lashing and the interpreter consoles displays show 01 for both the booth and the desk number On all interpreter consoles not yet initialized manually assign the booth number see Manually assigning an...

Страница 105: ...ecomes effective Configuring the audio inputs and outputs You can connect external audio sources such as a CD player a microphone with preamplifier etc to the central unit s audio inputs Instead of co...

Страница 106: ...ng to the maximum permissible volume which is by law in some countries allowed to affect your hearing for the duration of a working day It is used as a basis according to the specifications of industr...

Страница 107: ...ollowing are sure signs that you have been subjected to excessive noise for too long a time y You can hear ringing or whistling sounds in your ears y You have the impression even for a short time only...

Страница 108: ...itch between the two outputs during a conference the volume can vary Attention High Volume This is a professional conference system Commercial use is subject to the rules and regulations of the trade...

Страница 109: ...sen and press the ENTER key to save your setting Turning on off an external equalizer If you connect an external equalizer to the central unit you have to activate the equalizer via the central unit s...

Страница 110: ...nal e g microphone Adjust the input sensitivity and press the ENTER key to save your setting Configuring the outputs of the SDC 8200 analog output unit You can configure the outputs of the SDC 8200 AO...

Страница 111: ...sing as well as the screw on the front panel with a 2 0 mm Allan key and lift the cover off the unit Leave the two DIP switches in position OFF as shown in the illustration on the left Use a screwdriv...

Страница 112: ...d to the port No cable string is connected to the port If this symbol appears even though a cable string is connected to the port check if the cable string is connected correctly A communications erro...

Страница 113: ...ent sound console with your SDC 8200 conference and interpretation system As soon as all other consoles in the conference room are deactivated the ambient sound console automatically turns on in order...

Страница 114: ...s operating menu choose System Ambient Sound and Aux In one after the other To turn the AUX input signal on choose Switch Off No to turn the AUX input signal off choose Switch Off Yes Press the ENTER...

Страница 115: ...as well as the camera control function Please note that only the SDC 8200 CU central unit can be expanded by purchasing licenses for further languages interpretation channels These licenses see Licen...

Страница 116: ...neously active microphones is set to at least 1 see Setting the speaker limit on page 90 No audio signal can be heard through the consoles built in loudspeakers If no external equalizer is connected M...

Страница 117: ...Software module Mic Management 500978 SDC 8200 S VM Software module Voting Management 500979 SDC 8200 S VD Software module Result Display 500980 SDC 82008200 S IM Software module Interpreter Managemen...

Страница 118: ...5 W Operating temperature 0 to 50 C Standards IEC 849 Housing recyclable ABS Dimensions approx W 150 mm H 80 mm D 185 mm Microphone gooseneck length approx 380 mm Weight approx 570 g Features SDC 820...

Страница 119: ...BS Dimensions approx W 150 mm H 80 mm D 185 mm Microphone gooseneck length approx 380 mm Weight approx 570 g SDC 8200 DC Frequency response 100 14 000 Hz Pick up pattern cardioid Headphone output 3 5...

Страница 120: ...ABS Dimensions approx W 150 mm H 80 mm D 185 mm Microphone gooseneck length approx 380 mm Weight approx 570 g SDC 8200 DV Frequency response 100 14 000 Hz Pick up pattern cardioid Headphone output 3 5...

Страница 121: ...W 150 mm H 80 mm D 185 mm Microphone gooseneck length approx 380 mm Weight approx 590 g SDC 8200 ID Frequency response 100 14 000 Hz Pick up pattern cardioid Headphone output 3 5 mm mono jack socket 1...

Страница 122: ...ency response 100 14 000 Hz THD N 0 5 0 dBu Headphone output Output level max 750 mV at 32 S N max 75 dBA Frequency response 100 14 000 Hz THD N 0 5 0 dBu PC interface COM 1 RS 232 SUB D 9 for interpr...

Страница 123: ...100 14 000 Hz Output level XLR max 0 dBu balanced Output level RCA max 0 dBu unbalanced Output Impedance 80 at 1 kHz S N 77 dBA Operating temperature 0 to 50 C Dimensions 483 19 x 43 2 x 178 mm Weigh...

Страница 124: ...he camera control must be connected to the SDC 8200 CU central unit s COM 2 interface RS 232 connection The settings for the communications port for camera control are Bits per second 19 200 Data bits...

Страница 125: ...ted p00010131 The chairman unit 0001 is deactivated M Mic No 4 CRC 4 A delegate unit is activated M00030110 A delegate unit is activated and it has the microphone number 0003 m Mic No 4 CRC 4 A delega...

Страница 126: ...ontrol panel is to be reset Reset The control panel must be connected to the central unit s COM 2 interface RS 232 connection The settings for the communications port for the control panel are Bits pe...

Страница 127: ...ed 1l0001015E The microphone with the number 0001 is deactivated 1 D Mic No 4 CRC 4 A microphone goes into request 1D00020137 The microphone with the number 0002 goes into request mode E 00 CRC 4 All...

Страница 128: ...es should be connected to the OUT socket It is also possible to connect a cable daisy chain with conference consoles to the central unit and when the cable daisy chain reaches 100 m insert a repeater...

Страница 129: ...lated by non authorised persons or repair stations In the case of a claim under the terms of this guarantee send the device including accessories and sales receipt to the responsible service partner T...

Страница 130: ...Sennheiser electronic GmbH Co KG 30900 Wedemark Germany Phone 49 5130 600 0 Fax 49 5130 600 300 www sennheiser com Printed in Germany Publ 07 06 516540 A01...

Отзывы: