


The Menu
36
Temperature correction: To feed more efficiently, the daily amount of feed can be
adjusted by the sensor temperature. You can enter here directly the values of the data
sheets of the feed producer in % or kg feed per 100 kg fish biomass. These values are used
to automatically correct the daily feed amount (which refers to 16°C) according to the
measured temperature.
Light stimulation: Some fish feeders from SENECT are equipped with LEDs to attract the
fish to the location of the feeder prior to the feeding. You can select in this menu item,
how long before the feeding (turn on time) and how long after feeding (turn off time) the
LEDs should be switched on. Additionally, start-up and end ramps can be defined by the
start-up duration to enable a soft light start.
Calibration: The calibration of the feeder is a necessary step to use all feed-weight related
functions. Catch therefore the feed which comes out of the feeder for 5 and 10 s and
weight it. Type in the weight respectively. Now, you can use the function “Daily feed
amount” and when you adjust the duration of the feeding, you can see directly the feed
weight which corresponds to the duration.
The function “feeder” creates a dynamic submenu where additional features (Time-control –
which are here the feeding times, Output signal, etc.) like previously described can be set.
Hint: If you want to increase the oxygen level prior to feeding, select the output port of the
sensor-control (oxygen dosing valve, etc.) and select the additional function „Time-
controlled“. Use the mode „Output coupling“ with the oxygen dosing plug and set the „turn
on time“.
Time-controlled
You can select under “time-controlled” different methods to control the output temporally:
Timer Table
In the timer table, you can define specific times when the output should be activated.
Choose “+ New Entry” to create a new activation time. Enter therefore the starting time and
duration and press OK to save this entry.
By pressing
, you can delete entries from the list.
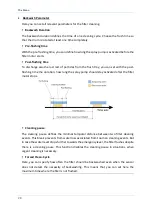
Interval
With the interval function, you can define
time intervals on which the output should
be activated. Enter here the duration of
each event, e.g. always switch on for 5
minutes and the interval between the
events, e.g. every 2 hours.
Interval (e.g. 30 min)
e.g. 10 s)
tim e-axis
Output po rt active
Содержание AQUACULTURE AQC-A1-333-150
Страница 1: ......


