background image

E

n

g

lis

h

E

n

g

lis

h

6

7

  Securing instructions

Anchoring option is for Secure Doc Executive only 
(not applicable for Secure Disc)

Recommendation

We recommend that you:
•  Position the safe as near to the floor as 
  possible in case of outbreak of fire. 
•  Secure your safe with the anchoring bolt
  provided to the floor. This offers the best
  protection against unauthorised removal of
  your safe.

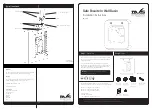
Your safe is equipped with one hole in the bottom. 
Using the fixing set supplied, you can secure the 
safe to the floor. For details, see figure 1.


If you wish to install it on a wooden floor it may be 
desirable to use different fixings to ensure optimum 
fixing strength. Various types of anchor bolts are 
available for use in wood which can give a better 
result that the screws supplied. The choice of 
fixings is largely determined by the thickness and 
type of wood on which the safe is placed.

  What do you need?

To secure the safe you need fixings and tools.

Before starting to secure the safe, check that you
have the following items to hand:
1.  The fixing set supplied.
2.  An electric (hammer) drill. If the base material 
  is concrete, you will need a hammer drill.
3.  The fixing hole in the base material needs to 
  be drilled first. If the base material is concrete 
  or stone, you will need a concrete drill bit. If the
  base material is wood, use wood drill bit. Note:  
  you may therefore require both drill bits, for 
  example if the floor is made of concrete and 
  the wall is wood.
4.  A socket wrench.
5.  A vacuum cleaner to clear the drill holes.
6.  Possibly a hammer.

  Installation instructions

1.  Place the safe in the position you have 
  selected. Before marking or drilling any holes
  ensure that there are no pipes or cables
  present at the fixing points. If there is skirting
  board present at the desired fixing point, this  
  should be removed to allow the safe to be 
  fitted flush to the wall.
2.  Open the safe and remove any shelves and / 
  or trays.
3.  Remove the metal cover with a screwdriver to  
  gain access to the anchoring hole.
4.  Using a pencil or a sharp object, mark out the  
  drill hole.
5.  Close the safe.
6.  Now move the safe to give enough room to 
  drill the fixing hole.
7.  Drill the hole: you will need the concrete drill bit  
  for a concrete base material, and the wood drill 
  bit for a wooden base material.
8.  Clear the drill hole and remove any drilling 
  debris using a vacuum cleaner.
9.  If you have drilled hole in a concrete floor, 
  ensure that the end of the plug is level with the  
  edge of the drill hole. If necessary, use a 
  hammer to insert the plug. The plugs are not  
  used when securing the safe to a wooden 
  floor.
10.Now position the safe so that the fixing holes 
  on safe match the drill holes in the floor.
11.Secure the safe using the fixing screws 
  supplied. Slide the washer over the fixing 
  screw before screwing it into the drill hole. You  
  will need a socket wrench to drive in the screw.
12.You can cover the hole again with the metal  
  cover.

  Maintenance

•  Never throw your keys. Distortion of the key 
  can damage the lock.
•  When closing the door, there should never be  
  anything between the door and the safe (e.g. a  
  paper clip). The bolts must be fully retracted.
•  Do not fill the safe to such an extent that it is  
  hard to close the door. The locking mechanism  
  could then seize up as a result of pressure on  
  the inner plate.
•  Ensure that the key in the door does not hit a  
  wall when opening. This can cause the key to  
  snap, and can damage the locking 
  mechanism.
•  If you find that the lock becomes harder to  
  open or stiffer, never use oil or graphite 
  powder to “lubricate” the lock. This can make  
  the tumblers sticky, which could prevent the  
  lock from opening at all. Your supplier can  
  advise you on the correct cleaning product to  
  use.
•  The outside of your safe can be cleaned with a  
  slightly damp cloth. Never use chemical 
  cleaning agents.

  Troubleshooting

Although your safe has been manufactured with 
the greatest care, a fault may nevertheless occur, 
such as:
•  The locking mechanism does not work
•  You cannot open your safe
•  Faulty lock
•  You lose your key

The most important rule is not to try and force 
anything. The locking mechanism in particular 
is made of precision components which can be 
damaged.

First re-read the manual. If you cannot find a 
solution, contact your supplier.

Figure 1

Содержание SDE-30E

Страница 1: ...ve y Secure Disc Manuel de l utilisateur Coffres forts Secure Doc Executive et Secure Disc Manuale d uso per casseforti Secure Doc Executive e Secure Disc Gebruikershandleiding voor Secure Doc Executi...

Страница 2: ...is equipped with a removable shelf and or tray For Secure Disc Data Media re insert 2 keys only if your safe is equipped with a key lock 4 batteries 1 battery holder only if your safe is equipped wit...

Страница 3: ...ckwise until stop position reached 5 If steps 2 3 and 4 are carried out successfully you can close the door and lock the safe Closing the safe 1 Close the door and keep it gently pressed shut with one...

Страница 4: ...mark out the drill hole 5 Close the safe 6 Now move the safe to give enough room to drill the xing hole 7 Drill the hole you will need the concrete drill bit for a concrete base material and the wood...

Страница 5: ...entum zu sch tzen Wir w nschen Ihnen viele Jahre Sicherheit Was haben Sie erhalten Bitte pr fen Sie sorgf ltig dass Sie die folgenden Teile erhalten haben Wenden Sie sich andernfalls bitte an Ihren Li...

Страница 6: ...llte nur bei ge ffneter T r getestet werden 1 Den W hlknopf gegen den Uhrzeigersinn drehen bis die Stopp Position erreicht ist 2 Die START Taste am Tastenfeld dr cken Im LCD Display erscheint 3 Geben...

Страница 7: ...Schlag Bohrmaschine Falls das Bodenmaterial Beton ist ben tigen Sie eine Schlagbohrmaschine 3 Das Befestigungsloch im Boden muss zun chst gebohrt werden Falls der Boden aus Beton oder Stein besteht be...

Страница 8: ...Garantie fallende Reparaturen und Besuche vor Ort gehen zu Lasten des K ufers Kl ren Sie bitte im Einzelfall vorab mit Ihrem H ndler ob die verlangten Leistungen durch die Garantie gedeckt sind oder n...

Страница 9: ...ans le sens des aiguilles d une montre jusqu la position d arr t 5 Si les tapes 2 3 et 4 sont r alis es avec succ s fermez la porte et verrouillez le coffre Fermeture du coffre 1 Fermez la porte en ex...

Страница 10: ...coffre pour disposer d un espace suf sant pour percer le trou de xation 7 Percez le trou utilisez la m che de perceuse pour b ton pour un mat riau en b ton et la m che de perceuse pour bois pour un ma...

Страница 11: ...iene la informaci n necesaria para el mejor bene cio de su caja fuerte Le aconsejamos leer este manual y con mucha atenci n dado que es para la protecci n de sus objetos de valor Le deseamos muchos a...

Страница 12: ...re el bot n giratorio en el sentido de las agujas del reloj hasta llegar al tope 5 Si lleva a cabo correctamente los pasos 2 3 y 4 puede cerrar la puerta y asegurar la caja fuerte Cierre de la caja fu...

Страница 13: ...Ahora aparte la caja fuerte para tener su ciente espacio para taladrar el agujero de anclaje 7 Taladre el agujero necesitar la broca para hormig n para una base de material de hormig n y la broca para...

Страница 14: ...simo vantaggio dalla cassaforte SecureLine Consigliamo pertanto di leggere attentamente l intero manuale Dopo tutto non si mai troppo attenti quando si tratta di proteggere i propri beni Le auguriamo...

Страница 15: ...guite correttamente possibile chiudere la porta e la cassaforte Chiusura della cassaforte 1 Chiudere la porta e tenerla chiusa con una mano 2 Ruotare la manopola in senso anti orario no all arresto Il...

Страница 16: ...consentire di trapanare il foro per il ssaggio 7 Trapanare il foro utilizzare la punta per calcestruzzo se la base in calcestruzzo e quella per il legno se la base in legno 8 Pulire il foro trapanato...

Страница 17: ...informatie over de wijze waarop u het meest pro jt van uw SecureLine kluis kunt trekken Wij raden u aan de handleiding zorgvuldig en in haar geheel te lezen Men kan nu eenmaal niet te zorgvuldig zijn...

Страница 18: ...cht op en het LCD scherm toont OPEN 4 Draai binnen 3 seconden de draaiknop met de wijzers van de klok mee tot de aanslag 5 Als de punten 2 3 en 4 juist uitgevoerd kan de deur worden gesloten en de klu...

Страница 19: ...eringopening 4 Gebruik een potlood of scherp voorwerp om het gat te markeren 5 Sluit de kluis 6 Verplaats de kluis nu zodanig dat er voldoende ruimte ontstaat om het bevestigingsgat te boren 7 Boor he...

Страница 20: ...mmer att f rhindra att f rem l med h gt affektionsv rde g r f rlorat Den h r manualen inneh ller information som kommer att hj lpa Er att f mesta m jliga beh llning av Ert sk p Vi rekommenderar att Ni...

Страница 21: ...och LCD sk rmen visar OPEN 4 Vrid nummerskivan till stoppl get inom 3 sekunder 5 Om 2 3 och 4 utf rs p r tt s tt kan du st nga d rren och l sa kassask pet St nga sk pet 1 St ng d rren och h ll den st...

Страница 22: ...en penna eller ett vasst f rem l f r att markera borrh let 5 St ng kassask pet 6 Flytta kassask pet tillr ckligt f r att borra f sth let 7 Borra h let du beh ver en betongborr f r grundmaterialet beto...

Страница 23: ...Suositamme ett luet koko k ytt oppaan tarkasti Omaisuutensa suojaamisessa ei voi olla koskaan liian huolellinen Toivotamme turvallisia vuosia eteenp in Mik toimitus sis lt Tarkasta huolellisesti ett o...

Страница 24: ...tunnuslukusi Kuuluu piippaus ja vihre merkkivalo syttyy LCD n yt ss n kyy OPEN 4 K nn kiertonuppia kolmen sekunnin kuluessa my t p iv n niin pitk lle kuin se menee 5 Jos vaiheet 2 3 ja 4 sujuvat ongel...

Страница 25: ...ysreik peitt v metallikansi ruuvitaltalla 4 Merkitse porausreik lyijykyn ll tai ter v ll esineell 5 Sulje kassakaappi 6 Siirr kassakaappi pois kiinnitysreikien porauksen tielt 7 Poraa rei t k yt beton...

Страница 26: ...ksyt vaatimuksia jotka liittyv t kuljetuksessa aiheutuneisiin menetyksiin 6 Takuun piiriin eiv t kuulu paristot eiv tk viat jotka johtuvat v r n j nnitteen omaavien paristojen k yt st 7 Takuu ei anna...

Страница 27: ...PEN 4 3 5 6 7 8 SAFE GOOD 9 1 START 2 3 3 Memory IN 4 1 2 START 3 IN 4 1 2 START 3 OPEN 4 3 5 2 3 4 1 2 y 1 START OPEN 2 3 3 3 Error 3 3 START LOW BAT after pressing the START button alkaline LR6 AM3...

Страница 28: ...n n 54 55 1 1 2 3 4 5 6 1 2 3 4 5 6 7 8 9 10 11 12 1...

Страница 29: ...n 56 1 2 3 4 5 6 7 8 9 10 www Secure Line net...

Отзывы: