background image

• 16 •

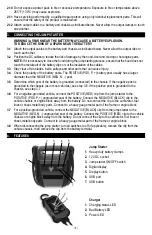
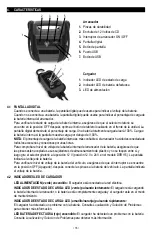
4.  CARACTERÍSTICAS

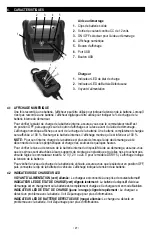
Arrancador

1.  Pinzas de durabilidad
2.  Enchufe de 12 Voltios de CD
3.  Interruptor de arrancador ON / OFF
4.  Pantalla digital
5.  Botón de pantalla
6.  Puerto USB
7.  Botón de USB

1

2

3

4

5

6

7

Cargador

1.  Indicador LED de estado de carga
2.  Indicador LED de batería defectuosa
3.  LED de alimentación

1

2

3

4.1 

PANTALLA DIGITAL

Cuando se conecta a una batería, la pantalla digital puede usarse para indicar el voltaje de la batería. 

Cuando no se conecta a una batería, la pantalla digital puede usarse para indicar el porcentaje de carga de 

la batería interna del arrancador. 

Para verificar el estado de carga de la batería interna, asegúrese de que el selector rotatorio se 

encuntre en la posición OFF después oprima el botón de tablero localizado en el frente de la unidad. La 

pantalla digital demostrará el porcentaje de carga. Una batería totalmente cargada leerá 100%. Cargue 

la batería interna si la pantalla muestra carga por debajo del 100%.

NOTA: El porcentaje de carga de la batería interna es más confiable si el arrancador ha sido desconectada de 

todos los accesorios y conexiones por unas horas.

Para comprobar el nivel de voltaje de la batería interna del arrancador de la batería, asegúrese de que 

las pinzas estén acopladas a sus sujetadores de almacenamiento de plástico y no se toquen entre sí, y 

luego gire el selector giratorio a la posición 12 V (posición 12 V o 24 V en el modelo DSR115). La pantalla 

indicará el voltaje de la batería.

Para verificar el nivel de voltaje de la batería del vehículo, asegúrese de que el interruptor se encuentre 

en la posición OFF (Apagado), después conecte las pinzas a la batería del vehículo. La pantalla indicará 

el voltaje de la batería. 

4.2 

INDICADORES LED DE CARGADOR
LED ALIMENTACIÓN (verde) encendido:
 El cargador está conectado a la red eléctrica.
INDICADOR DE ESTADO DE CARGA: LED (verde) pulsando lentamente: El cargador está cargando 

la batería interna del arrancador, o la batería está completamente cargada y el cargador está en el modo 

de mantenimiento.  
INDICADOR DE ESTADO DE CARGA: LED (amarillo/naranja) pulsando rápidamente:    

El cargador ha detectado un problema con la batería. Consulte Localización y Solución de Problemas 

para obtener más información.
LED BATERÍA DEFECTUOSA (rojo) encendido: El cargador ha detectado un problema con la batería. 

Consulte Localización y Solución de Problemas para obtener más información.
Содержание DSR114

Страница 1: ...ese instructions and precautions carefully POR FAVOR CONSERVE ESTE MANUAL DEL USUARIO Y LEALO ANTES DE CADA USO En este manual le explica c mo utilizar la fuente de poder de manera segura y confiable...

Страница 2: ...STARTER 6 FEATURES 6 CHARGING THE INTERNAL BATTERY OF THE JUMP STARTER 7 OPERATING INSTRUCTIONS 9 MAINTENANCE INSTRUCTIONS 10 MOVING AND STORAGE INSTRUCTIONS 10 TROUBLESHOOTING 10 BEFORE RETURNING FO...

Страница 3: ...STICAS 16 PARA CARGAR LA BATERIA INTERNA DEL ARRANCADOR 17 INSTRUCCIONES DE OPERACI N 18 INSTRUCCIONES DE MANTENIMIENTO 20 INSTRUCCIONES PARA EL MANEJO Y ALMACENAMIENTO 20 LOCALIZACI N Y SOLUCI N DE P...

Страница 4: ...26 CARACT RISTIQUES 27 CHARGEMENT DE LA BATTERIE INTERNE DE L AIDE AU D MARRAGE 28 CONSIGNES D UTILISATION 29 INSTRUCTIONS D ENTRETIEN 30 INSTRUCTIONS DE STOCKAGE ET EMPLACEMENT 31 D PANNAGE 31 AVANT...

Страница 5: ...ONS EACH TIME YOU USE THE POWER PACK b To reduce risk of battery explosion follow these instructions and those published by battery manufacturer and manufacturer of any equipment you intend to use in...

Страница 6: ...ost 3 5 Determine which post of the battery is grounded connected to the chassis If the negative post is grounded to the chassis as in most vehicles see step 3 6 If the positive post is grounded to th...

Страница 7: ...hooting for more information 5 CHARGING THE INTERNAL BATTERY OF THE JUMP STARTER IMPORTANT CHARGE IMMEDIATELYAFTER PURCHASE AFTER EACH USE AND EVERY 30 DAYS TO KEEP THE UNIT S INTERNAL BATTERY FULLY C...

Страница 8: ...ils charging will abort The red Bad Battery LED will light and the yellow orange Charging Status LED will flash Completion of Charge When the internal battery is fully charged the jump starter s displ...

Страница 9: ...for more than five minutes four beeps will sound This is a reminder to turn the jump starter off and or disconnect it from the vehicle s battery when not in use WARNING RISK OF EXPLOSION To prevent s...

Страница 10: ...en not using it to jump start a vehicle 8 3 If the jump starter is moved around the shop or transported to another location take care to avoid prevent damage to the cords clips and jump starter Failur...

Страница 11: ...of progress is detected and battery voltage is below 14 2V The battery s initial voltage is below 12 2V and the total input is less than 1 5Ah The battery voltage drops below 12 2V during Maintain Mod...

Страница 12: ...r repair or replacement to occur Manufacturer does not provide any warranty for any accessories used with this product that are not manufactured by Schumacher Electric Corporation and approved for use...

Страница 13: ...eipt because it will be required for any warranty claims This warranty is not transferable Send warranty card only DO NOT SEND UNIT TO THIS ADDRESS FOR REPAIR Mail this card to Schumacher Electric Cor...

Страница 14: ...podr an comportarse de manera impredecible y provocar un incendio una explosi n o riesgo de lesiones 1 8 No opere el bloque de alimentaci n con un cable o enchufe da ado o un cable de salida da ado 1...

Страница 15: ...asis como se indica a continuaci n Nunca permita que las pinzas de salida entren en contacto entre s 3 CONECTAR EL ARRANCADOR ADVERTENCIA UNA CHISPA PROVOCADA CERCA DE LA BATER A PUEDE CAUSAR LA EXPLO...

Страница 16: ...conexiones por unas horas Para comprobar el nivel de voltaje de la bater a interna del arrancador de la bater a aseg rese de que las pinzas est n acopladas a sus sujetadores de almacenamiento de pl st...

Страница 17: ...bsolutamente necesario El uso de un cable de extensi n incorrecto podr a tener como consecuencia un riesgo de incendio y descargas el ctricas Si es necesario utilizar un cable de extensi n aseg rese d...

Страница 18: ...RGA DEL PUERTO 12V NO CARGAR LA BATER A INTERNA POR M S DE 30 MINUTOS NI DEJAR LA BATER A SIN SUPERVISI N PODR A EXPLOTAR Y OCASIONAR DA OS MATERIALES O LESIONES CORPORALES 1 Aseg rese de que el veh c...

Страница 19: ...12 V 2 Tambi n aseg rese de que las pinzas queden sujetas en su lugar 3 Abra la tapa protectora de entrada del aparato de CD en el frente de la unidad 4 Conecte el aparato de 12V de CD en la salida d...

Страница 20: ...r a llegar a causarle da os personales o de inmueble IMPORTANTE No use o almacene la unidad bajo ninguna circustancia en reas donde puede causar da o alguno en caso de que la bater a derrame cido 8 4...

Страница 21: ...iente Controle la posible presencia de fusibles abiertos o disyuntores que suministren energ a al tomacorriente de CA Controle la posible p rida del enchufe perteneciente a los cables de alimentaci n...

Страница 22: ...bater a La bater a puede estar defectuosa Verif quela o reempl cela 10 ANTES DE DEVOLVER A REPARACIONES Si desea obtener m s informaci n sobre la soluci n de problemas p ngase en contacto con el depar...

Страница 23: ...ada es reparado o modificado por personas que nos sean el Fabricante o si esta unidad es revendida a trav s de un vendedor minorista no autorizado El Fabricante no realiza ninguna otra garant a inclui...

Страница 24: ...L como comprobante el cual le otorga todo derecho a cualquier reclamo de garant a Esta garant a no es transferible Envie tarjeta de garant a solamente NO ENV E LA UNIDAD A ESTA DIRECCI N PARA SU REPAR...

Страница 25: ...une personne qualifi e Un remontage incorrect pourrait conduire un incendie ou un danger d lectrocution 1 10 Pour viter le danger de choc lectrique d branchez le bloc d alimentation de la prise de cou...

Страница 26: ...ENT RISQUE DE GAZ EXPLOSIFS UNE TINCELLE PR S DE LA BATTERIE PEUT PROVOQUER UNE EXPLOSION POUR R DUIRE LE RISQUE D UNE TINCELLE PR S DE LA BATTERIE 3 1 Fixez les c bles de sortie la batterie et le ch...

Страница 27: ...is lorsque l aide de d marrage a t d connect de tous les p riph riques et charger les sources de quelques heures Pour v rifier le niveau de tension de la batterie interne du dispositif d aide au d mar...

Страница 28: ...incendie ou de choc lectrique Si vous devez utiliser une rallonge assurez vous que Les broches sur la prise de la rallonge soient du m me nombre de la m me taille et de la m me forme que celles de la...

Страница 29: ...LE DE CHARGE DE PORT 12V NE PAS RECHARGER LA BATTERIE INTERNE DE PLUS DE 30 MINUTES OU LAISSER LA BATTERIE SANS SURVEILLANCE IL POURRAIT EXPLOSER ET PROVOQUER DES DOMMAGES MAT RIELS ET DES BLESSURES 1...

Страница 30: ...n CC et mettre l appareil en 12 V CC sur ON au besoin 5 Si l appareil 12 V CC consomme plus de 15Aou est en court circuit le disjoncteur interne de l aide de d marrage se d clenchera et d connectera l...

Страница 31: ...mp rature a un effet sur toutes les batteries La temp rature id ale de rangement est de 21 C La batterie interne se d chargera perdra de la puissance graduellement avec le temps particuli rement si el...

Страница 32: ...e d un court circuit Faites v rifier la batterie ou remplacez la La capacit de la batterie est trop faible ou la batterie est trop vieille Faites la v rifier ou remplacez la La batterie ne conservera...

Страница 33: ...ris s pour la r paration ou le remplacement de ce produit Fabricant ne fournit aucune garantie concernant les accessoires utilis s avec ce produit qui ne sont pas fabriqu s par Schumacher Electric Cor...

Страница 34: ...ORIGINAL puisqu il sera requis pour une ventuelle r clamation au titre de la garantie Cette garantie n est pas transf rable Envoyer la carte de garantie seulement NE PAS ENVOYER L UNIT CETTE ADRESSE P...

Отзывы: