background image


iv 

1.3  Safety instructions 


  Before  operating  the  appliance,  please  read  this  manual  carefully  and  retain  it  for  further 

reference. 


  Before cleaning the appliance,  it has to be switched off and unplugged from the power  outlet. 

Wipe the appliance with a soft damp cloth.  


  Do not use harsh cleansers or aerosols for cleaning. The type label may not be replaced. 


  Do  not  use  attachments  unless  recommended  by  the  manufacturer  as  they  may  affect  the 

functionality of the appliance and result in the risk of fire, electric shock or injury.   


  Never install the appliance in areas exposed to water or other liquids. 


  The appliance has to be installed in a safe and stable location according to the instructions of 

the manufacturer. Care should be used when moving heavy equipment. Quick stops, excessive 

force,  and  uneven  surfaces  may  cause the  appliance  to fall  causing  serious  injury  to  persons 

and damage to objects. 


  Openings in the appliance, if any, are provided for ventilation to ensure reliable operation of the 

appliance and to protect if from overheating. These openings must not be covered or blocked. 

Please make sure that the appliance does not overheat. 


  The appliance should only be operated from the type of power source indicated on the marking 

label. If you are not sure of the type of power supplied at the installation location, please contact 

your local dealer.  


  An appliance which is powered through a polarized plug (a plug with one blade wider than the 

other)  will  fit  into the  power  outlet  only  one  way. This  is  a  safety feature.  If  you  are  unable to 

insert  the  plug  into  the  outlet,  try  reversing  the  plug.  Do  not  defeat  the  safety  purpose  of  the 

polarized plug.  


  If the appliance is powered through a grounding-type plug, the plug will only fit into a grounding-

type  power  outlet.  This  is  a  safety  feature.  If  your  outlet  does  not  have  the  grounding  plug 

receptacle, contact your local electrician.  


Содержание SNC-CPR-01

Страница 1: ...Version 1 0cko 0117 engl SANTEC IP CAMERA FOR CAR PLATE RECOGNITION Model SNC CPR 01 User Manual...

Страница 2: ...mprint All rights reserved This publication may not be reproduced stored in a retrieval system or transmitted in any form or by any means electronic mechanical photocopying recording or otherwise with...

Страница 3: ...4 1 First Time Log in 1 4 2 Non first Time Login 3 4 3 System Menu 3 5 Preview 4 5 1 Video Bit Stream Bar 5 5 2 Preview Window Switch 5 5 3 Common Function Bar 7 5 4 Monitor Window Switch 8 6 Query 9...

Страница 4: ...larm 38 7 4 2 Abnormity 38 7 5 Storage 41 7 5 1 Point 41 7 5 2 Local 41 7 5 3 FTP 42 7 5 4 Client 43 7 5 5 Path 43 7 6 System 44 7 6 1 General 44 7 6 2 Account 45 7 6 3 Default 49 7 6 4 Import Export...

Страница 5: ...literature accompanying the appliance 1 2 1 CE compliance This appliance complies with the CE guidelines If you require an EC Declaration of Conformity for this device please send a request to support...

Страница 6: ...using serious injury to persons and damage to objects Openings in the appliance if any are provided for ventilation to ensure reliable operation of the appliance and to protect if from overheating The...

Страница 7: ...yourself as opening or removing covers may expose you to dangerous voltage or other hazards Refer all servicing to qualified service personnel When replacement parts are required be sure that the serv...

Страница 8: ...lations on waste if you need to dispose of discarded appliances This symbol means that electrical appliances need to be disposed of properly and not simply with unsorted household refuse Please respec...

Страница 9: ...notice Before operating the appliance please read this manual carefully and retain it for further reference Verify that all appliance items are included in the delivery Should items be missing do not...

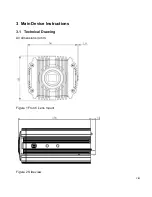
Страница 10: ...viii 3 Main Device Instructions 3 1 Technical Drawing All dimensions in mm Figure 1 Front Lens mount Figure 2 Side view...

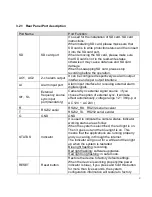
Страница 11: ...ix 3 2 Rear Panel Figure 3 Rear Panel...

Страница 12: ...rnal signal source if you choose the option of external sync it will take effect automatically voltage range 12 36Vp p or AC 12V AC 24V R RS232 serial RS232_RX RS232 serial receiver T RS232_TX RS232 s...

Страница 13: ...o signal detectors vehicle detector and so on B2 RS485_B2 port It can be connected to signal detectors vehicle detector and so on G GND When customers use the device please connect the interface to th...

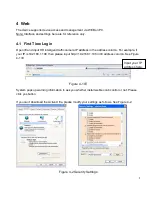
Страница 14: ...the address column For example if your IP is 192 168 1 108 then please input http 192 168 1 108 in IE address column See Figure 4 1 IE Figure 4 1 IE System pops up warning information to ask you whet...

Страница 15: ...change password and click OK Note For security reasons please modify your password after you first login You can go to Setup System Account User Name to change password of default users Figure 4 3 Lo...

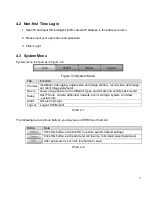
Страница 16: ...age set client image parameter Query Query image and record in different types watermark and vehicle pass record Setup Set ITC rule camera attributed network event storage system and view system info...

Страница 17: ...e you can view live video image snapshot record and etc See Figure 5 1 Figure 5 1 Live There are five sections Section 1 Video bit stream bar Section 2 Preview window switch Section 3 Common function...

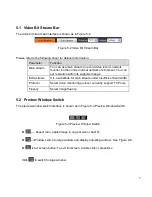
Страница 18: ...ted range Extra stream It is a substitute for main stream under insufficient band width Protocol Select video monitoring protocol currently support TCP only Fluency Select image fluency 5 2 Preview Wi...

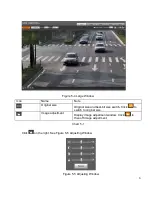
Страница 19: ...size Original size and best bit size switch Click to switch to original size Image adjustment Display image adjustment window Click to then off image adjustment Chart 5 1 Click on the right See Figure...

Страница 20: ...saturation to system default values 5 3 Common Function Bar The common function bar interface is shown as in Figure 5 6 Figure 5 6 Common Function Bar Please refer to the following sheet for detailed...

Страница 21: ...Snapshot Click it snapshot picture from video stream and save to set path Record Click it to start recording Click to stop recording Chart 5 2 5 4 Monitor Window Switch The monitor window switch inte...

Страница 22: ...ture click Open to preview Figure 6 1 SD Picture Query Parameter Note Start Time Set picture query start time End Time Set picture query end time Event Type Query all pictures or filter picture by eve...

Страница 23: ...me and naming method Select download picture by file or by time Figure 6 2 Parameter Note Download Time Create time when picture is downloaded on PC picture attribute time is PC time Snap time when pi...

Страница 24: ...e check whether picture has been modified via watermark Figure 6 3 Step 1 Click Open Local select folder of picture you want to verify Step 2 Select picture Step 3 Click Water Verify see results in li...

Страница 25: ...ord path click Open to view record Icon Name Note play pause When it shows means pause or play record After you click it switches to normal playing status When it shows means it is playing record Afte...

Страница 26: ...Camera Video and set watermark content Default watermark is DigitalCCTV Select Query Record Query Water Mark system shows progress of verifying and normal watermark See Figure 6 5 Figure 6 5 Step 1 Cl...

Страница 27: ...1 ITC 7 1 1 Lane Property Figure 6 7 1 2 Traffic Flow You can setup the expected period of traffic to optimize the algorithm The sum of vehicles in period should be set for the numbers of lanes you s...

Страница 28: ...tion Parameter Note Work mode Auto Mix Video Coil Radar Video Manual Coil force to coil snapshot Video force to video snapshot Mix mode force to combine coil and video snapshot Speed Adjust Set max sp...

Страница 29: ...16...

Страница 30: ...gger mode No trigger not trigger snapshot Rise edge trigger snapshot when vehicle exits coil Drop edge trigger snapshot when vehicle enters coil Step 3 Select scheme Single_in1 snap_nospeed Double_in1...

Страница 31: ...18 7 1 4 2 Radar Enable Radar and configureate the COM SET based on Radar Types setup Figure 10 Intelligent Radar...

Страница 32: ...s taken Step 5 Set expected Direction of vehicle movement Step 6 Save and test settings Notes To modify setup press Redraw or Edit Take time to do and test the setup at day and nighttime to get the be...

Страница 33: ...20 7 1 4 3 2 Video Analysis Speed Measuring Figure 12 Intelligent Video Analyse Speed Measuring Set distances and height as exactly as possible to get a good result...

Страница 34: ...rmation Parameter Function Vehicle Sign Select this parameter it can recognize vehicle LOGO Vehicle Type Detect vehicle size SunShade Detect Detect sun shade CarSeries Detect Detect car series DriverF...

Страница 35: ...Mode Head Mode Tail Mode Head Prior Mode Tail Prior Mode 7 1 4 3 4 Intelligent Analyse Video Analyse Advance Config Figure 7 14 Parameter Note YellowPlateLetter Allows to recognize yellow plate letter...

Страница 36: ...tion Set OSD font Step 3 Set channel title and location a Select channel title b Check Turn on c Input channel name d Use the mouse to drag the yellow box or change the regional point coordinates sele...

Страница 37: ...s include time driveways name week location speed license plate illegal code and other information Select Setup ITC OST Config Snap PSD See Figure 7 16 Figure 7 16 Select any region in video and drag...

Страница 38: ...ps Click Suggest Overlay to quickly set common overlay mode Parameter Note Insert Front Back OSD option to adjust the order selected between Modify All selected OSD information state by turns you can...

Страница 39: ...nable NO light according to time or brightness Light Brightness Set light brightness range 0 20 Light Arr Mark On light group there are 3 groups for selection Auto Mode When work mode is auto select N...

Страница 40: ...ttings Note You cannot restore IP address and other network info Figure 7 19 Intelligence Default 7 2 Camera 7 2 1 Attribute 7 2 1 1 General The general interface is shown as in Figure 7 20 Here you c...

Страница 41: ...rast is insufficient you may adjust this value Recommended value is 40 60 within 0 100 range Hue The value adjusts hue of image Default value is 50 It will not affect image brightness It has a relativ...

Страница 42: ...information Parameter Function Shutter mode Select single shutter Video Tridim 3D Denoise Check Enable to enable 3D NR Scene mode Select device scene mode to adjust video to best effect Sharpness Sets...

Страница 43: ...o and manual You can set manual exposure mode as 1 50 1 10000 You may also customize Gain mode Auto gain if you set it to 20 auto gain will be 20 Fixed gain if you set it to 20 gain will be 20 Scene m...

Страница 44: ...ttings By verifying watermark character you may check if record is edited Check front box to enable function Default watermark character is DigitalCCTV Only number letter and underline are supported m...

Страница 45: ...redetermined time period Trigger snap works at time of motion detect privacy masking and relay activation Note This device does not support this function Pic size Be consistent with main stream resolu...

Страница 46: ...In the video drag mouse left key to set interest area which is shown as yellow box Note You can set up to 3 interest areas at the same time Please refer to the following sheet for log parameter infor...

Страница 47: ...odels support dual Ethernet ports so do not set the two ports in the same segment Figure 7 25 TCP IP Please refer to the following sheet for log parameter information Parameter Function Host name Set...

Страница 48: ...resses both can be accessed IP address Input new IP address to edit and set subnet mask and default gateway Preferred DNS DNS server IP address Alternate DNS DNS server alternate IP address 7 3 2 ONVI...

Страница 49: ...the IP address of the user to log in and ban the IP address blacklist users log device Supports adding IP or IP range See Figure 7 27 For example to add IP into trusted list Step 1 Select Setup Netwo...

Страница 50: ...informs you it has been successfully saved In Trusted list tab you can Click to modify existing IP address or IP segment Click to delete existing IP address or IP segment Click to clear all IP address...

Страница 51: ...hown as in Figure 7 30 Relay out Figure 7 30 Relay out Step 1 Click 1 or 2 to set 1 ch alarm channel output Step 2 Click Trigger to output alarm output signal Step 3 Click Refresh to search alarm outp...

Страница 52: ...39 Figure 7 32 SC Space Lack Figure 7 33 SC Error Figure 7 34 Disconnection...

Страница 53: ...nformation Parameter Function Enable Check box to enable this function Relay out When alarm occurs set corresponding relay out You must enable this function first Relay out delay Alarm will continue f...

Страница 54: ...41 7 5 Storage 7 5 1 Point Set snapshot storage position Figure 7 36 Point 7 5 2 Local Figure 7 37 Local...

Страница 55: ...restored after the network upload to the FTP server or platform Enable Enable the FTP server storage point Server IP The IP address of the FTP server Encode Mode Picture naming for the Chinese charac...

Страница 56: ...43 7 5 4 Client Figure 7 39 Client It supports upload by IP address or MAC address Max support two clients 7 5 5 Path Figure 7 40 Path...

Страница 57: ...e and then close IE When you log in again system language will change Video standard Display device video standard such as PAL Machine Group Input device group Machine Address Input snapshot address o...

Страница 58: ...stem time DST enable Set DST may by date or week Setup becomes effective immediately Synchronize With NTP Check to sync with NTP NTP server Set NTP server address Port Set NTP port no Time zone Set de...

Страница 59: ...ult there are three users admin 888888 and 666666 Their passwords are the same as corresponding username Admin and 888888 are admin account by default while 666666 is user account which has monitor ri...

Страница 60: ...odify password Input current password and then input new password Click on save Password supports 0 15 characters including letter and number only Note You cannot modify right of the logged in account...

Страница 61: ...d delete group and modify group password The system supports up to 8 user groups Figure 7 45 Group Add group Add user within group and set group right Enter add group interface and input group name se...

Страница 62: ...shown as in Figure 7 47 Modify Group Figure 7 47 Modify Group Note You cannot delete admin and user groups You cannot delete group which contains currently logged in user 7 6 3 Default The default in...

Страница 63: ...9 Import Export Please refer to the following sheet for log parameter information Parameter Function Export Export system config to local Import Import local config to system Step 1 Click Import Expor...

Страница 64: ...in time periods Click on save to make setup effective 7 6 6 Upgrade When system upgrades you shall select firmware file Firmware file ends in bin Please maintain stable power supply connection and do...

Страница 65: ...Information 7 7 1 Version The version interface is shown as in Figure 7 52 Version Figure 7 52 Version Here displays device type software version and soft build time All info here subject to actual co...

Страница 66: ...to search End time Set end time of log to search Type Log type includes system config data event record account and clear all log Search In dropdown list select log type and set start end time Click o...

Страница 67: ...54 7 7 3 Online User The online user interface is shown as in Figure 7 54 Online User Here displays online user and their group IP address and login time Figure 7 54 Online User...

Страница 68: ...isk Full When disk is full it triggers alarm Disk Error When disk has error it triggers alarm No Disk When there is no disk it triggers alarm Operation Listen Alarm Alarm type subscribed on device whe...

Страница 69: ...difference may be found in the user interface All the designs and software here are subject to change without prior written notice All trademarks and registered trademarks mentioned are the propertie...

Страница 70: ...57 __________________________________________________________________________ www santec video com Local distributor...

Отзывы: