installation & connection
10_ installation & connection
4.
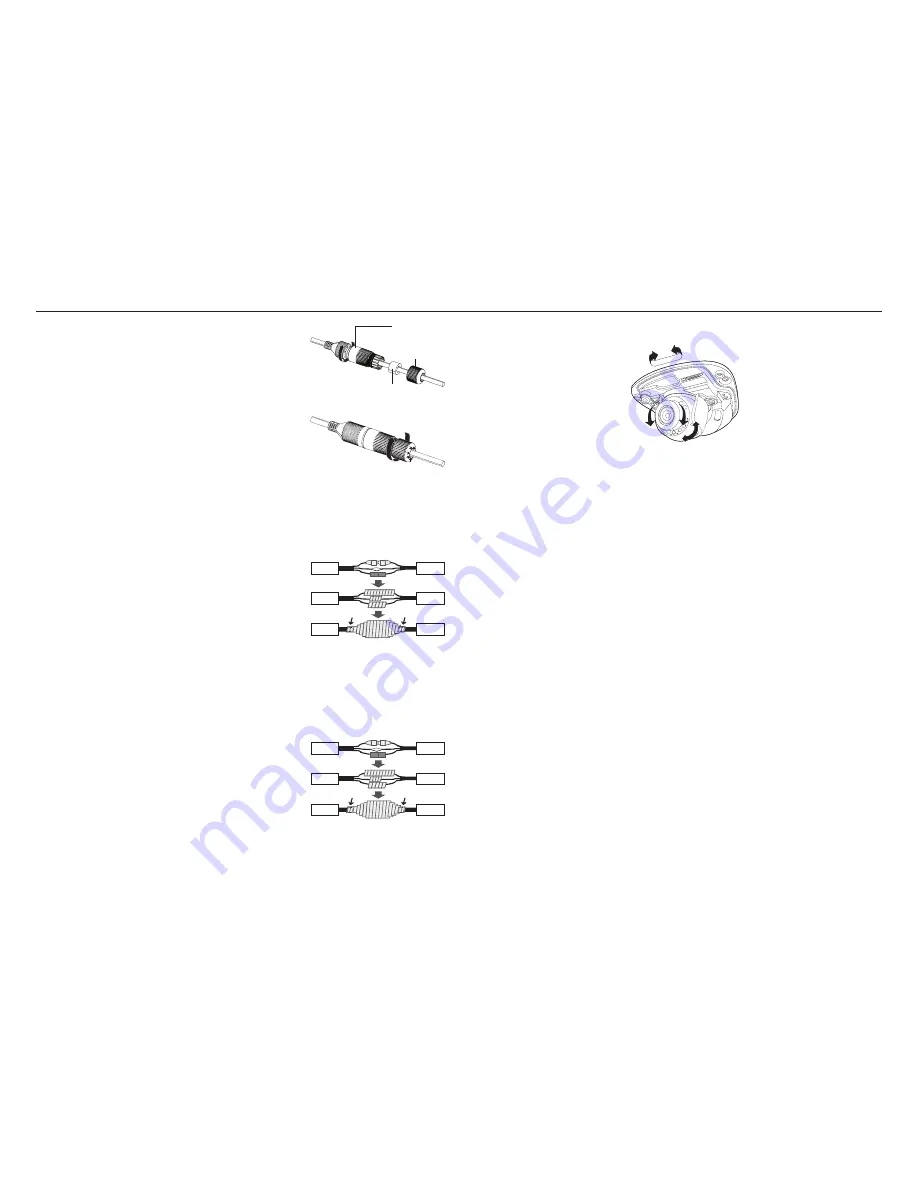
Assemble by rotating the RJ45 modular jack (female) and the RJ45
protection cover clockwise (Follow the arrow).
5.
Assemble by rotating RJ45 protection cover and back cover
clockwise (Follow the arrow).
When the back cover is assembled, the cable waterproof gasket is
tightly attached to the cable to make it waterproof.
J
`
You must fully assemble it to rotate the back cover up to the end of the screw
thread of the RJ45 connector.
outdoor installation (Snv-L6013r)
When you install it outside of the building, please waterproof it with waterproof butyl rubber tape (can be
purchased in stores) so that water does not leak from the gap of the cable connected to the outside.
1.
Connect the power, Audio In, and LAN cables.
2.
Wrap the black cable jacket (Area A) and the cable connection area
with waterproof (butyl rubber) tape so that more than half of the
butyl rubber tape is overlapped.
J
`
If the cable jacket is not waterproofed properly, then it can directly cause
leakage. Make sure to protect the cable with a dense layer of taping.
`
Waterproof butyl tape is made of butyl rubber that can be stretched to twice
its normal length.
outdoor installation (Snv-L6014rm)
As water can leak from the gap of the externally connected cable if you install it outside a building
without using an M12 connector and an M12 cable, you need to use waterproofing butyl rubber tape for
waterproofing as shown below.
1.
Connect the power, Audio I/O, and LAN cables.
2.
Wrap the black cable jacket (Area A) and the cable connection area
with waterproof (butyl rubber) tape so that more than half of the
butyl rubber tape is overlapped.
J
`
If the cable jacket is not waterproofed properly, then it can directly cause
leakage. Make sure to protect the cable with a dense layer of taping.
`
Waterproof butyl tape is made of butyl rubber that can be stretched to twice
its normal length.
Camera
Camera
Camera
System
System
System
A
A
Camera
Camera
Camera
System
System
System
A
A
RJ45 connector
protection cover
Back cover
Cable waterproof
gasket
Adjusting the monitoring direction for the camera
`
Adjusting the monitoring direction
You can adjust the camera direction only when the camera is fixed on the ceiling.
Where, rotating the camera unit to the left or right is called Pan, adjusting the tilt is called Tilt, and turning the
lens on its axis is called Rotation.
- The maximum PAN range is from -5˚ to +5˚.
- The angle of ROTATE is either -90˚ or +90˚.
- The total range of TILT is 67˚.
J
`
Use of the camera at an angle that is out of the specifications may cause reflection by IR or blind image.
`
methods of adjustment
1.
After installing the camera, adjust the panning angle in consideration of the monitoring direction.
2.
Set the horizontal angle so that the image is not reversed.
3.
Adjust the tilt angle so that the camera faces toward the monitoring object.
Pan
Tilt
Lens rotation


