background image

16 Channel DVR

User Manual

SNR-1162

imagine

 the possibilities

Thanks you for purchasing this Samsung product.
To receive a more complete service, please 
register your product at

www.samsung.com/global/register

02093A-SNR-1162-ENG.indb   1

02093A-SNR-1162-ENG.indb   1

2008-11-07   오후 2:30:31

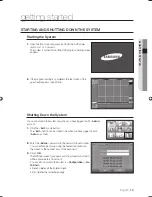
2008-11-07   오후 2:30:31

Содержание SNR-1162

Страница 1: ...Channel DVR User Manual SNR 1162 imagine the possibilities Thanks you for purchasing this Samsung product To receive a more complete service please register your product at www samsung com global register ...

Страница 2: ...uring the period of text recording schedule Search and Play of Recording In SURVEILLANCE mode one channel search Normal search one channel search searches for the latest data from the selected channel Date time search searches for the recording data of the specified date and time Smart search searches for motion in a specified area Recording channel map search searches for recording data with all ...

Страница 3: ...lade or the third prong are provided for your safety if the provided plug does not fit into your outlet consult an electrician for replacement of the obsolete outlet Protect the power cord from being walked on or pinched particularly at plugs convenience receptacles and the point where they exit from the apparatus Only use attachments accessories specified by the manufacturer Use only with the car...

Страница 4: ...ed in this manual If you want to open the case of your system for checking problems please consult the expert from the shop where you bought the product You may download open source codes from the following website www samsungsecurity com Before installing any external device such as external memory or HDD please check the compatibility of the device with Samsung DVR The list of the compatible dev...

Страница 5: ...This product may not work properly if you run right after a long period of storage at a temperature below the guaranteed one When using the device after a long period of storage at low temperature place the product at room temperature for a while and run it Especially for the built in HDD in the product its guaranteed temperature range is 5 C 55 C 41 F 131 F Likewise the hard drive may not work at...

Страница 6: ... 13 13 Starting and Shutting Down the System 14 Logging In and Out 15 Live Screen Main Mode Buttons SURVEILLANCE MODE 16 16 Surveillance Live Mode Screen Layout 17 Camera Information Panel 19 Screen Information Display 20 Setting Screen Layout 24 Controlling a Remote PTZ Camera 27 Controlling Zoom Audio 28 Status Display Bar 29 One Channel Search CONTENTS SEARCH MODE 31 31 Search Mode Screen Layou...

Страница 7: ...er Password Setup 61 System Setup 67 Text Setup 71 Shell Mode 72 Configuration Settings 75 Log Viewer CUSTOM SETUP MODE 76 76 Custom Setup Mode 79 Server to Server BACKUP 85 85 Data Backup PRINTING 87 87 Saving Recording Screen 89 Printing Recording Screen ENDING 90 90 Logout Shutdown APPENDIX 91 91 Product View 92 Troubleshooting FAQ 106 Product Specifications ...

Страница 8: ...8_ overview overview PACKAGE CONTENTS USB DVR User manual Keyboard Power cord Mouse Program CD Rack mount fixing screw and handle HDD fixing screw Audio cable RJ 11 cable ...

Страница 9: ... CD DVD drive Enables reading CD DVD media CD DVD LED Shows CD DVD access operations CD DVD eject button Used to eject a CD DVD from the drive USB ports 2 0 Used to connect USB devices Front side lock Locks the cover to prevent access of unauthorized persons Power switch Used to turn the power on Front side cover Protects the menu button of the product Vents Used to circulate air inside the produc...

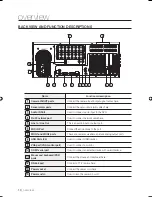
Страница 10: ... audio input or output port MIC IN Port Connect the microphone to the port MON1 and MON2 ports These are camera surveillance picture analog output ports USB Ports 2 0 Used to connect USB devices VGA port VGA monitor port Used to connect a monitor COM1 serial port Used to connect an external device with serial interface Mouse and keyboard PS2 ports Connect the mouse and keyboard here 12 RS 485 port...

Страница 11: ...amp floor power extension cable without ground worn out power cord no safe ground and so on CHECKING INSTALLATION ENVIRONMENT Check installation environment for safe use of the system This system can be installed on a flat table This system must be installed horizontally Do not stand it vertically or diagonally The location of the main body and the power outlet is very important for proper operati...

Страница 12: ...sors and Alarms Connect one of the two lines from the sensor to the ground G and connect the other line to one of the corresponding sensor ports Connect one of the two lines from the alarm to the ground C and connect the other line to one of the corresponding alarm ports 1 2 ...

Страница 13: ...shutdown the system only when you have logged in with Admin account Click the Exit mode button The Exit button can be clicked only when you have logged in with Admin account Enter the Admin password in the password input window You can enter a password using the numeric keyboard on the screen or the numeric keys of the keyboard Click OK The DVR live screen disappears and the system is shutdown wit...

Страница 14: ...et up password and privilege for users in Configuration User Password For security purposes change the password of Admin when you have logged in for the first time In Live Mode you can log into the system with another user account Click the Login Logout mode button from among the main mode buttons Select a user account Click the dropdown menu button Registered users will be listed Select the user ...

Страница 15: ...etup Screen You can change DVR settings and move to shell mode Setup camera schedule alarm communication user password system and text setup are available Backup Screen manual backup You can manually backup recording data onto a CD ROM DVD or removable HDD AVI BMP and JPG Save Screen You can save a found picture as AVI or BMP JPG file The JPG BMP and AVI save screen is available in search mode onl...

Страница 16: ...CD No video signal Network Disconnection None The logo will be displayed Remote PTZ control If you switch a PTZ protocol set camera to one channel screen layout the PTZ control menu will appear Zoom Audio Volume Control You can zoom in or out the picture through the zoom level bar in one channel screen layout When the audio output is set to On you can control the volume with the mouse One Channel ...

Страница 17: ...the External Monitor described above Default setting shows the picture from camera No 1 on the external monitor You cannot set up external monitor for a network camera Sensor folder Shows the connected sensors alarm inputs in the order of the sensor number If the sensor is working the icon will be displayed in red Digital OUT folder Shows the connected D O alarm output devices in the order of the ...

Страница 18: ...VR servers You can also register a DVR server in Custom Setup Server to Server Registering a DVR server Page 79 Operating DVR Server If you click DVR Server the registered DVR servers will be listed Click DVR Server The registered DVR servers are listed Right click over a desired DVR server item Context sensitive pop up menu appears Connect to server connects to the selected DVR server Disconnect ...

Страница 19: ...t recording status NOR Normal recording MOT Motion recording SEN Sensor recording TXT Text recording M S Motion sensor recording M T Motion text recording S T Sensor text recording M S T Motion sensor text recording A Audio recording Motion sensor and text recordings have priority over normal recording You can set normal recording motion recording sensor recording and text recording in Configurati...

Страница 20: ...selected screen layout button is displayed in purple To Set Screen Layout You can select one of 8 screen layouts Pictures are displayed in the layout in the order of camera number 1 Channel 1X1 4 Channels 2X2 9 Channels 3X3 16 Channels 4X4 8 Channels main 1 sub 7 13 Channels main 1 sub 12 10 Channels main 2 sub 8 7 Channels main 3 sub 4 ...

Страница 21: ...tures are automatically switched to the pictures from next cameras in the current screen layout Automatic picture switch in 4 channel screen layout Click the automatic picture switch button or select another screen layout button to stop automatic picture switch You can set automatic picture switch in Etc Layout rotation time For 16 channel 4X4 screen automatic picture switch is not supported User ...

Страница 22: ...tting Camera Layout Users can change the order of cameras A user can save the changed camera layout The other users cannot use the changed camera layout Camera Layout Presets Click a desired screen layout button Click User Screen Setting Click Camera folder in camera information panel Drag and drop a camera over a desired location in the screen The original screen is switched to picture of the cam...

Страница 23: ...g Layouts Select a camera layout name The screen changes to the selected camera layout Click User Screen Layout The screen changes to the screen layout in the order of default camera number You can only select the camera layout that you have set Camera layouts set by other users will not appear Deleting a Layout Select a camera layout name Click Delete The deletion confirmation window appears Clic...

Страница 24: ...t Registration confirmation box Select check box for preset or pattern registration Pattern Registers and moves to auto pattern P run Starts the selected preset number A run Starts the saved pattern Power Turns the camera on or off Light Turns the light on or off Wiper Turns the wiper on or off Aux Auxiliary button It is an extendible button Mouse control You can move PTZ camera using the mouse Sp...

Страница 25: ...elect Registration Confirmation Box Preset setup is disabled and it is switched to normal mode In addition the configured preset is saved Confirming Preset Location Set a PTZ protocol set camera to one channel layout The selected channel camera is switched to one channel layout and the PTZ control menus appear Click a desired preset number The camera moves according to the configured value Startin...

Страница 26: ...trol menus appear Click A run It will move by the configured pattern value Click Aux The pattern operation will stop Controlling the Mouse You can control PTZ using the mouse instead of PAN TILT controller Select a camera Select Mouse control check box If you select the mouse control box the PTZ camera will move according to the movement of the mouse If you change the direction while holding down ...

Страница 27: ...riginal screen layout If you zoom in a network camera the thumbnail picture in the zoom panel will not appear Controlling Audio Select Camera Information Panel Audio Folder select a desired audio channel and then right click over the selected channel You can turn On the audio output only for one channel Set the audio output to On The audio of the channel will be played by the speaker Adjust the au...

Страница 28: ...d to the normal size Close Disconnects the connection with the DVR server Back Up Status Display If the icon is displayed in white Backup is not in process If the icon is displayed in yellow Backup is in process Network Connectivity Display Shows the client and CTMS connection status If the icon is displayed in grey The system is not connected with client or CTMS If the icon is displayed in yellow...

Страница 29: ...in different formats For more information on each menu button refer to the descriptions in Search Mode Search Panel Layout and Functions Page 33 Play Button See the descriptions about the search button in One channel search Play Speed Control You can control play speed in 6 levels Audio Volume Control You can control the audio volume Search Menu Button If you click One channel search button you ca...

Страница 30: ... set to the default value 30 seconds If the latest recording data is 12 30 00 clicking the play button in one channel search plays the recording from 12 29 30 Other Search Menus In the SURVEILLANCE screen click the One channel search button The search menu on the right side is activated Smart Search Select an area in One channel search Then a motion is detected in the specified area the play is st...

Страница 31: ...e structure See Camera Information Panel Page 17 Screen Layout Button Select a layout button in the display window of the search screen You can use the right button in the search screen In the search screen you can select 1 channel 4 channel 9 channel and 16 channel screen layouts In the search screen you can use User Screen Setting One channel search plays a recording in a speed that is closest t...

Страница 32: ...Date Time Zoom Level displayed in one channel screen If there is no recorded video for the section found the DVR logo will be displayed Recording Calendar Shows whether there is a recorded data or backup data for a date in calendar Data Drive Searches for data recorded in the DVR Backup Drive Searches for backup data Zoom Magnifies the selected video You can set the zoom level from 0 54 to 1 66 Se...

Страница 33: ... all channels cameras Text search button Enables search with the text entered in POS or ATM Event search button Enables event search with motion sensor and text recording data The picture actually found may be slightly before the corresponding time Channel Camera Selection Select a camera to be searched in one channel screen layout Map Button Shows 24 hour recording map for the selected camera Sho...

Страница 34: ... Search in the Search menu The thumbnail search screen appears and the recorded video is displayed as panorama pictures Search for Thumbnail picture Search for a thumbnail picture using the play button Continuous play If you click the Play button the recorded video is displayed as panorama pictures Select picture You can select each of the displayed pictures The currently selected picture is marke...

Страница 35: ... slide bar Move the sensitivity control slide bar to the right side to detect smaller motion Set Smart Search Area To perform smart search for the entire area click the entire area To set search area To perform smart search for an area click Add and then drag the mouse over the area to be searched while holding down the mouse button in the smart search screen The specified area is marked with a re...

Страница 36: ...hour recording information on all the channels cameras Select a time to be searched for by using the time bar on the recording map Click Search button The search screen appears and the recorded video appears in the display window of the search screen Click All channel video map in the Search Menu The All channel video map screen appears Select a desired month by specifying the Year and Month The r...

Страница 37: ...rch using the Time Bar Select a time to be searched for by using the time bar Click OK The recorded video of the specified time frame is displayed in the search window Select a desired search screen layout Play the recorded video using the Search button The recorded video of the specified time is played TEXT SEARCH You can search for a recording with the text entered in the POS or ATM Before start...

Страница 38: ...s not include the specified keyword Keyword Enter a keyword to be searched for Click Search Recordings satisfying the search conditions are found and displayed in the display window at the bottom of the screen If you click Clear the entire search result is deleted Double click Recording Data in the search result list window The selected recorded video is displayed as well as the corresponding reco...

Страница 39: ...e event search window appears Specify search options for Event Search Search recording data with the search options Camera number 1 16 All Select all cameras Reset Deselects all cameras Start search From Sets search start point End search To Sets search end point You can determine the order to sort the search result Descend Shows the latest picture first Ascend Shows the oldest picture first Speci...

Страница 40: ...e search button to play the recorded video found Select an event from the search result list Click Save The Save Image screen appears where you can save the picture Click Close The Event search screen is closed and the previous screen is displayed SEARCH WITH DATE TIME You can search for recorded video with date and time Click Search Mode button The search screen appears and the recorded video app...

Страница 41: ... button BACKUP SEARCH In the DVR you can search recording and backup data Click Backup Drive The recording data search mode is switched to backup data search mode Select a backup drive and folder Click OK The backup data image appears in the screen layout selected in the screen display window Select a time frame to be searched using the map and thumbnail in the search panel The map of the search p...

Страница 42: ...sword setup You can register user account and control privilege It is available for Admin user only System setup You can set up environment settings such as event and backup settings POS You can set up text input device such as POS and ATM Go To Shell You can switch to shell mode and set up the system settings It is available for Admin user only Exit You can return to the live screen The save conf...

Страница 43: ...a Camera number A selected camera number is displayed in bold font and the corresponding picture is displayed in the preview window Camera Type If a camera is set as a network camera the colors of the picture may differ from the actual colors None CCD Network Image size Set up the recording resolution of the camera CH 1 4 CH 5 8 CH 9 12 CH 13 16 PAL 360x288 720x288 720x576 NTSC 360x240 720x240 720...

Страница 44: ...TK C675BE VICON V1311RB BBV TX1000 BBV RS422 CRD J6416 SCANDOMEII VRX 2101 VRX 2201 FINE CRR 1600 American Dynamics VCL HRX 1000 HRX 2000 DYSPD 360 VC C50i PTC 102K KALATEL KTS 5000 KZC SPT261 HOSEO T HRX 700 MSD Cyber Scan Cynix CE Series DMP23_H2 TOA TYPE A CBC TYPE A PS TS SERIES Sanyo HSSP PELCO P Protocol PTZ Address Set up PTZ camera address Camera Name You can rename a camera in the camera ...

Страница 45: ...otion detection area in the preview window Set up the motion detection area by dragging the mouse while holding down the mouse button A specified area is marked with a red square with diagonal lines If you click Reset the specified area is deleted When Full region is selected The entire screen is set as motion detection target area The entire screen is marked with a red square with diagonal lines ...

Страница 46: ... cameras Network Camera If you select Network in the Camera Setup you can set up additional options of network camera in the Network Camera tab Enter camera address Camera Address IP address domain name Port default port 60001 ID default value guest Password default value guest Click Detail Setup Then the network camera detail settings window appears Set up network camera detail settings Network c...

Страница 47: ... a desired video quality 0 lowest 100 highest Max Bit Rate Shows the maximum data rate of the camera VBR Variable Bit Rate Bit Rate Shows the data rate of the camera CBR Constant Bit Rate Deinterlace Removes the after image of the shaded area of the picture from the camera Noise Filter Reduces noise in the picture from the camera Watermark Used to prevent video forgery Custom Setup You can check t...

Страница 48: ...TZ Option When an event occurs the camera moves according to the linked preset Select an event type to link to camera preset Available options Motion Set a preset to be linked to motion detection Sensor Set a preset to be linked to a sensor Alarm Set a preset to be linked to an alarm occurrence Select motion sensor and alarm channels to be linked to the preset camera Select a camera to be linked w...

Страница 49: ... beep sound will be generated Motion If a motion is detected the configured beep sound will be generated Sensor If a sensor event occurs the configured beep sound will be generated Select Event Popup option If the event occurs the picture from the camera linked with the event will pop up Other Buttons Beep type Select a desired beep sound Listen in advance You can listen to the selected beep sound...

Страница 50: ...on Determines the speed for motion recording of the camera Sensor Determines the speed for sensor recording of the camera Text Determines the speed for text recording of the camera Encode Mode Determines encoding mode H W MPEG4 Standard encoding mode H W MPEG4 N This encoding mode improves network data rate and video quality but the size of the recording is bigger than that of the standard encodin...

Страница 51: ...You can re configure an existing schedule by dragging over the existing schedule An example of setting schedule on Sunday 00 00 08 00 Normal Recording 08 00 16 00 Normal Motion Sensor Recording 16 00 22 00 Motion Sensor Recording 22 00 24 00 Normal Text Recording Repeat step 2 and step 3 for each day of the week For a day that is manually set as holiday you have to configure the holiday recording ...

Страница 52: ...tton Function Example of holiday list display Add Sets the selected day as holiday 2009 03 15 Monthly add Sets the selected day day of the week of every month as holiday Monthly 15 Yearly add Sets the selected day day of the week of every year as holiday Yearly 03 15 Delete Deletes the selected day from the holiday list Deletes only the selected holiday Delete all Deletes all of the holiday list D...

Страница 53: ...linked with a sensor you have to set up a sensor schedule in Schedule Click Sensor tab Enter the name of each sensor Set linked camera If you click the default value of a linked camera the linked camera setting window will appear All camera Selects all cameras Reset Deselects all the selected cameras Cancel Exit without saving the settings Select a camera to be linked with the sensor You can selec...

Страница 54: ...g values If the sensor is activated the screen is displayed in the selected screen layout Set up the other sensors by repeating Step 2 6 above Alarm Setup You can set up alarms Click Alarm tab Enter the name of each alarm Select input type of each alarm Available options NO Normal Open The alarm is normally in open state and turns to close state if a signal is input NC Normal Close The alarm is no...

Страница 55: ...figuration menu click Communication menu at the right side Basic Settings Set up DVR basic configuration necessary for communication Enter the DVR name in the DVR name field Select Network type Default value is TCP IP In DNS enter the IP address of DNS server or domain name If you click the default value the DNS address is reset Enter a port number Other Buttons Advanced Select network adapter ID ...

Страница 56: ...address IP address Click IP Refresh to refresh the IP address Subnet mask Gateway DVR Keyboard Setup Set system controller connection setting for the DVR Select Use DVR Keyboard option Select the keyboard model Select the keyboard address Select the COM port used to connect with the system controller The DVR keyboard is defaulted to COM2 PTZ Port Setup Select RS 485 port to connect a PTZ camera to...

Страница 57: ...he domain name entered in the DDNS setup You don t have to enter the IP address to connect to the DVR Check Use DDNS Select a DDNS server Using public servers requires subscription to create a new ID and password for domain setup Enter the ID and Password Enter the Domain Name Click Register Domain The entered domain name will be registered with the DDNS server Use the default address that is supp...

Страница 58: ...user Cancel Cancels the settings without saving changes If you click the Add button the button changes to Cancel button Delete Deletes the selected user Registering and Changing Users Enter user name and password User name Enter a user name Password Enter the user password Password confirm Re enter the user password Name modify You can rename the user Password modify You can change the user passwo...

Страница 59: ...egistering a New User Click Add Add a user in the User List Enter a user name Enter the password using the numeric keypad Re enter the password you have entered in step 3 Click Save The user name and password is saved and the privilege for each user appears For a new user basically the user is set as the surveillance screen user Change the privilege of users User Authority Setup You can set up use...

Страница 60: ... user name Click Save The renamed user name will appear in the User List You cannot rename Admin user account Changing a Password Click Password modify Enter a new password Re enter the new password Re enter the password you have entered in step 2 Click Save The password is changed and saved Deleting a Registered User You cannot delete Admin and Guest user accounts Select a user to be deleted from...

Страница 61: ... Remote time sync To use NTP server the DVR must be connected to the Internet Setting NTP Server Click Setting in the Remote time sync field The Remote time sync setting window will open Select Use time sync option Select one of the following NTP server types Using NTP Enter the domain name and the port number of the server Default value 123 DVR Time Server Enter the IP address and the port number...

Страница 62: ...Auto Delete 1 99 days automatically deletes data in specified days When the overwrite option is set to Non Overwrite and the recording is stopped due to disk full if you change the overwrite option to Overwrite the recording will resume If you change the overwrite option from Overwrite to Non Overwrite when the HDD usage display is 100 the warning message shows and the recording will be stopped Dr...

Страница 63: ... changed Drive information Shows the interface with the system motherboard of each drive Automatic Backup Setting If you have set a drive to Autobackup Drive you can select a channel camera to be automatically backed up Setting Automatic Backup Channel In the Drive setting window click Automatic Backup Setting The Automatic Backup Drive Setting window appears Select a drive in the Automatic Backup...

Страница 64: ...IP address field and click Find Shared Folder The folders in the network drive appear Select a folder to be used as Backup Drive or Autobackup Drive Set up a drive for the selected folder Enter user ID and password for network drive connection and click Map Network Drive Click Cancel to finish the network drive setting Drive Letter Shows the drive that is being used for recording 7 x dvr ...

Страница 65: ...n e mail You can turn the function on or off by selecting the event alarm setting tab The e mail electronic mail will provide simple text information only You can set up the e mail address in Communication E Mail address Motion Alarm Setting If a motion is detected the corresponding camera information is sent through CMS and e mail electronic mail CMS On sends event information Off does not send e...

Страница 66: ... an error occurs in the HDD of the power fails the error information is sent through CMS and e mail electronic mail CMS On sends event information Off does not send event information E Mail On sends event information Off does not send event information Time Synchronization Error Alarm Setting If an error occurs in the NTP server the error information is sent through CMS and e mail electronic mail ...

Страница 67: ... to set up input device basic settings in Preset settings Select Use TEXT Device option Select a text input device ID Enter a name for the text input device Select a camera to be linked with the text input device Default value none You can select one or more cameras All camera Selects all cameras Reset Deselects all the cameras Cancel Close the camera selection window without saving the changes Se...

Страница 68: ...od of time Popup the receipt screen Shows the text and the picture from the camera in one screen Email sending Sends the text information through an e mail when a receipt is printed The e mail is sent to the e mail address set in Communication E Mail Address Remote sending Sends the text information through CMS when a receipt is printed Beeping Generates beep sound when a receipt is printed Text I...

Страница 69: ...ngs In the text settings click Port settings Set up port for the communication with the text input device If the settings are not same as those of the text input device the corresponding text information will not be displayed Baud rate Data bit Parity Stop bit Flow control If the setting is completed click OK to finish the setting Click Save The text input device settings are saved Modifying a Reg...

Страница 70: ...linked with the event You can select one or more alarms All Alarm Selects all alarms Reset Deselects all selected alarms OK Saves the settings and exits Cancel Exit without saving the settings If the setting is completed click OK The configured alarm will be displayed Other option settings Set options for the event keyword detection Remote sending If an event text is detected sends the text inform...

Страница 71: ...ing Go To Shell click Exit to save the settings If you switch to Shell mode all recordings will be stopped Icon Name Function description Explorer Enables users to explore and change the files in the storage of the DVR and other storage devices DVR System Returns to DVR mode Configuration Settings Enables setting DVR system environment settings LOG Viewer Shows DVR system log information System Sh...

Страница 72: ... and change the selected font color Register User App You can register a frequently used external program in the Shell mode Select Enable checkbox You can register an external program Enter the name of the program to be registered Default value App1 App5 Select the external program to be registered Select Auto Run checkbox so that the external program is automatically executed when the system star...

Страница 73: ...lick OK to save the settings If you install a UPS in the DVR When the main power fails the UPS supplies power You can secure time to save recording data onto the HDD safely If the UPS power is exhausted the system is shutdown The operations above are recorded in the DVR log Upgrade Click Upgrade The Upgrade window appears Select the program type to be upgraded and click OK Available Option Local S...

Страница 74: ...es the same as that of a normal PC To remove the DVR program enter Admin user password Only Admin user can remove the program To install the DVR program in the normal PC state insert the installation CD ROM into the CD ROM drive and execute Setup exe Control Panel Network Setting You can check and set up network connection Printer Setting Set up the connected printer Date Time Setting When you tur...

Страница 75: ...language Click Apply LOG VIEWER Query condition Specify values for log information search Date Select a date to be searched User name Select a user name Mode Select an operation mode Search Searches for log information with the specified values Other buttons Export Saves the log information on the screen as a file Close Closes the Log Viewer 4 1 2 1 2 3 ...

Страница 76: ... Set up the popup time for a camera linked with an event Available options 1 10 12 14 16 18 20 25 30 Sec Layout rotation time Set the time to show picture for Automatic Picture Switch function Available options 1 10 12 14 16 18 20 25 30 Sec External monitor mode Select external monitor Spot mode Fixed Mode Rotation Mode User Define Mode and Event Spot Mode are available Fixed Mode Shows the select...

Страница 77: ...od of time set in the External monitor rotation time Available options 1 10 12 14 16 18 20 25 30 Sec Skip back time In One channel search the pictures of the previous time frame are played for the period of time that is set in the Skip back time from the last recorded video time Relation Setting Refer to the descriptions in One channel search section Page 29 Available options 30 45 Sec 1 5 Min 10 ...

Страница 78: ...layed on the external monitor and the time to display You cannot select a channel that is set to Network or None in Camera in the Spot Out Setting Set the time to display pictures on the external monitor Click Apply and click OK Other buttons Default Sets the camera order to ascending order and the time to 3 seconds Reset Sets all the channels cameras to Hide X state Close Closes the Spot Out Sett...

Страница 79: ...ick Save The Network address window is closed and the server list including the new DVR will be displayed To register more DVR servers repeat steps 1 3 described above When registering DVR is completed click Close The Server list window is closed and the entered DVR server name appears in the camera information window Modifying Registered DVR Server Select a DVR to be modified from the server list...

Страница 80: ...re listed Select a DVR server to be connected and right click The context sensitive menu appears Click Connect to server The login window appears Enter User name and Password If the connection is established the connected DVR server screen appears The name of connected DVR in the DVR server list is displayed in red color You can connect to up to 4 DVR servers according to the procedures above If m...

Страница 81: ...ntext Sensitive Menu If you right click over a channel camera the context sensitive menu pops up Channel Change Select a channel camera and change the order of the camera Layout Change You can change the screen layout to 1 channel 4 channel 9 channel or 16 channel screen layout To Live You can switch from Search mode to Live mode To Search You can switch from Live mode to Search mode Live Streamin...

Страница 82: ...ts PTZ Control You can control PTZ in 1 channel screen layout Move the PTZ camera to up down left and right directions Set the mouse control speed for PTZ movement and Move to Center Screen Slide the speed control bar to right direction to accelerate the speed Adjust the focus Adjust the zoom Adjust light wiper and other devices PTZ Preset Executes registered preset settings P Run runs registered ...

Страница 83: ...ecording map appears Slide the blue time slide bar to a desired hour of the day You can select a time point using the slide bar It is not supported in 24 hour map Select a desired time point and click Open The recorded video of the selected time will be loaded Play the recorded video Click To Live to switch to Live mode The mode is switched to Live mode Right click over the search channel camera I...

Страница 84: ...ata of the remote DVR to be backed up Select the section to be backed up The size of the backup file for the selection is automatically displayed Select a drive of the media to be used for the backup Shows the free space of the media to be used for the backup Check if the selected backup file is bigger than the free space in the backup media Click Start The backup begins and the backup progress ba...

Страница 85: ... date from the calendar window Select the year and date you want to find To select the year and date select ones from the year and month combo box Red circle Date with recording data Blue circle The currently selected date Select time duration to be backed up from from h to h setting You can select time duration only Default setting is 00 24 J 1 2 backup ...

Страница 86: ...field If no file name is entered the file will be saved with default name DVR Backup _ Year Month Day _ Recording Duration Click Start If the backup begins backup progress is displayed If the backup is complete the backup completion window is displayed Backup using CD DVD File Shows CD DVD writing session progress status Total Shows the writing progress status of all data backup files Backup using...

Страница 87: ...els cameras are selected If you click Reset all the channels cameras are deselected Duration Determines the duration of the recording to be saved Text If you select this option text is also saved Audio If you select this option audio is also saved Copy codec To play an AVI file on a normal PC MPEG4 codec PMK4 exe is required If you select this option MPEG4 codec as well the AVI file is also saved ...

Страница 88: ...ed Date Time Serial Number File Extension OSD Option If you select OSD On an option window will appear where you can select position top bottom of recording information in the camera screen Click Save The image is saved Until the saving operation is completed you cannot use other functions If free space in the specified drive is insufficient while saving the data the save operation will be cancele...

Страница 89: ...k the channel camera button again the images in the preview screen disappear Select a desired print layout If the print page is more than one page click the previous or next page view button Select OSD On or OSD Off to determine whether to print recording information If you select OSD On an option window will appear where you can select position top bottom of recording information in the camera sc...

Страница 90: ...mode Shutting Down the System You can shutdown the system only when you have logged in with Admin account Click the Exit mode button The Exit button can be clicked only when you have logged in with Admin account Enter the Admin password in the password input window You can enter a password using the numeric keyboard on the screen or the numeric keys of the keyboard Click OK The DVR live screen dis...

Страница 91: ...English _91 APPENDIX PRODUCT VIEW appendix ...

Страница 92: ...ar check if recording schedule is set in the settings and if the recording area is properly set Check if a data drive exists through the settings In general data drive D must exist All the LEDs on the front panel of the system work but no video is displayed If screen does not appear when the power is on check if the monitor cable is disconnected Check if the beep sound is generated when the system...

Страница 93: ...allow using the corresponding port in the firewall When you are using a normal IP sharer the DVR server should statically use a private IP address that is allocated by the sharer Set the DMZ setting of the sharer If a separate firewall device or server is being operated you have to allow using the UDP port numbers 2301 2400 6093 and the TCP port number 35000 35001 The operating client has been dis...

Страница 94: ...eck if the type of the additionally installed HDD is supported by the system Even if the additionally installed HDD is supported by the system if the HDD is not initialized in the Shell mode the HDD may not appear in the DVR server I have connected an external storage device USB memory USB HDD or another USB storage device to the DVR system but the device does not appear in the DVR system The conn...

Страница 95: ...ive the recipients all the rights that you have You must make sure that they too receive or can get the source code And you must show them these terms so they know their rights We protect your rights with two steps 1 copyright the software and 2 offer you this license which gives you legal permission to copy distribute and or modify the software Also for each author s protection and ours we want t...

Страница 96: ...e whose permissions for other licensees extend to the entire whole and thus to each and every part regardless of who wrote it Thus it is not the intent of this section to claim rights or contest your rights to work written entirely by you rather the intent is to exercise the right to control the distribution of derivative or collective works based on the Program In addition mere aggregation of ano...

Страница 97: ...st validity of any such claims this section has the sole purpose of protecting the integrity of the free software distribution system which is implemented by public license practices Many people have made generous contributions to the wide range of software distributed through that system in reliance on consistent application of that system it is up to the author donor to decide if he or she is wi...

Страница 98: ...R PURPOSE See the GNU General Public License for more details You should have received a copy of the GNU General Public License along with this program if not write to the Free Software Foundation Inc 51 Franklin Street Fifth Floor Boston MA 02110 1301 USA Also add information on how to contact you by electronic and paper mail If the program is interactive make it output a short notice like this w...

Страница 99: ...at a company cannot effectively restrict the users of a free program by obtaining a restrictive license from a patent holder Therefore we insist that any patent license obtained for a version of the library must be consistent with the full freedom of use specified in this license Most GNU software including some libraries is covered by the ordinary GNU General Public License This license the GNU L...

Страница 100: ...ur option offer warranty protection in exchange for a fee 2 You may modify your copy or copies of the Library or any portion of it thus forming a work based on the Library and copy and distribute such modifications or work under the terms of Section 1 above provided that you also meet all of these conditions a The modified work must itself be a software library b You must cause the files modified ...

Страница 101: ...erical parameters data structure layouts and accessors and small macros and small inline functions ten lines or less in length then the use of the object file is unrestricted regardless of whether it is legally a derivative work Executables containing this object code plus portions of the Library will still fall under Section 6 Otherwise if the work is a derivative of the Library you may distribut...

Страница 102: ...ions are prohibited by law if you do not accept this License Therefore by modifying or distributing the Library or any work based on the Library you indicate your acceptance of this License to do so and all its terms and conditions for copying distributing or modifying the Library or works based on it 10 Each time you redistribute the Library or any work based on the Library the recipient automati...

Страница 103: ...FY AND OR REDISTRIBUTE THE LIBRARY AS PERMITTED ABOVE BE LIABLE TO YOU FOR DAMAGES INCLUDING ANY GENERAL SPECIAL INCIDENTAL OR CONSEQUENTIAL DAMAGES ARISING OUT OF THE USE OR INABILITY TO USE THE LIBRARY INCLUDING BUT NOT LIMITED TO LOSS OF DATA OR DATA BEING RENDERED INACCURATE OR LOSSES SUSTAINED BY YOU OR THIRD PARTIES OR A FAILURE OF THE LIBRARY TO OPERATE WITH ANY OTHER SOFTWARE EVEN IF SUCH ...

Страница 104: ...IAL DAMAGES INCLUDING BUT NOT LIMITED TO PROCUREMENT OF SUBSTITUTE GOODS OR SERVICES LOSS OF USE DATA OR PROFITS OR BUSINESS INTERRUPTION HOWEVER CAUSED AND ON ANY THEORY OF LIABILITY WHETHER IN CONTRACT STRICT LIABILITY OR TORT INCLUDING NEGLIGENCE OR OTHERWISE ARISING IN ANY WAY OUT OF THE USE OF THIS SOFTWARE EVEN IF ADVISED OF THE POSSIBILITY OF SUCH DAMAGE This product includes cryptographic ...

Страница 105: ...s software written by Tim Hudson tjh cryptsoft com THIS SOFTWARE IS PROVIDED BY ERIC YOUNG AS IS AND ANY EXPRESS OR IMPLIED WARRANTIES INCLUDING BUT NOT LIMITED TO THE IMPLIED WARRANTIES OF MERCHANTABILITY AND FITNESS FOR A PARTICULAR PURPOSE ARE DISCLAIMED IN NO EVENT SHALL THE AUTHOR OR CONTRIBUTORS BE LIABLE FOR ANY DIRECT INDIRECT INCIDENTAL SPECIAL EXEMPLARY OR CONSEQUENTIAL DAMAGES INCLUDING...

Страница 106: ... 214PTZ 232DPTZ 260S 241S 241SA 240Q 241Q 241QA a Compatible With Samsung Model SNC B2315 SNC B5395 SNC M300 Output Loop through 16 Channel Main SUB Main 1 Sub 1 S Video No VGA 1 Channel HDMI No System NTSC Yes PAL Yes Display resolution NTSC 720 480 PAL 720 576 Display speed NTSC 480ips PAL 400ips Camera Name Max 22 Characters Screen Split Control Full Quad 7 8 9 10 13 16 Screen Rotate Control 1 ...

Страница 107: ...Scheduling 256 frame 0 240 seconds Alarm Duration 0 600 seconds 10 minutes Continuous External EIDE Storage Option Quality Level 5 Level P B Maximum Playback Speed NTSC CIF 480ips 16CH Simultaneously Play back available VGA Half 240ips VGA 120ips PAL CIF 400ips 16CH Simultaneously Play back available VGA Half 200ips VGA 100ips P B Mode Play Pause Stop Fast Forward Reverse 2x 3x 4x 5x Slow Forward ...

Страница 108: ...X UDP TCP IP HTTP DHCP SMTP NTP PPP Web viewer Yes CMS Central Management S W Supported BACK UP of Network Yes BandWidth Using Gigabyte LAN Alarm Alarm Input 16 Ports NC or NO Non Isolate TTL Input Ground Common Alarm Output 16 Ports NC or NO Optional Isolated Relay Output Four Isolated Common Storage Internal EIDE Storage Default 250 GB 1 HDD Max 5 HDD 750GB 5 HDD 3 75TB External EIDE Storage Opt...

Страница 109: ... 232 D SUB RS 485 RJ 11 x1 Ethernet RJ 45 USB 2 0 Front 2 port Rear 2 ports VGA Output 15 pin female D SUB Support Mouse PS 2 Key Board Input PS 2 ELECTRICAL Power Source 110 240VAC 50 60Hz Free Voltage Power Consumption Appx 360 Watt Max ENVIRONMENT Operating Temp 5 40 C Storage Temp 5 60 C Humidity 30 90 RH non condensing PHYSICAL Color Black AU Dimension 440 W 177 H 461 D mm Weight Appx 22 5kg ...

Страница 110: ...fe recycling Business users should contact their supplier and check the terms and conditions of the purchase contract This product should not be mixed with other commercial wastes for disposal Correct disposal of batteries in this product Applicable in the European Union and other European countries with separate battery return systems This marking on the battery manual or packaging indicates that...

Отзывы: