background image

52

Sending box setting

Enter

`

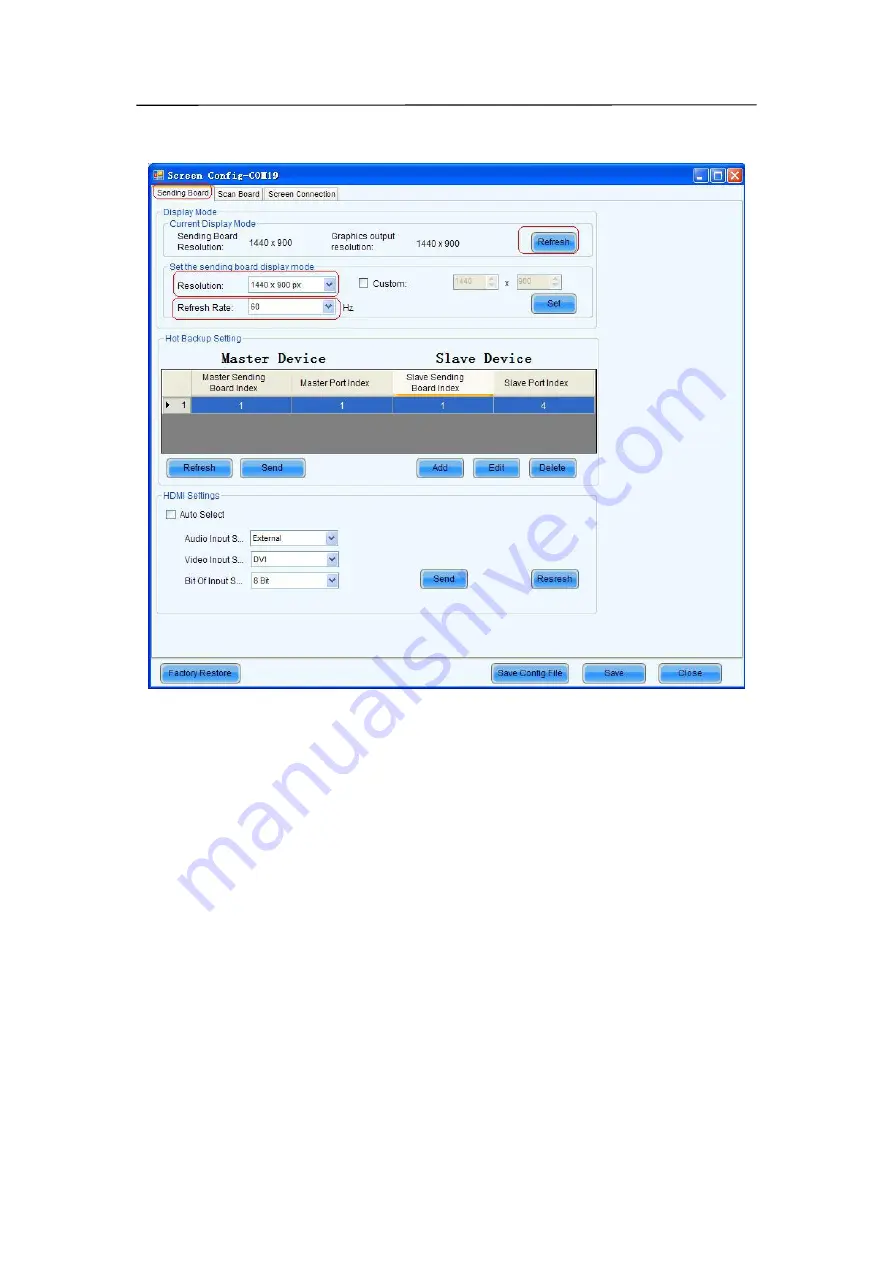
Screen Config`, choose `Sending Board` as shown in Fig 9-6.

Fig 9-6

In this interface, the user can set up `Sending Board`, `Scan Board` and `Screen Connection

`

Attention:

Usually the resolution of transmitting card is bigger than the resolution of the LED

display screen. Fox example, the resolution of the LED display screen is 1400*720, the user
can not choose 1280*1024, must choose bigger than 1400*900.

Another notice:

Every RJ-45 output of transmitting card can offer 650,000 pixels, if your

LED display`s pixels are more than this, you must use 2 cat-5 cable or more.

Содержание P10

Страница 1: ...1 Outdoor P10 Product User Manual Model Name XA010J Model Code Version Number A03 Date 26 Apr 2019 LH100XAJSAC ...

Страница 2: ...ist 23 6 Trouble shooting list 26 6 1 Display screen problem 26 6 2 Cabinet problem 29 6 3 Module problem 31 7 Installation Guides 34 7 1 Mechanical requirements and installation 34 8 Connection of the LED screen 41 8 1 Connection for equipments 41 8 3 Connection for power cables 43 8 4 Connection for data cables 44 9 Control system setting 46 9 1 Software setup 46 9 2 NovaLCT Mars Main interface ...

Страница 3: ...3 10 1 Cleaning 104 10 2 Calibration 105 10 3 Replacement steps 106 11 Appendix 119 ...

Страница 4: ...rounding type plug will expose you to the risk of electric shock Grounding symbols Electric safety Do not open equipment with below symbols To reduce the risk of electric shock do not remove cover or back No user serviceable parts inside Qualified service personnel is required for serving High voltage symbols High voltage symbols The lighting flash with an arrowhead within a triangle is intended t...

Страница 5: ... any components Ground the LED display screen before connecting the power source Contacting displays that are not earth grounded may cause death or serious injury Do not use the LED display screen ground lugs for installation equipment such as welding equipment Structural mounting components should be kept dry clean lubricated only if recommended coated properly and maintained in a manner consiste...

Страница 6: ...ets plugs are damaged then replacement of the detective parts must be undertaken immediately Protect the power data cords from being taken off or pinched particularly at plugs convenience receptacles and the point where they exit from the apparatus Replace damaged power data cords immediately Only use attachments accessories specified or provided by the manufacturer Use with caution during lifting...

Страница 7: ...7 2 Open Package 2 1 Front view Step 1 Open the top wooden cover Step 2 Open the side wooden cover Step 3 Take the cabinets out from the wooden box ...

Страница 8: ...8 2 2 Side view Step 1 Open the top wooden cover Step 2 Open the side wooden cover Step 3 Take the cabinets out from the wooden box ...

Страница 9: ...king the cabinets out from the wooden box when you place the cabinet on the ground please put the back side on the ground first then carefully put it standing on the ground as shown above to make sure the modules will not be damaged ...

Страница 10: ...nm B 4nm 10 Number of LED color bin combination 1ea upto 2ea 11 Driver IC vendor MBI 12 Driver IC part name MBI5051B 13 T CON vendor Novastar 14 T CON part name MCTRL600 MRV560 MON300 15 SMPS vendor Mean Well 16 SMPS part name HSP 300 4 2 4 2V 60A 17 Module Dimentions LxH mm 320x320 18 Cabinet Dimensions LxH mm 1280x1280x144 19 Cabinet Dimensions With Waterproof cover LxH mm 1280x1280x177 20 Cabin...

Страница 11: ... Max 670W 37 Power consumption Typical 240W 38 Power AC100 120V 220 240V 47 63Hz 39 Monitoring Function LOD Module data Temperature Huminity Power voltage Fan and so on 40 Working Temperature 30 C to 50 C 41 Operation Humidity 10 to 90 42 Storage Temperature 30 C to 60 C 43 Storage Humidity 10 to 90 44 Color Temperature 45 Default 6500K 500K 46 Adjustable range 2800 16000K 47 Cooling Fan 4pcs 48 I...

Страница 12: ...12 3 2 Product Appearance ...

Страница 13: ...13 ...

Страница 14: ...14 3 3 Product design Decomposition chart ...

Страница 15: ...15 Assembly drawing ...

Страница 16: ...16 3 4 Product main components Module Power Supply Receiving Card Monitoring Card ...

Страница 17: ...17 Fan Hub board Power data cables 16pcs DC power cables 8PCS and Flat cables 16 pcs ...

Страница 18: ... Audio input connect to the audio source receiving the audio signal USB Control port connect to the computer receiving control signal DVI input DVI video input connect to the video source receiving the video signal HDMI input HDMI video input connect to the video source receiving the video signal Ethernet port Signal output ports connect to the display pass signal Cascade Cascade control in and ou...

Страница 19: ...440x900 6 1 light sensor interface 7 Cascading supported 8 18bit gray scale processing and presentation 9 Video format RGB YCrCb4 2 2 YCrCb4 4 4 10 Standard 1U housing independent power supply 1U chassis Size 482 6mm width 44 45mm height 250mm depth dd Weight 4 15Kg Net weight 2 7Kg Computer Note Usually the sending box and he PC should be running in control room LED display screen ...

Страница 20: ...2J8 22 0125 R2L3 27 0104 USB cable AC power input cable Signal input cable AC power cascade cable BN81 15311A Different code by different project R2L3 27 0105 Different code by different project 3D2 22 8582 Signal cascade cable Connect plate M10 Bowls Key for power box R3D3 23 1931 R2J8 42 10000 R2W8 22 0466 R2W8 29 3277 Remark The final quantity is subject to each order ...

Страница 21: ... AC power input cable Signal cascade cable BN81 15336A Different code by different project L2A8 24 00000 R2W8 22 1410 Different code by different project AC power cascade cable Signal cascade cable Power data cable Transfer board 3D2 22 8582 R3D3 23 1931 R3D2 23 10002 R3C6 88 10005 DC cable 1 DC cable 2 Flat cable Monitoring card 3D2 22 10034 3D4 22 0069 R2S8 22 2170 Remark The final quantity is s...

Страница 22: ...Series Powebox PCS Depend on project Signal input cable Cat 5 type L depend on project PCS Depend on project AC Power input cable 3 2 5m L depend on project PCS 3D2 22 8582 AC power cascade cable 3 2 5m 150CM both end plug PCS R3D3 23 1931 Signal cascade cable Cat 5 type 140CM both end plug PCS R2J8 42 10000 Connect plate 117 92 12 PCS R2W8 22 0466 M10 Bowls PCS R2D8 22 0159 Power supply HSP 300 4...

Страница 23: ...es Power box 8 PCS AIR SWITCH Air switch R2S9 88 0178 A S AIR SWITCH JDM R2S9 88 0178 Air switch 1 PCS AC FILTER AC Filter R2S9 88 0375 A S AC FILTER JDM R2S9 88 0375 AC Filter 1 PCS FAN Fan SD8025C5H3 R2F8 88 0438 A S FAN JDM R2F8 88 0438 SD8025C5H3 4 PCS DVI CABLE DVI Cable R2L3 27 0104 A S DVI CABLE JDM R2L3 27 0104 DVI Cable 1 PCS USB CABLE USB Cable R2L3 27 0105 A S USB CABLE JDM R2L3 27 0105...

Страница 24: ...CS DC OUTPUT CABLE DC output cable 2 5m 20CM 3D2 22 10034 A S DC OUTPUT CABLE JDM 3D2 22 10034 2 5m 20CM 2 PCS DC OUTPUT CABLE DC output cable 2 5m 25CM 3D2 22 10035 A S DC OUTPUT CABLE JDM 3D2 22 10035 2 5m 20CM 2 PCS DC OUTPUT CABLE DC output cable 2 5m 45CM 3D2 22 10036 A S DC OUTPUT CABLE JDM 3D2 22 10036 2 5m 45CM 2 DC OUTPUT CABLE DC output cable 2 5m 50CM 3D2 22 10037 A S DC OUTPUT CABLE JD...

Страница 25: ...ask 4 PCS U DISK U DISK 2S8 22 2038 A S CD DISK JDM R2S8 22 2038 U DISK 1 PCS M10 BOWLS M10 Bowls R2W8 22 0466 A S M10 BOWLS JDM R2W8 22 0466 M10 Bowls 16 PCS SCREW Screws for Mask M1 2 6 R2W8 22 1410 A S SCREW JDM R2W8 22 1410 Screws for Mask M1 2 6 92 PCS ...

Страница 26: ...the first cabinet is working normally in the display screen Check if the brightness setting is 0 Check if the software setting is correct The whole display screen is blinking Check if the connection is broken between PC and Sending box Check if the connection is broken between Sending box and the display screen Check if the sending box is normal Check if the first cabinet is working normally in th...

Страница 27: ... cabinet Check if the receiving card is normal Check if the software setting is correct Check if the program in receiving card is correct Part of the display screen is blinking Check if the connection is broken between cabinet and cabinet Check if the receiving card is normal Check if the software setting is correct Check if the program in receiving card is correct ...

Страница 28: ...s connected well Check if the USB cable is broken Check if the software is running well The display screen display wrong image Check if the connection table setting is correct Check if the software setting is correct Check if the program in receiving card is correct ...

Страница 29: ...cabinet to cabinet Check if the receiving card is normal Check if the power supply is broken in cabinet Check if the program for receiving card is correct The cabinet is blinking Check if the receiving card is broken Check if the connection is broken between cabinet to cabinet Check if the program for receiving card is correct ...

Страница 30: ...broken Check if the flat cable is broken Check if the DC power cable is broken Check if the HUB board is broken Check if the module is broken Part of the cabinet is blinking Check if the flat cable is broken Check if the HUB board is broken Check if the module is broken ...

Страница 31: ...k if the module is broken Check if the last module is broken The module is blinking Check if the flat cable is broken Check if the module is broken Check if the last module is broken Block of module is broken or column of module is broken Check if the driver IC is broken Check if the soldering of the driver IC is broken ...

Страница 32: ...32 Row of module is broken Check if the 4973 IC is broken Check if the soldering of the 4973IC is broken Pixel of module is broken Check if the led is broken Check if the soldering of led is broken ...

Страница 33: ...lights on the receiving card as shown below If everything is right the Red one is blinking and the Green one is on no blinking Otherwise the user needs to check receiving card the programmer and the Cat 5 cable connect into this scan board How to check the input and output problem of board Usually there are one input and one output on board If a board is broken we can get data from another board t...

Страница 34: ...nmental conditions Humidity wind temperatures rain snow etc Location Outdoor Indoor altitude etc Usually for outdoor display screen the customer should build top cover and side cover for IP protection Including waterproof and dustproof Ground stability Front clearances For making sure there is sufficient free area in front of the LED display screen and respect the maximum viewing angles and distan...

Страница 35: ...35 Installation of cabinets Fixing of connect plate ...

Страница 36: ...vel as shown as below 2 First cabinet is placed in the middle of the bottom row with the stud rods in the middle of the corresponding slot as shown as below do not fix the nuts tightly 3 Place the cabinets beside one another from the middle of the row to the sides as shown as below do not fix the nuts tightly 4 Finish the first row by same way as shown as below ...

Страница 37: ... the connect plates 6 Place the middle cabinet in the second row adjust it and fix it but not tight Make sure it is installed horizontally and vertically then fix it tightly as shown as below 7 Finish the second row by the same way as shown as below 8 Finish the rest installation of all the cabinets by the same way as shown as below ...

Страница 38: ...protect circuit Do not route power and communication wires in the same conduit Separate conduits must be run for communication wires and power wires However fiber optic wire may be run in the same conduit with power wires Grounding The LED display screen must be properly grounded according the applicable national and local codes Properly grounding every display cabinet is necessary as it is essent...

Страница 39: ...w Nominal discharge current In 8 20µs 20 kA The maximum discharge current Imax 8 20µs 40 kA Voltage protection level Up in ln AC385 505V 1 7kV TA 25ns Lighting Strike Protection of Cabinet Every cabinet which connect power input cable from electric closet have installed the surge protector So when you install the LED display screen cabinet must finish it according to the LED display cabinets arran...

Страница 40: ...s of the LED screen At least per 3 4M height should install 2 air flow on two sides of LED screen the air flow should use suction type one it means the air flow should take out the air from structure and cabinet And if the LED display screen is more wide than 10M should install more air flow inside steel structure to make sure all the area air can be took out Usually per 5M need to add a air flow ...

Страница 41: ...41 8 Connection of the LED screen 8 1 Connection for equipments Connection between Sending box and PC ...

Страница 42: ...42 8 2 Port of Cabinet and serial number paint ...

Страница 43: ...is not certain The AC cascade cable 3 2 5m 150CM both end plug Attention For 220 240V AC power voltage countries and areas each AC input cable can offer power for 4 cabinets But each AC input cable only can offer power for 2 cabinets in 100 120V AC power voltage countries and areas For XAJ product every cabinet has one surge protect in the bottom power box ...

Страница 44: ...f the AC input cable is 50M but sometimes it depend on the distance between the control room and LED display screen it is not certain The signal cascade cable Cat 5 type 150CM both end plug Attention Each signal input cable can offer signal for 35 cabinets ...

Страница 45: ...urn This is only a sample to show you what it like Note For waterproof no passing hole on the top cabinet no passing hole on the bottom cabinet no passing hole at the far left cabinet no passing hole at the far right side cabinet For light surge protection the AC power input cable must be connected to the cabinets with the surge protectors ...

Страница 46: ...ext to start follow the guides to finish the setup Fig 9 1 When the setup of the NovaLCT Mars is completed the LED software will show up in the Start Program Click to start operation after entering NovaLCT Mars in the program as Fig 9 2 shown Fig 9 2 There are shortcuts of NovaLCT Mars in the desktop as icon shown double click it to start up the program ...

Страница 47: ...set screen parameters as follows Enter NovaLCT Mars main interface Step 1 Start NovaLCT Mars click User Advanced Login enter User login window as shown in Fig 9 3 Fig 9 3 Step 2 Input the password admin enter the NovaLCT Mars main interface for advanced users as shown in Fig 9 4 Fig 9 4 ...

Страница 48: ...t of brightness control and monitoring of multiple LED displays easier when these LED displays are combined together Details will be given in a later part of this manual Hardware Information This is used to check the information about the current LED display control system Prestore Screen Enter the restore screen booting screen and no signal including the disconnected network cable and no DVI sign...

Страница 49: ...e the configuration file in controller Quickly Adjust Dark or Bright lines Adjust dark or bright lines caused by box splicing and recovery for cabinet Video control Input setting output setting and stitching management of video processor Plug in Tool Test Tool To open the page which all test tools test content for LED displays testing are in Calculator A shortcut to the calculator application of M...

Страница 50: ... Tools Brightness in the main menu the same as Tools Calibration in the main menu the same as Tools Display Control in the main menu the same as Tools Monitor in the main menu the same as Tools Function Card in the main menu Register the display screen to the user in NovaiCare ...

Страница 51: ...ystem the used serial port will be automatically set as the current serial port Otherwise if multiple serial ports are used to connect control systems to the computer one serial port for one control system the serial port that is used to connect the control system which is to be configured should be set as the current serial port If it s the mode with no sending board please set the corresponding ...

Страница 52: ...ally the resolution of transmitting card is bigger than the resolution of the LED display screen Fox example the resolution of the LED display screen is 1400 720 the user can not choose 1280 1024 must choose bigger than 1400 900 Another notice Every RJ 45 output of transmitting card can offer 650 000 pixels if your LED display s pixels are more than this you must use 2 cat 5 cable or more ...

Страница 53: ... loaded to all the scan boards in cabinets Save Save the programmer parameter which is sent to all the scan boards in cabinets After saving you will not need to operate again Attention We have saved all the program into the receiving card before delivery not need to save it again We have saved all the programmer file and control system software into the U disk please check if you got it in the pac...

Страница 54: ...s in cabinets Save Save the connection table parameter which is sent to all the scan boards in cabinets After saving you will not need to operate again Save Config File Save all the configuration which is sent to all the scan boards in cabinets After saving you will not need to operate again Attention Usually we will make the connection table file and send it to the user but if you want use it you...

Страница 55: ...olor configuration includes the exit factory configuration color space configuration and color temperature table configuration the target color space plan and color temperature table configured here can be called directed when adjusting brightness ...

Страница 56: ...e on local disk 1 Color space configuration Original color space It is suggested to use a light gun to measure current CIE coordinates and brightness and fill out properly use original color space as basis for adjusting color temperature Target color space The black triangle in the color space on left side of the interface is target color space drag your mouse to change four color target pixel It ...

Страница 57: ...NTSC system Enable color space adjustment After being checked the target color space values can be applied to the entire LED display Add color space information save current color space as a customized color space information to be called at any time in the future The operation is shown in the picture below ...

Страница 58: ...eted click this button the color space information will be deleted Send current calibrated color space and target space to LED display Save current calibrated color space and target space to hardware 2 Color temperature table Click add color temperature segments the operation is shown in the picture below ...

Страница 59: ...59 ...

Страница 60: ...erature segment Delete selected color temperature segment Clear all color temperature segment Save the color temperature table to local space Every project must make a color temperature table 8ea adjust and save it into Memory card ...

Страница 61: ...anual adjustment and automatic adjustment after adjustment is done click and save the adjustment results to hardware Manual Adjustment Select Manual in the Adjustment Mode panel to open manual adjustment page Shown below is the manual setting page of the Display Adjustment window Brightness Adjustment Brightness can be adjusted by the slide bar All together there are 256 levels of brightness Contr...

Страница 62: ...Adjustment Pull the bar to adjust the color temperature Enter Setting Advanced color configuration Configure Color Space interface fill the value of original color space which must be obtain by light sensor and send the values to hardware Accurate Adjustment Check this option then choose color temperature segment For color temperature segment configuration please see 5 2 Advanced color configurati...

Страница 63: ...t is to achieve automatic adjustment at present time There are two methods of adjustment they are Advanced Adjustment and Adjust by Light Sensor Choose the Automatically Adjustment option at LED display adjustment interface click to check current brightness ...

Страница 64: ...nated by the user the brightness is fixed Environment brightness The brightness of environment from certain time on designated by the user the software will automatically adjust the LED display brightness in accordance with the parameters set by the users as well as environment brightness information collected by light sensors so that the LED display can exhibit proper brightness under different e...

Страница 65: ...adjust color temperature if it s needed to adjust color temperature you can choose color temperature segment in the drop down list color temperature table must be configured in advance please see description of color temperaturetable in 9 6 advanced color configuration check adjust Gamma drag scroll bar to adjust Gamma value ...

Страница 66: ...stment Click choose whether to adjust color temperature if it s needed to adjust color temperature you can choose color temperature segment in the drop down list color temperature table must be configured in advance please see description of color temperature table in Advanced color configuration check adjust Gamma drag scroll bar to adjust Gamma value ...

Страница 67: ...w connection or disconnecting the light sensor during operation When light sensor fails adjust the brightness to Enabled after being checked If not enabled when light sensor fails the brightness will remain at the latest updated brightness value Divide the portion between the maximum environment brightness and minimum environment brightness into designated equal parts the portion between themaximu...

Страница 68: ...68 ...

Страница 69: ...o back to the main interface of automatically adjustment you can click to add some settings of environment brightness or specified brightness it s also be allowed to edit or delete the added brightness settings After all the operations is finished it s must to click ...

Страница 70: ...ck 2 If you have not finished configuration of light sensor it s need to configure the light sensor then the detailed operation please refer to the step 3 in 5 3 2 1 advanced adjustment 3 The environment brightness by Software added automatically as shown in the figure below according to your need to add specified brightness or environment brightness or to edit or delete the added Settings ...

Страница 71: ...ing steps are to set the time interval for auto brightness Step 1 Click right button on the circled panel icon as shown in Fig 9 9 and select Brightness Advance Setting from the pop up menu as shown in Fig 9 10 to open the Advance Setting window as shown in Fig 9 11 Fig9 9 Fig9 10 ...

Страница 72: ...s of the light sensors Thus the auto brightness time interval is the production of Detect Period and Read times of light sensors For example if light sensors measure the environment brightness every 10 second this is the Detect Period and NovaLCT Mars reads the measurement results of the light sensors for 5 times this is the Read times of light sensor before adjusting the LED display brightness th...

Страница 73: ...CT Mars application main interface to open the Screen Control window Kill Show nothing on the LED display Lock Always show the current image frame of the LED display Run Switch the LED display back to normal from Kill or Lock Self Test Show the test images generated by the receiver card for LED displays aging test or error detecting ...

Страница 74: ...tem to be configured as the current serial port Time of Hardware This is the date and time of the current Mars serial LED display control system Click Read button to update the hardware time shown in the Time panel Click Set button to set the time of the current Mars serial LED display control system as that of the computer Hardware Version This includes the version information of the MCU sending ...

Страница 75: ...d to the computer will be list in this panel Select the LED display to be calibrated from the list Local IP This is the IP address that NovaLCT Mars listens to It is actually an IP of the computer on which NovaLCT Mars is running Port This is the port that NovaLCT Mars listens to Reconnect Click this button to terminate the current listening process and start a new listen process using the setting...

Страница 76: ...o the LED display Save coefficients to database This operation is to read back the calibration coefficients form the LED display and save them to a database file Set coefficients for a new scan board This option is to set the calibration coefficients for a newly placed receiver card in the LED display Set coefficients for a new module This option is to set the calibration coefficients for a newly ...

Страница 77: ...tains calibration coefficients for one or multiple cabinets Cabinet ID The cabinet ID s will be shown here if the selected is a cabinet calibration coefficient database Columns This is the column number of the calibration coefficient array of the selected database Rows This is the row number of the calibration coefficient array of the selected database Click Next button to open the page for Step 2...

Страница 78: ...et list If the current LED display is a simple or a standard display the sketch map of the cabinet array will be shown after this option is selected Otherwise if the current is a complex display the show is the cabinet list Zoom The zoom slide bar is for zoom in or out the cabinet array sketch map Shown below are the pages for the three options ...

Страница 79: ...79 Click Next to open the page for Step 3 ...

Страница 80: ...pload the selected calibration coefficients to the hardware Save Save the selected calibration coefficients to hardware FLASH The saved data won t be lost even the system is powered off Save Coefficients to Database This operation is to read back the calibration coefficients form the current LED display and save them to a database file Step 1 The calibration coefficients read back can be saved to ...

Страница 81: ...The new saved coefficients will replace the old ones according to the position If the coefficients array size of the opened database is smaller than that of the current display the save operation will be failed If the opened is a cabinet database the ID list of the existing cabinets of the database will be shown ...

Страница 82: ...Select this option if it is to save the calibration coefficients to a new cabinet database Create Click this button to create a new screen database or a cabinet database according to the settings Step 2 Select the display area for which the calibration coefficients are to be saved to a database Shown in Fig 9 18 is the page for Step 2 ...

Страница 83: ...for which the calibration coefficients are to be saved Note that if the database for saving the coefficients is a cabinet database one cabinet should be selected at one time for coefficients saving Save Click this button to save the calibration coefficients of the selected display area to the specified database If the database for saving the coefficients is a cabinet database a dialog will appear ...

Страница 84: ...ig 9 19 is the page for specifying the area Fig 9 19 Step 2 Select the calibration coefficient source The coefficients could be from a database the Database option or generated according to those of the surrounding receiver cards the Refer to Surrounding Scan Board option Fig 9 20 and Fig 9 21 show the pages for two option respectively ...

Страница 85: ...is a cabinet database the cabinet ID should also be specified from the Cabinet ID drop list Cabinet ID If the selected database is a cabinet database the IDs of the cabinets of which the calibration coefficients are contained in the database will be list in the drop list If the selected database is a screen database the list will be unavailable ...

Страница 86: ...libration coefficients from Step 2 are not satisfying they can be adjusted There are two type of adjustment Simple and Advanced Shown in Fig 9 22 and Fig 9 23 are the pages for Simple and Advanced adjustment respectively Fig 9 22 ...

Страница 87: ... can be adjusted in the Color Adjust panel Color Temperature Adjustment Use the slide bars to adjust the red green and blue components for yellow cyan magenta and white in the Color Temperature Adjust panel Simple Click this item to switch to the simple adjustment page The color bar under each side bar indicates the color to be shown when adjusting Step 4 Save the calibration coefficients to the h...

Страница 88: ...88 Fig 9 24 Set coefficients for a new module Step 1 Specify the cabinet which the new module is in this can be done through the page shown in Fig 9 25 Fig 9 25 ...

Страница 89: ...ides a cabinet into modules according to the module pixel array size and the cabinet pixel array size Step 3 Select the calibration coefficients source Calibration coefficients generated according to those of the surrounding modules are used for the new module because the coefficients saved in the receiver card or the database are not suitable for the new module Shown in Fig 9 27 is the page for s...

Страница 90: ... the hardware FLASH so they won t be lost when the LED display is powered off The operation is similar to that for a new receiver card Adjust Coefficients If some parts of the LED display are different from the rest in color the color of these areas can be adjusted by modifying the corresponding calibration coefficients Step 1 Select the areas to be adjusted Fig 9 28 shows the page for area select...

Страница 91: ...e LED display If Effect As Other Selected Area option is selected the color of the selected area will be adjusted according to the reference area color The selected area color will look similar to the reference area color after the adjustment operation Shown in Fig 9 29 and Fig 9 30 are the page for the two adjustment type respectively Fig 9 29 Fig 9 30 ...

Страница 92: ...efficients won t be lost even the system is powered off Shown in Fig 9 31 is the page for saving the calibration coefficients Fig 9 31 The adjustment operations in Step 2 and Step 3 can also be applied to other areas that need the same adjustment Click Apply The Effect To Other Area item on Fig 9 31 to open the page for setting Shown in Fig 9 32 is the page for Apply The Effect To Other Area Fig 9...

Страница 93: ...ation coefficients of the whole display or any cabinets Reload coefficients reload the calibration coefficients lastly saved in hardware Fig 9 33 Screen Select this option to erase all calibration coefficients for the whole display Topology or List Select this option to select the cabinets from the cabinet array sketch or the cabinet list of which the calibration coefficients are to be erased ...

Страница 94: ...correction coefficients of the full screen or the specified area in accordance with the size of module or pixel Complete all operation of reset coefficient click on the Save To HW The correction coefficient reset will be effective ...

Страница 95: ...nd door status Supports ordinary screen and screen combination surveillance Click to enter the monitoring interface and click to check hardware status data of all screens of this system Then click to perform monitoring configuration Monitoring Refresh This button is used to update the monitored data Settings This button is used to edit the contents to be monitored and set rules for alarm ...

Страница 96: ...Care server check Auto refresh to perform remote monitoring Auto Refresh If this option is check NovaLCT Mars will automatically check the status and parameters being monitored and update the monitored data periodically according to the period setting Retry times after read status failed This parameter determines how many time NovaLCT Mars will retry to check the status and parameters being monito...

Страница 97: ...dvanced setting of monitor as shown in the figure below Each receiving card is connected with one monitoring card by default Click to pop up with the interface below Please set the number of receiving cards 0 or 1 according to the actual situation ...

Страница 98: ...ber of fan If the numbers of fans to be monitored are different from one cabinet to another select this option and click the Setting button to set the fan numbers for each cabinet Refresh the power supply of the monitoring card If this option is selected the power supplies on the monitor board will be under monitoring Every monitoring card has the same number of power supply If for every monitor b...

Страница 99: ...99 The difference lies in that the number of fan power supply of every cabinet can be set to be different when separately performing refreshing setting to every screen as shown in the following figure ...

Страница 100: ...an stops in the temperature range 20 C 30 C It means the temperature control IC is working well Other temperature if the fan stops it means there is problem of the fan Data alarm configuration Display alarm or fault information when setting the temperature humidity fan speed and voltage critical value ...

Страница 101: ...Select one screen or all screen to perform monitoring configuration separately Click to add control information the figure below shows adding temperature control information and the figure shows adding smoke control information ...

Страница 102: ...tting Shown below is the page for email notification setting Set the email notification according to the instructions given on the page If the sending system report Email is enabled the regular sending could be set ...

Страница 103: ...fication emails Information about the notification emails such as date error display index email recipients and so on can be checked through this window The details of operation for NovaLCT Mars please refer to the Nova M3 LED Display Control System UserManual V4 4 1 pdf ...

Страница 104: ...nt Soft hand brush with long hair recommended 4 cm pork hair Garden hose with a spray nozzle Air compressor Cleaning steps 1 Seal up the data and power sockets using a power and data linking cable Make sure that all plug holder clamps are locked firmly 2 Put the detergent on the shades and LED s part by part of the LED display screen Do not use industrial grease removers Use only materials or chem...

Страница 105: ...ion before goods are delivered out of factory Site calibration When the LED display screen is running for a long time for example for one year some part of the display screen may play a different image from other parts Chromatic aberration will appear on the LED display screen Then a site color calibration is needed to achieve color uniformity among all cabinets of the LED display screen please co...

Страница 106: ...module from cabinet by hand as shown below Bring a new module and connect the power data cable into the new module by short screwdriver as shown below Put the new module on the cabinet and then install it into cabinet by front service tool as shown below Power on the cabinet After replacing modules the customer should update the calibration data for that module in the receiving card Operation deta...

Страница 107: ...alibration coefficients in receiving card View the calibration coefficients in the receiving card which the new module is in Check coefficients in modules View and update calibration data from module flash Save Calibration coefficients in receiving card Send the calibration coefficients in the receiving card which the new module is in Save to HW Save the calibration coefficients in the receiving c...

Страница 108: ...ower box Before replace the bad parts in on power box you need to remove all the modules which in on the front of the power box Put down the power box as shown below Open the door of the power box as shown below ...

Страница 109: ...ort screwdriver and take away modules as shown below Remove the screws which connect the bad power data cable into the power box by screwdriver and take away the bad power data cable as shown below Bring a new power data cable and install it into the power box first by screwdriver as shown below Install back the modules which connect to the new power data cable as shown below and then install back...

Страница 110: ... cables connected to the power supply by screwdriver as shown below Take away the bad power supply as shown below Bring a new power supply and put it in the power box then connect the cables to power supply by screwdriver as shown below Fix the new power supply in the power box with fixing board as shown below Power on the cabinet ...

Страница 111: ...ble from the receiving card as shown below Remove the bad receiving card from box by screwdriver as shown below Bring a new receiving card and put it in the power box then install it by screwdriver as shown below Install the cat 5 cable into receiving card as shown below Power on the cabinet ...

Страница 112: ...onitoring card by screwdriver as shown below Remove the bad monitoring card by screwdriver then take off it as shown below Bring a new monitoring card and put it in the power box then install it by screwdriver as shown below Install all the monitoring cables into the new monitoring card as shown below Power on the cabinet ...

Страница 113: ...ard on the HUB board as shown below Remove the Hub board from the power box by screwdriver then take away it as shown below Bring a new hub board then install it into power box by screwdriver as shown below Install all the cards and all the cable on the hub board as shown below Power on the cabinet ...

Страница 114: ...er board is in Remove the cables on the bad transfer board as shown below Remove the transfer board from the power box by screwdriver as shown below Bring a new one and install it on power box then install the cables on it as shown below Power on the cabinet ...

Страница 115: ...the fan is in Remove the fan cable from HUB board then remove the fan from power by screwdriver as shown below Bring a new fan and install it into the power box then install the fan cable into HUB board as shown below Power on the cabinet ...

Страница 116: ... and the power supply as shown below Bring a new one and install it as shown below Power on the cabinet Flat Cable Power off the cabinet where the cable is in Remove the cables from the transfer board and the hub board as shown below Bring a new one and install it as shown below Power on the cabinet ...

Страница 117: ...wer box and the Hub board as shown below Bring a new one and install it as shown below Power on the cabinet Network cable Power off the cabinet where the cable is in Remove the door network cable from the power box as shown below Bring a new one and install it as shown below Power on the cabinet ...

Страница 118: ... the module is in Remove the power data cable by screwdriver then remove the bad module as shown below Bring a new one and install it on cabinet as shown below Power on the cabinet Other parts the replacement steps are same as doing it for front service ...

Страница 119: ...gram If customer requests software installation and setup for the product If a service technician removes cleans dusts or foreign materials inside of the product If customer requests an installation additionally after purchasing a product through home shopping or online A product damage cased by customer s fault Product damage caused by customer s mishandling or wrong repair If a product damage is...

Отзывы: