5
R. 10/15 850 812
SAMOA Industrial, S.A. · Pol. Ind. Porceyo, I-14 · Camino del Fontán, 831 · 33392 Gijón - Spain · Tel.: +34 985 381 488 · www.samoaindustrial.com
2015_10_27-13:40
Fig. C
Fig. 5
Installation / Instalación / Installation / Montage / Instalação
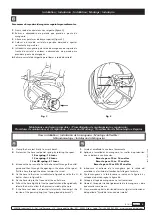
Para mover o braço de saída seguir os seguintes procedimentos:
1.
Fixar a roda do carretel em um sargento (figura C).
2.
Retirar a abraçadeira de parada que prende a ponta da
mangueira.
3
. Afrouxar os parafusos do braço superior (figura 5).
4
. Colocar o braço do carretel na posição desejada e apertar
novamente os parafusos.
5
. Introduzir a mangueira pela saída de mangueira do suporte da
frente do carretel e colocar a abraçadeira de parada para
prender a ponta da mangueira.
6.
Retirar o carretel do sargento para liberar a roda do carretel.
PT
1.
Clamp the hose reel firmly to a work bench.
2.
Pre tension the hose reel power spring by rotating the spool:
10 m spring: 16 turns
15 m spring: 19 turns
15 m HD spring: 21 turns
3.
Introduce the hose end to fix to the hose reel through the outlet
guide and then through the opening in the drum of the spool.
Pull the hose through the drum towards the swivel.
4.
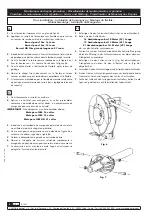
Fix the hose to the swivel as indicated in figure 8a and fix the U
bolt as shown in figure 8b.
5.
Fix the hose stop to the free end of the outlet hose.
6.
Pull out the hose slightly to free the spool latch and then gradually
release the hose to allow the hose reel to wind up the hose.
7.
If the hose reel does not rewind satisfactorily then adjust the
tension of the power spring (see “Spring load adjustment”).
EN
1.
Sujete el enrollador a una base firmemente.
2.
Aplique, al enrollador sin manguera, las vueltas de pretensión
que se indican a continuación.
Resorte para 10 m: 16 vueltas
Resorte para 15 m: 19 vueltas
Resorte para 15 m HD: 21 vueltas
3.
Introduzca el extremo de la manguera por la salida del
enrollador y el orificio del tambor hasta llegar a la rótula.
4.
Fije la manguera a la rótula como se indica en la figura 8a y
coloque el abarcón según la figura 8b.
5.
Coloque el tope de manguera en el extremo libre.
6.
Libere el trinquete tirando ligeramente de la manguera y deje
que enrolle suavemente.
7.
Si es necesario ajustar la tensión del resorte, siga las instrucciones
del apartado “Ajuste de la tensión del resorte”.
ES
Maintenance and repair procedures / Procedimientos de mantenimiento y reparación /
Procédures de maintenance et de réparation / Service und Wartung / Procedimentos de Manutenção e Reparos
Hose installation / Instalación de la manguera / Montage du flexible /
Schlauchmontage / Instalação da Mangueira


