12
5. INSTALLATION
Install the pump in a frost-free/dust-free and well-
ventilated location that is protected from adverse
weather conditions.
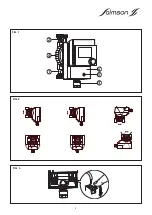
5.1 Mounting (See FIG. 1)
Risk of damage to the pump ! Dirt can
cause the pump to malfunction.
Do not install until all welding and soldering work has
been completed and the pipe system has been
flushed (if required).
For connection with the water supply
network, the use of new accessories is
necessary.
- Mount the pump in an easily accessible location with
gate valves at both suction and discharge sides in
order to facilitate subsequent inspections or
replacements.
- It may be necessary, depending on the application
to replace the spring discharge-side gate valve with
a spring-activated non-return valve.
- The gate valves are not required on Thermo’clock as
their functions are assumed by the integrated non-
return and ball valves.
- Install the pump without voltage with the pump shaft in
a horizontal position.
- Observe the installation positions (
FIG. 2
).
Risk of damage to the pump !
The
screwed
cable
gland
(FIG. 1 - item 3) must point downwards to prevent
water easily penetrating the motor housing. If
necessary, rotate the motor housing after releasing the
union nut (FIG. 1 - item 4). Do not damage the housing
gasket.
- The directional arrow on the pump housing shows the
direction of flow.
- On the Thermo'clock the non-return valve
(
FIG. 1 - item 1
) is screwed into the dishcarge port,
whilst the ball shut-off valve (
FIG. 1 - item 2
) is
screwed into the suction port.
- The ball valve is open when the slot is in line with the
direction of flow.
- The ball valve is closed when the slot is perpendicular
to the direction of flow.
Risk of damage to the pump !
In the case of the versions with check
valve and non-return valve, these are already pre-
assembled with a tightening torque of 15 Nm (hand-
tight). If the tightening torque is too high, this will
destroy the valve screw connection and the O-ring.
When installing the valve, use a wrench to prevent it
from turning!
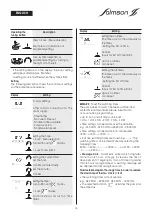
signifies that the Thermo’clock maintains the warm
water temperature in the return of the drinking water
circulation system using the integrated temperature
sensor.
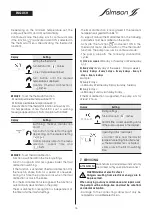
Thermal disinfection
In addition, the Thermo’clock offers a routine for the
recognition and support of boiler thermal disinfection
switching. This boiler function involves heating the
drinking/warm water storage tank to approx. 70 °C on
a weekly basis. Since the circulating pump is switched
off at night, a routine is required that recognises the
heating process and activates the pump independent
of the timer setting.
When the Thermo’clock is connected to the mains
voltage for the first time, the pump starts a teach-in
phase, independently of the timer setting, of at least
one week, to recognise a possible temperature
increase in excess of 68 °C in the system (if the
function is activated). During this teach-in phase, the
pump switches on for 10 minutes every 20 minutes. If a
temperature increase occurs, the time is recorded
and the pump continues to run until the next
temperature increase. The time difference between
both temperature increases is the teach-in frequency
for thermal disinfection (TD). This means: Thanks to this
teach-in routine the Thermo’clock recognises when a
TD of the boiler occurs and switches on automatically
for approx. 2 hours (in continuous mode) to support
the TD in the circulation system.
Changes to the timing of the TD performed are
recognised and corrected automatically.
4.3 Scope of delivery
Pump THERMO’CLOCK SB 04-15 T with :
- Ball shut-off valve and non-return valve,
- Integrated timer and temperature control,
- Installation and operating instructions.
4.4 Accessories
Accessories must be ordered separately :
- Reserve motor suitable for each pump housing of the
same design,
- Threaded or soldering union nuts.
ATTENTION !
ENGLISH
ATTENTION !
ATTENTION !
ATTENTION !
Содержание THERMO'CLOCK
Страница 2: ...2...
Страница 3: ...3...
Страница 4: ...4 3 5 6 1 4 2 FIG 1 FIG 2 FIG 3...
Страница 29: ...29 NOTES...
Страница 30: ...30 NOTES...
Страница 31: ...31 NOTES...


