4.2
Revised 3/04/11
..
.
..
..
..
..
OPERATING INSTRUCTIONS
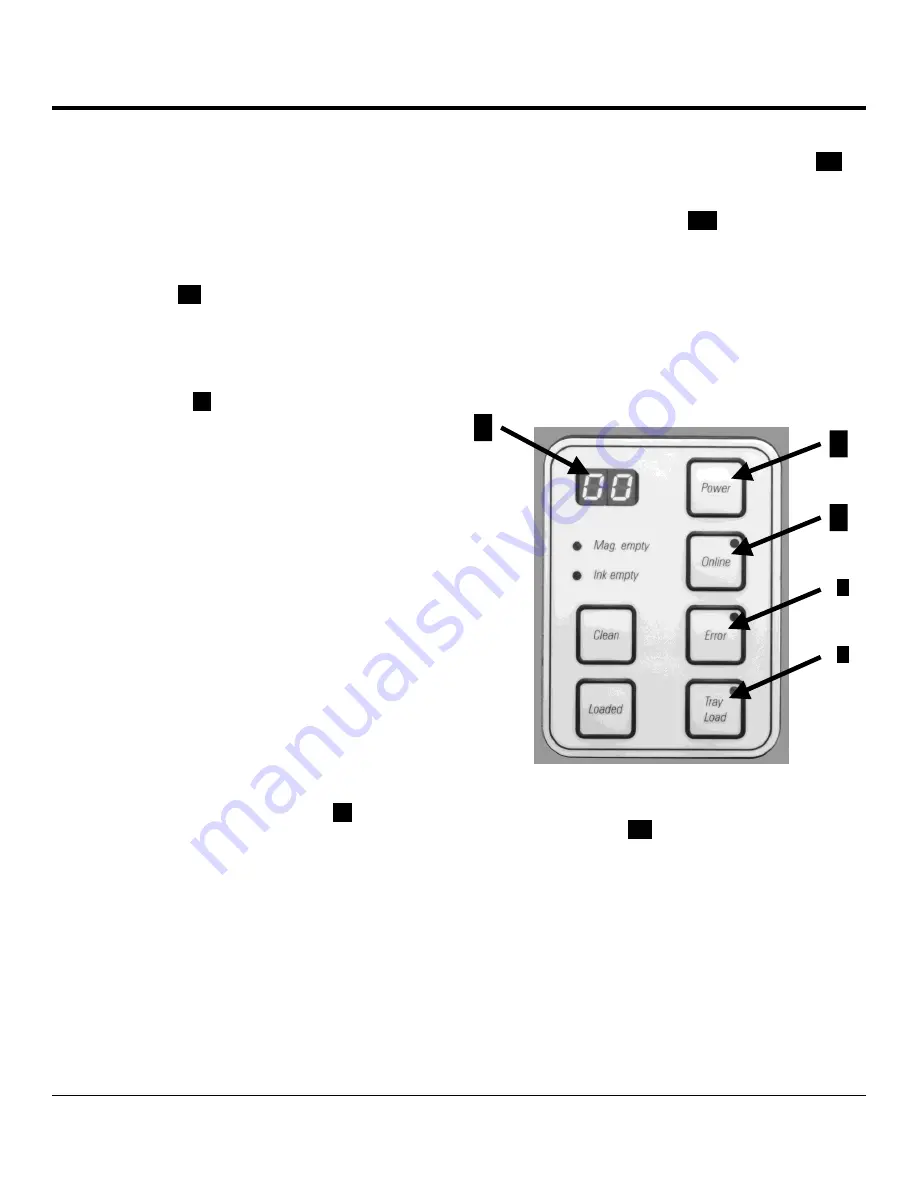
Description of Control Panel
(Figures 4-B and 4-C)
Once the instrument is powered on it will initialize and
perform a series of system checks to prepare for operation.
After the initialization process is complete, the instrument is
ready for operation.
The Display
1
..
is a two-figure, seven-segment LED
display that is located on the top left of the control panel.
On the right-hand side of the control panel are four
function keys labeled:
[POWER], [ONLINE], [ERROR]
and
[TRAY LOAD].
The
[POWER]
2
..
key is used to switch the instrument
between the POWER ON mode and the STANDBY mode.
Located on the [POWER] key is an LED indicator. When
the LED is on, the instrument is in the POWER ON mode
which means that power is supplied to all printer systems
and the printer is ready to print. When the LED flashes,
the instrument is in the STANDBY mode. In the STANDBY
mode, only the microprocessor is powered on. When in
the STANDBY mode, the printer performs a print head
clean at regular intervals (approximately 4 times a day)
and switches into the POWER ON mode for a short period
of time. If the LED is off, the printer is disconnected from
the power source.
NOTE:
Printing is only possible in POWER ON mode.
Pressing the [POWER] key in STANDBY mode switches
the printer to the POWER ON mode. POWER ON can
also be activated by the PC interface.
NOTE:
When the printer remains idle for any period of
time, the printer automatically switches to the STANDBY
mode.
Below the power key is the
[ONLINE]
3
key. This key
is used to interrupt a print job that is in progress. If the
ONLINE LED is on, the printer is ready and awaiting a
new print job. When the ONLINE LED flashes, a data
transmission is in progress or a print job is being carried
out. When the ONLINE LED is off, there is no data
transmission in progress, no print job in progress, or a print
job has been temporarily interrupted. Pressing the
[ONLINE] key while a print job is in progress will interrupt
printing. The [ONLINE] key LED goes out and the printer
can be accessed manually (i.e.: for removing a half-empty
magazine and refilling it). Pressing the [ONLINE] key again
resumes operation. The LED flashes if a job was
interrupted, or comes back on if there is no job printing.
Directly beneath the online key is the
[ERROR]
4
..
key. When the LED on the [ERROR] key flashes, it
signifies that an error has occurred. The corresponding
error code shows in the display
1
…
Once the error has
been determined and the source eliminated, and all
obstacles removed, pressing the [ERROR] key removes
error indication and resumes normal operation. If there are
several errors simultaneously, the error of the highest
priority is displayed first. Once the first error has been
acknowledged, pressing the [ERROR] key again displays
the error of the second highest priority and so on. When
the error LED is not illuminated, the instrument is working
trouble-free.
1
2
3
4
5
Figure 4-B
The
[TRAY LOAD]
5
..
key controls the movement of
the elevating tray of the optional unload station. If the
stack of trays is completely or partially indexed, pressing
the [TRAY LOAD] key briefly moves the stack of trays up
one tray. Pressing the [TRAY LOAD] key longer than one
second indexes the stack of trays completely out of the
unload station. If a print job is in progress, the LED in the
key will flash, and the print job is interrupted. If the stack of
trays is indexed completely out, pressing the [TRAY LOAD]
key longer than one second indexes the stack of trays
(there can be any number of trays between 1 and
10, as the number of trays is counted by the printer) into
the unload station. The LED goes off once the stack has
Содержание Tissue-Tek Autowrite
Страница 1: ...3 4 2011 Tissue Tek Autowrite Slide Printer ...
Страница 18: ...1 14 Revised 3 04 11 INTRODUCTION ...
Страница 32: ...2 14 Revised 3 04 11 INSTALLATION SETUP ...
Страница 43: ...Revised 3 04 11 3 11 Section 3 ...
Страница 62: ......
Страница 68: ...8 2 Revised 3 04 11 SERVICE AND REPLACEMENT PARTS ...


