background image

Linkage Bar Installation

1. 

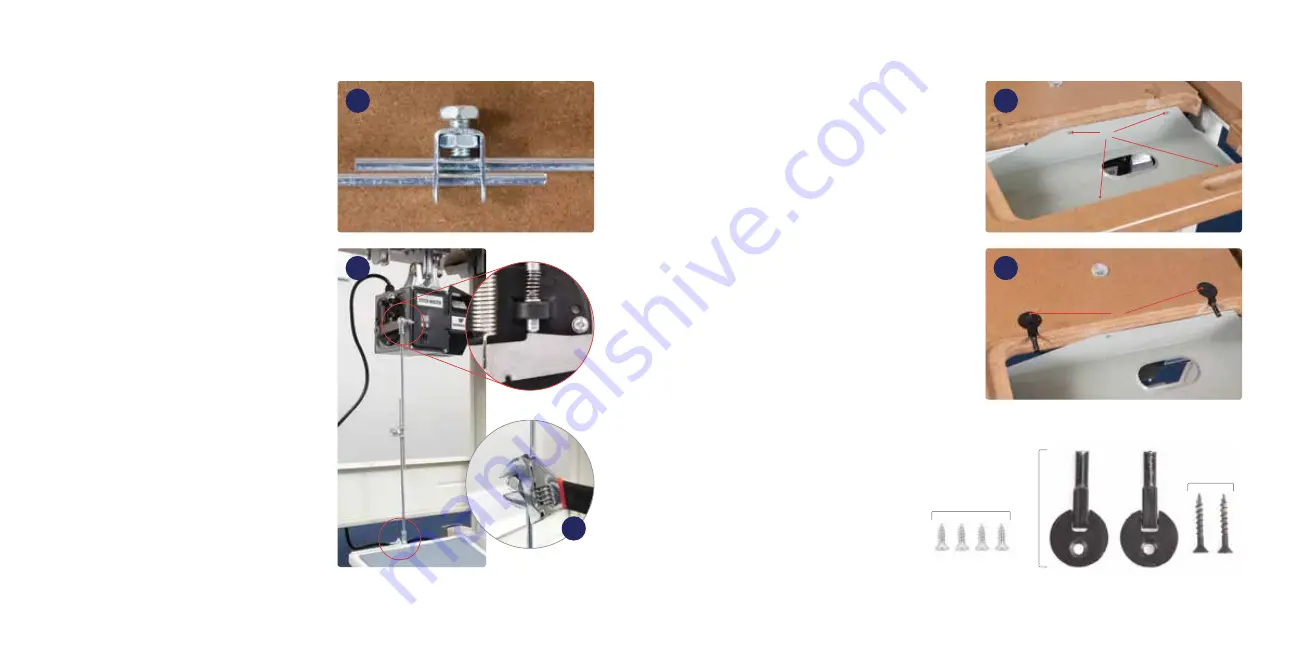
Loosen the center nut on the linkage bar 

(

A

) so that it will slide apart (

18

). Slide into 

furthest position so the linkage bar is at 

its longest length and re-snug the nut. On 

each end of linkage bar take off the first nut 

and lock washer. 

2. 

Bolt the linkage bar (

A

) to the outer-most 

holes of the motor operation lever on the 

Workhorse™ Servo Motor and the treadle-

bracket of the treadle (

19

). By increasing 

or decreasing the overlap of the linkage 

bar, different treadle pedal angles can be 

achieved depending on user preference. 

Use a crescent wrench to set the angle (

20

).

3. 

If the linkage bar overlap is too agressive, 

the pedal angle will be extreme preventing 

the operation lever to make contact with its 

resting stop. When this happens, the motor 

will not run. Image (

B

) is correct with the 

pedal not actuated.

Install Oil Tray and Hinges

1. 

Find the metal oil tray (

C

) and reference 

the belt slot of the tabletop (

21

). Place the 

oil tray (

C

) under the tabletop and line up 

the mounting holes in the oil tray to the 

pilot holes inside the rim of the tabletop 

cutout. Next, thread in the four flat head 

tapping screws (

D

) to attach the oil tray 

(Due to small size, extras are included in 

the package). Use a #1 Stubby Phillips 

screwdriver.

2. 

Place the two hinges (

E

) into the pre-made 

hinge holes in the tabletop. Secure with 

included wood screws (

F

) (

22

).

18

19

20

21

22

Hardware is scaled 50%

E

F

D

A

A

B

C

E

E

D

F

Stitch Master

®

 Guidebook: Assembling the Stitch Master

14

13

Содержание Craftool Pro Stitch Master

Страница 1: ...Set Up Use Maintenance Troubleshooting Schematics ...

Страница 2: ...to Sew 34 Regulating Stitch Length 35 Sewing in Reverse 35 Turning Corners 35 Thread Tension Adjustment 36 Adjusting Presser Foot Tension 38 Removing Material from Under the Presser Foot 39 Motor Speed Adjustment 40 Stitch Master Maintenance 41 Lubrication 41 Troubleshooting the Stitch Master 45 Material Surface is Being Damaged 46 Inconsistent Stitch Tension 47 Removing the Hook to Clean the Shut...

Страница 3: ...Table Top and Legs Hardware Table Top and Legs Stitch Master Legs Table Top Components 37 PCS PZ II I ...

Страница 4: ...Accessories Box 10 6 Servo Motor Box Head Box Stitch Master Sewing Machine Components 77 PCS PZ IV III ...

Страница 5: ...s 12 Wire the light in a manner to keep it clear of belts and other moving parts Workhorse Servo Motor Safety Precautions The Workhorse Servo Motor is designed specifically for sewing machines and is not warranted for other uses Please follow the guidelines below to prevent injury or damage to the motor sewing machine 1 Confirm the shaft of the motor rotates counterclockwise before operating the s...

Страница 6: ...lacing heavy objects excessive force or bends in the power cord b Ensure the power cord cannot be caught in the timing belt c Check that the outlet voltage matches the motor voltage before plugging in the power cord Mallet or Hammer 3 8 inch Socket Wrench 14 mm Socket Wrench Crescent Wrench 2 Phillips Screwdriver 1 Stubby Phillips Screwdriver Flat Screwdriver included Box End Wrench included Tape ...

Страница 7: ...nut in the desired position slide the bottom brace into position and thread in the corresponding bolt 4 Do this for both sides 4 Use a tape measure to confirm the bottom brace is squarely positioned Tighten the bolts Assembling the Legs 1 Position legs A on their side unfinished sides facing in with the feet facing you Line up the back brace B with the corresponding threaded holes 1 2 To connect t...

Страница 8: ...rough each hole Position the bolts all the way to the left in the treadle bracket slots and tighten each bolt C with a nut D on the back side 5 2 Find the two pivots E bolts lock washers and washers F and nuts G With the stand upside down place one pivot underneath the far right slot of the bottom brace making sure the tab is facing up away from center and through the slot Run the bolt up through ...

Страница 9: ... each foot to be threaded all the way in 9 Once the table is upright this makes it easier to adjust one or two feet to stabilize the table Once adjusted use the nut to lock the position permanently Attach Idler Pulley 1 Partially thread the two remaining hex head lag screws B lock washers C with two small washers E into the two pilot holes next to the belt slot of the tabletop 10 2 Slide the two p...

Страница 10: ...sher H and finally thread on a nut I Tighten each with crescent wrench or a 14mm deep socket wrench 17 6 Flip the table so that it is upright before continuing to the next step Tabletop Motor Attachment 1 Use a mallet or hammer to pound the three carriage bolts A into the three through holes in the tabletop 12 2 Flip the table over again legs up 3 Within the motor box find the plastic belt cover a...

Страница 11: ...ive the pedal angle will be extreme preventing the operation lever to make contact with its resting stop When this happens the motor will not run Image B is correct with the pedal not actuated Install Oil Tray and Hinges 1 Find the metal oil tray C and reference the belt slot of the tabletop 21 Place the oil tray C under the tabletop and line up the mounting holes in the oil tray to the pilot hole...

Страница 12: ...e holes B over the hinge pins of the hinges previously screwed to the tabletop 25 Allow the sewing machine to slide all the way back down on the hinge pins and rest the machine on the tabletop Tighten the set screws A 26 Pivot the sewing machine upright 23 24 25 26 27 28 C D F A B A G H E E Attach Power Plus Flywheel 1 Set the Posi Pin E aside and unscrew the reverse threaded Posi Pin Nut F 27 Sli...

Страница 13: ...to make sure that both belts are aligned correctly The position of the Idler Pulley L bracket and the Workhorse Servo Motor can be adjusted for perfect alignment 3 Check the tension of both timing belts by pressing at the middle of each belt There should be equal tension between the two belts If one is more loose use the box end wrench to loosen and tighten the idler pulley accordingly 32 4 To che...

Страница 14: ...clockwise 4 Select 0 and the motor will run counterclockwise this is the setting the motor should be on 5 Press the P button to save the selection of 0 Insert Support Pin and Thread Stand Post 1 Locate the support pin A and thread stand posts B and C 34 The longest thread stand post with looped end C will drop into the back corner hole on the tabletop Gently tap the non tapered end of the short po...

Страница 15: ...e keyway cut on the belt cover C will lock onto the shaft of the key of its mating component 38 Install Light and Wire 1 To attach the LED light place the magnetic light in your desired location 39 If it is a 110 volt sewing machine the light will plug into the back of the Workhorse Servo Motor If it is a 220 240 volt machine the light will plug into a wall outlet 2 Use the included adhesive piece...

Страница 16: ... Set Up Thread Stitch Master sewing machines can handle most polyester nylon cotton or monofilament thread from general purpose to heavy duty V 92 T 90 Install Spool Pin and Felt 1 Screw the spool pin A into the threaded hole on top of the sewing machine Slide the red felt disc over the pin 40 40 A 24 Stitch Master Guidebook Assembling the Stitch Master 23 ...

Страница 17: ...e machine CAUTION If the needle is inserted the wrong way the machine will skip stitches and break thread To make sure your needle is inserted far enough you can look through the sighting hole 43 E near the bottom of the needle bar The top of the needle should be fully visible in the sighting hole and pushed all the way to the top A Needle bar thread guide hole B Needle groove C Needle eye D 3 16 ...

Страница 18: ...shing the post to the left and pulling the bobbin off Cut the thread A B C D It s faster to wind while you sew Run thread to the bobbin winder from an extra cone of thread Simply place the second cone beside the primary cone and lead the thread up through the same guides Follow normal bobbin winding instructions but do not disengage the clutch 45 44 46 Disengage the Clutch i e Posi Pin Clutch Syst...

Страница 19: ...f bobbin tensioner C 4 Loop through ear holes D 5 Thread through upper tension shown without cover knob E Make sure lift lever F is raised up to release tension plates so thread can pass through Be sure to catch the hooked spring end with the thread last 6 Pass through take up arm right to left G and then under end cover 7 Pass through the needle bar thread guide hole H and then down through the n...

Страница 20: ...case out With the lever held open the bobbin is captive in the bobbin case Release the lever and the bobbin will fall out Installing Pull and hold the spring loaded lever outward to keep the bobbin from falling out and push the case onto the axle of the gib hook The finger of the bobbin case F should point upward If the lever E is held up until the bobbin case is completely installed the lever whe...

Страница 21: ...ead After the machine is threaded and the bobbin case with bobbin is installed pick up the bobbin thread as follows 1 Hold the needle thread loosely to the side 50 and rotate the Power Plus Flywheel by hand toward you until the needle moves down and then back up 2 As the needle nears its highest point pull the needle thread gently The bobbin thread should come up through the needle hole with the n...

Страница 22: ... length To set the stitch length loosen the two thumb screws A slide the posts up or down and tighten the screws The thumb screw stops B restrict the movement of the Feed Regulator Lever C which is spring loaded to always rest against the upper stop B C A 6 mm Longest Forward 6 mm Longest Reverse Thread Tension Adjustment Tension adjustment refers to the combination of tension on both the upper th...

Страница 23: ...is controlled by the Pressure Regulating Thumb Screw A This screw compresses a long coil spring above the presser foot Turn the screw clockwise to increase the downward foot pressure 58 Turn the screw counterclockwise to decrease the foot pressure 59 When sewing a thick leather assembly set the regulating thumb screw to be very loose To do this turn the thumb screw until it comes free of the machi...

Страница 24: ...oject you are sewing you may want to change the top end speed of the machine A slower speed is generally better for sewing more intricate projects while a faster speed may be better for sewing larger project Removing Material from Under the Presser Foot 1 Stop the machine with the needle at its upward most position 60 2 Raise the lift lever p 34 54 3 Pull the material straight back to remove it fr...

Страница 25: ...Oil all metal to metal working parts frequently Use only sewing machine oil After oiling briefly sew with scrap material to prevent soiling your work For good maintenance of your machine you should oil it at least twice yearly before it is put in storage or anytime the machine sounds like it is running roughly Right end lubrication points 62 63 42 41 ...

Страница 26: ...Underside lubrication points 65 Left end and back side lubrication points 64 Stitch Master Guidebook Stitch Master Maintenance 44 43 ...

Страница 27: ... your Stitch Master and to help fine tune and resolve common sewing machine problems Material Surface is Being Damaged Surface marring is damage to leather and other delicate material surfaces The Stitch Master sewing machine has special knurled surface feet and feed dogs to reduce marring To further avoid marring reduce the amount of pressure down on the presser feet by nearly unthreading the pre...

Страница 28: ...ll need to replace the take up spring To do this you ll need to disassemble the upper tension assembly Keep track of how the parts are removed as they will be replaced in the same manner 66 1 Pull the cover knob A straight off wiggle a bit if needed 2 Unscrew and remove the threaded knob B 3 Remove the big spring C the spring holder D the two tension disks E F and the keyway washer with pip G 4 Re...

Страница 29: ...e foot to twist the sewn assembly and make a direction change Drop the presser feet and continue sewing Follow these directions to avoid badly tensioned corner stitches and reduce the chance of a skipped stitch 3 Not Enough Foot Pressure Materials like dense vegetable tanned leather can make the withdrawal of the needle from the material difficult If the presser foot is being lifted as the needle ...

Страница 30: ...hread entry and material condition 3 Incompatible Needle Size Thread Weight If the thread is too thick for the needle it will not pass through the needle eye and form a loop and will instead ball at the needle Check the compatibility of the needle size and thread weight p 24 4 Burred Gib Hook or Retaining Ring Cap Spring A needle strike to the gib hook or the edge of the retaining ring cap spring ...

Страница 31: ... 29 47 I Then pull out a longer thread tail and trap it with your finger to the bed of the sewing machine Release the thread tail after the first few stitches A rat s nest forms in the first few inches of sewing and then clears up Eliminate this formation by trapping the thread tails from the needle and the bobbin to the bed of the sewing machine as you start to sew When stopping to turn a corner ...

Страница 32: ... is loose 1 Make sure the spring pin is properly inserted 2 If slipping still occurs remove the Posi Pin nut p 77 2 pull out the spring pin 1 3 5 and slide the Power Plus Flywheel 6 off the bushing 3 Use a 2 5mm Allen wrench to tighten the two set screws 17 that fasten the bushing to the machine s upper shaft then reinstall the Power Plus Flywheel and check for proper operation Bobbin Winding Issu...

Страница 33: ...of the needle to the gib hook The gib hook picks up the upper thread at the needle and carries it down around the bottom of the bobbin case where the upper thread loop is pulled tight by the take up arm above the needle bar Starting on p 59 follow these steps to adjust the timing on your Stitch Master About the Class 15 Shuttle Hook System The Stitch Master has a class 15 shuttle hook system In th...

Страница 34: ... way down Unlock the needle bar from the drive collar by loosening the set screw located either in the front or the side of the pillow block B If the screw is in the side of the pillow block it can be accessed through a hole in the machine casting C 5 With the needle bar at the bottom of its stroke reposition the needle bar so the mark lines up with the top surface of the upper needle bar guide Ge...

Страница 35: ...ot continue on to adjust the driver 3 The driver is secured to the lower shaft with two set screws 75 Loosen the screws B and gently twist the shuttle driver Keep the driver from sliding left or right on the shaft If the fit is tight carefully use a screwdriver as leverage After adjusting the rotational timing of the gib hook you may need to adjust the rotational positioning of the shuttle race gu...

Страница 36: ... hook must be held in place with light finger pressure to keep it from falling out of the shuttle assembly when rotating the Power Plus Flywheel A Check the Rotational Positioning of the Shuttle Race Guide Shaft Before making any adjustments to the left right positioning of the shuttle assembly check the rotational positioning of the shuttle race guide shaft 1 Remove the needle plate p 67 17 and f...

Страница 37: ...k in place loosen the right collar E and move it as far right as possible just resting on the frame 6 Tighten the two collar screws There should be practically no side to side play in the center shaft To move the hook to the right 7 Loosen the two screws in the right collar E and move it to the left on its shaft and move the shuttle assembly D to the right 8 Move the assembly to position the hook ...

Страница 38: ...titch Length Plate Screw 103263 17 Needle Plate 5mm W032 18 Needle Plate Screw A052 19 Shuttle Race Slide Plate 121534 20 Three Hole Thread Guide W029 21 Upper Tension Assembly includes 24 8511 22 Thread Guard Screw 103253 23 Top Plate Set Screw E072 24 Thread Take Up Spring included in 21 5332 25 Tension Release Pin W184 2 26 Shuttle Race Slide Spring A049 27 Shuttle Race Slide Spring Screw A050 ...

Страница 39: ...ar Support B016 21 Needle Bar Set Screw D097 22 Zigzag Connecting Rod W015 23 Needle Bar Connecting Joint Pin B099 24 Needle Bar W066 25 Needle Thread Guide W067 26 Needle 135X16 N A 27 Presser Foot Screw A036 28 Inside Presser Foot W012 29 Presser Bar A035 1 30 Presser Bar Lower Bushing B028 31 Presser Bar Bracket W039 32 Presser Bar Feed Actuator Pivot Screw 103257 33 Tension Release Lever Drag ...

Страница 40: ...ble Timing Clamp B155 11 Compressible Timing Clamp Pin A084 12 Compressible Timing Clamp Screw B153 13 Shuttle Race Guide Shaft B170 14 Lower Shaft B172 15 Shuttle Driver W172 16 Shuttle Gib Hook 9601 17 Bobbin 123100 18 Bobbin Case Assembly 1232 19 Screw B139 2 20 Retaining Ring Cap Spring 1603 21 Retaining Ring Clip Set 123011 22 Retaining Ring Clip Spring 103273 23 Retaining Ring Clip Screw 103...

Страница 41: ... and Nut A023 12 Driving Crank W046 13 Feed Rock Shaft Crank A071B 14 Feed Rock Shaft A071A 15 Feed Bar Center Screw Nut A076 16 Feed Bar A075 17 Feed Dog Screw A078 18 Feed Dog 121265 19 Driving Crank Guide Nut W046 1 20 Driving Crank Guide Screw A061 21 Feed Lifting Rock Shaft A072 22 Feed Lifting Rock Shaft Crank A073 23 Screw B139 2 24 Feed Regulator Wavy Washer A067 25 Forked Rod Support Spri...

Страница 42: ...2 Presser Foot Bracket Limiter W014 23 Screw C097 24 Presser Bar Feed Rod W036 25 Presser Bar Actuator Spacer W024 1 26 Bearing Bracket Bushing W021 27 Lift Crank Rod Bearing Plate W023 28 Rocker End Set Ring W052 29 Presser Bar Actuator Rocker W033 30 Presser Bar Actuator Feed Rocker W034 31 Crank Rod Rocker W035 32 Crank Rod W053 33 Set Screw 103640 34 Screw A036 or 100576 35 Presser Bar Actuato...

Страница 43: ...10 Idler Pulley Washer W061 6 11 Idler Pulley Set Nut W061 2 12 Pulley Bracket W059 13 Bracket Washer LT 2M 4 14 Bracket Lock Washer LT 2M 3 15 Bracket Bolt LT 2M 2 16 Screw W049 1 17 Set Screw 713100 18 Idler Pulley Stitch Master L Bracket 121448 19 Washer 121444 20 Compression Spring 121443 21 Fiber Washer 121445 22 Belt Cover and Bracket 120930 23 Cogged Sewing Machine Timing Belt 15 8 121447 2...

Страница 44: ...om 3 Oil Tray 120864 4 Table Top for Stitch Master 121454 5 Support Pin 120866 6 Thread Stand 18303 7 Hinge 432100 8 Flat Head Wood Screw 103528 9 Flat Head Screw 120462 10 LED Light 121551 110V or 121552 220 240V European Union or 121553 220 240V Australia or 121554 220 240V United Kingdom 1 2 3 Idler Pulley See p 77 4 5 6 10 7 9 7 Not to Scale Not to Scale Not to Scale 8 8 79 80 ...

Страница 45: ... and attempt to operate if it works material was too heavy for motor E2 Over current or under voltage Check the power source to ensure that the motor voltage matches the outlet voltage E3 The board cannot read the parameter Turn the power off and on twice and try again If the problem still occurs contact Sailrite E4 Hall signal error Replace the main fuse To do this turn off and unplug the motor r...

Страница 46: ...saster insufficient excessive electrical supply abnormal mechanical or environmental conditions wear and tear resulting from normal use of the product or any unauthorized disassembly repair or modification This limited warranty does not extend to any indirect consequential or incidental damages that may be suffered by a user or from the use of the motor including without limitation any liability f...

Страница 47: ...r Craftool Pro et Stitch Master sont des marques déposées de Tandy Leather Used with permission Manufactured for Craftool by Sailrite Fabicado para Craftool por Sailrite Fabriqué pour Craftool par Sailrite Workhorse EZ Set Power Plus and Posi Pin are registered trademarks of Sailrite Workhorse EZ Set Power Plus y Posi Pin son marcas registradas de Sailrite Workhorse EZ Set Power Plus et Posi Pin s...

Отзывы: