SAGEMCOM F@st 5260, Руководство пользователя
SAGEMCOM F@st 5260 - компактный и надежный маршрутизатор с высокой производительностью. На нашем сайте вы можете бесплатно скачать руководство пользователя для этого устройства. Наслаждайтесь быстрым и безопасным интернетом с SAGEMCOM F@st 5260! Скачайте руководство с manualshive.com.
Поделиться
Скачать


Отзывы:
Нет отзывов
Похожие инструкции для F@st 5260

IDS1000
Бренд: IDENTEC SOLUTIONS Страницы: 17

DIR-868L
Бренд: D-Link Страницы: 3

AC1200
Бренд: D-Link Страницы: 2

KA300
Бренд: Kasda Страницы: 42

ZoneFlex 7341 802.11n
Бренд: Ruckus Wireless Страницы: 2

AIR 1 ANC
Бренд: Happy Plugs Страницы: 21
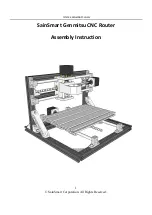
Genmitsu CNC
Бренд: SainSmart Страницы: 12

N3 11N
Бренд: Tenda Страницы: 80

RNX-N360RT
Бренд: Rosewill Страницы: 8

AR315W
Бренд: Airlinkplus Страницы: 96

RP052M
Бренд: Sercomm Страницы: 14

AX75 V1
Бренд: TP-Link Страницы: 2

LAPN300
Бренд: Linksys Страницы: 112

APBTCS1
Бренд: Billionton Страницы: 43

CarrierGate PCWA-A220
Бренд: Sony Страницы: 17

MDR-RF815R
Бренд: Sony Страницы: 22
Vaio PCWA-A500
Бренд: Sony Страницы: 32

WX-GS920BH
Бренд: Sony Страницы: 41


