background image

32

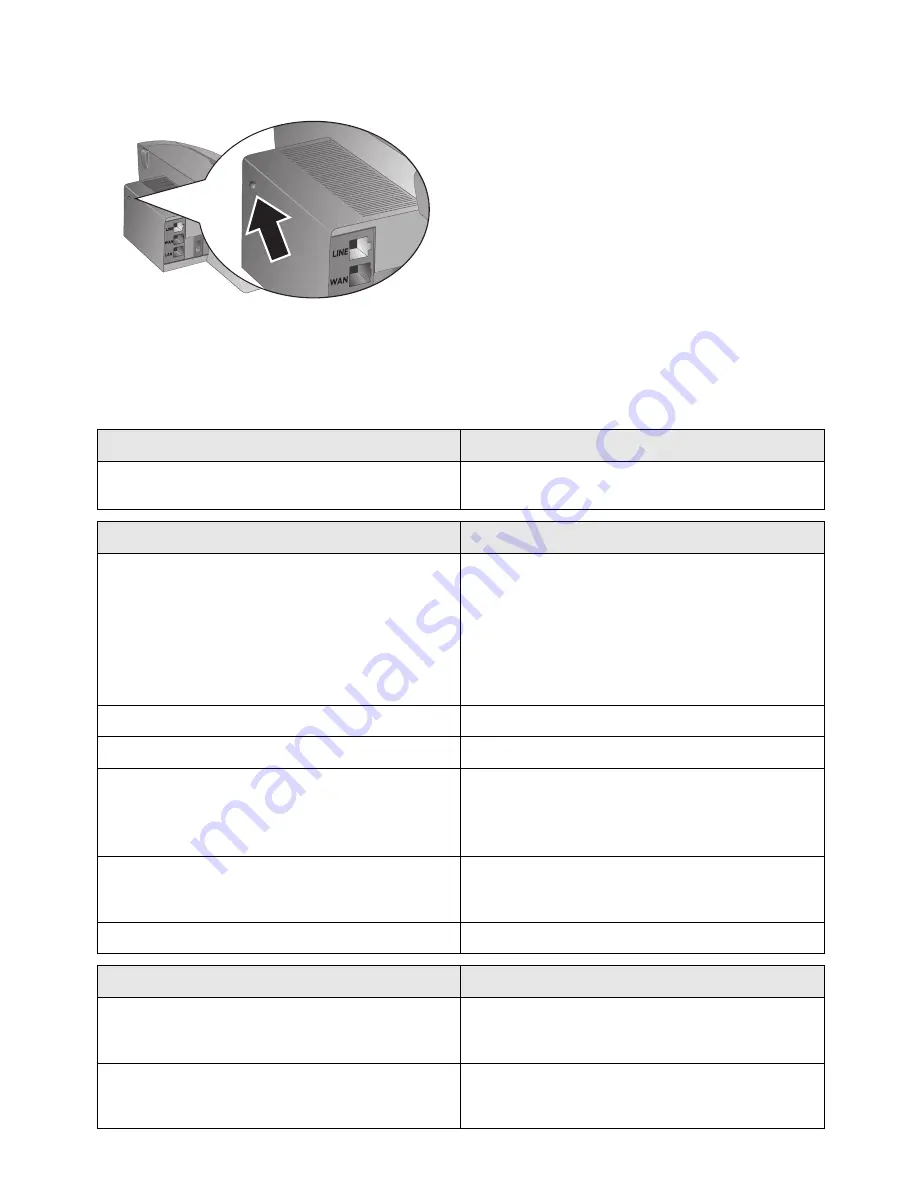
Reset button

The button for restarting the device is located on the rear
side of the device. Use a pointed object (for example, a
straightened paper clip or a toothpick) to press the button.

Reset-Knopf Detail

Power Cycling

If a problem occurs that cannot be corrected with the in-
structions in this user manual (see also the help below), fol-
low the steps given here.

1

Pull out the power plug.

2

Wait at least ten seconds, then plug the power plug
back into the socket.

3

If the error occurs again, please contact our technical
customer service or your retailer. Follow the instruc-
tions on the display and on the error report.


General information


The time and date flash on the display.

You must check the time and date after a short power fail-
ure. Confirm using 

OK

.

Problems when faxing or printing


Faxes sent are of poor quality.

Change the resolution from 

RESOL.: STANDARD

 to

RESOL.: FINE

 or 

RESOL.: PHOTO

.

Change the contrast.
Clean the scanner and the document feed slot.
Test the device by making a copy of the document. If the
device is in order, the fax machine of the recipient is defec-
tive.

The device produces black lines when sending or printing. Clean the scanner and the document feed slot.

Copy is blank.

Insert the documents face up into the document feeder.

Printing is interrupted.

Paper or document jam, no paper or ink film. Follow the
instructions on the display and in the error report.
There could be a small pause after printing several pages.
The device continues printing automatically.

No printing

Check if you have inserted clamped paper correctly.  The
lever on the right hand side next to the paper feeder must
be folded backwards.

Documents are not properly fed.

Clean the scanner and the document feed slot.

Problems with the connection

The device rings once, remains silent for a short while and
starts ringing again.

This is absolutely normal. The fax switch checks the call af-
ter the first ring. If it is a voice call, the device continues to
ring.

No dial tone

Check the installation of the device. Connect the telephone
cable to the socket marked 

LINE

. Insert the telephone plug

into your telephone connection socket.

Содержание IP PHONEFAX 43A

Страница 1: ...User Manual...

Страница 2: ...an make the necessary settings for other providers via the web interface of the device from your PC Connect your device to a wireless network with a PCM CIA plug in card for the Wireless Local Area Ne...

Страница 3: ...lter installieren Inserting paper Paper Format Before you can receive or copy documents you must insert paper Please use only suitable paper in the standard format A4 210 297 millimetre preferably 80...

Страница 4: ...or telephone and network cables on the rear side of the device R ckseite Detail Connecting the Telephone Cord Connecting the Telephone Cable Connect the telephone cord to the device by inserting it in...

Страница 5: ...allation commences Press Your device prints a help page Selecting the Language 1 Use to select the desired display language 2 Confirm with OK Selecting the Country Setting the Country Correctly Settin...

Страница 6: ...ntering login name 1 Enter the login name with which you login to your Voice over IP provider 2 Confirm using OK Additional user name Entering password 1 Enter the password which is used for login to...

Страница 7: ...entries page 24 3 Fax 31 Polled reception page 19 32 Polling send page 20 33 Transmission with delay page 19 34 Sending to multiple recipients broadcast page 19 35 Fax journal page 25 36 Transmission...

Страница 8: ...e IP address DHCP Line socket LINE socket Connection socket for analog tele phone cord Reset button Reset button Resetting device to factory settings All personal settings will be deleted WLAN PCMCIA...

Страница 9: ...nd hold Starting fax polling Speed dial buttons Speed dial buttons Press briefly Recalling speed dial entry press and hold Editing speed dial entry Message Button Lights up if new messages are receive...

Страница 10: ...ds or for eign objects have entered the machine and have your ma chine examined by trained professionals at a technical serv ice location Do not allow children to handle the machine without su pervisi...

Страница 11: ...ting up a wireless network WLAN 17 3 Fax 18 Fax over IP 18 Sending fax 18 Manually Sending a Fax 19 Broadcasting 19 Delayed Fax Transmission 19 Receiving Faxes 19 Polling Faxes 19 Using Fax Templates...

Страница 12: ...a dialling pause into the tele phone number for instance for the outside line access code for an extension or sub address or in a long distance number Press R The second part of the number is only di...

Страница 13: ...Confirm with OK 6 Page through the entries of the group with 7 Press j twice to return to the starting mode Deleting Individual or All Group Entries Deleting an Individual Entry 1 Press OK 13 and OK...

Страница 14: ...Missed Calls If you received a call while away the button flashes 1 Press 2 Using you can page through the list of missed calls 3 To call back pick up the handset Displaying Telephone Book Names If th...

Страница 15: ...ivate IP address in the network to the device Network report 1 Start an Internet browser on a computer which is con nected to the network Enter the private IP address of the device in the network in t...

Страница 16: ...or select manual configura tion 3 Confirm using OK Entering user name Login name and User name In addition to the login name with which you login with your Voice over IP provider you will also receive...

Страница 17: ...network you require the following components Original WLAN PCMCIA plug in card optional Existing configured wireless network with WLAN rout er Computer with network socket connector RJ 45 and network...

Страница 18: ...ed telephone number with the number pad Speed dialling Press the desired speed dial button Telephone book 1 Press m 2 Use to select an entry Enter the initial letters with the number buttons to naviga...

Страница 19: ...is inserted the machine saves the incoming faxes The button blinks Once paper or a new ink film is in serted the saved faxes are printed out Paper Error Full Message Memory If the message memory is fu...

Страница 20: ...e Press j to eject the document This interrupts the standby mode Using Fax Templates Fax Templates Five fax templates which you can use are stored in your device With these templates you can quickly c...

Страница 21: ...O for photos Press RES The configured resolution ap pears on the display Press RES again to change the res olution Creating a Copy Press COPY briefly The copy is created Creating Multiple Copies 1 Hol...

Страница 22: ...2 Dial using SUDOKU LAST 3 Confirm using OK 4 Enter how many copies of the Sudoku you would like to print maximum 9 copies 5 Confirm using OK 6 Using select if you would like to print the solution 7 C...

Страница 23: ...ttings Optimized adaptation for text and photo printing CONTR DARK For darker copies and fax transmission for example documents with faint printing 3 Confirm using OK Custom settings default settings...

Страница 24: ...Confirm using OK 6 Using set the volume 7 Confirm using OK Configuring Night Mode 1 Press OK 52 and OK 2 Configure the same settings as for the day mode see steps 2 to 7 Setting the Timer Timer The t...

Страница 25: ...w Press and 1 to print an overview of the help pages Help 3 Telephone Book Press and 3 to print an overview of the telephone book Help 4 Fax Transmission Press and 4 to print instructions for sending...

Страница 26: ...e counters Connection to the device EXT socket adapter EXT connection adapter You can connect additional devices to the EXT socket of your device using the enclosed adapter In this way the fax switch...

Страница 27: ...the setting Number of rings of the external answering machine 1 FAX RINGS 3 TOTAL RINGS 5 also see Chapter Setting the Fax Switch Page 24 External Answering Machine If the external answering machine...

Страница 28: ...The used ink film cannot be reused 5 Pull the used Plug n Print card out of the plug socket on the left hand side next to the ink film tray The Plug n Print card cannot be reused 6 Carefully remove th...

Страница 29: ...pages that can still be printed with the ink film is shown on the display 3 Press j to return to the starting mode If the ink film used up or if there is no ink film in the ma chine a message appears...

Страница 30: ...t paper again Cleaning Cleaning Fax Cleaning Sheets 1 Remove the paper from the paper feeder and take the paper tray out of the device 2 Open the device by lifting the panel using grip in the centre a...

Страница 31: ...Press OK 45 and OK 2 Enter a service code 7117 Deletes all changed settings and saved data The device is reset to factory settings and the initial instal lation process is started 7140 Deletes all cha...

Страница 32: ...t Test the device by making a copy of the document If the device is in order the fax machine of the recipient is defec tive The device produces black lines when sending or printing Clean the scanner a...

Страница 33: ...total number or the number of rings for the answering machine model dependent to 5 see Page 24 You cannot simultaneously use the answering machine fa cility of your telephone service provider voice m...

Страница 34: ...m home users to multinational organi sations In order to apply the guarantee you should contact your dealer Proof of purchase will be required Should mal functioning arise the dealer will advise you w...

Страница 35: ...heir national legislation such in validity or illegality shall not impair or affect the remaining provisions or parts of this guarantee The CE symbol confirms conformity with the EU direc tives that a...

Страница 36: ...e statutory regulations of your country regarding telecommunications secrecy and data privacy This product is intended for use on an analogue public tel ecommunications network PSTN and in the country...

Страница 37: ...37...

Страница 38: ...38...

Страница 39: ...39...

Страница 40: ...le Our employees are trained ex perts who would be happy to answer your questions We can assist your more quickly if you do not call us from the machine rather an external telephone Keep a printout of...

Отзывы: