


Saberz Project
M Chassis Installation Guide
A
DDITIONAL
Version 1.9.5_b
–
September 18, 2022
•
Page 26
14
Additional
-
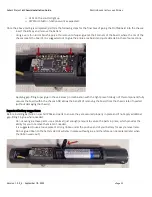
It is highly NOT RECOMMENDED to power on a chassis outside of the hilt. Handling the chassis while powered on
outside of the hilt with the ProffieBoard (and other electronics) exposed can cause shorts which will destroy the unit.
Be extremely careful when inserting batteries back into the chassis. Always be sure the positive (+) and negative (-)
on the battery match to the correct posts in the battery sled.
-
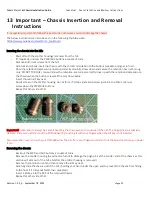
NPXL Blades
–
It should not be necessary to sand the 7/8” NPXL blades to fit properly in the Project M hilt.
-
It is normal to see small scratches on the chassis set from time to time from the removing and replacing them in the
hilt. If you wish to remediate, rub in a drop or so of Vallejo black primer using a cloth. Be sure to remove the
batteries before doing such tasks!
14.1
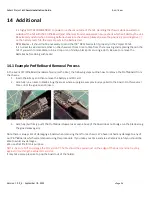
Example ProffieBoard Removal Process
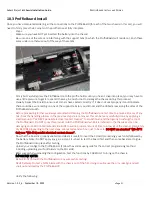
In the event of ProffieBoard hardware failure (or the like), the following steps outline how to remove the ProffieBoard from
the chassis:
1-
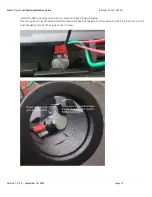
Insert the kill key and then remove the battery and SD card.
2-
Carefully run an Exacto blade along the areas where superglue was previously applied to the board. Do this several
times, until the glue seal is broken:
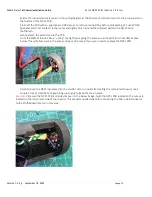
3-
Carefully (but firmly push) the ProffieBoard upwards as seen above (if the board does not budge run the blade along
the glued areas again):
Note there is always risk of damaging a board when removing them from a chassis. We have not had any damage to any of
our ProffieBoards which were removed using this procedure. If you take your time and are extremely careful you should be
able to avoid any damages.
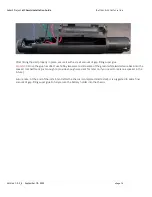
We use a flat file for this purpose.
NOTE - be sure NOT to damage the SD card slot! The file should be applied just on the edge of the board, and not resting
against or touching the actual SD card slot.
It may take some pressure to pop the board out of the holder: