26
FA ROTEX A1 BGe - 02/2014
6
x
Control unit
7. Unplug the plugs on the internal cable connections from the
individual components (flue gas temperature sensor, 2 pump
plugs, plugs X1 and X5 on the automatic firing, pressure sen-
sor).
8. Remove all the cables from the guiding elements.
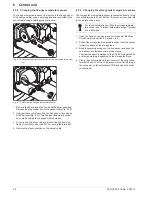
9. Remove the fixing screws of the boiler control panel with
wrench SW 8 (fig. 6-7) and remove the control panel.
Installation (observe sequence)
1. Insert the boiler control panel into the holder. Insert and
tighten the fixing screws.
2. Hook the cable duct into the contrpol panel.
3. Hook in/fix the internal cables on the guiding elements provid-
ed.
4. Plug back the plugs on the internal cable connections to the
individual components.
5. Place all sensor and connecting cables into the cable ducts of
the control panel. Ensure the correct cable routing through
the strain relief plates.
6. Insert all connectors on the switchboard PCB. The connec-
tors are colour and shape-coded to avoid confusion. Do not
force the connector!
7. Mount the control panel cover.
8. Fit both top heat insulation shells.
9. Fit the boiler cladding.
10. Replace the noise insulation hood and secure the locking
screws.
6.4 Changing cables
The connection cables can be loosened either on the boiler
control panel or on the component in question.
– The cables for the internal components in the unit are con-
nected to the circuit board connectors and cannot be
released. They can be released from the respective compo-
nents where they are plugged in.
– The cables for external components (e.g. external tempera-
ture sensors), or for components not included in the scope of
supply, are connected to the circuit board connectors with
screw terminals.
Changing the cables (observe sequence)
1. Remove the sound insulation hood (see chapter 9.2.1).
2. Unscrew the switching panel cover and remove (see fig. 6-3).
3. Pull out the relevant sensor or connection cable from the ca-
ble duct.
4. Unplug the associated plugs from the control panel PCB, dis-
connect the cable from the PCB plugs if necessary.
5. Separate the other cable end from the component (release
plug connection or remove the cable from the terminal).
6. Replace the cable. Ensure that the cable cross section is cor-
rect.
Install the new cable in reverse order. Whilst doing so, ensure the
following:
– The technical specification of the new cable must correspond
to the values of the replaced cables (e.g. conductor cross
section).
– The circuit board connectors are colour and shape-coded. Do
not force the connector!
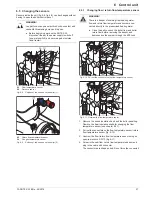
Fig. 6-6
Unhook the cable duct from the switching panel
Fig. 6-7
Remove the fixing screws for the boiler control panel
WARNING!
Live parts can cause an electric shock on contact and
cause life-threatening burns and injuries.
Ɣ
Before beginning work on live parts, disconnect
them from the power supply (switch of fuse, main
switch) and secure against unintentional restart.
Содержание A1 BG Inline
Страница 30: ...30 FA ROTEX A1 BGe 02 2014 6 x Control unit Fig 6 16 Wiring diagram ROTEX A1 BG for legend see tab 6 1...
Страница 60: ...60 FA ROTEX A1 BGe 02 2014 14 x Notes 14 Notes...
Страница 61: ...14 x Notes FA ROTEX A1 BGe 02 2014 61...
Страница 62: ...62 FA ROTEX A1 BGe 02 2014 14 x Notes...
Страница 63: ...14 x Notes FA ROTEX A1 BGe 02 2014 63...


