5
29-6900-0360
1.6 EINSCHALTEPROZEDUR
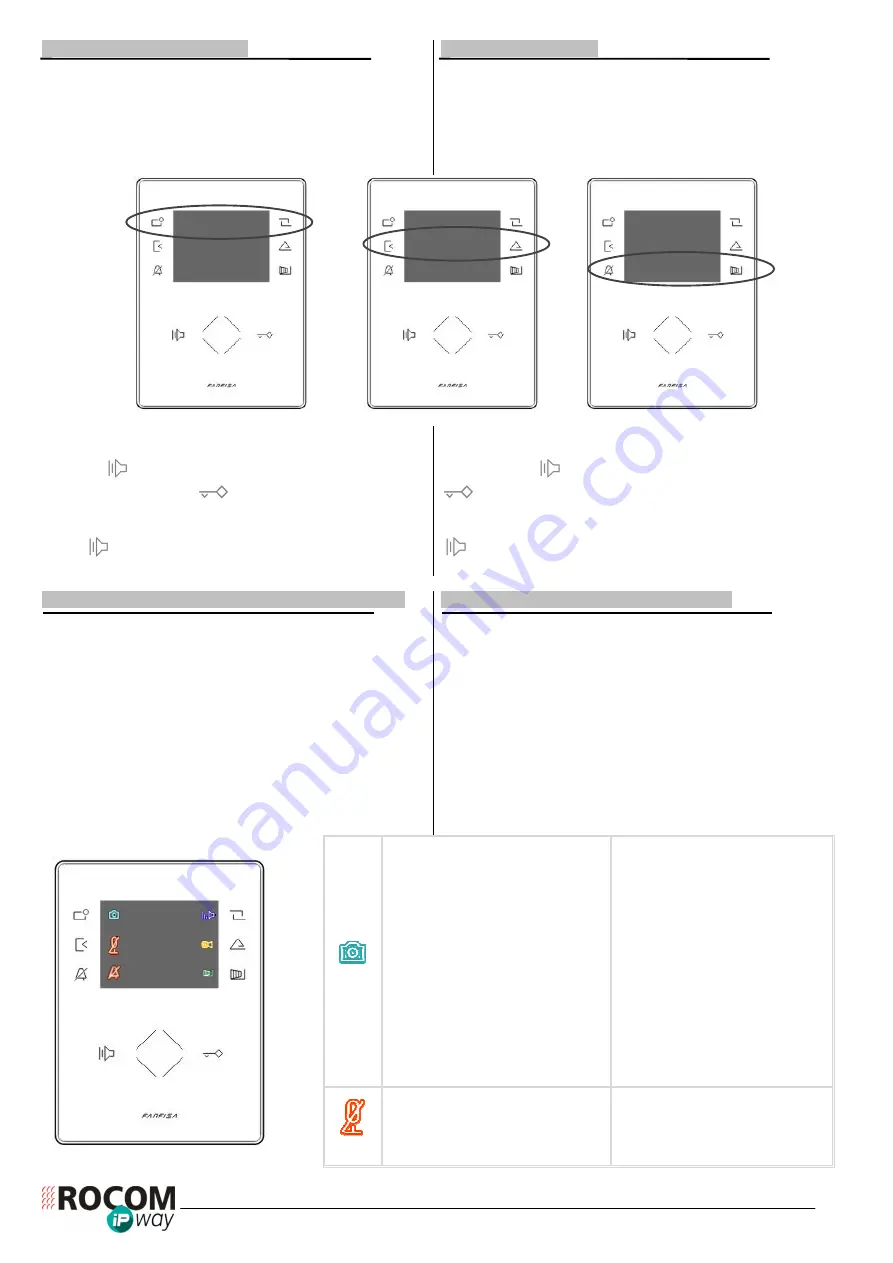
Sobald das Gerät eingeschaltet wird erfolgt automatische die
Einschalteprozedur. Die weißen LED auf der Seite des
Bildschirms leuchten dabei paarweise von oben nach unten um
den Vorgang anzuzeigen (siehe auch nachfolgendes Bild). Die
Einschalteprozedur benötigt ca. 20 Sekunden je nach
Konfiguration:
1.6 BOOT SEQUENCE
As soon as the monitor is ON, it starts automatically the boot
sequence. The frontal white led's groups on the sides of LCD
screen light up in sequence to show the progress of boot
sequence (about 20 sec. according to configuration) as in the
following picture:
Am Ende dieser Prozedur il das Gerät bereit für den Empfang
von Anrufe aus der Videotürstation in der P2P Modalität.
Die Taste
betätigen um den Anruf zu beantworten oder zu
beenden und die Taste
betätigen um der Türöffner zu
aktivieren (erster Steuerkontakt in der AgoràIP Videotürstation).
Wenn das Videohaustelefon sich im Ruhezustand befindet die
Taste
betätigen um sich mit der Videotürstation zu
verbinden.
At the end of this sequence the monitor is ready to receive a
P2P call from the door station.
Use the button
to answer and / or terminate the call and
button to release the door lock (first relay of AgoràIP door
station).
When the monitor is in stand-by mode, touch the soft button
to power it on and display pictures from the last door
station which has made a call to the monitor.
2.1 GRAFISCHE BENUTZERSCHNITTSTELLE (GUI)
Das Videohaustelefon ZHeroIP kann mit Hilfe der Soft Touch
Tasten auf den Seiten des Bildschirms und der zentralen
WHEEL Taste gesteuert, konfiguriert und programmiert werden.
Die Funktion dieser Tasten ändert sich je nach Zustand des
Gerätes (Ruhezustand, Anruf, Sprechverbindung) und wird
durch entsprechende Ikonen auf dem Bildschirm angezeigt.
Bei den Einstellungen können sowohl die Pfeiltasten als auch
die WHEEL Taste für die gleiche Funktion benutzt werden. Zum
Beispiel kann der Wert einer Einstellung mit der Pfeiltaste nach
oben oder über eine Rechtsdrehung auf der WHEEL Taste
erhöht, bzw, mit einer Linksdrehung vermindert werden.
Während einem Ruf oder einem Gespräch werden folgende
Ikonen angezeigt. Benutzen Sie die entsprechende Taste um
die folgenden Funktionen zu steuern:
2.1 GRAPHICAL USER INTERFACE (GUI)
ZHeroIP monitor can be controlled, set and programmed using
the 6 soft touch buttons on the LCD display sides and the
central WHEEL. The use of these buttons is different according
on monitor status (stand-by, call, conversation) and it is cleared
by the icons displayed on the screen.
When setting options into the GUI (Graphical User Interface)
menu the arrow buttons can be used as WHEEL, rotating the
finger clockwise to increase values or counter clockwise to
decrease values.
When the monitor is ringing (call) and during conversation the
following icons are displayed, use the side buttons to activate
the related function as described in the table:
AUTOMATISCH:
bei
einem
ankommenden Anruf speichert das
Videohaustelefon automatisch ein
Bild nach ca, 3 Sekunden
Sprechzeit. Es ist möglich weiter
Bilder durch Betätigung dieser
Taste während dem Gespräch zu
speichern.
MANUELL: um eine Bild des
Besucher zu speichern diese Taste
betätigen.
BILDSPEICHERMODUS
AUOTMATISCH/MANUELL: dieser
kann
im
weiter
unter
beschriebenen Menu eingestellt
werden.
AUTO mode: When there is a
visitor calling the monitor will save
a picture automatically, as soon
as the 3 seconds countdown is
expired. It is possible to save
further pictures touching on the
related button.
MANUAL mode: touch the side
button to save a picture of the
visitor.
PICTURE
MEMORY
MODE
(AUTO / MANUAL) can be set via
GUI menu as described below.
Taste betätigen um das Mikrofon
während
dem
bestehendem
Gespräch
stummzuschalten.
Nochmals
betätigen um
das
Mikrofon wieder einzuschalten.
Touch the side button to disable
monitor's
microphone
during
current conversation. Touch again
the
button
to
enable
the
microphone.
3
1
2


