8
1.2 Product Usage
Operating Smart Controller
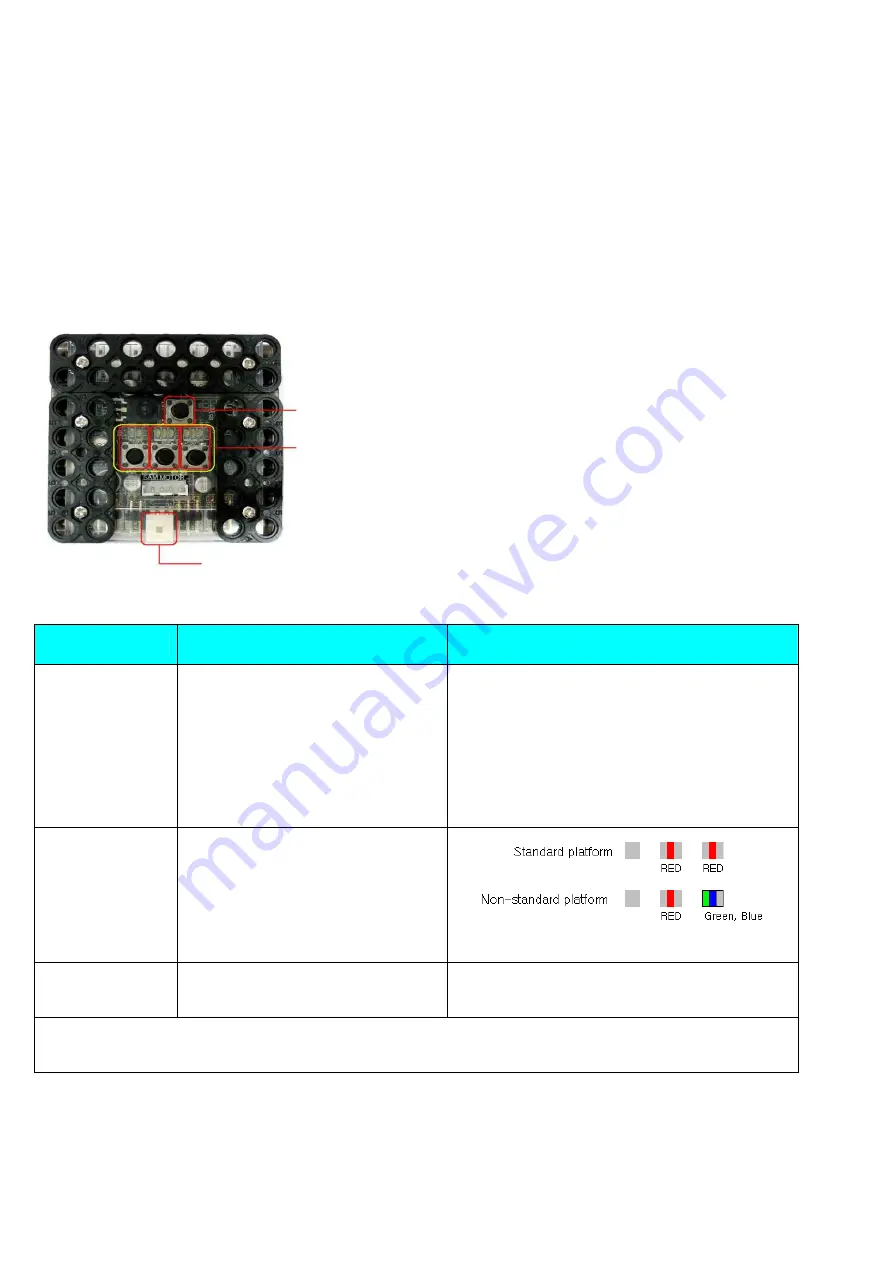
By manipulating the smart controller, you can select proper robot platform, and play motions. Also, you
can change into various mode (such as PC direct control mode or firmware upgrade mode).
버
Button P : Power (ON/OFF) button / Run button
In smart controller, ‘1’, ‘2’, ‘3’ numbers are written.
Below in each number, there are “button 1, button 2 and button 3”.
Above in each number, there are “LED 1, LED 2, LED 3”.
Power Connector
Function
Manipulation
Descriptions
Power On
Connect battery line to Power
Connector and press
Button P.
LED indicates “STOP” state.
(“STOP” state means LED lights
but is NOT blinking.)
-
It sets the latest platform.
-
It sets Standard platform,
Non-standard platform, Zero position
setting.
Platform
Selection
Press button 3 in order to set
“Standard platform” and “Non-
standard platform”
in “STOP” state.
(RQ-HUNO is
standard platform.)
Power Off
Press button P more than
5 seconds.
All LEDs are off.
For more information, see the next page.
Содержание RQ-110
Страница 1: ......
Страница 12: ...12 1 3 Rivet Tool Rivet Tool Usage ...
Страница 13: ...13 ...
Страница 14: ...14 ...
Страница 15: ...15 ...
Страница 16: ...16 2 RQ HUNO Assembly Guide 2 1 Check Part List Place all the parts as the below for RQ HUNO assembly ...
Страница 28: ...28 STEP8 Connect ID02 and Joint Frame by using 3s rivet Then rotate W Cable two times and connect with ID01 ...
Страница 31: ...31 STEP4 Connect Joint Frame that connected with ID14 and ID15 by using 3s rivet ...
Страница 34: ...34 STEP4 Connect Joint Frame that connected with ID14 and ID15 by using 3s rivet ...
Страница 54: ...54 3 Click Next and finish the installation as shown in the below ...
Страница 60: ...60 Screen Layout This is the screen layout of the MotionBuilder ...
Страница 61: ...61 ...
Страница 65: ...65 9 Move the Jog Dial of ID11 10 For the next movement add the third scene 11 Move the Jog Dial of ID12 ...
Страница 70: ...70 2 Click New Scene to add new scene 3 Click Get Pose you can see Motor Enable window then check Check All ...
Страница 72: ...72 6 Click New Scene to add new scene 7 Click Get Pose you can see Motor Enable window then check Check All ...
Страница 89: ...89 8 3 How to charge ...


