5
[
Notice for Assembly and Operation
]
· All users should follow the instructions in this user manual.
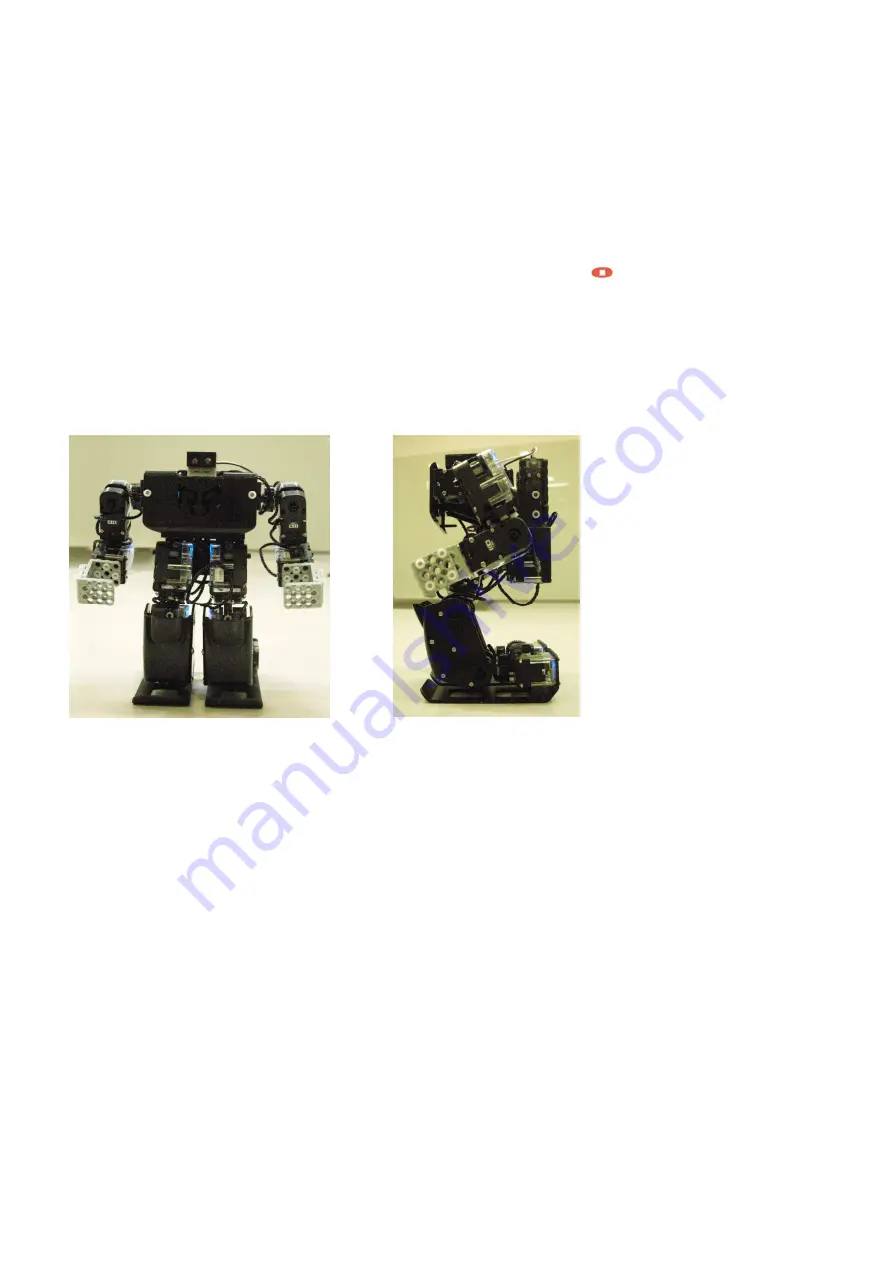
· The basic posture of standard platform (HUNO) robot is as shown in the below.
If robot does not take the posture as the below after you press the center ( ) button of
IR remote controller, it means that robot was assembled in wrong way.
Do not operate robot by force when robot was assembled in wrong way
Otherwise, robot could be damaged and it gets out of order.
· Sometimes, smart servo does not rotate well when you assemble it by hand.
This happens when internal gears are stiff, not a defective problem.
This kind of problem will be solved when robot took the basic posture after
you power-on smart controller.
· Generally, it takes about one hour to assemble it by using '+' screw driver.
But this is the average assembly time. so it can take longer or less depends on users' working environment.
· Robot will walk well in the flat place. It can be fallen down when you put a robot in carpet or rugged place
· Basic motions (11 motions) are already pre-programmed.
These motions are played by IR remote controller as soon as receiving robot.
. Make sure that nuts are not dropped into smart servo or smart controller during assembling robot.
Содержание RQ-110
Страница 1: ......
Страница 12: ...12 1 3 Rivet Tool Rivet Tool Usage ...
Страница 13: ...13 ...
Страница 14: ...14 ...
Страница 15: ...15 ...
Страница 16: ...16 2 RQ HUNO Assembly Guide 2 1 Check Part List Place all the parts as the below for RQ HUNO assembly ...
Страница 28: ...28 STEP8 Connect ID02 and Joint Frame by using 3s rivet Then rotate W Cable two times and connect with ID01 ...
Страница 31: ...31 STEP4 Connect Joint Frame that connected with ID14 and ID15 by using 3s rivet ...
Страница 34: ...34 STEP4 Connect Joint Frame that connected with ID14 and ID15 by using 3s rivet ...
Страница 54: ...54 3 Click Next and finish the installation as shown in the below ...
Страница 60: ...60 Screen Layout This is the screen layout of the MotionBuilder ...
Страница 61: ...61 ...
Страница 65: ...65 9 Move the Jog Dial of ID11 10 For the next movement add the third scene 11 Move the Jog Dial of ID12 ...
Страница 70: ...70 2 Click New Scene to add new scene 3 Click Get Pose you can see Motor Enable window then check Check All ...
Страница 72: ...72 6 Click New Scene to add new scene 7 Click Get Pose you can see Motor Enable window then check Check All ...
Страница 89: ...89 8 3 How to charge ...


