background image

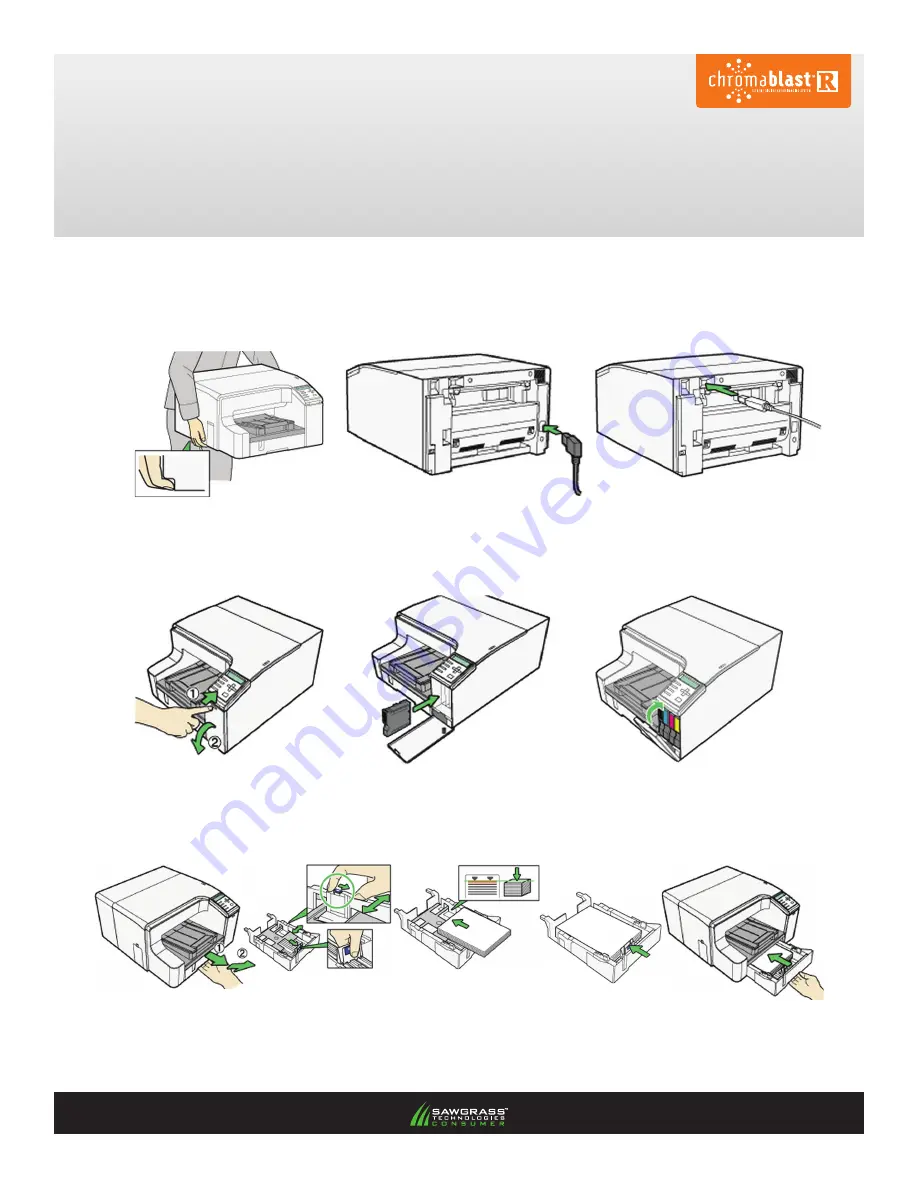
1.)  Open the printer box, remove the cables and other accessories, and place them aside. Next, remove 

the printer from the box, and place it on a sturdy work surface with sufficient operational clearances (

the 

printer weighs approximately 31 lb

).  Finally, remove the orange adhesive tape and attach the power cord 

and the USB cable. 

dO NOT POWeR ON THe PRINTeR AT THIs TIMe.

2.)   Remove the ChromaBlast-R ink cartridges from their packages. Open the right front cover on the printer, 

and insert the cartridges in the order indicated—from left to right (as you face the printer): black (K), cyan 
(C), magenta (M) and yellow (Y). Press each cartridge in until it engages securely, and close the cover 
once all of the cartridges are in place. 

Never shake or agitate the cartridges.

3.)   Remove the paper tray, pull the cover straight up, and adjust the guides for the paper size you will be 

using. Load the paper, put the cover back on, and reinsert the tray into the printer. For larger paper sizes, 
refer to the documentation provided with your Ricoh printer for extending the paper tray.

Ricoh GXe3300N

Printer setup & OeM driver Installation

PAGe 1


of 2 >>

Содержание Aficio GX e3300N

Страница 1: ...If you experience any communication errors a powered USB Hub may be required CAUTION DO NOT INSTALL OEM INK BEFORE INSTALLING ChromaBlast R INK Do not power ON the printer before installing the cartridges Installation Guide ...

Страница 2: ...SECTIONS Printer Setup OEM Driver Installation 2 pages OEM Driver Initialization 2 pages ChromaBlast GXe3300N Installation Registration 7 pages ...

Страница 3: ...n the printer and insert the cartridges in the order indicated from left to right as you face the printer black K cyan C magenta M and yellow Y Press each cartridge in until it engages securely and close the cover once all of the cartridges are in place Never shake or agitate the cartridges 3 Remove the paper tray pull the cover straight up and adjust the guides for the paper size you will be usin...

Страница 4: ...E 5 Start your computer wait until Windows is fully operational and then insert the Ricoh CD in the CD ROM drive The CD contains the printer driver and the program will start automatically Follow the on screen instructions beginning with the selection of the language 6 Once you have installed the Ricoh OEM Driver restart your computer and proceed to the OEM Driver Initialization portion of the ins...

Страница 5: ...owever the settings will be the same 1 Begin by clicking your Start icon see Figure 1 1 and select Printers and Faxes see Figure 1 2 This will open the Printers and Faxes window see Figure 2 2 Right click on the Ricoh GX e3300N printer icon see Figure 2 1 and select Properties see Figure 2 2 This will open the GelSprinter GX e3300N Properties window see Figure 3 Note If you are running Widows 7 yo...

Страница 6: ...age will print signifying that communication has been bridged between your computer and printer Congratulations The Ricoh e3300N OEM Driver has now been initialized and is ready to use in conjunction with ChromaBlast GXe3300N Please proceed to the ChromaBlast GXe3300N Installation portion of your Installation Guide Figure 3 1 ...

Страница 7: ...ast Drivers page http www sawgrassink com v php pg 365 First highlight Technical Support next highlight ChromaBlast Tech Support then highlight ChromaBlast Downloads and finally highlight and click on Download ChromaBlast Drivers see Figure 1 This will open the Download ChromaBlast Drivers window see Figure 2 2 From the list click on the name of your printer that is associated with your operating ...

Страница 8: ...n you are ready to begin the installation click Install see Figure 4 Check that you are installing ChromaBlast GXe3300N v2 9 4 and click Next Figure 5 This will open the License Agreement window see Figure 6 4 If you agree with the terms of the License Agreement click I Agree see Figure 6 Then choose the components you wish to install and click Next see Figure 7 This will open the Choose Install L...

Страница 9: ...e installing you will see a Hardware Installation window Click Continue Anyway to ignore this warning and continue with the installation see Figure 10 As installation nears completion a new window will prompt you to register your product see Figure 11 DO NOT SKIP THIS STEP registration is required to use the software Click Yes to continue see Figure 11 Figure 8 Figure 9 Figure 10 Figure 11 ChromaB...

Страница 10: ...847 Note You must have a separate Registration Code for every machine on which the ChromaBlast GXe3300N is installed 8 The following instructions will show how to register On line Start by selecting Click Here to Obtain Registration Code see Figure 12 The Product Registration Web Page will appear see Figure 13 Complete the requested information on the form and click Submit see Figure 13 PAGE 4 of ...

Страница 11: ...color management in your graphics software Click Continue to proceed see Figure 16 10 When installation has completed you will receive the following window asking you to reboot your computer and initialize ChromaBlast GXe3300N upon restart Click Yes to reboot your computer see Figure 17 Figure 14 Figure 15 Figure 16 Figure 17 ChromaBlast R Ricoh GXe3300N ChromaBlast GXe3300N Installation Registrat...

Страница 12: ...ck on the Chromablast GXe3300N icon and click Printing Preferences see Figure 19 This will open a window asking you to select your OEM printer Click OK to continue see Figure 20 This will open the ChromaBlast GXe3300N Printing Preferences window see Figure 21 PAGE 6 of 7 Figure 18 Figure 19 ChromaBlast R Ricoh GXe3300N ChromaBlast GXe3300N Installation Registration cont d 6 7 ...

Страница 13: ...tions The ChromaBlast GXe3300N installation and setup is now complete Click OK to exit and begin using NOTE For the absolute latest Information and Updates on all Products Materials Processes and or Procedures relative to all offerings by or through Sawgrass Technologies Inc please refer to our Website www sawgrassink com ChromaBlast R Ricoh GXe3300N ChromaBlast GXe3300N Installation Registration ...

Отзывы: