background image

Paper and Other Media

15

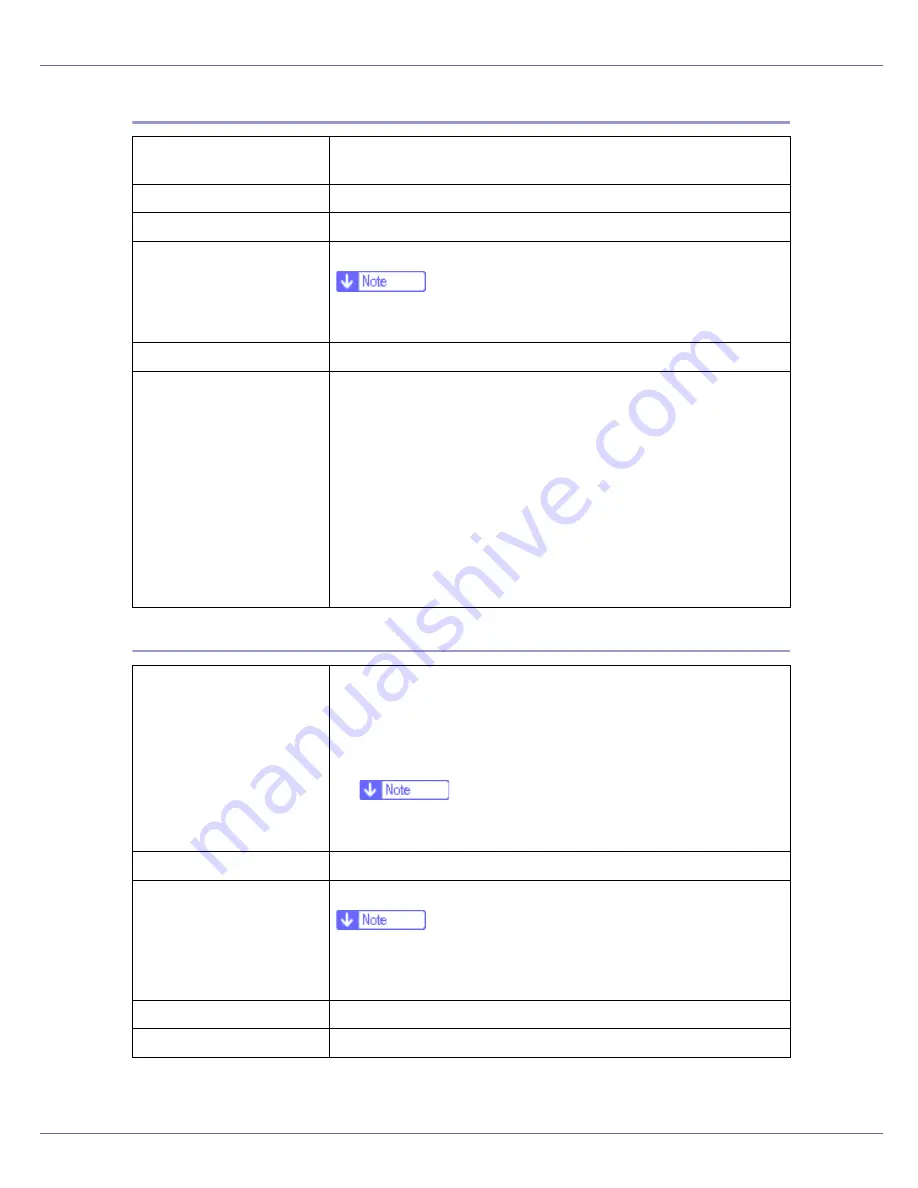
OHP transparencies

Special Paper

Printer setup

Press 

[

Paper Input

]

 menu, 

[

Paper Type

]

, and then 

[

Transparency

]

 on 

the control panel.

Printer driver setup

Click 

[

Transparency

]

 in the 

[

Type:

]

 list.

Enabled paper feeding tray Bypass tray

Number of sheets that can 
be set

100

Make sure paper is not stacked higher than the paper guides 
inside the bypass tray.

Both-sided printing

Not possible

Additional cautions

Print speed for OHP transparencies is slower than for plain pa-
per.

Paper settings can be set using the printer driver. Setting the 
paper sizes using the display panel is not necessary when it is 
set by the printer driver.

Paper size settings set using the printer driver have priority 
over those set using the machine's display panel.

When the printer driver is not used, make settings using the 
display panel.

Select the 

[

Maintenance

]

 menu. Press 

[

4C.Graphic Mode

]

[

Text 

Priority

]

, and then print.

Printer setup

Make the following two settings using the control panel:

Press 

[

Paper Input

]

 menu, 

[

Paper Type

]

, and then 

[

Special Paper

]


on the control panel.

Press 

[

Maintenance

]

 menu, 

[

Special Paper

]

, and then 

[

Special Pa-

per 1

]

 - 

[

Special Paper 4

]

.

From 

[

Special Paper 1

]

 to 

[

Special Paper 4

]

 in the menu, select 

the paper type according to the paper you are loading.

Printer driver setup

Click 

[

Special Paper

]

 in the 

[

Type:

]

 list.

Enabled paper feeding tray Any input tray can be used.

Make sure paper is not stacked higher than the upper limit 
mark (

T

) inside the tray. Make sure paper is not stacked higher 

than the paper guides inside the bypass tray.

Both-sided printing

Possible

Additional cautions

Print speed for special paper is slower than for plain paper.

Содержание Aficio C7528n

Страница 1: ... supported by this printer 17 Print Area 18 Loading Paper 20 Loading Paper in Tray 1 2 and the optional paper feed unit 20 Loading Paper in the Bypass Tray 28 Switching between Paper Trays 34 Replacing Consumables and Maintenance Kit Using the Screwdriver 36 Detaching and Reattaching the Options 37 Detaching the SR960 2 Tray Finisher 37 Detaching the SR950 Booklet Finisher 38 Opening and Closing t...

Страница 2: ...ue 84 Viewing the Color Calibration Sample Sheet and Gradation Correction Sheet 88 Resetting the gradation correction values to the initial values 89 Adjusting Image Density 92 Adjusting Tray Registration 94 Troubleshooting Error Status Messages on the Control Panel 97 Printer Does Not Print 108 Checking the port connection 110 Other Printing Problems 113 Additional Troubleshooting 121 Removing Ja...

Страница 3: ...emove Misfeed Y Paper Tray Appears 150 When Remove Misfeed Z1 Duplex Unit Appears 151 When Remove Misfeed Z2 Dup Feed Unit Appears 153 Appendix When the Front Cover Does Not Close 157 Moving and Transporting the Printer 159 Moving the Printer 159 Consumables 161 Toner Cartridge 161 Staple Cartridge 161 Other consumables 162 Specifications 163 Mainframe 163 Options 166 ...

Страница 4: ...rks The proper names of the Windows operating systems are as follows Microsoft Windows 95 operating system Microsoft Windows 98 operating system Microsoft Windows Millennium Edition Windows Me The product names of Windows 2000 are as follows Microsoft Windows 2000 Advanced Server Microsoft Windows 2000 Server Microsoft Windows 2000 Professional The product names of Windows XP are as follows Micros...

Страница 5: ... this sym bol Be sure to read the instructions all of which are described in the Safety In formation section The statements above are notes for your safety If this instruction is not followed paper might be misfed originals might be dam aged or data might be lost Be sure to read this This symbol indicates information or preparations required prior to operating This symbol indicates precautions for...

Страница 6: ... feed direction The direction is determined based on paper size Input Paper Sizes Metric version In this manual On the display Paper feed direction L Feed direction A4 210 297 8 1 2 11 Short edge feed direction K Feed direction A4 297 210 11 8 1 2 Long edge feed direction Feed direction Size mm Bypass tray Paper tray Tray 1 Paper tray Tray 2 Paper feed unit Tray 3 4 2000 sheet Large Capacity Tray ...

Страница 7: ...216 356 Letter LT 81 2 11 L 216 279 K 279 216 51 2 81 2 L 140 216 Executive Exec 71 4 101 2 L 184 276 K 276 184 Folio 81 4 13 L 210 330 Foolscap F4 81 2 13 L 216 330 F GL 8 13 L 203 330 Com10 Env 91 2 41 8 K 241 3 104 8 C5 9 02 6 38 K 229 162 C6 6 38 4 49 K 162 114 DL Env 8 66 4 33 K 220 110 Monarch 71 2 37 8 K 190 5 98 4 Custom Size 8K 101 2 15 35 L 267 390 16K 7 68 101 2 L 195 267 K 267 195 Feed...

Страница 8: ...i in length can be set The size is not supported Input Paper Sizes Inch version Feed direction Size inch Bypass tray Paper tray Tray 1 Paper tray Tray 2 Paper feed unit Tray 3 4 2000 sheet Large Capacity Tray 12 18 L 12 18 DLT 11 17 L 11 17 Legal LG L 81 2 14 Letter LT L 81 2 11 K 11 81 2 51 2 81 2 L 51 2 81 2 Executive Exec L 71 4 101 2 K 101 2 71 4 A3 L 11 26 16 54 B4 L 10 12 14 33 A4 L 8 26 5 8...

Страница 9: ...he control panel When using the RPCSTM printer driver sheets of up to 49 61 inch 600 600 dpi 1200 600 dpi in length can be set The size is not supported Paper weight and number of sheets to be set Foolscap F4 K 13 81 2 F GL K 13 8 Com10 Env K 91 2 41 8 C5 K 9 02 6 38 C6 K 6 38 4 49 DL Env K 8 66 4 33 Monarch K 71 2 37 8 Custom Size 8K L 101 2 15 35 16K L 7 68 101 2 K 101 2 7 68 Supported paper wei...

Страница 10: ... capacity tray 60 105 g m2 16 28 lb 2000 80 g m2 20 lb SR960 2 tray finisher 60 105 g m2 16 28 lb 2000 80 g m2 20 lb Feed direction Size mm Standard tray External tray 1 2 tray finisher Booklet finisher A3 L 297 420 B4 L 257 364 A4 L 210 297 K 297 210 B5 L 182 257 K 257 182 A5 L 148 210 K 210 148 B6 L 128 182 A6 L 105 148 12 18 L 305 457 DLT 11 17 L 279 432 Legal LG 81 2 14 L 216 356 Letter LT 81 ...

Страница 11: ...114 DL Env 8 66 4 33 K 220 110 Monarch 71 2 37 8 K 190 5 98 4 Custom Size 8K 101 2 15 35 L 267 390 16K 7 68 101 2 L 195 267 K 267 195 Feed direction Size inch Standard tray External tray 1 2 tray finisher Booklet finisher 12 18 L 12 18 DLT 11 17 L 11 17 Legal LG L 81 2 14 Letter LT L 81 2 11 K 11 81 2 51 2 81 2 L 51 2 81 2 Executive Exec L 71 4 101 2 K 101 2 71 4 A3 L 11 26 16 54 B4 L 10 12 14 33 ...

Страница 12: ... A4 L 8 26 5 83 K 5 83 8 26 B5 L 7 17 10 12 K 10 12 7 17 A5 L 5 83 8 26 K 8 26 5 83 B6 L 5 04 7 17 A6 L 4 13 5 63 Folio L 81 4 13 Foolscap F4 L 81 2 13 F GL L 8 13 Com10 Env K 91 2 41 8 C6 K 6 38 4 49 C5 K 9 02 6 38 DL Env K 8 66 4 33 Monarch K 71 2 37 8 Custom Size 8K L 101 2 15 35 16K L 7 68 101 2 K 101 2 7 68 Feed direction Size inch Standard tray External tray 1 2 tray finisher Booklet finishe...

Страница 13: ...wn Print quality cannot be guaranteed if paper other than the ones recommended is used For more information about recommended paper contact your sales or service representative Do not use paper that has already been printed onto by other printers Storing Paper Paper should always be stored properly Improperly stored paper might result in poor print quality paper misfeeds or printer damage Recommen...

Страница 14: ...ng on the reverse side of plain paper that is already printed on select Plain Dup Back from Paper Type using the con trol panel or printer driver Paper thickness 106 163 g m2 28 2 42 lb Printer setup Make the following two settings using the control panel Press Paper Input menu Paper Type and then Thick Paper Press Maintenance menu Thick Paper and then Thick Paper 1 Thick Paper 4 From Thick Paper ...

Страница 15: ...t using the machine s display panel When the printer driver is not used make settings using the display panel Select the Maintenance menu Press 4C Graphic Mode Text Priority and then print Printer setup Make the following two settings using the control panel Press Paper Input menu Paper Type and then Special Paper on the control panel Press Maintenance menu Special Paper and then Special Pa per 1 ...

Страница 16: ...ss 72 90 g m2 19 24 lb Recommended weight and size Metric version 72 g m 2 114 162 mm C6 Env Inch version 24 lb 3 7 8 7 1 2 Monarch Printer setup Press Paper Input menu Paper Type and then Thick Paper Printer driver setup Click Thick in the Type list Enabled paper feeding tray Bypass tray Enabled paper feeding tray 10 Make sure paper is not stacked higher than the paper guides inside the bypass tr...

Страница 17: ...ose weight is heavier or lighter than the limitation Paper with windows holes perforations cutouts or embossing Additional cautions Check the print side is facing up Check there is no air in the envelopes before loading For better print quality we recommend the right left top and bottom print margins to be at least 15 mm 0 6 each Load only one size and type of envelope at a time When loading envel...

Страница 18: ...int area may vary depending on paper size printer language and printer driver settings If you load paper larger than A3L in the bypass tray hold it steady so it feeds properly Paper feed accuracy and print quality may vary according to paper thickness and width Do a test print to check the paper you want to use gives satisfactory results The maximum length of the print area is 457 mm 18 in the pap...

Страница 19: ...nd Other Media 19 Envelope A Print area B Feed direction C Approx 4 2 mm 0 17 inches D Approx 4 2 mm 0 17 inches The print area may vary depending on the paper size printer language and printer driver settings ...

Страница 20: ...o load A4 K paper in tray 1 and the optional 2000 sheet large capacity tray contact your sales or service representative See p 6 Paper and Other Media Supported by This Printer for details about paper to be loaded in the paper tray and optional Paper Feed Unit Type 7300 Loading Paper in Tray 1 2 and the optional paper feed unit Loading Paper in Tray 1 Tray 1 uses only letter size paper 11 81 2 K p...

Страница 21: ...nit Type 7300 Paper of different sizes can be loaded in tray 2 and the 500 and 1000 sheet pa per feed units optional by adjusting the positions of the side and end guides This section describes loading paper in tray 2 If the side and end guides are in the right positions for the paper to be loaded they do not have to be adjusted A Slowly slide the paper tray out until it stops B Adjust the side gu...

Страница 22: ...the side guide green lever adjust the position of the guide by moving it in the direction of the arrow D Adjust the end guide according to the size and orientation of the paper by gripping both edges of the guide and then moving it in the direc tion of the arrow ...

Страница 23: ...until it stops Do not slide the paper tray in with force If you do the front and side guides might move Be sure to adjust the side guides to the paper size or misfeeds might oc cur Loading Paper in Paper Bank Type 7300 2000 sheet Large Capacity Tray The 2000 sheet large capacity tray uses only letter size paper 11 81 2 K exclusively Load letter size paper at all times If you want to load A4 K pape...

Страница 24: ... left and right walls or mis feeds might occur Check that the top of the stack is not higher than the limit mark inside the tray C Slowly push in the paper tray until it stops If you load a paper size that is not selected automatically Paper sizes not selected automatically are B4L A4L B5L 71 4 101 2L 8 13L 81 2 13L 81 4 13L 8K 101 2 15 35 L 16K 7 68 101 2 L 16K 101 2 7 68 K See p 21 Loading Paper...

Страница 25: ...tact your sales or service representative This section uses A4 210 297 L as an example A Press the Menu key The Menu screen appears on the display B Press the U or T key to display Paper Input and then press the Enter The paper selection menu appears C Press the U or T key to display Tray Paper Size and then press the Enter key The paper tray selection menu appears D Press the U or T key to displa...

Страница 26: ... is not selected automatically if you want to print on paper that is selected automatically again reload the paper pro ceed to step G and return the setting to Auto G Press the Menu key The Menu screen appears on the display H Press the U or T key to display Paper Input and then press the Enter key The paper selection menu appears I Press the U or T key to display Tray Paper Size and then press th...

Страница 27: ...screen appears Specifying a paper type for Tray 1 2 and the optional paper feed unit Improve printer performance by selecting the optimum paper type for the tray You can select from the following paper types Plain Paper Recycled Paper Special Paper Color Paper Letterhead Pre printed Paper A Press the Menu key The Menu screen appears on the display B Press the U or T key to display Paper Input and ...

Страница 28: ...ith the printer driver Make sure the settings do not conflict Otherwise the paper may jam or the print quality may be affected The bypass tray can accommodate sheets 90 305 mm 3 5 12 01 wide and 148 457 mm 5 8 18 long However the paper size must be set using the control panel When using the RPCSTM printer driver sheets of up to 1260 mm 49 61 in length can be set If you load custom size paper or sp...

Страница 29: ... use L orientation if possible When loading the bypass tray with paper that will be delivered into the top left tray load the paper so the side you want to print on faces up You cannot use the following functions when printing on paper loaded in the bypass tray Duplex Print Job Separation Staple Punch Auto Tray Select A Open the bypass tray If you load A4 or larger size paper pull out the bypass t...

Страница 30: ... side guides to fit the paper width Check that the top of the stack is not higher than the limit mark inside the tray Shuffle the paper before loading the stack onto the tray so multiple sheets are not fed in together D Set the paper size using the control panel Press the Menu key The Menu screen appears on the display ...

Страница 31: ...appears Specifying custom size paper for the Bypass Tray The paper size selected using the printer driver overrides that selected using the control panel You do not have to make settings using the control panel if you already made them using the printer driver However when printing with a printer driver other than the RPCSTM printer driver you must make the set tings using the control panel For de...

Страница 32: ...varies by 1 inch F Press the U or T key to set the vertical value and then press the Enter key After about two seconds the display returns to the menu G Press the Online key The initial screen appears Specifying a paper type for the Bypass Tray By selecting the paper type you want to load the printer performs better You can select from the following paper types Plain Paper Recycled Paper Special P...

Страница 33: ...T key to display Paper Input and then press the Enter key The paper selection menu appears C Press the U or T key to display Paper Type and then press the En ter key The paper tray selection menu appears D Press the U or T key to display Bypass Tray and then press the Enter key The paper type selection menu appears E Press the U or T key to display the target paper type and then press the Enter ke...

Страница 34: ...witch the tray to be used to the paper feed unit using Tray Priority in the Paper Input Menu A Press the Menu key The Menu screen appears on the display B Press the U or T key to display Paper Input and then press the Enter key The paper selection menu appears C Press the U or T key to display Tray Priority and then press the Enter key The paper tray selection menu appears D Press the U or T key t...

Страница 35: ...Paper and Other Media 35 The initial screen appears ...

Страница 36: ...ons and is located inside the front cover A Open the printer s front cover and then remove the provided screwdriv er B Insert the screw into the screwdriver By pushing the screw into the screwdriver you can work without having to worry about dropping the screw After using the screwdriver return it to its original position inside of the front cover ...

Страница 37: ...ray finisher from the printer to remove misfed paper This section describes how to detach the 2 tray finisher A Hold the handle at the top of the 2 tray finisher firmly using one hand pull the 2 tray finisher straight out and let go when it stops The 2 tray finisher is detached from the printer B Use both hands to push it straight back in and let go when it clicks into place The 2 tray finisher is...

Страница 38: ...er is detached from the printer B Attach the booklet finisher The booklet finisher is reattached to the printer Opening and Closing the Duplex Reversal Unit There are times when you may need to detach the duplex reversal unit to remove misfed paper This section describes how to detach the duplex reversal unit A Push up the lock release button and leave it in place ...

Страница 39: ...R960 2 Tray Finisher or p 38 Detaching the SR950 Booklet Finisher You do not have to remove the external tray even if the 2 tray finisher or the booklet finisher is attached The duplex reversal unit is opened C Close the duplex reversal unit by raising it slowly using both hands and push it in until it clicks into place The duplex reversal unit is closed Attach the duplex reversal unit after closi...

Страница 40: ...in a place with an open flame The toner might ignite and cause burns or a fire Keep toner used or unused and the toner cartridge out of reach of chil dren If toner or used toner is inhaled gargle with plenty of water and move into a fresh air environment Consult a doctor if necessary If your skin comes into contact with toner or used toner wash the affected area thoroughly with soap and water If t...

Страница 41: ...and White from the printer driver If black toner runs out printing is not possible until the black toner cartridge is replaced A While pushing the lock button on the upper right cover of the printer open the upper right cover From the end the toner cartridges are installed in the order of magenta M cyan C yellow Y and black K B Remove the toner cartridge for the color you want to replace Unhook th...

Страница 42: ...oner cartridge Remaining toner might scatter Depending on the setting up environment toner might be left in a toner car tridge In such cases reinstall the toner cartridge D Take the new toner cartridge out of the box The black toner cartridge contains more than the other toner cartridges E Shake the toner cartridge back and forth five or six times ...

Страница 43: ... the direction of the arrow Do not touch the metal contact area with your fingers G Slowly insert the toner cartridge until the green hook clips over the met al contact area Do not install and remove toner cartridges repeatedly This could result in toner leak H Close the upper right cover Please wait while the toner loads ...

Страница 44: ...Replacing Consumables and Maintenance Kit 44 The following message appears on the display To avoid malfunction do not turn off the power while Loading Toner ap pears on the display Loading Toner ...

Страница 45: ...three color photoconductor units The replacement procedure for the third photoconductor unit from the top left will be described The procedure is the same for all four photoconductor units A Turn off the power and then unplug the power cable B Slowly open the front cover of the printer remove the green screwdriv er p 36 Using the Screwdriver C Turn the green lever counterclockwise Replace Black PC...

Страница 46: ...ner cover until it clicks into place and holds The photoconductor units are installed as shown Starting from the upper left the units are attached in the order of black K yellow Y cyan C and ma genta M F Remove the photoconductor unit you want to replace Move the green hook slowly to the right as shown The green hook is located on the up per right of the photoconductor unit ...

Страница 47: ...the green areas at the top and bottom of the photoconductor unit and then slowly pull the unit out until you can see the entire green handle Pulling out the photoconductor unit quickly might cause it to fall H Lift and hold the green handle at the top and then slowly pull out the unit I Install the new photoconductor unit Take the unit out of the bag ...

Страница 48: ...tor unit and remove the adhesive tape at the tip of the unit Do not remove the cover attached to the bottom of the photoconductor unit yet K Line up the green arrow at the tip of the photoconductor unit with the rail inside the printer Make sure the green arrow fits securely to the rail before proceeding to the next step ...

Страница 49: ...n push in until it stops If you do not attach the green arrow of the photoconductor unit securely to the rail you might damage the photoconductor unit Do not touch the light sensitive area of the photoconductor unit M Remove the cover and then slowly push in the photoconductor unit un til it stops N Slowly lower the inner cover out ...

Страница 50: ...rovided screwdriver Be sure to return the provided screwdriver to its original position on the back of the front cover P Turn the green lever clockwise Q Slowly close the front cover by pushing the two areas on the left and right R Plug in the power cable and then turn on the power ...

Страница 51: ... Consumables and Maintenance Kit 51 The printer starts calibration Wait until it stops The following message ap pears on the display To avoid malfunction do not turn off the power during calibration Calibrating ...

Страница 52: ...ace the dustproof filter See p 62 Re placing the Dustproof Filter When replacing the black development unit clean the registration roller See p 73 Cleaning the Registration Roller The replacement procedure for the third development unit from the top left will be described The procedure is the same for all four development units A Turn off the power and then unplug the power cable B Slowly open the...

Страница 53: ...s E Lift the inner cover until it clicks into place and holds The development units are installed as shown Starting from the upper left the units are attached in the order of black K yellow Y cyan C and magenta M F Remove the development unit Hook your finger into the green tab in front of the development unit you want to replace and then pull it out halfway ...

Страница 54: ...fall G Hold the right side of the Development unit using your right hand and pull the unit slowly out Be careful not to touch the right side of development unit Be careful not to let it come into contact with your hands or clothes H Install a new development unit Take the unit out of the bag The procedure for attaching the development unit is the same for all four col ors ...

Страница 55: ...e development unit back and forth five or six times J Remove the adhesive tape on the upper side of the unit Do not remove the tape attached to the front of the development unit K Insert the development unit along the rail and push in slowly until it stops ...

Страница 56: ...alfunction be sure to pull out the tape The removed tape is dirty Be careful not to let it come into contact with your hands or clothes M Slowly lower the inner cover out N Tighten the two screws using the provided screwdriver Be sure to return the provided screwdriver to its original position on the back of the front cover ...

Страница 57: ... close the front cover by pushing the two areas on the left and right Q Plug in the power cable and then turn on the power Please Wait appears on the display and initial adjustments begin Wait until these stop To avoid malfunction do not turn off the power during adjustments Please Wait ...

Страница 58: ... the SR950 Booklet Finisher C If the duplex unit is installed open the duplex reversal unit p 38 Opening and Closing the Duplex Reversal Unit D If the external tray is attached to the printer raise it in the direction of the arrow and then remove it The fusing unit becomes very hot When installing a new fusing unit turn off the printer and wait about an hour After that install the new fusing unit ...

Страница 59: ...r left cover G Holding the fusing unit handle as shown slowly pull the fusing unit up and then put it down on a surface Do not touch any area other than the green felt parts Do not touch the inside of the fusing unit H Take the new fusing unit out of the bag and put it down on a level sur face ...

Страница 60: ... it with the marks on the machine stand Install the fusing unit so the blue dial is on the front cover side J Slowly turn the fusing unit handle in the direction of the arrow until it clicks K Close the upper left cover and then push the part labeled PUSH next to the handle at the bottom rear until it clicks ...

Страница 61: ...r slits and lower it toward you M If the duplex unit is installed close the duplex reversal unit p 38 Opening and Closing the Duplex Reversal Unit N If the 2 tray finisher or the booklet finisher is installed reattach it to the printer p 37 Detaching the SR960 2 Tray Finisher p 38 Detaching the SR950 Booklet Finisher O Plug in the power cable and then turn on the power ...

Страница 62: ...g the black development unit also replace the dustproof filter The dustproof filter is attached to the left side of the printer as shown A Turn off the power and then unplug the power cable B Push in the grips on both sides of the dustproof filter cover to pull it off Be sure to put the removed dustproof filter cover down on a stable and level surface ...

Страница 63: ...ilter and glove D Put the glove on either hand E Using your gloved hand slowly take out the dustproof filters attached to the dustproof filter cover one by one and put them into the box that contained the black development unit Handle the removed dustproof filters with care If you shake them dust might scatter F Take off the glove ...

Страница 64: ...taching a new dustproof filter G Attach the new dustproof filters to the dustproof filter cover one by one Attach the large filter H Attach the small filter I Insert the dustproof filter cover into the upper left area of the printer J Plug in the power cable and then turn on the power ...

Страница 65: ... Waste Toner Type E appears on the display replace the waste toner bottle A Turn off the power and then unplug the power cable B Take the new waste toner bottle out of the bag C Slowly open the front cover by pulling down from the two areas on the left and right Replace Waste Toner Type E ...

Страница 66: ...e waste toner bottle horizontally E Remove the lid and then put it in the position shown in the illustra tion F Put the used waste toner bottle into the bag that contained the new waste toner bottle and then seal the bag Be sure to handle the bottle carefully so waste toner does not spill G Insert the new waste toner bottle as shown ...

Страница 67: ... Push it in until it stops Be sure to firmly insert the waste toner bottle to avoid toner leakage inside the printer I Slowly close the front cover by pushing the two areas on the left and right J Plug in the power cable and then turn on the power ...

Страница 68: ...eplacing the paper feed rollers of Tray 1 The same procedure applies to other trays A Check the contents of the box for the following items Paper Feed Roller A Paper Feed Roller B Paper Feed Roller C Two Stoppers B Turn off the power and then unplug the power cable If you are replacing the paper feed rollers of the optional 2000 sheet Large Capacity Tray remove all paper from the tray Replace Feed...

Страница 69: ...ys while lifting up a little If you are replacing the paper feed rollers of the optional paper feed unit or 2000 sheet Large Capacity Tray pull out all paper trays from each unit D Check the position of the paper feed rollers Confirm the positions and names of each roller ...

Страница 70: ...0 E While pushing the pin of the paper feed roller A outwards remove the paper feed roller F Remove the stopper from the paper feed roller B and then remove the roller G Remove the stopper from the paper feed roller C and then remove the roller ...

Страница 71: ...its gear towards the shaft Insert it into the rear shaft so that the roller gear interlocks with the shaft gear Lock the roller with the stopper J Hold the new paper feed roller A with its pin towards you Insert the roller onto the front shaft until it clicks into place K Slowly slide all trays back into the printer until they stop If you are replacing the paper feed rollers of the optional 2000 s...

Страница 72: ...ust or grime inside the printer wipe it away using a clean dry cloth Do not remove any covers or screws other than those specified in this manual Some parts of the machine are at a high voltage and could give you an electric shock Also if the machine has laser systems di rect or indirect reflected eye contact with the laser beam may cause serious eye damage When the machine needs to be checked adj...

Страница 73: ...ower and then unplug the power cable B Open the right cover as shown The registration roller is set as shown C Wipe around the registration roller by turning it and applying a soft damp cloth The inside of the printer becomes very hot To avoid burns do not touch parts labelled hot surface otherwise it could cause a burn ...

Страница 74: ...Cleaning 74 Do not use chemical cleaners or organic solvents such as thinners or ben zene D Close the right cover by pushing the area labeled PUSH E Plug in the power cable and then turn on the power ...

Страница 75: ...t A Turn off the power and then unplug the power cable B Open the front cover and then remove the cleaning brush There are four holes for cleaning the dustproof glass C Slide the cleaning brush in and out slowly 8 to 10 times to clean all four areas Do not insert the brush roughly Doing so may damage the printer ...

Страница 76: ...Cleaning 76 D Return the cleaning brush to its original position E Plug in the power cable and then turn on the power ...

Страница 77: ...epresentative A Make sure the printer s ground is properly connected B Turn off the power If the 2 tray finisher or the booklet finisher is attached to the printer detach it before checking the earth leakage breaker C Press the earth leakage breaker s test button with a point of an object such as a ballpoint If the earth leakage breaker has tripped contact your sales or service rep resentative Do ...

Страница 78: ...e breaker by moving it to the position F Turn on the power If the printer does not start up when the main power is switched on check whether the earth leakage breaker has tripped If it has contact your sales or service representative Do not reset the earth leakage breaker yourself ...

Страница 79: ...how color degradation after the printer is moved perform auto matic color adjustment A Press the Menu key The Menu screen appears on the display B Press the U or T key to display Maintenance and then press the Enter key The maintenance menu appears C Press the U or T key to display Color Regist and then press the Enter key D Check Auto Adjust appears and then press the Enter key E Check Now appear...

Страница 80: ...the Fuser for Thick Paper If color registration shifts when using thick paper If color registration shifts when using thick paper adjust the fuser for thick paper Fuser adjustment for thick paper is not possible if the toner has almost run out Carry out this adjustment after changing the toner cartridge Thick paper is needed to make the adjustment Use the thick paper you nor mally use A Load thick...

Страница 81: ...lay Fuser Adjust and then press the Enter key F Check Thick Paper appears and then press the Enter key If the toner cartridge is almost empty the following message appears on the display After changing the toner cartridge carry out fuser adjustment for thick paper For details about changing the toner cartridge see p 40 Replacing the Toner Cartridge G Check the following message appears and then pr...

Страница 82: ...83 Test Sheet Samples In this example thick A4 paper is loaded in the bypass tray K Compare the color adjustment sheet sample with the framed white part of the printed pattern If sample and printed pattern are almost the same select 0 Otherwise select one of the following values according to the position of the color in the sample Color at center 0 Color shifted to left 1 Color shifted to right 1 ...

Страница 83: ...inter returns to stepI Keep adjusting until you can select 0 L Press the Online key The initial screen appears Test Sheet Samples The following illustration is an example of a test sheet printed during fuser ad justment for thick paper Fuser Adjust Sheet ...

Страница 84: ...e operation repeat the cor rection several times as needed Corrections to color gradation will be applied to all user jobs Use the same paper when printing a run of gradation corrections If a different type of paper is used corrections may not be apparent This requires the use of the supplied Color Calibration Sample Sheet Corrections to color gradation are performed in the following order Set the...

Страница 85: ...en press the Enter key If you want to perform only calibration 2 proceed to step O D Check Adj Auto Dens is displayed and then press the Enter key E Check Now is displayed and then press the Enter key The check message appears F Press the Enter key Automatic density adjustment begins and the following message appears To avoid malfunction do not turn off the power while Adjusting appears on the dis...

Страница 86: ...e using the supplied Color Calibration Sample Sheet and the gradation correction sheet 1 printed in the previous step Set M magenta C cyan and Y yellow using the same method Each time the U or T key is pressed the value increases or decreases respectively in increments of 1 The correction value can be set between 0 and 6 J Press the Enter key after setting the K black gradation The cursor shifts t...

Страница 87: ...es the changes will not be applied to subsequent print jobs This concludes the setting for correction 1 Next proceed to correction 2 O Press the T key to display Start Calibr 2 and then press the Enter key P Check Yes is displayed and then press the Enter key to print gra dation correction sheet 2 Q Perform the same operations as in step I and set the gradation correc tion value of the middle part...

Страница 88: ...is used for calibration 2 Color sample and correction values The following explains how to use the color sample of the Color Calibration Sample Sheet and the correction values of the gradation correction sheet This explanation uses K black as an example The setting method for M ma genta is similar For C Y cyan yellow the correction value is determined based on combinations of these two colors alth...

Страница 89: ...y set correction value is printed in red B M magenta correction values Use to adjust the color printed when only magenta toner is used The cur rently set correction value is printed in red C C cyan Y yellow correction values Use to adjust the color printed when cyan and yellow toner are used For C Y cyan yellow the correction values are determined based on a com bination of these two colors althou...

Страница 90: ...brate and then press the Enter key D Press the U or T key to display Reset and then press the Enter key A confirmation message appears E Press the Enter key A message indicating the gradation correction values have returned to their default appears After about 2 seconds the display returns to the Color Calibrate Reset menu F Press the Online key Menu Maintenance Color Calibrate Reset Press to rese...

Страница 91: ...Adjusting the Printer 91 The initial screen appears ...

Страница 92: ...ensity settings might cause deterioration in color balance We recommend leaving image density at the factory default setting A Press the Menu key The Menu screen appears on the display B Press the U or T key to display Maintenance and then press the Enter key The maintenance menu appears C Press the U or T key to display Image Density and then press the Enter key D Press the U or T key to select t...

Страница 93: ...d then press the Enter key You can adjust image density in seven increments from 3 to 3 Increas ing the value makes printout darker decreasing the value makes printout lighter To adjust another color repeat steps D and E F Press the Online key The initial screen appears Black 3 3 0 ...

Страница 94: ...creen appears on the display B Press the U or T key to display Maintenance and then press the Enter key The maintenance menu appears C Press the U or T key to display Registration and then press the Enter key The registration menu appears D Print the test sheet to preview the settings Confirm that Prt Test Sheet is displayed and then press the Enter key A screen prompting you to select the tray to...

Страница 95: ...rgins of the test sheet so that they are equal in size G Press the Escape key H Press the U or T key to display Adjustment and then press the Enter key I Press the U or T key to display the parameter to be adjusted and then press the Enter key J Press the U or T key to set the registration value mm Adjustment Horiz Tray 2 Horiz Tray 2 5 0 5 0 0 0 ...

Страница 96: ...ative direction A Print Area B Feed Direction Pressing the U or T key makes the value increase or decrease by 1 0 mm steps K Press the Enter key The display returns to the print area Adjustment menu L Print the test sheet to confirm the adjustment result M Press the Online key The initial screen appears Registration Adjustment ...

Страница 97: ...Add Toner Magenta The printer is out of toner M Replace the toner cartridge M See p 40 Replacing the Toner Car tridge Add Toner Yellow The printer is out of toner Y Replace the toner cartridge Y See p 40 Replacing the Toner Car tridge Calibrating The printer is calibrating the color Wait a while Call Service EC Power Off On If Error Reoccur Call Service A communication error sent from the engine t...

Страница 98: ...cover for the duplex unit is open Close the cover for the duplex unit Close Finisher Front Cover The front cover for the finisher is open Close the front cover for the finisher Close Finisher Upper Cover The finisher upper cover is open Close the upper cover for the finisher The paper entrance cover for the finisher is open Close the upper entrance cover for the finisher Close Lower Right Cover Th...

Страница 99: ...another tray or cancel the job and then switch your printer Off then back On If the error continues contact your sales or ser vice representative Exceeded Max Pages Collate The printer identified a collation page overflow error Add extra RAM Install the optional hard disk drive Exceeded Max Stored Files The maximum number of stored files has been exceeded during Sample Print of Locked Print Delete...

Страница 100: ...d to the printer D Restart the computer If the mes sage appears even after executing above operation proceed to the following steps E Execute the utility tool for IEEE 1394 interface board that is stored in the following path in the CD ROM labeled Printer Drivers and Utilities UTILITY 1394 For details about using the utility tool for IEEE 1394 see the RE ADME file in the same directory in the CD R...

Страница 101: ...it or the Bluetooth interface unit Turn the power off and then on Re move and re install the IEEE 802 11b interface unit or the Bluetooth inter face unit correctly If the message appears again contact your sales or service representative See Attaching IEEE 802 11b Inter face Unit Type H or Attaching Blue tooth Interface Unit Type 3245 Setup Guide Hardware Problem Wireless Card The IEEE 802 11b int...

Страница 102: ...password using the control panel Load Paper Tray on Form Feed The indicated tray is out of pa per tray number Load paper into the indicated paper tray A The printer received a re quest for a paper type or paper size not supported by printer and Tray Locking is not applicable B The paper type and size loaded in the tray which the printer searched using Tray Locking is invalid for Duplex Print Chang...

Страница 103: ...emove Misfeed R Finisher Open Finisher Cover There is a misfeed in the finish er Open the finisher cover and remove the misfed paper See p 142 When Remove Misfeed R Finisher Appears Remove Misfeed Y Paper Tray See Instructions in Front Cover There is a misfeed in the speci fied input tray or the printer is not feeding paper Remove the misfed paper following the instructions inside the front cover ...

Страница 104: ...ce the black PCU Replace the black PCU Depending on your service contract contact your sales or service representative See p 45 Replacing the Photocon ductor Unit Replace Black PCU soon F The time to replace the black PCU is soon Prepare to replace the color PCU when the message Replace Black PCU Type F appears on the dis play Replace Color Dev Unit TypeB It is time to replace the color de velopme...

Страница 105: ...n your service contract contact your sales or service representative Replace Waste Toner Type E It is time to replace the waste toner Replace the waste toner bottle De pending on your service contract con tact your sales or service representative See p 65 Replacing the Waste Toner Bottle Reset Develop Unit correctly XXX XXX The indicated development unit s is are not set correctly or not set XXX Y...

Страница 106: ...orrectly or not set Set the waste toner bottle correctly Resetting Job Job is being reset Wait a while ROM Update Waiting for Data The printer is waiting for updat ed data Don t turn off the printer while it is wait ing for data ROM Update Receiving Data The printer is receiving updated data Don t turn off the printer while it is re ceiving data SC XXX X Power Off On If Error Reoccur Call Service ...

Страница 107: ...de Err Power Off On The printer has failed to start updating data Turn the printer OFF and then back ON to restart Waiting The printer is waiting for the next data to print Wait a while Warming up The printer is warming up and not ready Wait until the printer signals Ready Waste Toner is almost full E The waste toner bottle is almost full Prepare to replace the waste toner bottle Depending on your...

Страница 108: ...necting the printer to the computer connected se curely Connect the interface cable properly If there are any connectors or screws check they are fastened securely Are you using the correct interface cable The type of interface cable you should use depends on the com puter Be sure to use the correct one If the cable is damaged or worn replace it Does the Data In indicator blink or light after the ...

Страница 109: ...ing the utility tool for IEEE 1394 see the README file in the same directory on the CD ROM How is the signal strength when using the wireless LAN Ad Hoc Mode or 802 11 Ad Hoc Mode Either move to a location where the signal is good or remove obstructions Infrastructure Mode Check the signal status from the Maintenance menu on the control panel If the signal is poor either move to a location where i...

Страница 110: ...ager B Make sure Bluetooth Serial Client COMx appears under Client Ports in the 3Com Bluetooth Connection Manager C Restart the computer this printer and the other devices D Make sure no IEEE 802 11b wireless LAN or other Blue tooth devices are in use Interference may occur with the IEEE 802 11b interface unit Such interference may affect the transmission speed and other functions E Transmissions ...

Страница 111: ...C Click the Port tab D Check the Print to the following port box to confirm that the correct port is selected Windows XP Professional Windows Server 2003 A Access the Printers and Faxes window from Start on the taskbar B Click to select the icon of the printer Next on the File menu click Prop erties C Click the Port tab D Check the Print to the following port s box to confirm that the correct port...

Страница 112: ...hat the correct port is selected Windows NT 4 0 A Click Start point to Settings and then click Printers B Click to select the icon of the printer After that on the File menu click Properties C Click the Port tab D Check the Print to the following port box to confirm that the correct port is selected ...

Страница 113: ...ite under the printer driver s Print Settings tab For details see the printer driver Help Some applications normally print color text as black and white Fine dot pattern does not print PCL 5c PCL 6 PostScript 3 Change the Dithering setting in the Advanced dialog box under the printer driver s Print Quality tab RPCS Change the Dithering setting under the Image Adjust ments tab in the Change User Se...

Страница 114: ...e size and feed direction as the settings on the control panel See p 24 If you load a paper size that is not selected auto matically The paper size and feed direction settings on the control pan el may not match the size and feed direction of the paper in the bypass tray Make the settings that match the size and feed direction of the paper in the bypass tray See p 28 Loading Paper in the Bypass Tr...

Страница 115: ...elect Text Priority under 4C Graphic Mode and then print To set 4C Graphic Mode select 4C Graphic Mode from the Maintenance menu Reduce the resolution and then print In the RPCSTM printer driver Change User Settings dialog box change the Resolu tion setting on the Image Adjustments tab Try reducing the print density It is recommended to reduce the image density of black cyan magenta and yellow equ...

Страница 116: ...driver Help Black areas and lines are not pure black In the RPCSTM printer driver Change User Settings dialog box set Gray reproduction Text Line Art on the Image Adjustments tab to K Black For details see the printer driver Help The black areas in the gradation are not pure black In the RPCSTM printer driver Change User Settings dialog box set Gray reproduction Text Line Art on the Image Adjustme...

Страница 117: ...ority under the Print Quality tab in the printer properties dialog box For details see the printer driver Help The data is so large or complex that it takes time to process If the Data In indicator is blinking data processing is in progress Just wait until it resumes If the Warming Up message appears on the display the printer is warming up Wait a while To maintain optimum quality color adjustment...

Страница 118: ...low PCL 5c PCL 6 PostScript 3 Select K Black for Gray Reproduction in the printer driv er s Advanced dialog box under the Print Quality tab RPCS Select K Black for Gray Reproduction under the Image Adjustments tab in the printer driver s Change User Set tings dialog box Solid lines are printed as broken lines PCL 5c PCL 6 PostScript 3 Change the Dithering setting in the Advanced dialog box under t...

Страница 119: ...de of pages is hazy gray Adjust image density To adjust image density press Menu and select Image Density from the Maintenance menu See p 92 Adjusting Image Density If paper is curled correct it Curled or folded paper might result in hazy gray print Curling often occurs with postcards so be sure to correct it before printing Printed images are different to computer screen images When you use certa...

Страница 120: ...details about PDF Change PW see PDF Menu Soft ware Guide For details about Web Image Monitor see Help PDF files not allowed to be printed by the PDF file security setting cannot be printed As a result of printing using PDF Direct Print characters are missing or misshapen Before printing embed the font in the PDF file to be printed The paper size appears on the control panel and printing is not per...

Страница 121: ... E mail Address Groups to Notify Select Groups Items to Notify For details about the settings see Web Image Monitor Help Access the printer through Web Image Monitor logging on as an Administrator and then confirm the settings of the SMTP server in E mail For details about the settings see Web Image Monitor Help When the power is turned off before the e mail is transmitted the e mail will not be r...

Страница 122: ...ding However an error solved e mail is sent The error notification timing was changed but no error notifica tion e mail was received for that timing If an error notification e mail is sent before the error notifica tion timing is changed another error notification e mail for that error will not be sent for the new timing When no date information is in cluded in sent e mail the mail server has a ma...

Страница 123: ... printer does not staple even after instructed jammed staples might be the cause SR960 2 Tray Finisher A Open the front cover of the 2 tray finisher The stapler is positioned in the location as shown B Remove the cartridge by pulling the green knob in the direction of the arrow Add Staples ...

Страница 124: ...Troubleshooting 124 C Open the cartridge face plate to unlock it D Remove jammed staples E Close the cartridge face plate so it clicks into place ...

Страница 125: ...nd then push in until it clicks into place G Close the front cover of the 2 tray finisher SR950 Booklet Finisher A Open the front cover of the finisher B Hold the lever and then pull out the staple unit C Turn knob R5 until the cartridge moves to the front ...

Страница 126: ...Troubleshooting 126 D Push the cartridge button and lift up while removing E Open the cartridge s faceplate F Remove any jammed staples ...

Страница 127: ...Troubleshooting 127 G Close the cartridge s faceplate H Push in the cartridge until it clicks I Close the front cover of the finisher ...

Страница 128: ...ppears on the display add a new staple refill SR960 2 Tray Finisher A Open the front cover of the 2 tray finisher The stapler is positioned in the location as shown B Remove the cartridge by pulling the green knob in the direction of the arrow Add Staples ...

Страница 129: ...bleshooting 129 C Push the areas labeled PUSH located on both sides of the stapler The case cover on top rises D Pull the case cover up E Hook your finger in the hole of the empty refill case to pull it out ...

Страница 130: ...ntil the arrow on the refill case lines up with the arrow on the refill case cover G Push the case cover down until it clicks into place H Pull out the ribbon used for tying together the staples Remove the entire length of the ribbon ...

Страница 131: ...ush in until it clicks into place J Close the front cover of the 2 tray finisher SR950 Booklet Finisher A Open the front cover B Hold the lever and then pull out the staple unit C Push the cartridge button and then pull out the cartridge while lifting the cartridge ...

Страница 132: ...roubleshooting 132 D Hold both sides of the cartridge and then pull up the upper unit of the cartridge E Remove the empty refill in the direction of the arrow F Push in the new cartridge until it clicks ...

Страница 133: ...Troubleshooting 133 G Gently push down the upper unit H Pull out the ribbon I Push in the cartridge until it clicks J Close the front cover of the finisher ...

Страница 134: ...essage appears when the punch waste box is not installed cor rectly SR960 2 Tray Finisher A Open the front cover of the 2 tray finisher The punch waste box is positioned in the location shown in the illustration B Pull out the punch waste box and then remove the paper chips C Re install the punch waste box D Close the front cover of the 2 tray finisher Empty Punch Receptacle ...

Страница 135: ...pears on the control panel even when the punch waste box is not full chips might be stuck around the punch waste box hole as shown Remove punch hole chips from around the hole SR950 Booklet Finisher A Hold the release lever and then pull out the booklet finisher B Pull out the punch waste box and then remove the paper chips ...

Страница 136: ...Troubleshooting 136 C Reinstall the punch waste box If the message does not disappear reinstall the punch waste box D Attach the booklet finisher ...

Страница 137: ...on prints made after removing misfed paper may be loose inadequate ly fused Make a few test prints until smudges no longer appear Do not forcefully remove misfed paper it will tear Torn pieces remaining in side the printer will cause further misfeeds and possibly damage the printer Misfeed Recovery This printer has a misfeed recovery function that sends misfed paper to the standard tray or right c...

Страница 138: ...ve Misfeed A Internal Path Appears A Open the bottom right cover by pulling its lever B Move the blue lever up and down to feed the misfed paper and then slowly pull out the paper C Close the right cover by pushing the area labeled PUSH ...

Страница 139: ...0 Booklet Finisher B If the duplex unit is installed open the duplex reversal unit p 38 Opening and Closing the Duplex Reversal Unit C If the output tray is attached to the printer raise it in the direction of the arrow and then remove it D Slowly pull out the upper left cover for the printer The inside of the machine becomes very hot Do not touch parts labelled hot surface Touching a hot surface ...

Страница 140: ... the paper Always turn the blue dial in the direction of the arrow If you turn it in the reverse direction paper feeds into the printer making it difficult for you to take out Do not pull out misfed paper Use the blue dial to push it G Close the upper left cover and push the part labeled PUSH next to the handle at the bottom rear the back until it clicks ...

Страница 141: ... printer slits and then lower it toward you I If the duplex unit is installed close the duplex reversal unit p 38 Opening and Closing the Duplex Reversal Unit J If the 2 tray finisher or the booklet finisher is installed reattach it to the printer p 37 Detaching the SR960 2 Tray Finisher p 38 Detaching the SR950 Booklet Finisher ...

Страница 142: ...d Paper 142 When Remove Misfeed R Finisher Appears Open the top cover and front cover of the 2 tray finisher and then remove the misfed paper A Fold the output tray Raise it vertically B Fold it over the printer top ...

Страница 143: ...paper D Close the top cover slowly E Open the front cover for the 2 tray finisher Check to see if there is misfed paper in areas A B C and D F Check area A of step E Lift the lever and then while holding it up with your hand slowly pull out the misfed paper G Slowly lower the lever to put it back into place ...

Страница 144: ...he direction of the arrow and then slowly pull out the misfed paper K Slowly lower the lever to put it back into place L Close the front cover of the 2 tray finisher If the error message does not disappear even after misfed paper is removed detach the 2 tray finisher from the printer to check for misfed paper there See p 37 Detaching the SR960 2 Tray Finisher for details about how to detach reatta...

Страница 145: ...Removing Misfed Paper 145 M Put the output tray back into place Raise the tray N Lower it slowly ...

Страница 146: ...Removing Misfed Paper 146 When Remove Misfeed R1 Appears A Hold the release lever and then remove the booklet finisher B Remove the misfed paper C Open the upper cover ...

Страница 147: ...Removing Misfed Paper 147 D Remove the misfed paper E Close the upper cover F Attach the booklet finisher ...

Страница 148: ...sfed Paper 148 When Remove Misfeed R2 4 Appears A Hold the release lever and then remove the booklet finisher B Open the front cover C Make suer the blue marker is visible If not turn knob R2 until it is visi ble ...

Страница 149: ...Removing Misfed Paper 149 D Remove the misfed paper E Hold lever R3 and then open the cover F Remove the misfed paper G Turn knob R4 and then remove the misfed paper ...

Страница 150: ...moving Misfed Paper 150 When Remove Misfeed Y Paper Tray Appears A Open the lower right cover of the paper feed unit and then pull out the misfed paper B Close the lower right cover of the paper feed unit ...

Страница 151: ... the SR950 Booklet Finisher B Open the left cover of the duplex reversal unit and then remove the mis fed paper Do not pull the paper out forcefully If you cannot remove the paper proceed to step C C Push up the lock release button of the duplex reversal unit and then hold it in place The inside of the machine becomes very hot Do not touch parts labelled hot surface Touching a hot surface could re...

Страница 152: ... lower the duplex reversal unit until it stops and remove the mis fed paper E Slowly raise the duplex reversal unit and insert until it clicks into place Raise the left cover and then close it securely by pushing the area la beled PUSH ...

Страница 153: ... this procedure See p 138 When Remove Misfeed A Internal Path Appears Be sure to remove misfed paper by following the procedure below when the Remove Misfeed Z2 Dup Feed Unit message appears on the display A Turn off the power and then unplug the power cable B Slowly open the front cover of the printer remove the green screwdriv er p 36 Using the Screwdriver C Remove the screw fastening the duplex...

Страница 154: ...halfway out E Hold the duplex feed unit using both hands place it on the vertical rail and slide it straight out F Slowly place the duplex feed unit on the floor Open it slowly and re move the misfed paper Do not forcefully open the duplex feed unit It might damage the unit G Close the duplex feed unit ...

Страница 155: ...tical rail and slide it slowly in until it stops The vertical rail is in the position as shown I Refasten the duplex feed unit using the provided screwdriver Use the screw removed in step C Be sure to return the provided screwdriver to its original position on the in side of the front cover ...

Страница 156: ...Removing Misfed Paper 156 J Slowly close the front cover by pushing the two areas on the left and right K Plug in the power cable and then turn on the power ...

Страница 157: ... Front Cover appears on the display the cover is not properly closed even if it appears to be If the front cover does not close check the green lever is in the locked position as shown A Turn off the power and then unplug the power cable B Turn the green lever clockwise Close Front Cover ...

Страница 158: ...Appendix 158 C Slowly close the front cover by pushing the two areas on the left and right D Plug in the power cable and then turn on the power ...

Страница 159: ...talled external options remove them C Be sure to close the bypass tray and front cover D Lift the printer and move it horizontally to the place you want to install it When moving the machine each person should hold the handle on the sides and lift slowly Lifting carelessly or dropping it may cause injury When moving the printer remember to unplug the power cord from the wall outlet to avoid fire o...

Страница 160: ...Appendix 160 Be sure to move the printer horizontally Moving the printer slowly prevents toner scattering If the paper feed unit s is installed detach it and move the printer sepa rately ...

Страница 161: ...here they were purchased When you first use this printer use the four toner cartridges packaged with the printer Numbers of pages that can be printed using the toner cartridge supplied with this printer are as follows Staple Cartridge Our products are engineered to meet the highest standards of quality and functionality When purchasing expendable supplies we recommend using only those specified by...

Страница 162: ...ach page as a single job the unit needs extra idling time thus reduc ing its print life by half Name Consumables Average printable number of pages 1 Printer Maintenance Kit Type 7200 7300A Color photoconductor unit 3 40 000 2 Printer Maintenance Kit Type 7200 7300B Color development unit 3 80 000 2 Printer Maintenance Kit Type 7200 7300C Fusing unit 1 80 000 2 Printer Maintenance Kit Type 7200 730...

Страница 163: ... per minute A4K 11 81 2 K 1 Duplex unit standard model printer Monochrome Maximum 35 pages per minute A4K 11 81 2 K 1 Color Maximum 35 pages per minute A4K 11 81 2 K 1 1 Printing speed may vary depending on the setting up environment Resolution 1200 1200 dpi RPCS PostScript 3 PCL 6 1200 600 dpi RPCS PostScript 3 PCL 5c PCL 6 600 600 dpi RPCS PostScript 3 PCL 5c PCL 6 300 300 dpi RPCS PCL 5c 1 1 mo...

Страница 164: ... and power cord included Standard Paper Tray 500 sheets 2 1 Bypass Tray 2 100 sheets 1 Paper Feed Unit Type 7300 500 sheets 1 500 sheets 2 1 Paper Bank Type 7300 2 000 sheets 1 Printing Basic model printer 1 320 W or less 1 Duplex unit standard model printer 1 400 W or less 1 Energy Saver 17 W or less Width Depth Height Basic model printer tray not extended 575 mm 22 7 inches 678 mm 26 7 inches 67...

Страница 165: ...SB computer port and cable that support USB 2 0 Optional Gigabit Ethernet 1000Base T IEEE 1394 SCSI print IP over 1394 IEEE 802 11b Wireless LAN Parallel Bidirectional IEEE 1284 Bluetooth USB host interface Printer Language RPCS PJL PCL 5c e 6 PostScript Level 3 PDF PictBridge Fonts PCL 5c Agfa Font 35 Manager Intellifonts 10 TrueType fonts and 1 Bitmap font Agfa Font Manager available 58 fonts Po...

Страница 166: ...21 3 23 7 10 7 in Paper Weight 60 105 g m2 16 28 lb Paper Size A5 Long edge feed A3 81 2 11 11 17 Short edge feed Paper Bank Type 7300 Large Capacity Tray Dimensions W D H 540 600 270 mm 21 3 23 7 10 7 in Paper Weight 60 105 g m2 16 28 lb Paper Size A4 Long edge feed or 81 2 11 Short edge feed SR960 2 Tray Finisher Dimensions W D H 680 620 1 030 mm 26 8 24 4 40 6 in Paper Size A5 Long edge feed A3...

Страница 167: ...5 603 932 mm 27 3 23 7 36 7 in Paper Size A5 Long edge feed A3 81 2 14 11 17 B5 Short edge feed Paper Weight 64 128 g m2 17 34 1 lb Stack Capacity No Staple 1000 sheets A4 A5 Letter 500 sheets A3 B4 11 17 Legal Staple 1000 sheets A4 A5 Letter 500 sheets A3 B4 11 17 Legal Or 30 sets A3 B4 A4 A5 11 17 Legal Letter Staple Capacity 50 sheets A4 A5 Letter 25 sheets A3 B4 11 17 Legal Staple Paper Size A...

Страница 168: ...ol Sample Locked Print data Store PostScript fonts Store log data You can install PostScript fonts using the optional hard disk drive With Macintosh supported fonts are PostScript Type 1 and PostScript Type 2 To download them use Printer Utility for Mac Memory Unit Type C 64 128 256MB Module Type SO DIMM Small Outline Dual in line Memory Module Memory Type SDRAM Synchronous Dynamic RAM Number of P...

Страница 169: ... power supply Cable Power repeated IEEE 1394a 2000 compliant IEEE 1284 Interface Board Type A Transmission Spec IEEE 1284 Required Cable Standard IEEE 1284 compliant Micro Centronics 36 pin cable IEEE 802 11b Interface Unit Type H Transmission Spec Based on IEEE 802 11b wireless LAN Protocol TCP IP IPX SPX AppleTalk RPDL and Web Image Monitor are supported Data Transfer Speed 1 Mbps 2 Mbps 5 5 Mbp...

Страница 170: ...lacement Profile BIP Basic Imaging Profile Frequency Range 2 GHz ISM band Data Transmission Speed 732 kbps The transmission speed is adjusted according to factors such as the dis tance and obstacles between the devices radio signal condition and Blue tooth adaptor Maximum Range 10 m Gigabit Ethernet Type 7300 Interface Connector Ethernet 10Base T 100Base TX 1000Base T USB 2 0 It requires a USB com...

Страница 171: ...x 171 Distance Between Devices Ethernet 100 m USB 5 m USB Host Interface Unit Type 7300 Interface Connector USB 2 0 host interface A type Data Transmission Speed 12 Mbps Full speed Distance Between Devices 5 m ...

Отзывы: