


Appendix F
•
Falk
™
Drive One
®
Enclosed Gear Drives
(Page 24 of 27)
Type D Series
•
Sizes M1130 thru M1210
168-050
Rexnord Industries, LLC, 3001 W. Canal St., Milwaukee, WI 53208-4200
January 2019
Telephone: 414-342-3131 Fax: 414-937-4359
Supersedes 04-11
e-mail: [email protected] web: www.rexnord.com
(PN 2124650)
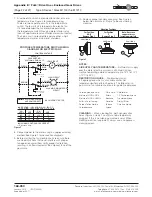
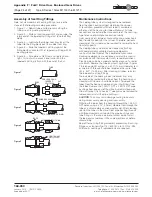
Assembly of Seal Ring Fittings
Note: For disassembly of seal ring fittings, reverse the
steps of the following assembly procedure.
1. Figure 1 — Deburr tube end to prevent cutting the
rubber seal ring during assembly.
2. Figure 2 — Slide nut and tapered split ring on tube. The
large end of the tapered split ring must face the fitting
body.
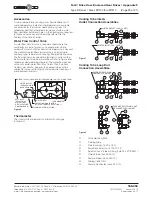
3. Figure 3 — Lubricate the rubber seal ring. Insert the
tube into the fitting body past the rubber seal ring.
4. Figure 4 — Slide the tapered split ring against the
fitting body. Lubricate O.D. of tapered split ring with #2
bearing grease.
5. Figure 5 — Assemble nut to fitting and tighten hand
tight. Turn nut with a wrench one turn or until the
tapered split ring is flush with the end of the nut.
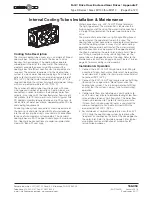
Maintenance Instructions
The cooling tube system is designed to be removed
from the drive housing without disturbing the drive or
its foundation, provided sufficient room is available at
either end of the housing for tube withdrawal. All tube
connections are outside the drive and are of the seal ring
type for ease of maintenance and reusability.
Light coatings of sludge or scale will cause a reduction in
heat transfer capacity of the system. Therefore, periodic
cleaning of the system may be required to restore the heat
transfer capacity.
The cooling tube system may be cleaned by flushing
with commercially available cleaning compounds
such as Oakite or Dowell. The commercially available
cleaning compounds are corrosive and must be used in
accordance with their manufacturer’s recommendations.
Cleaning may also be accomplished by means of a rod or
wire brush. Remove the tube end seal ring fittings (Figures
7 & 8 on page 25) and pass a .500” (12 mm) diameter rod
or wire brush through the tubes to remove the scale. Tube
I.D. is .527” (13.39 mm). After cleaning all tubes, reinstall
the tube end seal ring fittings.
The outside of the cooling tubes (aluminum fins) may
be cleaned by removing the tubes from the housing and
cleaning with steam or a suitable solvent. To remove the
tubes from the housing, remove all seal ring fittings from
the tubes. Remove the 1.250-11 NPT x .750-14 NPT pipe
bushings from one end of the drive. A special deep well,
thin wall socket (1.812 hex by 7” deep) may be required to
remove and reinstall the pipe bushings.
CAUTION
: Take care not to damage cooling tube ends
during disassembly, cleaning and reassembly.
Withdraw the tubes from the housing through the 1.250-11
NPT holes using a .375” (10 mm) diameter rod through the
tube as a disassembly and reassembly aid. After cleaning,
reinstall the tubes in the drive. Coat pipe bushing threads
with thread sealant and reinstall the pipe bushings and
tube fittings in the reverse order of disassembly. Install
the loop end assemblies in the same positions as before
disassembly.
See left for seal ring fitting assembly procedures. Seal ring
fittings use standard No. 114 (.625 I.D. x .812 O.D. x .094
W) Buna-N seal rings if replacements are required.
TUBE
DEBURRED END
BODY
TAPERED
SPLIT RING
NUT
RUBBER SEAL RING
TEFLON BACK-UP RING
BODY
TAPERED SPLIT RING
TIGHTEN NUT
UNTIL FLUSH
Figure 1
Figure 2
Figure 3
Figure 4
Figure 5