background image

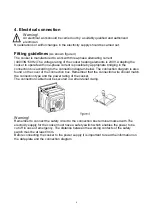
4. Electrical connection

Warning! 

All electrical work should be carried out by a suitably qualified and authorized 
electrician. 

No alterations or willful changes in the electricity supply should be carried out.


Fitting guidelines 

(As shown figure 4)

The cooker is manufactured to work with three-phase alternating current 
(400V3N~50Hz).The voltage rating of the cooker heating elements is 230V. Adapting the 
cooker to operate with one-phase current is possible by appropriate bridging in the 
connection box according to the connection diagram below. The connection diagram is also 
found on the cover of the connection box. Remember that the connection wire should match 
the connection type and the power rating of the cooker. 
The connection cable must be secured in a strain-relief clamp.


Warning! 

Remember to connect the safety circuit to the connection box terminal marked with.The 
electricity supply for the cooker must have a safety switch which enables the power to be 
cut off in case of emergency. The distance between the working contacts of the safety 
switch must be at least 3mm. 
Before connecting the cooker to the power supply it is important to read the information on 
the data plate and the connection diagram.  

Содержание DIGI SET 8 GLAS PP

Страница 1: ...keramik Kochfeld User s manal and Installation instruction Oven Set with Witro ceramic Hob Ofen Oven DIGI 8 GLAS PPS Kochfeld Hob KM2KBA AK580 9D3 3G CS O1 14 H4M2W61 2 NEG Novex Großhandelsgesellschaft für Elektro und Haustechnik GmbH Chenover Str 5 D 67117 Limburgerhof fi20221atNEG D GB ...

Страница 2: ...dem Schutz des Benutzers und dem Gerät dienen und einem aktuellen technischen Standard entsprechen Sollten Sie trotz unserer eingehenden Qualitätskontrolle einmal etwas zu beanstanden haben so wenden Sie sich bitte an den Kundendienst Dieser wird Ihnen gerne weiterhelfen CE Konformitätserklärung Der Hersteller der des hierin beschriebenen Produkte s auf welche s sich diese Erklärung bezieht erklär...

Страница 3: ...edienung 7 Die Regler am Backofen und deren Funktion 8 Ofenfunktion und Bedienung 9 Einstellung und Verwendung des Timers 10 Bedienung im Notfall 11 Pflege und Reinigung 12 Austauschen der Lampe für die Ofenbeleuchtung 13 Ausbau der Tür 14 Ausbauen der Glasscheibe aus der Tür 15 Backen im Backofen 16 Entsorgung 17 Transport 18 Garantiebedingungen ...

Страница 4: ...auf das Kochfeld Reinigen Sie die Glasscheibe der Ofentür nicht mit Scheuermitteln oder scharfkantigen Metallschabern Diese könnten das Glas zerkratzen und dazu führen dass die Glasscheibe springt Verwenden Sie das Kochfeld nicht wenn ein technischer Fehler daran vorliegt Fehler müssen von einer entsprechend qualifizierten und autorisierten Fachkraft behoben werden Liegt ein technischer Fehler vor...

Страница 5: ...s Kochfeldes Installieren des Kochfelds Der Einbaubereich in der Küche muss trocken gut durchlüftet und mit einer effizienten Belüftung ausgestattet sein Das Kochfeld muss so eingebaut werden dass alle Bedienelemente leicht zugänglich sind Dies ist ein Kochfeld vom Typ Y Das heißt es kann seitlich neben einem höheren Küchenmöbel oder einer Wand installiert werden Beschichtungen oder Verkleidungen ...

Страница 6: ...ieben Sie den Ofen ein Stück weit in die vorbereitete Einbauöffnung hinein und verbinden Sie den Ofen mit dem Kochfeld Die Steckverbinder an den Enden der Leitungen vom Kochfeld müssen an die Anschlüsse gleicher Farbe am Bedienfeld angeschlossen werden also der schwarze Steckverbinder an den schwarzen Anschluss usw Das Gerät muss geerdet werden Verbinden Sie den Schutzleiter des Kochfelds gelb grü...

Страница 7: ...rgenommen werden Das Anschlussdiagramm ist auch auf dem Deckel der Anschlussdose abgebildet Denken Sie daran dass die Verbindungsleitung auf den Verbindungstyp und die Nennleistung des Geräts abgestimmt sein muss Für das Verbindungskabel ist eine Zugentlastung erforderlich Warnung Schließen Sie den Sicherheitsschaltkreis an den Anschluss mit der Kennzeichnung in der Anschlussdose an In die Stromve...

Страница 8: ...4 5 überbrückt werden Anschluss des Schutzleiters an H05VV F4G2 5 3 Bei einem zweiphasigen Netzanschluss mit 400 230 V und Schutzleiter müssen die Klemmen 4 5 überbrückt werden Phasenleiter in der Reihenfolge 1 2 und 3 Anschluss des Nullleiters an 4 5 und des Schutzleiters an H05VV F5G1 5 L1 L2 und L3 3 Phasen N Nullleiter PE PE Anschluss Erdleitung Achtung Elektrischer Anschluss des Kochfelds Das...

Страница 9: ...e vordere linke Kochzone 6 Regler für die vordere rechte Kochzone 7 Regler für die hintere rechte Kochzone 8 Kochfeldbetriebsanzeige rot 9 Griff der Backofentür 10 Anzeige Kochzone heiß auf dem Glaskeramikfeld 11 Glaskeramikkochfeld 12 Display Keramikkochfeld 1 Ø 165 270 mm 900 1100 W 2 Ø 155 mm 1200 W 3 Ø Ø150 190 mm 700 1000 W 4 Ø 155 mm 1200 W 5 Restwärmeanzeigen 1 2 3 4 5 ...

Страница 10: ...chzone zugehörigen Reglers nach rechts auf die gewünschte Heizstufe 1 bis 6 Zum Zuschalten einer der Zweikreiskochzonen drehen Sie den der Kochzone zugehörigen Regler zuerst auf das Zweikreisymbol und wählen Sie anschließend die gewünschte Heizstufe Zum Ausschalten einer Kochzone drehen Sie den der Kochzone zugehörigen Regler auf 0 Restwärme Anzeige H Wenn eine Kochzone nach dem Ausschalten noch h...

Страница 11: ...te Kochfeld Drehen Sie ihn im Uhrzeigersinn um das Kochfeld einzuschalten F ist der Regler für das hintere rechte Kochfeld Drehen Sie ihn im Uhrzeigersinn um das Kochfeld einzuschalten 8 Ofenfunktionen und Bedienung Herkömmlicher Konvektionsofen Im Ofen stehen Heizelemente oben und unten sowie ein Grillelement zur Verfügung Wählen Sie die gewünschte Ofenfunktion mit dem Backofenfunktionsknopf aus ...

Страница 12: ...d die Hitze strahlt direkt auf die Speisen darunter ab Diese Funktion eignet sich zum Grillen von Speck Fleisch Toasts usw in kleinen Portionen KOMPLETTER GRILL Bei dieser Einstellung werden die inneren und äußeren Teile des oberen Grillelements eingeschaltet und die Hitze strahlt direkt auf die Speisen darunter ab Diese Funktion eignet sich zum Grillen von Würstchen Speck Steaks Fisch usw in mitt...

Страница 13: ...e des Ofens sollte ebenfalls mit warmer Seifenlauge sowie einem Schwamm oder weichen Tuch gesäubert werden Verwenden Sie auf keinen Fall scheuernde Reinigungsmittel Wir empfehlen die Edelstahloberflächen des Geräts regelmäßig mit einem dafür vorgesehenen Spezial bzw Politurmittel zu säubern Timer Modus Wechseln des Timer Modus Es gibt 3 Timer Modi Standby Funktionswahl und Betrieb Standby Modus Na...

Страница 14: ...nsabfolge sind wie folgt Schaltdiagramm der Timer Funktionsmodi Bedienungsanleitung 1 1 Einschalten Zunächst ertönt der Summer einmal und gibt damit an dass der Timer in den Standby Modus schaltet Die Uhr zeigt die Systemzeit an und beginnt zu laufen Beim Einschalten wird 0 00 angezeigt dann erscheint im Display die Systemzeit Das Dezimalsymbol blinkt 1 mal pro Sekunde Abb 5 Mit der Taste können S...

Страница 15: ...chselt in den Standby Modus Das Display blinkt wie in Abb 6 zu sehen Abb 8 Systemzeit eingestellt Hinweis 1 Als Systemzeit können die Uhrzeiten von 0 00 bis 23 59 eingestellt werden Hinweis 2 Zum Einstellen der Zeit für eine Timer Funktion drücken Sie oder lang oder kurz Mit einem kurzen Tastendruck verlängern bzw verkürzen Sie die Zeit um jeweils 1 Minute Mit einem langen Tastendruck wird die Zei...

Страница 16: ...e Restzeit wird angezeigt und Sie können den Alarm neu einstellen Nach dem Einstellen erscheint im Display wieder die Systemzeit Abb 11 Alarmsignal eingestellt Abb 12 Alarmzeit abgelaufen Alarmsymbol leuchtet Alarmsymbol blinkt Im folgenden Beispiel wurde der Alarm auf 10 Minuten eingestellt Nach 10 Minuten leuchten im Display die Systemzeit das Ofen Betriebssymbol das Dezimalsymbol und die System...

Страница 17: ...eit eingestellt Wenn Sie den Timer im Betriebsmodus neu einstellen möchten drücken Sie dreimal Daraufhin blinken das Symbol AUTO und das Ofen Betriebssymbol Der eingestellte Timer bzw die Restzeit wird angezeigt und Sie können den Timer neu einstellen Nach dem Einstellen erscheint im Display wieder die Systemzeit Das Dezimalsymbol und die Systemzeit leuchten stetig Abb 16 Abb 16 Gardauer läuft Abb...

Страница 18: ... einstellen Abb 20 Garzeitende 0 30 Abb 19 Anfangsanzeige für das Garzeitende Abb 20 Garzeitende eingestellt Nehmen Sie nach dem Einstellen der Zeit den Finger von der Taste und warten Sie 5 Sekunden lang Das Symbol AUTO und das Ofen Betriebssymbol hören auf zu blinken und leuchten stetig Im Display erscheint die Systemzeit Das Dezimalsymbol und die Systemzeit leuchten stetig Damit ist die Zeit ei...

Страница 19: ...zunächst die Standardanzeige 0 00 Wenn das Symbol AUTO und das Ofen Betriebssymbol blinken können Sie mit oder die Gardauer einstellen Abb 24 Gardauer eingestellt Abb 25 Anfangsanzeige der Garzeitprogrammierung Als Nächstes drücken Sie noch einmal Wenn das Symbol AUTO blinkt können Sie mit oder das gewünschte Garzeitende einstellen Wenn Sie diese eingestellt haben nehmen Sie den Finger von der Tas...

Страница 20: ...Modus wenn also im Display die Systemzeit erscheint und das Dezimalsymbol blinkt können Sie durch Drücken der Plus Taste den gewünschten Signalton unter den 3 möglichen Tönen auswählen Zur Auswahl des Tons drücken Sie die Taste einmal Standardmäßig ist beim Einschalten der zweite Signalton eingestellt Richtlinien zum Garen Bitte nutzen Sie die Informationen auf den Lebensmittelpackungen als Richtw...

Страница 21: ...lelement und andere Bauteile im Garraum werden im Betrieb extrem heiß Achten Sie darauf diese beim Hantieren mit Speisen im Garraum nicht versehentlich zu berühren Wichtig Wenn Sie die Tür öffnen achten Sie darauf weder mit heißen Teilen des Ofens noch mit heißem Dampf in Berührung zu kommen Reinigen Sie das Gerät nicht mit einem Dampfreiniger Warnung Zugängliche Geräteteile können im Betrieb heiß...

Страница 22: ...us Ofenbeleuchtung funktioniert nicht Lampe locker oder defekt Drehen Sie die Lampe wieder fest oder tauschen Sie sie aus falls sie defekt ist siehe Pflege und Reinigung WICHTIG Wenn das Gerät nicht ordnungsgemäß funktioniert wenden Sie sich bitte an den Händler VERSUCHEN SIE NICHT DAS GERÄT SELBST ZU REPARIEREN Bitte beachten Sie Folgendes Wenn ein Techniker während der Garantiezeit hinzugezogen ...

Страница 23: ...Sie den Ofen auf keinen Fall mit einem Dampfreiniger Reinigen Sie den Garraum mit warmer Seifenlauge sowie einem Schwamm oder weichen Tuch Verwenden Sie auf keinen Fall scheuernde Reinigungsmittel Flecken am Boden des Garraums stammen von Lebensmittelspritzern oder Speisen die beim Garen überlaufen Das kann darauf zurückzuführen sein dass Speisen bei zu hohen Temperaturen oder in zu kleinen Gefäße...

Страница 24: ... und achten Sie darauf dass sie ordnungsgemäß in der Keramikfassung sitzt Schrauben Sie die Lampenabdeckung wieder auf Auf Leuchtmittel wird keine Garantie gewährt 13 Ausbauen der Tür Abb 5 Um den Zugang zum Garraum für Reinigungszwecke zu erleichtern kann die Tür ausgebaut werden Klappen Sie dazu die Sicherheitsarretierung der Scharniere nach oben Schließen Sie die Tür leicht heben Sie sie an und...

Страница 25: ... bitte auf den Rost Schwarze Backformen sind besonders geeignet da sie die Hitze besser leiten und dadurch die Backdauer verkürzen Backformen mit hellen oder glänzenden Oberflächen sind nicht zu empfehlen wenn Sie die herkömmliche Backfunktion mit Ober und Unterhitze verwenden da der Kuchenboden in solchen Formen unter Umständen nicht durchbäckt Bevor Sie den Kuchen aus dem Ofen nehmen prüfen Sie ...

Страница 26: ...tretenen Fleischsaft oder heißem leicht gesalzenem Wasser zu übergießen nicht jedoch mit kaltem Wasser ART DES BACKWERKS EBENE TEMPERATUR BACKDAUER min Backen in Kuchenformen Biskuit Marmorkuchen Victoria Sponge Kuchen Boden für eine Schichttorte Biskuitboden für eine Schichttorte Teekuchen Brot z B Vollkornbrot 2 2 2 3 2 2 2 170 180 160 180 170 180 170 180 160 180 210 220 60 80 65 80 20 30 30 40 ...

Страница 27: ...n Schinken Filet 2 2 3 200 210 200 210 210 230 90 140 60 90 25 30 KALBFLEISCH 2 200 210 90 120 LAMMFLEISCH 2 200 210 100 120 WILD 2 200 220 100 120 GEFLÜGEL Hähnchen Gans ca 2 kg 2 2 220 250 190 200 50 80 150 180 FISCH 2 210 220 40 55 Die Zahlen in der Tabelle beziehen sich auf 1 kg Bei größeren Mengen muss die Gardauer pro weiterem Kilogramm um 30 40 Minuten verlängert werden Achtung Nach Ablauft...

Страница 28: ...arin falls es einmal transportiert werden muss Beachten Sie dabei die Transportzeichen auf dem Karton Kleben Sie Karton oder Papier auf die Innenseite des Glases da es durch die Fächer beschädigt werden kann Verwenden Sie Kartonabdeckungen für den Drahtgrill und die Bleche in Ihrem Backofen Schützen Sie den Ofen auch an den Seitenwänden mit geeignetem Material Wenn der Originalkarton nicht verfügb...

Страница 29: ...Leuchtmittel wird in keinem Fall Garantie gewährt Der Garantieanspruch ist vom Käufer durch Vorlage der Kaufquittung nachzuweisen Die Garantiezusage ist gültig innerhalb der Bundesrepublik Deutschland WARRANTY CONDITIONS The manufacturer does not take any responsibility for damage caused by the buyer This device has been manufactured and tested according to the latest methods Irrespective of the s...

Страница 30: ...e manufacturer reserves the right to make any necessary model changes to device types to improve user friendliness and to protect the user and the device and which comply with current technical standards Despite our ongoing quality control should you wish to make a complaint please contact Customer Service They will be pleased to assist Declaration of conformity CE The manufacturer of the product ...

Страница 31: ...e 7 The controls on the oven and their function 8 Oven function and operation 9 Setting and using the timer 10 Operation in an emergency 11 Care and cleaning 12 Replacing the lamp for the oven lighting 13 Removing the door 14 Removing the glass pane from the door 15 Baking in the oven 16 Disposing of the device 17 Transport 18 Warranty conditions GB ...

Страница 32: ...erheating or boiling over Do not switch on the hob until a pan has been placed on it Do not put pans weighing over 15kg on the opened door of the oven and pans over 25kg on the hob Do not use harsh cleaning agents or sharp metal objects to clean the door as they can scratch the surface which could then result in the glass cracking Do not use the cooker in the event of a technical fault Any faults ...

Страница 33: ...foil Do not allow electrical fittings or cables to come into contact with areas on the appliance that get hot Do not use the appliance to heat the room it is located in or to dry clothing Do not install the appliance next to curtains or soft furnishings Do not attempt to lift or move cooking appliances by using the oven door or handle as this may cause damage to the appliance or result in injury t...

Страница 34: ...mensions given in the diagram for the oven to befitted Make sure the mains plug is disconnected and then connect the oven to the mains supply Partially insert the oven into the prepared opening and connect the oven to the hob The connectors at the end of the group of wires coming out of the hob should be inserted into the appropriate sockets in the control panel of the oven according to their colo...

Страница 35: ...ording to the connection diagram below The connection diagram is also found on the cover of the connection box Remember that the connection wire should match the connection type and the power rating of the cooker The connection cable must be secured in a strain relief clamp Warning Remember to connect the safety circuit to the connection box terminal marked with The electricity supply for the cook...

Страница 36: ...ges connect 2 3 terminals and 4 5 terminals the earth wire to H05VV F4G2 5 3 For 400 230V earthed two phase connection bridges connect 4 5 terminals phases in succession 1 2 and 3 Neutral to 4 5 the earth wire to H05VV F5G1 5 L1 R L2 S L3 T N neutral wire terminal PE earth wire terminal Caution HOB Electrical connection The hob to work with 230V alternating current electrical connection must get t...

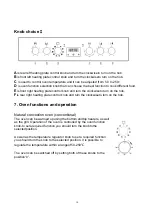
Страница 37: ...ng light orange 4 rear left heating plate control knob 5 front left heating plate control knob 6 front right heating plate control knob 7 rear right heating plate control knob 8 heating plate operating light red 9 oven door handle 10 high temperature indicator lamp of glass plate 11 ceramic cooker hob 12 Display ...

Страница 38: ...he heating zone Turn the knob clockwise to turn on the hob High temperature indication lamp When the glass plate is too hot the high temperature indication lamp will light up don t touch the glass plate until the indication lamp goes out Turn the knob clockwise to symbol the inner and outer burner of the hob will start to work at the same time If you cancel this cooking function you can turn the k...

Страница 39: ...b Fis rear right heating plate control knob and turn the clockwiseto turn on the hob 7 Oven functions and operation Natural convection oven conventional The oven can be warmed up using the bottom andtop heaters as well as the grill Operation of the oven is controlled by the oven function knob to seta required function you should turn the knob tothe selectedposition As well as the temperature regul...

Страница 40: ... for grilling small portions of bacon toast and meat etc FULL GRILL This method of cooking utilises the inner and outer parts of the top element which directs heat downwards onto the food This function is suitable for grilling medium or large portions of sausages bacon steaks fish etc FAN AND GRILL This method of cooking utilises the top element in conjunction with the fan which helps to provide a...

Страница 41: ...onge or soft cloth No abrasive cleaners should be used Outer parts of the oven should be cleaned with warm soapy water using either a sponge or soft cloth No abrasive cleaners should be used We would recommend that an appropriate stainless steel cleaner and polish is regularly used on the stainless steel surfaces of this appliance Timer working status Switching the timer status The timer has 3 sta...

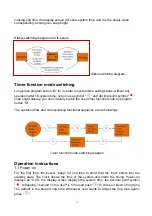
Страница 42: ...he oven timer function mode by program button M The operation flow and corresponding functional sequence are as followings Timer function mode switching diagram Operation instructions 1 1 Power on For the first time the buzzer beep for one time to show that the timer enters into the standby state The clock shows the time of the system and starts the timing Power on displays as 0 00 the display scr...

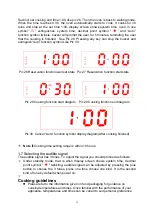
Страница 43: ...kles then can set the time again Pic 6 Clock setting state diagram Pic 7 Feature to be selected state diagram second icon flickering second icon always bright Press button again for 3 seconds oven is turned off and returns to standby status The display of pic 6 is flashing Pic 8 System time well set diagram Note 1 System time setting range is 0 00 23 59 Note 2 When setting the time for each functi...

Страница 44: ...l and system time keep bright It means time is well set See Pic 11 Whenever user wants to adjust the clock in the working status push two times when user sees the alarm clock icon twinkles it will shows the set clock or the time left and user can adjust the clock again After setting is done the display will change back to system time Pic 11 Alarm clock working status diagram Pic 12 Alarm clock tim...

Страница 45: ...inger off the buttons and wait for 5 seconds then the icon AUTO and oven in use symbol stop twinkling and change to always bright display It means time is well set Whenever user wants to adjust the timer in the working status push three times when user sees the icon AUTO and oven in use symbol twinkles it will shows the set timer or the time left and user can adjust the timer again After setting i...

Страница 46: ...ep bright Display effect see Pic 19 Suppose current system time is 0 00 When the icon AUTO and oven in use symbol twinkle you can set cooking end time by pressing or well set diagram see Pic 20 Suppose cooking end time is 0 30 Pic 19 Cooking end time setting initial state Pic 20 Cooking end time well set state After choosing the time lift the finger off the buttons and wait for 5 seconds then the ...

Страница 47: ... cook and when to have the dish ready First press button 3 times then the icon AUTO and oven in use symbol icon twinkle The screen shows the cooking time First set default display 0 00 When the icon AUTO and oven in use symbol twinkle user can set the cooking time by pressing or Pic 24 Cooking time well set diagram Pic 25 Reservation function setting initial state Second press one time again when ...

Страница 48: ... Cooking function start diagram Pic 29 Cooking function end diagram Pic 30 Cancel Auto function symbol display diagram After cooking finished Note Cooking time setting range is within 10 hours 1 7 Selecting the audible signal The audible signal has 3 tones To adjust the signal you should proceed as follows Under standby mode that is when display screen shows system time decimal point symbol twinkl...

Страница 49: ...ase of your oven with aluminum foil During cooking never place pans or cookware directly onto the bottom of your oven They should always be placed on the shelves provided The grill heating element and other internal components of the oven becomes extremely hot during operation avoid touching it inadvertently when handling the food which you are grilling Important Be careful when opening the door t...

Страница 50: ... it with a new one The oven lighting does not work the bulb is loose or damaged tighten up or replace the blown bulb see Chapter Maintenance and cleaning IMPORTANT If your appliance appears not to be operating correctly Please contact with dealer DO NOT ATTEMPT TO REPAIR THE APPLIANCE YOURSELF Please note that if an engineer is asked to attend whilst the product is under guarantee and finds that t...

Страница 51: ...cavity should only be cleaned with warm soapy water using either a sponge or soft cloth No abrasive cleaners should be used Any stains that may appear on the bottom of the oven will have originated from food splashes or spilt food these splashes occur during the cooking process These could possibly be a result of the food being cooked at an excessively high temperature or being placed in cookware ...

Страница 52: ...ers Voltage230V Power 25W Thread E14 Do not use any other type of bulb Screw the bulb in making sure it is properly inserted into the ceramic socket Screw in the lamp cover No guarantee is given for lamps 13 Door removal As shown figure 5 In order to obtain easier access to the oven chamber for cleaning it is possible to remove the door To do this tilt the safety catch part of the hinge upwards Cl...

Страница 53: ...ays bought elsewhere which should be put on the drying rack for baking it is better to use black trays which conduct heat better and shorten the baking time Shapes and trays with bright or shiny surfaces are not recommended when using the conventional heating method top and bottom heaters use of such tins can result in undercooking the base of cakes Before the cake is taken out of the oven check i...

Страница 54: ...nd during roasting you should also baste the meat with its juices or with hot salty water do not pour cold water over the meat CAKE TYPE LEVEL TEMPERATURE BAKING TIME min Baking in cake tins Sponge cake marble cake Victoria sponge Base for a layer cake Sponge layer cake Teacake Bread e g wholegrain bread 2 2 2 3 2 2 2 170 180 160 180 170 180 170 180 160 180 210 220 60 80 65 80 20 30 30 40 40 60 50...

Страница 55: ...n of 1kg if the portion is larger than that an additional 30 40 minutes should be added for each additional kilogram Caution ln the middle of the roasting time the meat must be turned over It is advisable to roast meat in heatproof ovenware 16 Disposal of the appliance Old appliances should not simply be disposed of with normal household waste but should be delivered to a collection and recycling ...

Страница 56: ...ed Follow the transport signs on the carton Tape cardboard or paper onto the inside face of the glass as it will be prone to damage from the trays Use cardboard covers for the wire grill and trays in your oven Also tape the oven s covers to the side walls If the original carton is unavailable take measures to protect the external surfaces glass and painted surfaces of oven against possible blows a...

Страница 57: ...Leuchtmittel wird in keinem Fall Garantie gewährt Der Garantieanspruch ist vom Käufer durch Vorlage der Kaufquittung nachzuweisen Die Garantiezusage ist gültig innerhalb der Bundesrepublik Deutschland WARRANTY CONDITIONS The manufacturer does not take any responsibility for damage caused by the buyer This device has been manufactured and tested according to the latest methods Irrespective of the s...

Страница 58: ...Rating label ...

Отзывы: