background image

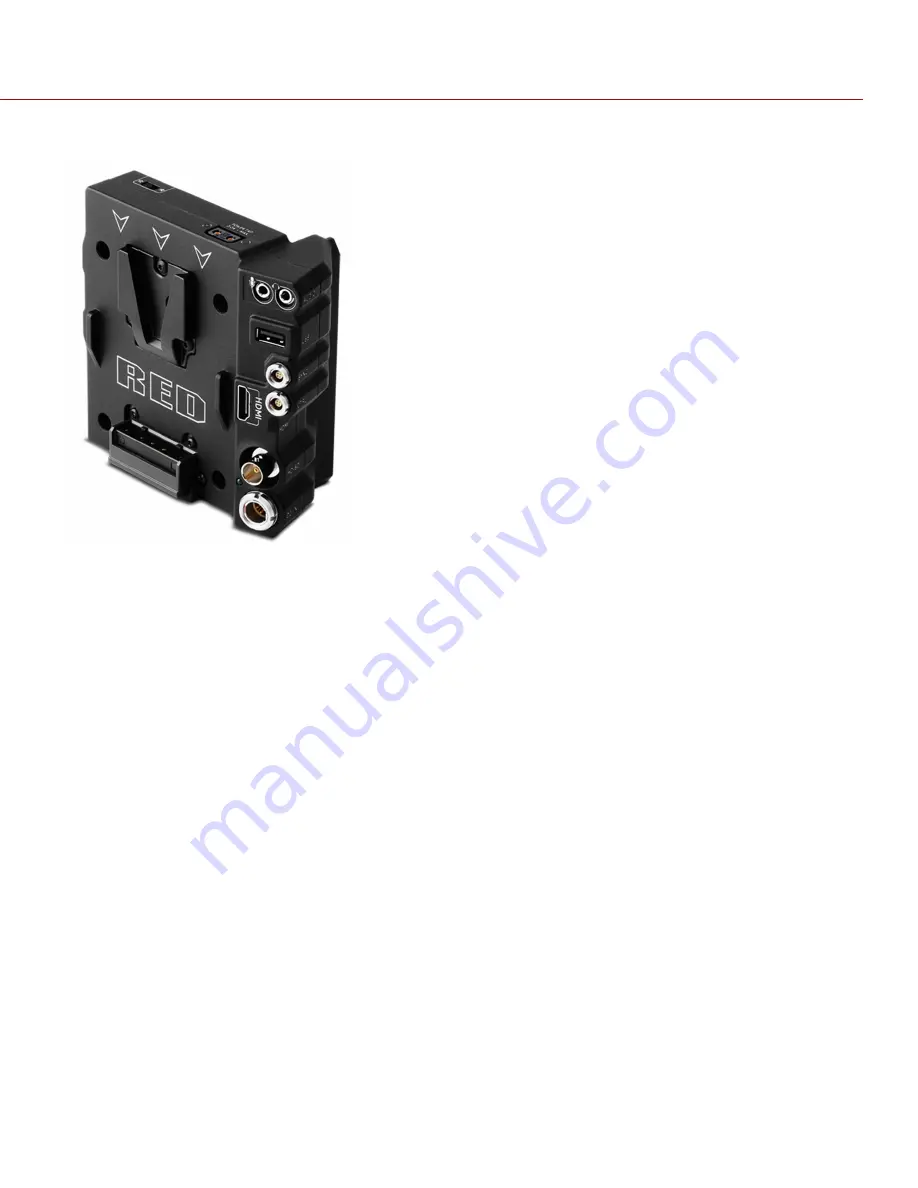
DSMC2 V-LOCK I/O EXPANDER


Figure: DSMC2 V-Lock I/O Expander

 
The DSMC2 V-Lock I/O Expander offers a variety of Input/Output connections, as well as an industry standard V-Lock 
mount to power your DSMC2 camera using RED BRICK batteries.

The DSMC2 V-Lock I/O Expander also features a selector switch that enables the BRAIN to automatically boot when 
power is provided via the DC IN connector on the expander. This feature allows you to use a connected DC input 
supply to turn the BRAIN on and off when the camera is mounted in remote or difficult to maneuver locations.

This   expander  is   an  ideal   solution  for  a   wide   variety   of   production  environments—from  low- profile   run- and- gun 
situations to studio shoots that require mobility.

NOTE: 

The DSMC2 Top Handle may not be fully compatible with the DSMC2 V-Lock I/O Expander, as the top handle 

may interfere with the battery when one is attached to the expander module.

NOTE: 

Only one (1) expander module can be used at a time.

C O PYR I G HT © 2 0 1 7 R ED.C O M , I NC

9 5 5 - 0 1 2 7 _V 6 .3 , R EV - M

|

   2 3

RED RAVEN OPERATION GUIDE

Содержание RED DRAGON 4.5K

Страница 1: ...RED RAVEN RED DRAGON 4 5K V6 3 RED COM RED RAVEN OPERATION GUIDE...

Страница 2: ...Navigation Controls 62 5 Advanced Menus 71 Advanced Menus Overview 71 COPYRIGHT 2017 RED COM INC 955 0127_V6 3 REV M 2 RED RAVEN OPERATION GUIDE TABLE OF CONTENTS Access the Advanced Menus 71 Settings...

Страница 3: ...94 DSMC2 V Lock I O Expander 195 DSMC2 REDVOLT Expander 196 DSMC2 Jetpack Expander 197 DSMC2 Jetpack SDI Expander 198 Record Monitor Out Ports 199 Communication Ports 201 Audio Ports 211 Power Ports 2...

Страница 4: ...ark of Blackmagic Design in the U S and other countries EDIUS Pro is a registered trademark of Grass Valley Vegas Pro is a registered trademark of Sony Creative Software IDX is a registered trademark...

Страница 5: ...implies conformity to the following European Norms in brackets are the equivalent international standards EN 60065 IEC 60065 Product Safety ETSI EN 300 328 Technical requirement for radio equipment E...

Страница 6: ...ture without appropriate protection and immediately remove power source if camera or accessories are exposed to moisture WARNING To reduce the risk of fire or electric shock do not expose the camera t...

Страница 7: ...damage due to crushing or other forms physical damage Products marked with this symbol are class 2 devices These devices are not provided with a grounding type plug CAUTION The power cord plug for the...

Страница 8: ...s Overcharging may increase internal temperature beyond the recommended limits and cause permanent damage to the battery DO NOT connect the positive and negative terminals to a metal object such as a...

Страница 9: ...and RED Li 7 2V batteries may also be classified as Dangerous Goods when purchased in bulk Applicable laws prohibit the shipping of batteries that are physically damaged We urge you to look into the...

Страница 10: ...er cameras go to RED Downloads at www red com downloads READ BEFORE YOU SHOOT Read this operation guide carefully and in its entirety before assembling or operating your camera or other RED accessorie...

Страница 11: ...o produce professional full sized prints Because of the ability to record at high frame rates and resolution the camera is ideally suited to capture video and still images simultaneously The camera is...

Страница 12: ...What you would observe in a traditional recording of this action is constant motion blur until the arm stops However what your eye sees is both motion blur and a sharper reference of the arm throughou...

Страница 13: ...at any time ADDITIONAL RESOURCES For more information on power and media see the following guides available at www red com downloads DSMC Power Operation Guide DSMC Media Operation Guide BRAIN Figure...

Страница 14: ...ou can press the button on the battery to check the battery charge level LED COLOR FLASHING DESCRIPTION Power Status LED PWR Off Camera off1 Green Camera on Amber flashing Camera on 5 to 10 min of bat...

Страница 15: ...Mount a DSMC2 RED Touch LCD The secondary LCD EVF port and an HDMI port cannot be used at the same time For more information go to LCD EVF 2 HDMI Select on page 80 4 Focus Hook Mounting Point2 Mount t...

Страница 16: ...ress Eject Media 2 REC button Programmable key Full Press Record Toggle Half Press AF Start 3 User Key 2 Programmable key User Key 1 2 Press Eject Media For more information see the DSMC Media Operati...

Страница 17: ...flashing slow Formatting media Red flashing slow Media mounted with 5 and 10 of media space available Red flashing fast Media mounted with 5 of media space available Red Recording media mounted with...

Страница 18: ...750 0075 v6 1 35 or later RED MINI MAG 240GB 725 0082 v5 1 47 or later RED MINI MAG 480GB 750 0090 v6 3 75 or later RED MINI MAG 512GB V41 725 0078 v5 1 34 or later RED MINI MAG 512GB V51 725 0078 v6...

Страница 19: ...nd durable magnesium this low profile module mounts directly to the BRAIN and offers interface connections for power DC IN HDMI 3G SDI HD SDI CTRL and SYNC ports for Timecode and Genlock as well as a...

Страница 20: ...o 1 5 Amps A front facing 2 Pin 0B LEMO AUX PWR port provides 3 0A maximum A front facing 7 Pin 0B LEMO SERIAL provides 1 5A maximum The SERIAL port is ideal for connecting to motor drivers A rear fac...

Страница 21: ...support and connectors for HDMI and USB power out perfect for housings and low profile setups The DSMC2 Jetpack Expander also features a selector switch that enables the camera to automatically boot...

Страница 22: ...thernet connection offers increased bandwidth for streaming high quality footage The DSMC2 Jetpack SDI Expander is ideal for housings and low profile configurations that require 3G SDI outputs or comp...

Страница 23: ...lows you to use a connected DC input supply to turn the BRAIN on and off when the camera is mounted in remote or difficult to maneuver locations This expander is an ideal solution for a wide variety o...

Страница 24: ...e but have not been tested Blueshape All BV series IDX E HL10DS and E HL9 Sony BP FL75 Switronix Hypercore series and XP L90S WARNING While third party batteries may be mechanically compatible with th...

Страница 25: ...with one 1 dual action release button for removing an attached battery The DSMC2 REDVOLT XL Module offers a DC IN power port that can be used to power the camera system when the module is attached to...

Страница 26: ...ers the following batteries and chargers Item Part Number REDVOLT XL 740 0021 REDVOLT Charger Quad 740 0015 For more information see the DSMC Power Operation Guide available at www red com downloads C...

Страница 27: ...0 LCD2 3 1920 x 1136 Total 180 Forward 90 Backward 90 Total 360 CW 180 CCW 180 730 0007 RED Touch 9 0 LCD2 1280 x 768 Total 270 Forward 180 Backward 90 Total 360 CW 180 CCW 180 730 0011 RED PRO LCD 7...

Страница 28: ...components of the camera system caused by using the display as a handle are not covered under warranty WARNING DO NOT use the threaded holes in the RED Touch LCD base to mount the display to the camer...

Страница 29: ...exposure to direct sunlight may damage the EVF Point the eyepiece away from sunlight when not in use Damage to the BOMB EVF OLED caused by continued exposure to direct sunlight is not covered under wa...

Страница 30: ...er blacks in a larger field of view Engineered with OBSOLESCENCE OBSOLETE in mind the DSMC2 RED EVF OLED is perfect for use with WEAPON SCARLET W RAVEN EPIC or SCARLET cameras RED offers multiple moun...

Страница 31: ...blished compatible with standard RED EVF LCD LEMO cables 3 Key 1 Programmable key Magnify Toggle 4 Key 2 Programmable key Exposure Check Toggle 5 Mounting point Mounting point for the DSMC2 RED EVF Mo...

Страница 32: ...to the primary top or the secondary side EVF LCD port on the DSMC2 camera When used along with the DSMC2 LEMO Adaptor B this adaptor enables you to mount a DSMC2 RED Touch LCD away from the camera to...

Страница 33: ...terface solution that offers intuitive integrated control over critical camera parameters Engineered exclusively for the DSMC2 system this low profile interface provides full access to basic and advan...

Страница 34: ...oggle record on off directly from the handle On top of an integrated RECORD button the DSMC2 Side Handle features a MARK FRAME button empowering you to tag frames while shooting and revisit them later...

Страница 35: ...gned with an ergonomic molded grip and integrated Record Start Stop button Mounted to the Top Handle Port on your camera the DSMC2 Outrigger Handle provides comfort and stability as well as additional...

Страница 36: ...splay the voltage or remaining battery capacity of third party power options POWER PRIORITY When multiple power sources are connected to the camera power consumption is prioritized in this sequence 1...

Страница 37: ...Cable TURN ON THE CAMERA NOTE If you have just turned off the camera wait at least three 3 seconds before turning the camera back on 1 Attach a power source to the camera The Power Status LED illumin...

Страница 38: ...DC IN connectors on any modules Figure Auto Boot on Power Switch ENABLE AUTO BOOT ON POWER 1 Toggle the Auto Boot on Power switch to On identified by a white star 2 Connect a power source to the DC IN...

Страница 39: ...of the BRAIN side plate was installed 5 Press the DSMC2 Sidekick down flush along the side of camera 6 Tighten the four 4 captive screws in a cross pattern X pattern using a T10 TORX driver DO NOT FUL...

Страница 40: ...to reach the thumbscrew with a hex key loosen the thumbscrew by hand 3 Remove the DSMC2 Side Handle from the camera REMOVE THE DMSC2 SIDE HANDLE GRIP NOTE You may replace the original grip of the DSM...

Страница 41: ...crews in a cross pattern X pattern approximately two 2 turns each using a T20 TORX driver DO NOT FULLY TIGHTEN 4 Fully tighten the four 4 screws in a cross pattern X pattern using a T20 TORX driver WA...

Страница 42: ...camera or expander 3 Apply pressure and tighten the four 4 captive screws in a cross pattern X pattern approximately two 2 turns each using a T20 TORX driver DO NOT FULLY TIGHTEN 4 Fully tighten the...

Страница 43: ...top of the camera 3 Tighten the two 2 captive screws approximately two 2 turns each using a 3 16 hex key DO NOT FULLY TIGHTEN 4 Fully tighten the two 2 screws using a 3 16 hex key WARNING DO NOT OVER...

Страница 44: ...g a 1 5 mm hex key NOTE Store the screw in a safe location or install it in the focus hook storage location after you remove the focus hook in Step 2 2 Remove the focus hook from the focus hook storag...

Страница 45: ...ible for any damage caused by using a tripod monopod mount or support system that does not provide sufficient support WARNING DO NOT use excessive force to mount a support accessory as this may damage...

Страница 46: ...10 bit LOG FILM encoded data HDMI Provides a 480p 720p or 1080p output suitable for monitoring via a Windows monitor or most HDTVs VIDEO MONITOR CATEGORIES NOTE HD SDI and HDMI ports are only availabl...

Страница 47: ...eously to an external recorder and a RED SSD To record simultaneously follow the instructions below 1 Attach a DSMC2 expander that has an HD SDI or HDMI port 2 Connect the camera to an external record...

Страница 48: ...the menu C Select Clean from the Mode drop down menu otherwise the external recorder records the overlay D Select the output resolution from the Resolution drop down menu NOTE The HDMI and HD SDI maxi...

Страница 49: ...rmation Functionality varies based on monitor output type and firmware version The GUI menu is separated into three 3 main sections Figure GUI Control Menu ITEM DESCRIPTION 1 Upper Status Row Basic Me...

Страница 50: ...ate Frame Rate on page 89 2 ISO Camera sensitivity ISO on page 84 3 Aperture Lens aperture F stop information Aperture on page 52 4 Exposure Shutter Integration time or shutter angle Exposure on page...

Страница 51: ...u in the Advanced Menus For example select Advanced in the Frame Rate menu to open Menu Settings Project Frame Rate For more information about Advanced Menus go Advanced Menus on page 71 Figure Select...

Страница 52: ...ination with the shutter speed angle setting controls the amount of light that reaches the sensor exposure Increasing the aperture to a higher number increases the depth of field but reduces the expos...

Страница 53: ...esolution aspect ratio frame rate HDRX mode media or the target REDCODE compression ratio The RECODE compression affects the overall quality of the footage A lower compression for example 2 1 increase...

Страница 54: ...Lens information when using supported Canon lenses Lens Information on the next page 2 AF Status Currently selected auto focus mode Focus Menu on page 134 3 Center Crosshair and Spot Focus Guide Cros...

Страница 55: ...AF is set to Manual or Confirm mode the focal distance displays as a pair of Near Far distances When in AF mode an estimated focus distance displays The focal length and focal distance values and rang...

Страница 56: ...mode provides key system information and camera values including ITEM SUB ITEM DESCRIPTION FOR MORE INFORMATION GO TO 1 Camera Mode Swipe up to toggle Motion Stills Playback modes Camera Mode on page...

Страница 57: ...e on page 152 Genlock GEN Indicator on page 60 Sync SYNC Indicator on page 60 LAN LAN Indicator on page 61 RIG Indicates 3D rig metadata is present N A WIFI Indicates WiFi connection WiFi Indicator on...

Страница 58: ...ord Motion mode includes the following features Motion recording modes Continuous Record on page 95 Internal Timelapse Timer on page 95 Frame Trigger on page 96 Speed Ramp Mode on page 96 REDCODE Burs...

Страница 59: ...sentation of exposure and sensor data levels for Red Green and Blue channels meter is affected by White Balance ISO and VIEW LOOK settings 4 RAW Clip Meter Also known as traffic lights Provides a visu...

Страница 60: ...day timecode For more information go to Timecode Genlock Multi Camera Setup on page 152 GEN INDICATOR The GEN indicator shows the current genlock status Grey No genlock signal is detected or the sign...

Страница 61: ...lement to access the Power menu For more information go to Power Menu on page 132 DC IN SUPPLY VOLTAGE When powering the camera via DC power the current voltage displays When powering the camera using...

Страница 62: ...Figure DSMC2 RED Touch 7 0 LCD RED TOUCH BUTTON DESCRIPTION 1 User Key 1 Toggle 1 1 Magnify on off 2 Up Button Increase display brightness 3 Down Button Decrease display brightness 4 User Key 2 Toggle...

Страница 63: ...keys Swipe Swipe to select different values in spinners or drop down menus For more information go to Swipe Up Menu on the next page Double Tap If the monitor is in Clean mode changes to Overlay mode...

Страница 64: ...ct a Camera Mode Figure Swipe Up to Select a Camera Mode Figure Stills Mode SWIPE UP SHORTCUT DESCRIPTION 1 Camera Mode1 Select Playback Motion or Stills 2 Tools Set Horizon RAW Magnify Zebras and Fal...

Страница 65: ...g Priority and Mode 7 Record Mode2 Select Multi Shot or Motion Stills 1 For more information about Stills mode and Motion mode go to Camera Mode on page 58 2 Shortcuts only available in Stills Mode CO...

Страница 66: ...selected menu 3 Directional Keys D Pad Navigate menus and menu items Navigate the menus using the following controls Press ENTER to open the menu then rotate the Scroll Wheel clockwise to move right c...

Страница 67: ...dekick buttons to prevent inadvertent menu changes NOTE DSMC2 Sidekick keys are programmable For more information go to Key Mapping on page 107 OPERATION MODES The DSMC2 Sidekick display reflects the...

Страница 68: ...CRIPTION 1 Frame Rate Current Recording Frame Rate 2 Lens Information Displays aperture if a supported Canon lens is attached 3 White Balance Color temperature 4 REDCODE REDCODE compression setting 5...

Страница 69: ...ecord 3 User Key 1 Mark Frame Button Mark a frame so that you can easily return to it in playback 4 Rotary Side Iris Control Wheel Clockwise Up Open Iris Counter Clockwise Down Close Iris 5 User Keys...

Страница 70: ...nity When a DSMC2 Side Handle is attached you can continue to adjust focus via the Lens menu Menu Settings Setup Lens if preferred To control focus via the Focus Control Wheel follow the instructions...

Страница 71: ...ayback View clips recorded to the attached SSD Playback Menu on page 127 Power Power sources settings status and shutdown Power Menu on page 132 HDRX HDRX mode and settings HDRX Menu on page 133 Focus...

Страница 72: ...COLOR MODES False color modes include Off Exposure Video Focus Edge and Gio Scope NOTE Only monitors with the Tools check box selected in the Monitor Control menu show the false colors For more inform...

Страница 73: ...lays in the Lower Status Row Colors are based on the RGB levels of the video out signal that is the cooked look and not RAW data The RGB settings settings in the Look menu affect the Video indicators...

Страница 74: ...dow Sharpening is disabled when 1 1 magnify is enabled The camera automatically exits magnify mode when recording begins The Magnify tool magnifies a 1920 x 1020 region centered on a 1920 x 1080 displ...

Страница 75: ...o function properly For more information go to Gyroscope and Accelerometer Calibration on page 123 ZEBRAS Use Zebra mode to enable and adjust the upper and lower values for two 2 independent zebra ind...

Страница 76: ...surfaces OVERLAY Select which overlay shows on top of the video RED provides preset overlays which have RED in the overlay name Create custom overlays in the Overlay tab For more information go to Ove...

Страница 77: ...isabled the video is scaled so that the menus are not overlaid on the video When this option is enabled the video is not scaled This option creates a control surface on a monitor without scaling the v...

Страница 78: ...rresponding guides to the overlay Frame Guide Action Guide Title Guide 5 Select a button on the matrix to add a user interface element to that position on the matrix By default the Magnify indicator M...

Страница 79: ...h monitor that has higher priority on the list must be either detached or not set to Overlay mode EXAMPLE By default the monitor priority is 1 LCD 2 EVF 3 HDMI If you remove an LCD when an EVF is atta...

Страница 80: ...aller than the default dialogs GENLOCK OFFSET NOTE HD SDI ports are only available on select DSMC2 expanders For more information go to Input Output Connectors on page 193 Offset the video of the HDSD...

Страница 81: ...etermine how the following settings display Camera Lens CAMERA TAB Figure Display Mode Camera EXPOSURE Time Absolute Displays the exposure time in seconds 1 xx sec When you change the frame rate in th...

Страница 82: ...erture increments in 1 4 stops 1 3 F Aperture increments in 1 3 stops Default FOCUS DISTANCE Metric Displays lens focus distances in meters Imperial Displays lens focus distances in feet and inches De...

Страница 83: ...ble range is 0 100 100 Right aligned for X offset and bottom aligned for Y offset 100 Left aligned for X offset and top aligned for Y offset APPEARANCE Line Style Select one of the following line styl...

Страница 84: ...fault is 0 0 Exp Comp Adjusts exposure compensation Available range is 7 0 to 7 0 Default is 0 0 GAIN Adjust the Red channel Blue channel and Green channel individually The range for each is 0 0 none...

Страница 85: ...ngs affects the user interface NOTE RED recommends using the most recently released Color Space and Graded Gamma settings Use legacy settings such as REDcolor2 only if you need to record footage to ma...

Страница 86: ...ATION Use the Look Config menu to set up Look A In the Look Config menu you can rotate the image FLIP MIRROR Mirror and flip invert the graphical user interface GUI and footage effectively rotating th...

Страница 87: ...tion on the previous page 3 Select a curve from the Curve drop down menu Neutral The camera does not apply a graded gamma space to the monitor output Graded The camera applies a graded gamma space to...

Страница 88: ...djust the color temperature manually Selecting a preset resets Tint to 0 000 PRESETS Each preset has 0 000 Tint Available preset options are Incandescent 2800 K Tungsten 3200 K Fluorescent 4500 K Flas...

Страница 89: ...time base and REDCODEproject time base REDCODE and Lookaround For more information about the maximum REDCODE settings for each common recording frame rate see the DSMC Media Operation Guide available...

Страница 90: ...mpatible with the current exposure the exposure changes to the longest exposure possible for the frame rate For more information go to Speed Ramp Mode on page 96 NOTE You cannot change the exposure wh...

Страница 91: ...s by device Uses the timecode from an external device connected to the timecode connector on the camera SLATE Use the Slate menu to add metadata to clips After configuring the following fields the inf...

Страница 92: ...0 48 10 80 23 15 4K 2 1 4096 2048 20 48 10 24 22 90 4K 2 4 1 WS 4096 1728 20 48 8 64 22 23 4K 16 9 HD 3840 2160 19 20 10 80 22 03 3 5K FF 3584 1876 17 92 9 38 20 23 3 5K 2 1 3584 1792 17 92 8 96 20 04...

Страница 93: ...MENSIONS MM WIDTH HEIGHT WIDTH HEIGHT DIAGONAL 2K 2 4 1 WS 2048 864 10 24 4 32 11 11 2K 16 9 HD 1920 1080 9 60 5 40 11 01 2K 3 2 1920 1280 9 60 6 40 11 54 COPYRIGHT 2017 RED COM INC 955 0127_V6 3 REV...

Страница 94: ...Mirror Scan Direction feature is intended for multi camera arrays when all sensors are synchronized and at least one 1 camera is mounted upside down Using this feature is helpful for matching the line...

Страница 95: ...Stills mode NOTE Audio is not recorded in Internal Timelapse Timer mode In Internal Timelapse Timer mode the camera records a specified number of frames at a specified interval The current recording f...

Страница 96: ...ot recorded in Speed Ramp mode Speed Ramp mode lets you program the current recording frame rate to transition to different recording frame rates during recording 1 Go to Menu Settings Recording Mode...

Страница 97: ...gs Recording Mode 2 Select REDCODE Burst from the Mode drop down menu 3 Use the Limit Recording to fields to set the recording to end at a predefined frame limit optional 4 Select a Pre Count and Post...

Страница 98: ...start a new clip and continuously add frames to that clip Release the Record key to stop adding frames and end the clip ADVANCED MULTI SHOT MODE In this mode the camera is continuously recording but...

Страница 99: ...f you initiate recording by pressing any other Record key you can press any key mapped to Record Mark Frame to mark stills To use Motion Stills mode follow the instructions below 1 Set the camera to S...

Страница 100: ...QuickTime files For more information go to HDRX Menu on page 133 RED recommends performing a Secure Format before recording Apple ProRes For more information see the DSMC Media Operation Guide availa...

Страница 101: ...mov files similar to how the camera creates multiple R3D files Figure File Structure REDCODE RAW QuickTime When recording QuickTime only this is the file structure of the recorded files on the RED MI...

Страница 102: ...rded to the Avid DNxHD HR file For more information go to HDRX Menu on page 133 RED recommends performing a Secure Format before recording Avid DNxHD HR For more information see the DSMC Media Operati...

Страница 103: ...how the camera creates multiple R3D files Figure File Structure REDCODE RAW DNxHD HR When recording Avid DNxHD HR only this is the file structure of the recorded files on the RED MINI MAG RDM Folder R...

Страница 104: ...u R3D R3D Apple ProRes R3D Avid DNxHD HR Apple ProRes Avid DNxHD HR The selected file format displays in the Lower Status Row 3 R3D Select a target REDCODE compression ratio from the REDCODE menu For...

Страница 105: ...al image that is brighter and possibly blurrier than any of the original frames so you can use frame summing to achieve the effect of long exposure FRAME AVERAGING Frame Averaging combines the specifi...

Страница 106: ...t sounds for the following actions Record Start Record Stop Mark Still Frame EVF Tally Light Select this check box to enable the EVF Record Tally LED on the EVF to illuminate red when recording SSD Ta...

Страница 107: ...SOFT KEYS The following sets of soft keys are available on the touchscreen A B C D Left side of the touchscreen 1 2 3 4 Right side of the touchscreen To map or remap a soft key select an action from...

Страница 108: ...filtering happens on the receiver side of the communication link Use camera names and group names to address commands to a specific camera or group of networked cameras Camera ID Enter a unique camer...

Страница 109: ...on other cameras If this camera receives a SET command the camera does not send the command to other cameras devices Enable External Control This camera can be controlled via TCP IP from an external...

Страница 110: ...ll be required to access the network 7 Close the WiFi screen 8 Connect your device to the ad hoc network created by the camera The steps in this procedure depend on what type of device and operating s...

Страница 111: ...network The access point for the network must have DHCP enabled 2 Make sure that you know the name and password for the network since you will need that information to connect the camera to the same...

Страница 112: ...the WiFi screen after the camera connects to the access point Figure Select Connect 11 Connect your device to the same wireless network that the camera is connected to The steps in this procedure depe...

Страница 113: ...ts outputs requires a DSMC2 expander For more information go to Input Output Connectors on page 193 GPI Function Camera Input Select one 1 of the following options to configure the input for devices c...

Страница 114: ...get Temperature and the fans self adjust to maintain the selected temperature The default Target Temperature is 39 C After the camera reaches the Target Temperature and if the ambient temperature rema...

Страница 115: ...Maximum Record Speed is 75 and the default Maximum Preview Speed is 75 The range for both Maximum Record Speed and Maximum Preview Speed is 25 100 POST RECORD DELAY Select the amount of time that it...

Страница 116: ...d on the lens Focus Use the slider to change the focal distance Manually changing the focal distance on the lens itself does not cause the slider to move This setting is only available if the lens is...

Страница 117: ...e information is stored in the clip metadata The Lens Metadata fields are Lens Name Lens Serial Number Lens Owner Lens Manufacturer Lens Min Focal Length Lens Max Focal Length Figure Metadata MOTOR CO...

Страница 118: ...o to Menu Settings Maintenance 3 Select Save Log The log file is saved as a txt file in the SSD root directory For more information about RED support or to create a support ticket go to https support...

Страница 119: ...the current noise profile follow the instructions below 1 Ensure that the camera reaches the temperature you want to use for your shoot 2 Set the exposure to the exposure you want to use for your sho...

Страница 120: ...y take off the lens and install the front body cap If you cannot take off the lens put a lens cap on the lens Not all lens caps completely block IR Lens caps are made to protect the lens not necessari...

Страница 121: ...Ensure that the camera reaches the temperature you want to use for your shoot 2 Ensure that the sensor is as dark as possible Preferably take off the lens and install the front body cap If you cannot...

Страница 122: ...nu Settings Maintenance Calibrate In Camera The calibration maps that are saved internally on the camera Factory This is the calibration map generated during the manufacturing process and is the defau...

Страница 123: ...rature to reach maximum operating temperature 5 When the camera reaches maximum operating temperature select High Temperature Calibration SELF TEST The Self Test menu includes Enable Sensor Test Patte...

Страница 124: ...urn on the camera REDISCOVER HARDWARE REDISCOVER Rediscovers all hardware and caches the data for future boot cycles Perform a Hardware Rediscover if a module is not functioning correctly To perform a...

Страница 125: ...cific to your camera SVN Revision The current firmware number Runtime The number of hours that the camera has been turned on OLPF RED RAVEN includes an integrated OLPF To view your OLPF type go to Men...

Страница 126: ...ng media see the DSMC Media Operation Guide available at www red com downloads DEVICE Format and eject unmount the SSD To see information about the SSD in the camera select More Info CLIPS View and lo...

Страница 127: ...elected clip to the Play List All Move all clips to the Play List Apply Image Metadata Image data such as color gain and curves recorded with the image displays with the playback image When deselected...

Страница 128: ...PLAYBACK CONTROLS Figure Playback Controls Figure Playback Controls COPYRIGHT 2017 RED COM INC 955 0127_V6 3 REV M 128 RED RAVEN OPERATION GUIDE...

Страница 129: ...layback controls CONTROL DESCRIPTION 1 Clips View clips as thumbnails 2 Load Previous Clip Loads the previous clip in the playlist 3 Frame by Frame Reverse Moves through the clip frame by frame in rev...

Страница 130: ...e a playlist go to Menu Playback Menu Media Playlist and move clips to the Play List field 16 Playback Speed Option to select x1 x2 x4 x8 or x16 playback speed 17 In Point Sets a red In Point marker i...

Страница 131: ...21 Next Marker Goes to the next marked frame which displays as a red line in the Playback Status Bar Disabled when there are no marked frames COPYRIGHT 2017 RED COM INC 955 0127_V6 3 REV M 131 RED RA...

Страница 132: ...RESET to clear the fault When the DSMC2 REDVOLT Expander is attached you can see the current output of each power out port in amps and toggle those ports on off POWER SAVE You can select the followin...

Страница 133: ...ollow the instructions below 1 Go to Menu HDRX 2 Select HDRX The HDRX text in the Lower Status Row turns white 3 Select the number of Factors The range is 1 6 and the default is 2 4 Select which track...

Страница 134: ...single shot AF Optimized for rapid focus even under low contrast conditions Works with both Center and Spot zones Continuous When you press the key mapped to AF Start the camera attempts to keep obje...

Страница 135: ...recording area SPOT Provides a small target for precise focus that you can move around the recording area MOVE THE SPOT FOCUS TARGET Move Spot target with touchscreen Tap and hold the touchscreen on...

Страница 136: ...e Enhanced A F feature is in Clean mode Figure Enable Enhanced A F CONFIRM STYLE CONFIRM STYLE DESCRIPTION OBJECTS IN TARGET ARE IN FOCUS OBJECTS IN TARGET ARE OUT OF FOCUS None Square target operates...

Страница 137: ...elect Rack from the Mode drop down menu 4 Select a size from the Size drop down menu Figure Set Up Rack Focus 5 Go to the Rack tab 6 Use the Rack Speed slider to change the speed at which the lens mov...

Страница 138: ...to return to the main screen C Tap and hold the touchscreen where you want the rack point to be or press and drag the rack point When you move a rack point the camera autofocuses NOTE To prevent a ra...

Страница 139: ...A is selected when you trigger the AF Start action the focus racks from point A to point B Press a key that is mapped to racking to a specific rack point MAP KEYS TO CYCLE RACK FOCUS You can map user...

Страница 140: ...bled Single Shot Map one of the following actions to trigger the AE tools AE Start AE AF Start Continuous in Preview The AE tools are enabled in preview only Continuous in Preview Record The AE tools...

Страница 141: ...s Normal Settings adapt in medium steps Fast Settings adapt in large steps SELECTION The Selection setting determines which values the algorithm uses This enables you to modify the list of values so t...

Страница 142: ...ter set to be modified and all the values to be updated to their current in camera values You cannot update factory installed presets which end with RED Clone Create a new preset using the selected pr...

Страница 143: ...your computer create a folder on the SSD called Looks 2 Save your RMD files that have been exported from REDCINE X PRO to the Looks folder on the SSD 3 Eject the SSD from your computer 4 Mount the SSD...

Страница 144: ...review The selected preset is applied every time the camera enters Preview mode including at startup and when exiting Playback mode On Enter Playback The selected preset is applied every time the came...

Страница 145: ...udio input output options are determined by the attached port expander For more information about the ports on each expander go to Input Output Connectors on page 193 The camera can record up to four...

Страница 146: ...Analog Ch1 Ch2 Ch3 Ch4 DSMC2 Base Expander DSMC2 V Lock I O Expander Stereo Microphone Rear Analog Ch1 Ch2 Ch3 Ch4 DSMC2 REDVOLT Expander AUDIO 1 and AUDIO 2 full size XLR NAME You can rename each au...

Страница 147: ...ollow the instructions below 1 Go to Menu Settings Audio Control Pre Amp Gain 2 Move the Pre Amp pre amplifier sliders up and down to adjust the amplification levels 3 To link the amplification for ea...

Страница 148: ...the steps below 1 Go to Menu Settings Audio Control Headphone Volume 2 Move the Left and Right sliders up and down to adjust the volume 3 To toggle mute unmute select Mute 4 To link the volume for Lef...

Страница 149: ...o channel to the Left Middle or Right side of the stereo mix Move the sliders up and down to adjust the volume You can control the volume and stereo for each audio monitoring option Headphone Mix Head...

Страница 150: ...Output as the VU Meter Source the Audio Meter displays the Headphone Mix Audio Out Mix and Monitor Mix levels For more information go to VU Meter on page 82 When recording to an external device use t...

Страница 151: ...ia headphones or HDMI and HD SDI monitors and automatically unmutes any muted audio outputs To access audio settings during playback go to Menu Settings Audio and select the following tabs Control Mix...

Страница 152: ...nd audio Timecode is embedded in recorded RAW files QuickTime files if recording an Apple ProRes codec and MXF files if recording an Avid codec as metadata and in HANC metadata provided by the HD SDI...

Страница 153: ...Source User Provided OUTPUT TIMECODE WITH DSMC2 REDVOLT EXPANDER NOTE A DSMC2 REDVOLT Expander is required to output timecode from the camera With the DSMC2 REDVOLT Expander you can output a timecode...

Страница 154: ...a 3BNC to 00 LEMO Sync Cable DSMC2 REDVOLT Expander Connect the GENLOCK port on the expander to the device using a 75 ohm BNC cable 2 Go to Menu Settings Project Timecode 3 Select the desired Timecode...

Страница 155: ...information go to Input Output Connectors on page 193 Monitor Sync occurs when a genlock signal is provided that is compatible with the current monitor output frequency Monitor Sync is achievable eve...

Страница 156: ...ith the current monitor output frequency When Monitor Sync is achieved the GEN indicator in the Lower Status Row illuminates green Figure HD SDI Output Frequency REQUIRED CABLE DSMC2 Base Expander DSM...

Страница 157: ...ompatible with the current monitor output frequency project time base and recording frame rate While operating in Sensor Sync sensor timing is locked to the genlock signal Sensor Sync requires the fol...

Страница 158: ...ure Sync Settings 5 Go to Menu Settings Display Monitor Control 6 Select HDSDI from the drop down menu 7 Select the desired monitor output frequency from the Frequency drop down menu Select Auto to au...

Страница 159: ...lip naming conventions for clips recorded on those cameras Master Slave is the most common configuration for Stereo 3D productions When cameras are operated in Master Slave configuration you can perfo...

Страница 160: ...the GIG E port on one expander to the GIG E port on the other expander 2 On the Master camera follow the instructions below A Go to Menu Settings Setup Communication B Type a name for the camera Examp...

Страница 161: ...ication and select the Ethernet tab E Select the Camera to Camera the check box The LAN indicator in the Lower Status Row illuminates green NOTE Cameras can also be set up in a Master Master configura...

Страница 162: ...edia 2 On both Master and Slave cameras select the desired Reel Number and Camera ID settings The Reel Number and Camera ID settings on both cameras should match 3 On the Master camera change the Came...

Страница 163: ...S Right The first clip recorded by this Master Slave camera configuration is Master S001_L001_0503B6 R3D Slave S001_R001_0503R7 R3D NOTE B6 and R7 are examples of camera generated wildcard characters...

Страница 164: ...ding frame rate To set up a Stereo 3D setup follow the instructions below 1 On both cameras set the project time base and recording frame rate 2 On both cameras follow the instructions in Sensor Sync...

Страница 165: ...enter a matching name in the Group ID field All cameras must have the same Group ID name C On the Ethernet tab select the DHCP Camera to Camera and External Control check boxes 2 Follow the instructio...

Страница 166: ...fects and difficult shots Motion Control uses GPIO signals transmitted using the SYNC GPI and CTRL GPO ports on the DSMC2 Base Expander or DSMC2 V Lock I O Expander For more information on GPIO connec...

Страница 167: ...BNC to 00 LEMO Sync Cable required per SYNC and CTRL port used COMPATIBLE TIMECODE DEVICES The following timecode devices are compatible with the camera Additional timecode devices may be compatible b...

Страница 168: ...Sync Generator with Universal Power Supply Ambient ACL 202CT Ambient ACL 203 Ambient ACL 204 Denecke SB T Evertz Master Clock 5600MSC NOTE Ensure that your genlock device provides a full strength gen...

Страница 169: ...files to the SSD Change the Mount preference to Read Write before attempting to copy firmware to the SSD 1 Connect an SSD RED MINI MAG to your computer 2 Download the most recent firmware for your cam...

Страница 170: ...System Status Camera Info and verify that the firmware version listed matches the firmware version that you downloaded 13 Reformat the SSD before recording COPYRIGHT 2017 RED COM INC 955 0127_V6 3 RE...

Страница 171: ...pressed air and gas dusters since the high pressure oily residue cold air particulates and moisture may cause damage You may use a filtered non residue gas duster to clean non critical areas such as a...

Страница 172: ...HIBITED EVF SCREEN CLEANERS DO NOT use any of the items listed below to clean the screen on the DSMC2 RED EVF These products have not been tested on RED products and may cause damage or streaking Comp...

Страница 173: ...rd party cleaning kits Pre packaged lens cleaner containing any additives such as detergent anti static compounds or fragrance WARNING Damage to any screens or other components of the camera system ca...

Страница 174: ...ave an equipment failure during a major shoot 1 Configure your camera 2 Perform a black shade calibration sensor calibration 3 Enable the Sensor Test Pattern in the Maintenance menu 4 Select the desir...

Страница 175: ...e Camera Firmware on page 169 Reset your camera s default settings For more information go to Reset Defaults on page 124 CAMERA DOES NOT RECOGNIZE LENS SYMPTOM The camera does not recognize the attach...

Страница 176: ...form a Hard Restore on page 178 LCD FLICKER SYMPTOM The LCD or monitor is flickering POTENTIAL RESOLUTIONS Go to Menu Settings Display Monitor Control and adjust the Frequency to 60 Hz Use a different...

Страница 177: ...E On Mac computers with REDCINE X PRO installed RED Watchdog mounts the SSD as Read Only by default which means that you are unable to write files including firmware upgrade files to the SSD Change th...

Страница 178: ...page 58 Use the lowest REDCODE compression possible for the settings you have selected For more information go to REDCODE on page 53 Use a higher resolution Use Adaptive fan mode to regulate the came...

Страница 179: ...SOLUTIONS Perform a black shade calibration For more information go to Sensor Calibration on page 119 Upgrade your camera firmware For more information go to Upgrade Camera Firmware on page 169 Reset...

Страница 180: ...camera to the newest firmware version One 1 of your modules or expanders collectively known as peripherals may be experiencing issues Remove all peripherals except for the media bay and upgrade firmw...

Страница 181: ...brate and select user1 Calibration Map Click Set Go to Menu Settings Maintenance Calibrate and delete all user created calibration maps Then reset your camera s default settings For more information g...

Страница 182: ...age 104 Submit a Technical Support request at https support red com Include the following with the request Log file For more information go to Save a Log File on page 118 List of modules lens and thir...

Страница 183: ...screws in a cross pattern X pattern using a T10 TORX driver 3 Remove the media bay from the camera 4 Inspect the connections and pins on the camera and ensure that they are clean and undamaged NOTE D...

Страница 184: ...ps at 2K Full Format 2048 x 1080 300 fps at 2K 2 4 1 2048 x 864 Playback Frame Rates Project Time Base 23 98 24 25 29 97 47 95 48 50 59 94 60 fps all resolutions REDCODE Settings Range from 2 1 up to...

Страница 185: ...EVF OLED compatible with DSMC2 LEMO Adaptor A and LCD EVF cable REDCINE X PRO Delivery Formats 4K DPX TIFF OpenEXR RED via RRencode Plugin 2K DPX TIFF OpenEXR RED via RRencode Plugin 1080p RGB 4 2 2...

Страница 186: ...COPYRIGHT 2017 RED COM INC 955 0127_V6 3 REV M 186 RED RAVEN OPERATION GUIDE B MECHANICAL DRAWINGS RED RAVEN BRAIN NOTE Dimensions are shown in mm The optical axis height of the camera is 95 90 mm...

Страница 187: ...FRONT VIEW Figure RAVEN Front View COPYRIGHT 2017 RED COM INC 955 0127_V6 3 REV M 187 RED RAVEN OPERATION GUIDE...

Страница 188: ...BACK VIEW Figure RAVEN Back View COPYRIGHT 2017 RED COM INC 955 0127_V6 3 REV M 188 RED RAVEN OPERATION GUIDE...

Страница 189: ...SIDE VIEW RIGHT Figure RAVEN Side View Right COPYRIGHT 2017 RED COM INC 955 0127_V6 3 REV M 189 RED RAVEN OPERATION GUIDE...

Страница 190: ...SIDE VIEW LEFT Figure RAVEN Side View Left COPYRIGHT 2017 RED COM INC 955 0127_V6 3 REV M 190 RED RAVEN OPERATION GUIDE...

Страница 191: ...TOP VIEW Figure RAVEN Top View COPYRIGHT 2017 RED COM INC 955 0127_V6 3 REV M 191 RED RAVEN OPERATION GUIDE...

Страница 192: ...BOTTOM VIEW Figure RAVEN Bottom View COPYRIGHT 2017 RED COM INC 955 0127_V6 3 REV M 192 RED RAVEN OPERATION GUIDE...

Страница 193: ...the following expanders DSMC2 Base Expander DSMC2 V Lock I O Expander DSMC2 REDVOLT Expander DSMC2 Jetpack Expander DSMC2 Jetpack SDI Expander NOTE When connecting a cable to a connector align the key...

Страница 194: ...stereo Headphone on page 212 3 SYNC 4 pin 00B LEMO SYNC Video Sync In with SYNC Trigger Button Circuit on page 201 4 CTRL 4 pin 00B LEMO CTRL RS232 Control on page 205 5 HDMI HDMI 1 2 Type A HDMI Out...

Страница 195: ...m stereo Headphone on page 212 4 USB Power USB 2 0 Type A power only USB Power on page 218 5 SYNC 4 pin 00B LEMO SYNC Video Sync In with Contact Closure Style Trigger Input on page 203 6 CTRL 4 pin 00...

Страница 196: ...O GIG E Ethernet on page 210 6 DC IN 6 pin 1B LEMO DC IN Power Input on page 213 7 GENLOCK BNC Genlock on page 208 8 TIMECODE 5 pin 0B LEMO Timecode on page 209 9 AUX PWR 2 pin 0B LEMO AUX Power 2 Pin...

Страница 197: ...ontrol on page 205 2 HDMI HDMI 1 2 Type A HDMI Out on page 200 3 DC IN 6 pin 1B LEMO DC IN Power Input on page 213 4 SYNC 4 pin 00B LEMO SYNC Video Sync In with Contact Closure Style Trigger Input on...

Страница 198: ...X 2 pin 0B LEMO AUX Power 2 Pin LEMO 1 5A on page 216 3 GIG E 9 pin 0B LEMO GIG E Ethernet on page 210 4 DC IN 6 pin 1B LEMO DC IN Power Input on page 213 5 SYNC 4 pin 00B LEMO SYNC Video Sync In with...

Страница 199: ...8 24 00 25 00 29 97 30 00 50 00 59 94 SMPTE ST 292 1 1 485 Gbps 1080p 10 bit 4 2 2 23 98 24 00 25 00 29 97 30 00 SMPTE ST 292 1 485 Gbps 1080p 10 bit 4 2 2 50 00 59 94 60 00 3G SDI SMPTE ST 424 2 970...

Страница 200: ...does not support progressive segmented frame PsF or interlaced i scan formats COMPATIBLE CABLE 790 0331 RED HDMI Cable 5 HDMI WIRELESS TRANSMITTERS The HDMI connector supports HDMI wireless transmitte...

Страница 201: ...Input GPI signals Figure Front Face of the SYNC Video Sync Connector Looking at the Camera 4 PIN 00B LEMO SYNC CONNECTOR PIN SIGNAL DESCRIPTION DIRECTION 1 GROUND Common ground N A 2 SS GPI Shutter s...

Страница 202: ...n the GPI trigger is used for record start stop Start Record On ground to 3 3 V transition During Record Hold at 3 3 V Stop Record On 3 3 V to ground transition During Stop Hold at ground Figure Trigg...

Страница 203: ...he GPI contact closure style trigger short Pin 2 GPI to Pin 1 ground WARNING DO NOT apply voltage to Pin 2 GPI Figure Front Face of the SYNC Video Sync Connector Looking at the Camera 4 PIN 00B LEMO S...

Страница 204: ...r Figure Contact Closure Style Trigger Button Circuit Diagram SYNC COMPATIBLE CABLES 790 0154 3BNC to 00 LEMO Sync Cable 790 0187 4 Pin 00 LEMO to Flying Lead 790 0415 RED Start Stop Cable 14 Pin LEMO...

Страница 205: ...the pulse indicates start of record falling edge represents end of record For more information about controlling the camera via RS232 download the REDLINK SDK available at www red com developers Figur...

Страница 206: ...1 to 6 on the SERIAL connector Figure Front Face of the SERIAL RS232 Connector Looking at the Camera SERIAL CONNECTOR PIN SIGNAL DESCRIPTION DIRECTION 1 GND Camera ground N A 2 RS232 RX RS232 RX In 3...

Страница 207: ...e this cable 790 0553 RED 7 Pin 0B LEMO to Flying Lead Serial Port Cable 6 For non GPI applications you can use this 6 pin cable 790 0444 REDLINK to T H C Connector Cable 3 COPYRIGHT 2017 RED COM INC...

Страница 208: ...incoming sync and genlock signals 75 OHM BNC CONNECTOR PIN SIGNAL DESCRIPTION DIRECTION Center SYNC SMPTE ST 274 RS 170A Tri Level Sync In Shield Screen GROUND Camera ground N A COMPATIBLE CABLE 790...

Страница 209: ...ut Pin 5 is a timecode output Figure Front Face of Timecode LEMO EAG 0B 305 CLN Connector Looking at the Camera LEMO EAG 0B 305 CLN CONNECTOR PIN SIGNAL DESCRIPTION DIRECTION 1 GROUND Camera Ground N...

Страница 210: ...00BASE T Figure Front Face of the GIG E Connector Looking at the Camera 9 PIN 0B LEMO GIG E CONNECTOR PIN SIGNAL DESCRIPTION DIRECTION 1 BI_DC Data pair C N A 2 BI_DC Data pair C N A 3 BI_DD Data pair...

Страница 211: ...o in connectors The two 2 3 pin XLR connectors provide input for two 2 audio channels Each port supports 48 V 10mA phantom power Each input may be independently set to either line or microphone level...

Страница 212: ...5mm stereo jack provides two 2 channels of audio for monitoring For maximum quality use high impedance headphones HEADPHONE JACK PIN SIGNAL DESCRIPTION DIRECTION TIP LEFT Left channel audio Out RING R...

Страница 213: ...cable that wires only one 1 pair of VBATT and GROUND pins may damage the power supply or the camera Damage to the power supply or other components of the camera system caused by using an inappropriate...

Страница 214: ...COMPATIBLE CABLES 790 0138 RED 2B to 1B LEMO Power Adaptor Cable 790 0164 XLR Power Cable 10 790 0165 XLR Power Cable 30 COPYRIGHT 2017 RED COM INC 955 0127_V6 3 REV M 214 RED RAVEN OPERATION GUIDE...

Страница 215: ...rrent draw is 3 0A Figure Front Face of AUX PWR Connector Looking at the Camera LEMO EEG 0B 302 CLL CONNECTOR PIN SIGNAL DESCRIPTION DIRECTION 1 GROUND Common ground N A 2 11 5 to 17 VDC 11 5 to 17 VD...

Страница 216: ...current draw is 1 5A Figure Front Face of AUX PWR Connector Looking at the Camera LEMO EEG 0B 302 CLL CONNECTOR PIN SIGNAL DESCRIPTION DIRECTION 1 GROUND Common ground N A 2 11 5 to 17 VDC 11 5 to 17...

Страница 217: ...ra LEMO EAG 0B 304 CLN CONNECTOR PIN SIGNAL DESCRIPTION DIRECTION 1 GROUND Camera Ground N A 2 GPI General purpose input trigger GPI use for trigger in In 3 GPO General purpose output trigger GPO use...

Страница 218: ...The USB power out connector supplies 5 V of power The maximum sustained current draw is 1 5A You can use the USB power out connector to provide power to an attached HDMI wireless transmitter NOTE The...

Страница 219: ...connector and supplies conditioned VBATT at a maximum of 3 0A of power Figure P Tap Connector Looking at Camera 2 PIN DTAP CONNECTOR PIN SIGNAL DESCRIPTION DIRECTION 1 GROUND Common ground N A 2 11 5...

Страница 220: ...ing Canon EF lenses For more information refer to the original manufacturer s instructions This section also lists lenses supported by the built in Canon Mount WARNING ALWAYS protect your equipment wh...

Страница 221: ...S USM Canon EF 24 105mm f 4L IS Canon EF 28mm f 1 8 USM Canon EF 28mm f 2 8 Canon EF 28mm f 2 8 IS USM Canon EF 28 105mm f3 5 II USM Canon EF 28 300mm f 3 5 5 6L IS Canon EF 35mm f 1 4L Canon EF 35mm...

Страница 222: ...EF 135mm f 2 0 L with 2 0x Extender Canon EF 135mm f 2 8 Soft Focus Canon EF 180mm f 3 5L Macro Canon EF 180mm f 3 5L Macro with 1 4x Extender Canon EF 180mm f 3 5L Macro with 2x Extender Canon EF 200...

Страница 223: ...ender Canon EF 400mm f 5 6L Canon EF 400mm f 5 6L with 1 4x Extender Canon EF 400mm f 5 6L with 2x Extender Canon EF 500mm f 4L IS Canon EF 500mm f 4L IS USM Canon EF 500mm f 4L IS II USM Canon EF 500...

Страница 224: ...DC HSM Art Sigma 20mm f 1 8 EX DG ASP RF Sigma 24mm f 1 8 EX DG ASP Macro AF Sigma 24 35mm f 2 DG HSM Art Sigma 24 70mm f 2 8 IF EX DG HSM Sigma 24 105mm f 4 DG OS HSM Sigma 28mm f 1 8 EX DG ASP Macro...

Страница 225: ...Pro DX 11 16mm f 2 8 SD IF DX Tokina AT X 116 Pro DX II 11 16mm f 2 8 SD IF DX Zeiss Distagon Zeiss Distagon T 15mm f 2 8 ZE Zeiss Distagon T 18mm f 3 5 ZE Zeiss Distagon T 21mm f2 8 ZE Zeiss Distago...

Страница 226: ...ide SSD Record Full Press Record Toggle Multi Shot Start Record Full Release Record Multi Shot Stop Record Half Press AF Start User 1 2 Press Eject Media LCD Primary and Secondary Up Press Br Up Incre...

Страница 227: ...ser A D Press SM Toggle Key Lock Nav Menu Press Navigation Menu Nav North Press Navigation Up Nav South Press Navigation Down Nav East Press Navigation Right Nav West Press Navigation Left Nav Enter P...

Страница 228: ...Record Mark Frame Record Half Press AF Start Record Half Release Key Disabled Record Full Press Record Toggle Multi Shot Start Record Full Release Record Multi Shot Stop Focus Control Wheel CW1 Incre...

Страница 229: ...COPYRIGHT 2017 RED COM INC 955 0127_V6 3 REV M 229 RED RAVEN OPERATION GUIDE F MENU MAP The menu map is applicable to RED RAVEN...

Страница 230: ...ensor Flip Mirror Scan Direction PROJECT Control Channel 1 2 Channel 3 4 Pre Amp Gain Headphone Volume Mix Headphone Mix Monitor Mix AUDIO Mode Storage Mode Codec Record File Format REDCODE QuickTime...

Отзывы: