background image

6

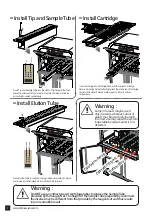
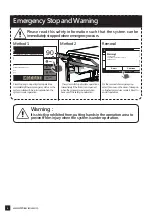
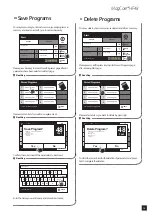
MagCore® HF48

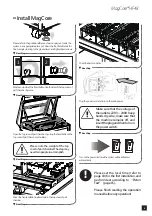
━ Install MagCore

Make sure that the voltage of 

the outlet is 220V ~ 240V. Keep 

hands dry. Also, make sure that 

the machine remains off, and 

insert the plug and then turn on 

the power switch.

Please note the weight of the top 

cover of part chamber. The step may 

need two people to accomplish.

Please refer to the position reference shown on page 5, locate the 
system in an appropriate place, put down the four fixed stands for 
fine-tuning according to the ground level, and tighten fixed screws 

Shear the transportation belt and return the top cover of part 
chamber 

Shear the belts on Racks 

Plug the power cord and turn on the main power 

Turn on the power (red) and the system will be initialized 

automatically  

Please set the local time (refer to 

page 19) for the first installation, and 

perform test according to “Piston 

Test”  (page 15)..

Please finish reading the operation 

manual before any operation!

Rotate and pull out the fixed bolts on both sides of the top cover of 
part chamber by coins 

Open the top cover of part chamber by using the fixed bolts on the 
top cover of part chamber as holders 

1

2

!

Next Step

Next Step

Next Step

Next Step

Next Step

Next Step

Содержание MagCore HF48

Страница 1: ...llCartridge 7 TouchPanelandUserInterface 8 MainMenu 8 PanelFunctionalArea 8 EmergencyStopandWarning 9 Start 10 LoadProgram 11 SavePrograms 12 DeletePrograms 12 UpdateProgramFiles 13 EasyMaintenance 13...

Страница 2: ...11 GroundingorPolarization Thisproductmaybeequippedwithapolarized alternating current line plug a plug having one blade wider than the other This plug will fit into the power outlet only one way This...

Страница 3: ...99 inches NetWeight 250kg 551 25Lb Specification OperationParameters OperationEnvironment Applications Whole Blood 200 400ul Viral Nucleic Acid DNA RNA Tissue Genomic DNA Plant Genomic DNA Bacteria Ki...

Страница 4: ...50 Tip TipHolderSetX 50 Elution Carrier X 1 CartridgeCarrierB X 1 CartridgeCarrierA X 1 TipCarrierB X1 TipCarrierA X1 PowerCord X1 Lubricant X1 O RingX 24 Systemtesttoolsshouldbekeptincleanplacesandth...

Страница 5: ...n Area Shutter Fixed Stands four legs Fixed Bolt on the Top Cover of Part Chamber SystemOverview Cooling Fans Power Switch and Plug Power Switch red Light Switch green Part Chamber Maintenance Cover S...

Страница 6: ...e for system installationandventilationbeforeinstallation When installation the system please make sure the elevation difference by using level rail for measurement and fixed stands forfine tuning Sys...

Страница 7: ...egroundlevel andtightenfixedscrews Shearthetransportationbeltandreturnthetopcoverofpart chamber ShearthebeltsonRacks Plugthepowercordandturnonthemainpower Turnonthepower red andthesystemwillbeinitiali...

Страница 8: ...ect usemay causethesystem inoperablebecauseCarrier isnot detected InstallCartridge Install Tip and SampleTube B A InsertTipandSampleTubeintotheslotsofTipCarrier Afterthat placetheentiresetofTipCarrier...

Страница 9: ...rial number error Setup Systemtimesetup Start Stop Save Back Load Program Start 24 Test 48 Test DNase I Treatment Sample Volume Elution Volume Please select Cartridge Code Elution Buffer Optical Detec...

Страница 10: ...e RemoveDNA SampleVolumn ElutionVolumn ElutionBuffer 48 105PlasmaDNAExtractionKit 1 2ml 200 l 150 l A A B B E D Warning Abort Program Stopped Press ABORT to terminate the process or CONTIUNE to run Co...

Страница 11: ...Sample Volume Elution Volume Please select Optical Detrction Optical Detection Save Back Load Program 101 MagCore Genomic DNA Whole Blood Kit Speedy installation Start Yes No 48 Test Test CartridgeCo...

Страница 12: ...red Program 3 Stored Program 4 Stored Program 5 Stored Program 6 Stored Program 7 Stored Program 8 Load Program Yes No 48 Test CartridgeCode RemoveDNA SampleVolumn ElutionVolumn ElutionBuffer 105Plasm...

Страница 13: ...1 2ml 200 l 150 l Start Stop Save Back Load Program Start 24 Test 48 Test Cartridge Code Dnase Treatmen Elution Buffer Sample Volume Elution Volume A B D A B E Please select Channel Youmaydeleteyourco...

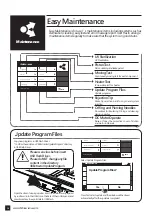
Страница 14: ...ack UV Sterilization Moving Test Heater Test Rejection Tip Piston Test O Ring Piercing Needles DC Motor Operate Update Program Files EasyMaintenanceisforuser smaintenanceitems includingsystemssuchas s...

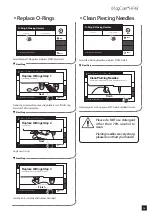
Страница 15: ...ings Step 2 Applywithnewone Replace O Rings Clean Piercing Needles Start Stop O Ring Piercing Needles Select item and Press Start to run Back Finish Replace O Rings Step 3 Usesuppliedlubricatingoil to...

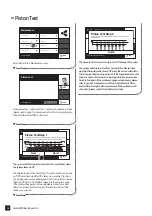
Страница 16: ...horizontalorthereisaloweringsituation pleasepress Finishtotestagain Iftheproblemhappenscontinuously please refertopage14toreplacenewO RingforproblematicPiston andtestthisitemagainafterreplacement Ifth...

Страница 17: ...Program Files HeaterTest Start Stop Heater Test Press START to run Back HeaterA 65 C 148 F Heater B 65 C 148 F Thisfunctionismainlyforthesystemtoperformrejectionafter emergencystoporoperationinterrup...

Страница 18: ...Update Program Files Start Stop 30min 60min UV Sterilization select Item and press START to run Back 30 00 Remaining Time Complete Back UVSterilization Openthetopcoverofthepartchamber ApplynewUVlamp S...

Страница 19: ...jection Tip Piston Test O Ring Piercing Needles DC Motor Operate Update Program Files Maintenance Please select Item Back UV Sterilization Moving Test Heater Test Rejection Tip Piston Test O Ring Pier...

Страница 20: ...0 Q W E R T Y U I O P Backspace Enter A S D F G H J K L Z X C V B N M System Timing Setting Start Maintenance Loadprogram Setup Status 2012 06 07 12 12 12 Time Setting Back Year 2012 24 h Hour 12 Minu...

Страница 21: ...p Operating Time Hr 00 Min 00 Sec 00 UI Software Ver Ver SUPER2012 0 1 PLC Software Ver Ver SUPER2012 0 1 Machine serial number Error history list UV Time Reset Status Back System Date 2012 12 12 Syst...

Страница 22: ...Choosethecorrespondingslotofyoursampleandscanyour sample scode afterthecompletioncodeisdisplayedonthe touchpanel placethesampleintotheslot ifyouhavemorethan onesample pleaserepeattheabovebarcodescanni...

Страница 23: ...ystem test and check liquid levels of each columnareatthesamehorizontal Liquidleveloversuctionfilter 1 Wrongsamplematerials 2 Wrongsampletubes 1 PleaserefertoMagCore kitmanual 2 Pleaseusetheprovidedsa...

Страница 24: ...TEL 886 2 8912 1200 FAX 886 2 8912 1300 3F No 132 Ln 235 BaoqiaoRd XindianDist NewTaipeiCity23145 TAIWAN http www rbcbioscience com...

Отзывы: