Rayburn 370 SFW Скачать руководство пользователя страница 24

8

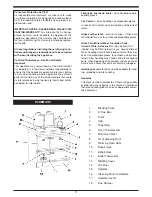
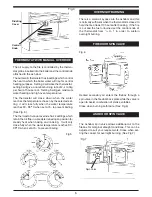
The insulating covers retain most of the heat that
would otherwise be radiated into the kitchen. They
also retain the heat in the hotplates so that rapid heat-
ing of cooking utensils will result when one or both of
them are lifted for cooking purposes. (See Fig. 11)

For best cooking results use heavy based, flat 
bottomed utensils.

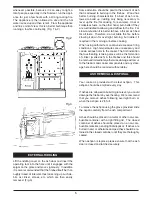
When baking or roasting, set the flue damper to
cooker and open the thermostat fully until the ther-
mometer shows a temperature about 50

o

F higher

than that which is required.  Then close the thermo-
stat to a point where the required temperature is sus-
tained  (a little practice will soon show how much
thermostat adjustment is necessary).  Much will de-
pend on the strength of the chimney draught.  It will
be found that a thermostat setting of 3 will be suitable
in most cases.

The main oven is heated on all four faces. The sim-
mering oven is heated on the top face only.

The temperature will be about half that of the main
oven, for slow cooking, of casseroles, stews, soups
etc.

USE OF OVENS

COOKING UTENSILS

INTERNAL/FLUE CLEANING

The flue or chimney will need to be cleaned regularly.
How often will depend a lot on how your Cooker is
run, but, to start with, make a point of inspecting the
flue system every one or two weeks

Fig.12

This period may well be extended as time goes by if
there is little sign of deposits.  Some people find they
need to sweep the flue every six to eight weeks but a
longer period is more normal and in some cases this
may be as long as 12 months.

For most efficient heat transfer to water jacket, all sur-
faces that come into contact with the flue gases
should be kept clean.  Regular cleaning will maintain
the efficiency of the unit.  Use the scraping tool to re-
move deposits from the inside surfaces of the firebox,
the flue ways and top water tube.  Regularly look at
the top and side of the oven by removing the hotplate
cleaning panel and removing the deposits with
scraper.  To help keep deposits to a minimum, it is a
good idea to have a fast fire for 15  minutes at least
once a week.  Loose deposits will be scoured off and
will make the necessity of cleaning out less frequent. 

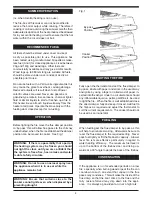
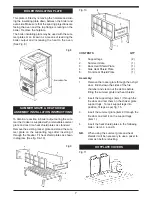
Every week, depending on the type of fuel used, it will
be necessary to take off the cleaning access plates
to remove deposits. The procedure is as follows:

Allow cooker to cool down completely, remove all
loose sections on top of the Cooker, set the flue
damper to by-pass, remove the flue box plate from
the flue chamber and remove the cleaning door from
the front of the Cooker in order to obtain access.  Re-
move the hotplate cleaning panel  and hob cleaning
plate, and clean the heat collecting fins on the hot-
plate.  Carbon deposits on these surfaces will reduce
        efficiency by up to 20%.  All deposits from the flue
pipe and the top of the oven may be brushed both into
the firebox and down the side of the oven.

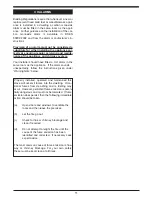
Deposits which have accumulated on the side of the
oven must also be brushed downwards.  To remove
the accumulated ash and soot, thoroughly clean out
the residue from the side flues and base plate through
the front cleaning door opening — this operation is
essential otherwise the flow of hot gases will be ob-
structed and satisfactory oven temperatures will not
be maintained, apart from which such deposits may
contribute to smoking.  Replace all the loose parts
which have been removed making sure that all cook-
ing surfaces have been thoroughly cleaned on the un-
derside. (See Figs. 12, 13 & 14). 

Fig.13

Содержание 370 SFW

Страница 1: ...vice this Cooker should be installed by a suitably qualified and competent person The provision of a Central Heating facility requires that the hot water systems involved conform fully to good plumbing practice and established standards INSTALLATION INSTRUCTIONS ...

Страница 2: ... 6 The Chimney 5 7 Cooker Flue Connection 6 8 Flue Layouts 7 9 Ventilation Combustion Air Requirements 7 10 Flue Box 8 11 Central Heating Hot Water Systems 8 12 Central Heating Pump Control 8 13 High Up Draughts 9 14 Cooker Clearance 9 15 Testing Commissioning 9 16 CO Alarm 10 17 Exploded View 11 18 Parts List 12 TABLE OF CONTENTS 2 ...

Страница 3: ...ing the appliance Control of Substances Health and Safety Important This appliance may contain some of the materials that are indicated It is the Users Installers responsibility to ensure that the necessary personal protective clothing is worn when handling where applicable the pertinent parts that contain any of the listed materials that could be interpreted as being injurious to health and safet...

Страница 4: ...er 150mm Max Water Pressure 1 79 Bar Minimum Flue Draught 15 pa Boiler Water Capacity 20 Litres Int Int Int Internal Thread 4 Fig 1 ELECTRICAL CONNECTIONS The installation of any electrical services during the installation of this cooker with boiler and the associated heating system must be carried out by a registered competent electrician and in accordance with the requirements of the latest issu...

Страница 5: ...N BUILDERS OPENING THE CHIMNEY Checking existing chimney The internal and external condition of the chimney should be checked before the appliance is installed and rectification made where necessary to prevent leakage or porosity The soundness of the chimney which should have a minimum flue dimension of 150mm diameter can be confirmed by smoke testing Advice on the test method can be obtained from...

Страница 6: ...ither top or back flue outlets by means of the reversible loose socket a Rear Flue Outlet This must only be used where there is a brick flue immediately behind the cooker Provision must be made for a condensate collecting vessel and cleaning door See Fig 3 NOTE MAXIMUM HORIZONTAL LENGTH 150mm EXTENDED REAR FLUE PIPE AND BENDS ARE NOT RECOMMENDED b Top Flue Outlet The cooker should be connected to ...

Страница 7: ... where a flue draught sta biliser is fitted If another appliance is fitted in an ad jacent room it will be necessary to calculate an additional air supply All materials used in the manufacture of air vents should be such that the vent is dimensionally stable corrosion resistant and no provision for closure The effective free area of any vent should be ascertained before installation The effect of ...

Страница 8: ...han 5m must be lagged Ensure that the flow pipe has an open vent and rises continuously from the boiler to the cylinder to ensure good gravity circulation In combined systems the water draw off pipes to the taps must be dead leg connection from the vent ex pansion pipe There are only two boiler tappings on this cooker and a typical design layout is shown in Fig 6 An injector tee is provided which ...

Страница 9: ...chen units This filler piece is mounted to the wall behind the cooker using the appropriate screws and rawl plugs not supplied and allows adequate clear ance from the front of the cooker to the front of the kitchen units for door opening see Fig 8 8a Fig 8 Fig 8a Gap between Cooker Kitchen units must be filled using a filler strip Cooker front must be kept in line with front of kitchen unit Back f...

Страница 10: ...bon monoxide alarm must be fitted in the same room as the appli ance Further guidance on the installation of the car bon monoxide alarm is available in BS EN 50292 2002 and from the alarm manufacturer s instructions CO ALARM 10 WARNING If the CO Alarm sounds unexpectedly 1 Open Doors and windows to ventilate the room and then leave the premises 2 Let the fire go out Provision of an alarm must not ...

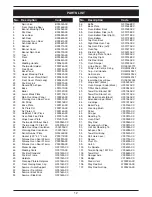
Страница 11: ...11 EXPLODED VIEW ...

Страница 12: ...nt Cleaing Door Clip Q00158AXX 52 Summer Grate Support Q00162AXX 53 Summer Front Brick Q00163AXX 54 Summer Back Brick Q00164AXX 55 Summer Side Brick Q00165AXX 56 Baffle Q00166BXX 57 Base Plate Q00168BXX 58 Oven Bottom Back Q00169AXX 59 Oven Bottom Side Left Q00170BXX 60 Oven Bottom Side Right Q00171BXX 61 Oven Bottom Q00172BXX 62 Top Oven Back Q00173BXX 63 Right Side Oven Top Q00176CXX 64 Top Oven...

Страница 13: ...13 NOTES ...

Страница 14: ...NOTES 14 ...

Страница 15: ...15 NOTES ...

Страница 16: ...he Company reserves the right to change specifications and make modifications to the appliance described at any time Manufactured by AGA Rangemaster Station Road Ketley Telford Shropshire TF1 5AQ England www rayburn web co uk www agacookshop co uk N00636AXX DP140901 ...

Страница 17: ...ll times and should not be allowed to touch the hot working surfaces while in use or until the appliance has thoroughly cooled When using the cooker in situations where children aged and or infirm persons are present a fireguard must be used to prevent accidental contact with the stove The fireguard should be manufactured in accordance with BS 8423 2002 USER INSTRUCTIONS ...

Страница 18: ... 11 Overnight Burning 6 12 Firedoor Spin Valve 6 13 Ashdoor Spin Valve 6 14 Boiler Insulating Plate 6 15 Summer Grate Heatshield Assy 7 16 Hotplate Covers 7 17 Cooking Utensils 8 18 Use of Ovens 8 19 Internal Flue Cleaning 8 20 Grate Removal 9 21 Cleaning 9 22 Opening Cooker Door 9 23 Air Supply 10 24 Cooker Clearance 10 25 Chimney Fires 10 26 CO Alarms 11 27 Fault Findings 12 TABLE OF CONTENTS 2 ...

Страница 19: ... responsibility to ensure that the necessary personal protective clothing is worn when handling where applicable the pertinent parts that contain any of the listed materials that could be interpreted as being injurious to health and safety see below for information Firebricks Fuel beds Fuels when handling use dis posable gloves Fire Cement when handling use disposable gloves In case of skin contac...

Страница 20: ...kindle with paper and sticks in the usual way and ignite by using a taper or rolled wad of paper in serted into the ashpit Under no circumstances should any inflammable liquid i e petrol paraffin etc be used to light the fire When the fire is well established close the direct damper fully and keep it closed Add fuel to the firebox as required and adjust the thermostat to suit the current requireme...

Страница 21: ...rheating We recommend that you remove ashes following overnight burn or when the ashpan is 2 3 full To remove the ashpan using the glove provided slide the aspan carefully from the ash compartment Ashes should be placed in a metal or other non com bustible container with a tight fitting lid The closed container of ashes should be placed on a non com bustible material pending final disposal If ashe...

Страница 22: ...redetermined open position for steady heat when baking and cooking It will only close fully when the water temperature reaches 90 95o C when set at 5 to prevent boiling Fig 4 Control Knob Riddling Cover Fig 5 There is a small air bypass into the ashdoor and this is normally sufficient when the thermostat is closed to hold the fire at least 10 hours after banking If the fire is out and the fuel unb...

Страница 23: ...mer grate on the supporting legs after inserting it through the firedoor Fit heat shield plates as shown in diagram See fig 9 10 Fig 9 CONTENTS QTY 1 Support legs 2 2 Summer Grate 1 3 Back Heat Shield Plate 1 4 Side Heat Shield Plate 2 5 Front Heat Shield Plate 1 Assembly 1 Remove the rocker grate through the ashpit door Brush down the sides of the fire chamber and clean out the debris before fitt...

Страница 24: ...ept clean Regular cleaning will maintain the efficiency of the unit Use the scraping tool to re move deposits from the inside surfaces of the firebox the flue ways and top water tube Regularly look at the top and side of the oven by removing the hotplate cleaning panel and removing the deposits with scraper To help keep deposits to a minimum it is a good idea to have a fast fire for 15 minutes at ...

Страница 25: ...ge the vitreous enamel 3 Keep a damp cloth to hand while cooking to wipe up any spills as they occur so they do not harden and become more difficult to remove later 4 If spills do become baked on a cream cleanser can be used For stubborn deposits a soap im pregnated pad can be carefully used on the vit reous enamel 5 Use only products recommended by the Vitreous Enamel Association these products c...

Страница 26: ...cooker to the front of the kitchen units for door opening see Fig 5 5a COOKER CLEARANCE CHIMNEY FIRES Prevention Chimney fires do not occur in clean in tact properly installed chimneys Have a professional chimney sweep clean and inspect your appliance at least once a year More frequent cleaning may be re quired based on the type of fuel burned and the fre quency of use In general an older applianc...

Страница 27: ...cause of fume emission is flue way or chimney blockage For your own safety these must be kept clean at all times Building Regulations require that whenever a new or replacement fixed solid fuel or wood biomass appli ance is installed in a dwelling a carbon monoxide alarm must be fitted in the same room as the appli ance Further guidance on the installation of the car bon monoxide alarm is availabl...

Страница 28: ...urn off un needed Radiators e Radiator Valves not adjusted e Adjust Valves to give even flow 8 Domestic Hot Water Cylinder a Cylinder too Large a Use 135 180 L Cylinder not heating b Flow Pipe too small b Use 25mm Bore Pipe c Flow Pipe crossed c Reverse Flow Pipe d Cylinder too far away d Not more than 7 8m fully lagged e Hot water from boiler not e Adjust Flow Control Valves or reaching cylinder ...

Страница 29: ...13 NOTES ...

Страница 30: ...14 NOTES ...

Страница 31: ...15 NOTES ...

Страница 32: ...ire TF1 5AQ England www rayburn web co uk www agacookshop co uk With AGA Rangemaster s policy of continuous product improvement the Company reserves the right to change specifications and make modifica tions to the appliance described at any time N00637AXX DP140901 16 ...

Отзывы: