Page 14 of 22
IN052 Rev. K 0613
2.6. Remote Air Intake
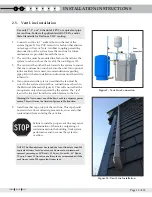
If a Remote Air Intake is required because of Air Quality or Quantity issues then Use Only 1-1/4” or larger
Schedule 40 PVC or equivalent pipe for the air intake line.
1.
Unscrew the air filter provided from the cover and run the intake line from the pipe thread
connection on the cover to the location selected for the air intake.
NOTE: A rubber coupling or similar means to disconnect the intake line from the AIRaider™ must be provided so that
the AIRaider™ cover may be removed for start-up and maintenance.
2.
Connect the air filter previously removed to the intake end of the intake line.
If the air intake is located outside, the intake must be mounted high enough to prevent the drawing in of snow, water and
other contaminants. Do not locate the air intake in the vicinity of vents from furnaces, barbecue grills, etc
.
2.7. System Start-Up
1.
Remove cover and lid and pour ¼ cup of chlorine into the AIRaider™ tank. (This will disinfect the
system.) Secure the lid with the screws and washers provided.
2.
Check that all plumbing and electrical connections have been properly completed.
3.
Slowly change bypass to the “service” configuration. Check for leaks.
4.
Turn power switch for AIRaider™ to “On”. Solenoid valves will now open allowing water into the
system. The aeration process will also start. Check for leaks.
5.
Allow the AIRaider™ to fill with water. The aeration process will stop. The pump will self prime
during the fill cycle. There is an orifice behind the left side of the pump which allows the pump to
prime. This orifice will spray water into the aeration tank whenever the pump is running. The orifice
is sized for the minimum flow specified for the pump. (The pump will fail to prime if the orifice is
blocked). The pump will start and will continue running until the house water system is pressurized.
Check thoroughly for leaks around all pipe joints, etc., and seal if required.
INSTALLATION INSTRUCTIONS
1
2


