background image

-30-

IT

NL

GB

DK

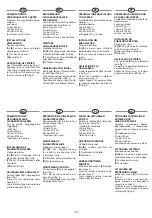
WALL MOUNTING 

ENCLOSED HOSE REEL

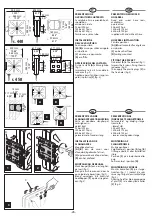
After choosing the ideal position, 

checking the consistency and 

thickness of the wall, marking the 

holes for the plugs (see template 

supplied with the hose reel) and 

making sure they do not interfere 

with water pipes or electrical ca-

bles, proceed with drilling fig. 6.

Screw the nuts [D] 3 – 4 turns only 

on the plugs of the top holes. Insert 

the hose reel in the special seats. 

Tighten the 4 fixing nuts.

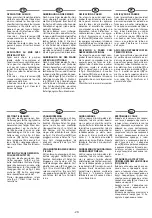
WALL MOUNTING WITH OPTION-

AL BRACKET

After choosing the ideal position, 

checking the consistency and 

thickness of the wall, making sure 

that the holes for the plugs do not 

interfere with water pipes or elec-

trical cables, fix bracket [C] to the 

wall as shown in fig. 7.

Screw the nuts [D] 3 – 4 turns only 

on the top part of the bracket.

Insert the hose reel in the special 

seats (fig. 7).

Tighten the 4 fixing nuts [D].

VÆGMONTERING AF 

INDKAPSLET SLANGETROMLE

Vælg den ideelle position og kon-

trollér væggens fasthed og tyk-

kelse. Afmærk hullerne til rawl-

plugsene (se boreskabelonen, 

som leveres sammen med slange-

tromlen) og kontrollér, at de ikke 

krydser vand- eller elledninger. Bor 

herefter hullerne (fig. 6). Fastspænd 

møtrikkerne  [D] i rawlplugsene i 

de øverste huller med tre-fire om-

gange. Indsæt slangetromlen i de 

respektive sæder. Fastspænd de fire 

låsemøtrikker.

VÆGMONTERING MED KONSOL 

(TILBEHØR)

Vælg den ideelle position og kon-

trollér væggens fasthed og tyk-

kelse.

Kontrollér, at hullerne til rawlplug-

sene ikke krydser vand- eller elled-

ninger.

Montér konsollen [C] på væggen 

som vist i fig. 7.

Fastspænd møtrikkerne [D] i kon-

sollens øverste del med tre-fire om-

gange. Indsæt slangetromlen i de 

respektive sæder (fig. 7).

Fastspænd de fire låsemøtrikker 

[D].

MONTAGE AAN DE MUUR 

SLANGHASPEL MET BEHUIZING

Na de ideale plaats gekozen te heb-

ben, de stevigheid en de dikte van 

de muur gecontroleerd te hebben, 

de gaten voor de pluggen afge-

tekend te hebben (zie de bij uw 

haspel meegeleverde mal) en ge-

controleerd te hebben of zij niet op 

waterleidingen of elektrische be-

drading terechtkomen kunt u over-

gaan tot het boren van de gaten, zie 

fig. 6. Draai de moeren [D] alleen in 

de pluggen van de bovenste gaten 

3 - 4 slagen aan. Breng de haspel 

op de daarvoor bestemde plaatsen 

aan. Draai de 4 bevestigingsmoeren 

aan.

MONTAGE AAN DE MUUR MET 

OPTIONELE BEUGEL

Na de ideale plaats gekozen te heb-

ben, de stevigheid en de dikte van 

de muur gecontroleerd te hebben, 

gecontroleerd te hebben of de ga-

ten voor de pluggen niet op water-

leidingen of elektrische bedrading 

terechtkomen moet u beugel [C] 

aan de muur bevestigen zoals aan-

gegeven op fig. 7. Draai de moeren 

[D] alleen in het bovenste gedeelte 

van de beugel 3 - 4 slagen aan. 

Breng de haspel op de daarvoor be-

stemde plaatsen aan (fig. 7). Draai 

de 4 bevestigingsmoeren [D] aan.

APPLICAZIONE A MURO 

AVVOLGITUBO CARTERATO

Dopo aver scelto la posizione ide-

ale, verificato la consistenza e lo 

spessore del muro, indicato i fori 

per i tasselli (vedi dima in dota-

zione al proprio avvolgitubo) e 

controllato che non vadano a inter-

cettare tubi idraulici o cavi elettrici, 

procedere con la foratura fig. 6.

Avvitare di 3 - 4 giri i dadi [D] solo 

nei tasselli dei fori superiori.

Inserire l'avvolgitubo nelle apposi-

te sedi. Avvitare i 4 dadi di fissag-

gio.

APPLICAZIONE A MURO CON 

STAFFA OPZIONALE

Dopo aver scelto la posizione ide-

ale, verificato la consistenza e lo 

spessore del muro, controllato che i 

fori per i tasselli non vadano a inter-

cettare tubi idraulici o cavi elettrici, 

fissare la staffa [C] al muro come 

indicato in fig. 7.

Avvitare di 3 - 4 giri i dadi [D] solo 

nella parte superiore della staffa.

Inserire l'avvolgitubo nelle apposi-

te sedi (fig. 7).

Avvitare i 4 dadi di fissaggio [D].

5

4

3

1

2

5

4

3

1

2

5

4

3

1

2

6

D

4

2

1

3

4

2

1

3

7

D

C

217 mm

8.58"

187 mm

7.36"

267 mm 10.51" 292 mm 11.50"

OPTIONAL

S. 450

S. 450

Содержание s.290

Страница 1: ...rsettelse fra italiensk Översättning från italienska Käännös italian kielestä IT AVVOLGITUBO GB HOSE REELS FR ENROULEURS DE AUFROLLER ES ENROLLADORES PT ROLDANAS NL SLANGHASPELS DK KABELTROMLER NO SLANGEVINDER SE SLANGUPPRULLARE FI LETKUNKELAUSLAITTEET RU РАЗДАТОЧНАЯ КАТУШКА ДЛЯ ШЛАНГА Перевод с итальянского RU s 330 s 290 s 440 s 450 s 540 s 550 s 560 s 530 s 520 s 430 s 420 s 436 s 390 s 380 V61...

Страница 2: ...er Anleitung finden Sie einen QR Code Durch Scannen des Codes werden Sie di rekt mit unserer Website verbunden auf der Sie eine digitale Kopie der Anleitung downloaden können Gracias por haber elegido un pro ducto RAASM En la contraportada de este manual encontrará un código QR escaneán dolo se conectará directamente a nuestro sitio web donde podrá des cargar una copia digital de este ma nual Obri...

Страница 3: ...cancía adquirida LEIA COM ATENÇÃO O MANUAL DE INSTRUÇÕES ANTES PÔR O EQUIPAMENTO A FUNCIONAR Cabe ao vendedor exportador comprovar que o manual de utilização a seguir está traduzido numa língua compatível com o país de destino da mercadoria comprada LEES DE GEBRUIKSAANWIJZING AANDACHTIG DOOR VOORDAT U HET APPARAAT IN GEBRUIK NEEMT Hetisdeverantwoordelijkheidvandeverkoper exporteur omervoortezorgen...

Страница 4: ...ag 48 INDEX SIGNIFICADO DE LA MARCACIÓN ATEX pag 6 ADVERTENCIAS GENERALES pag 11 USO PREVISTO Y LÍMITES DE USO pag 13 MANUTENCIONES Y CONTROLES pag 17 PRESENTACIÓN pag 23 INSTALACIÓN DEL ENROLLATUBO pag 25 PRESENTACIÓN ENROLLATUBO CON CARTER pag 27 INSTALACIÓN DEL ENROLLATUBO pag 27 APLICACIÓN DE LA ABRAZADERA pag 27 APLICACIÓN A PARED pag 29 APLICACIÓN A PARED ENROLLATUBO CON CARTER pag 31 APLICA...

Страница 5: ... SLANGHASPEL MET BEHUIZING S 440 pag 42 DEMONTAGE EN VERVANGING VAN DE SLANG pag 44 ATTENTIE pag 48 INDEX FÖRKLARING AV ATEX MÄRKNINGEN pag 7 ALLMÄNNA ANVISNINGAR pag 11 AVSEDD ANVÄNDNING OCH ANVÄNDNINGSBEGRÄNSNINGAR pag 13 UNDERHÅLL OCH KONTROLLER pag 17 PRESENTATION pag 23 MONTERING AV SLANGUPPRULLARE pag 25 PRESENTATION AV INKAPSLAD SLANGUPPRULLARE pag 27 MONTERING AV SLANGUPPRULLARE pag 27 MON...

Страница 6: ...pératures maxi indiquées sur le mode d emploi Der Benutzer ist dafür verantwortlich dass bei Benutzung vom Schlauchaufroller die in der Bedienungsanleitung angegebenen Höchsttemperaturen beachtet werden El usuario tiene que garantizar que el enrollatubo sea utilizado con las temperaturas máximas indicadas en las instrucciones O usuário deve garantir que o enrolador de tubo seja empregado nas tempe...

Страница 7: ...t Luft Ilma 40 C 104 F Olie antivries Olie frostvæske Olje frostvæske Olja frost skyddsmedel Öljy pakkasneste 80 C 176 F Vet Smørefedt Fett Fett Rasva 40 C 104 F Water Vand Vann Vatten Vesi 130 C 266 F Stikstof zuurstof Ilt nitrogen Oksygen nitrogen Syrgas kväve Happi typpi 40 C 104 F Ontvlambare gassen aardgas LPG stadsgas Brændbare gasser LPG metan bygas Brennbare gasser lpg metan bygass Bränsle...

Страница 8: ...arantizar que el enrollatubo sea utilizado con las temperaturas máximas indicadas en las instrucciones O usuário deve garantir que o enrolador de tubo seja empregado nas temperaturas máx indicadas nas instruções Temperature max per i vari fluidi Max temperatures for several fluids Températures maxi pour différents fluides Höchsttemperatur für die verschiedenen Flüssigkeiten Temperaturas max para l...

Страница 9: ...re væsker bensin og diesel Bränslevätskor bensin och diesel Polttonesteet bensiini ja die selöljy 40 C 104 F Max temperaturen voor de diverse vloeistoffen Maks temperatur for forskellige væsker Maks temperatur for de forskjellige væskene Max temperatur för olika vätskor Eri nesteiden max lämpötilats NL BETEKENIS VAN DE ATEX MARKERING DK ATEX MÆRKNINGENS BETYDNING NO BETYDNINGEN AV ATEX MERKET SE F...

Страница 10: ...ENERALES Pour l installation de l enrouleur il faut s assu rer que la surface d appui soit plate et vérifier que la consistance du mur soit adaptée à sup porter le poids de l enrouleur Le branchement de l enrouleur à la tuyau terie de l installation de distribution doit être effectué en utilisant des raccords appropriés et une colle de tenue aux niveau des points de connexion par exemple Teflon ou...

Страница 11: ...o del bobinador El enlace del enrollatubo con la tubería del equipo de distribución se tiene que hacer uti lizando empalmes adecuados y una masilla impermeable en los puntos de conexión por ejemplo Teflon y Loctite Les recordamos que si se someten con fre cuencia los tubos a dobleces con radios de cur vatura demasiado pequeños eso podría con el paso del tiempo perjudicar la integridad del tubo mis...

Страница 12: ...ks in the mining industry or surface facilities that may be exposed to the risk of release of fire UTILISATION PREVUE ET LIMITES D UTILISATION En fonction du modèle d enrouleur de tuyau ils sont destinés à être utilisés Pour des travaux avec de l air comprimé genre peinture au pistolet gonflage de pneus et pour l utilisation de visseuses marteaux pneumatiques riveteuses etc Pour des travaux qui pr...

Страница 13: ...o zonas 20 de conformidad con 99 92 CEE 2014 34 UE No están destinados a trabajos subterráneos USO PREVISTO E LIMITES DE USO Dependendo do modelo de enrolador de tubo destinam se a ser utilizados Trabalhos com ar comprimido tipo pinturas pulverização enchimento de pneus e para pa rafusador britadeira rebitador etc Trabalhos com água em geral as lavagens carro e outros veículos locais onde devem se...

Страница 14: ...s portatifs ou transportés par des personnes Toute utilisation hors du champ d application et destination d utilisation prévu est exclue Ze zijn niet bestemd voor ondergrondse werk zaamheden in mijnen en hun bovengrondse instellingen die blootgesteld kunnen worden aan het risico van mijngas en of ontbrandbaar stof koolstof gevaarlijk kunnen zijn Als in de versies die geschikt zijn voor het vervoer...

Страница 15: ...r personas Todo uso distinto del ámbito de aplicación y de la finalidad prevista queda excluido cais subterrâneos em minas e nas suas instala ções de superfície que podem estar expostos ao risco de libertação de grisu e ou de pós combustíveis pós de carvão Se as versões forem adequadas para o trans porte de líquidos inflamáveis eles NÃO SÃO adequados para líquidos diferentes da gaso lina e do gasó...

Страница 16: ...vuil in komt waardoor er elektrostatische ladingen in de slanghaspel kunnen ontstaan ENTRETIEN ET CONTROLES Effectuer au moins deux fois par an le contrôle du bon fonctionnement du ressort un test de tenue de la partie tournante et des raccords en utilisant un spray à mousse pour la locali sation de fuites le nettoyage des raccords et de la partie tournante contrôler que le tuyau soit intact contr...

Страница 17: ...sar acumulação de cargas eletrostáti cas no enrolador de tubo MANUTENCIONES Y CONTROLES Efectuar por lo menos dos veces al año el con trol del buen funcionamiento del resorte una prueba de estanquedad de la parte giratoria y de los empalmes utilizando un spray de espu ma para analizar las pérdidas limpieza de los empalmes y de la parte giratoria control de la integridad del tubo control de la suje...

Страница 18: ...n die gebruikt worden Met name mogen er voor de on Before commissioning the hose reel check the earthing in order to guarantee protection against risks caused by an accumulation of electrostatic charges Check that the earthing cable is not damaged and that the measured resistance of the tool during the test shown in the figure is less than 50 10 ohm 50MΩ For category 3 hose reels carry out test 1 ...

Страница 19: ...luidos utiliza dos Especialmente para os com ponentes em contato com o oxigê nio não se deve utilizar solventes a base de hidrocarbonetos substân cias oleosas e gordurosas pois que poderia provocar autocombustão ou até explosão Antes de la puesta en servicio del enrollatubos efectuar el control de la puesta a tierra a fin de garanti zar la protección contra los riesgos derivados de la acumulación ...

Страница 20: ...de vloeistof die ge bruikt wordt de kenmerken van de ruimte de ventilatie en de gebruiksdruk classificeren om het soort en de omvang van de gevaarlijke ge deelten te bepalen en dus de afstanden die in acht genomen moeten worden of de kenmer ken van de onderdelen die in deze gedeelten geïnstalleerd moeten worden en om het explo siegevaar dat per ongeluk veroorzaakt wordt door lekken te voorkomen Ma...

Страница 21: ... tipología y la ex tensión de las zonas creadas y en consecuencia las distancias de seguridad o las características de los componentes a instalar en dichas zonas y prevenir el riesgo de explosiones generadas por pérdidas accidentales No limpiar el enrollatubo utilizando chorros de agua dirigidos con alta presión El chorro podría remover la grasa del carter porta muelle y la grasa de la parte girat...

Страница 22: ...m 10 70 522 mm 20 55 488 mm 19 21 488 mm 19 21 578 mm 22 76 368 mm 14 53 398 mm 15 67 488 mm 19 21 488 mm 19 21 0 272 mm 10 70 s 550 s 380 110 mm 4 33 484 mm 19 05 184 mm 7 24 146 mm 5 75 300 mm 11 81 702 mm 27 04 218 mm 8 58 190 mm 7 48 268 mm 10 55 ø 390 mm ø 15 35 400 mm 15 75 144 mm 5 67 106 mm 4 17 226 mm 8 9 ø 510 mm ø 20 08 560 mm 22 05 s 520 s 420 208 mm 8 19 541 mm 21 3 162 mm 6 38 228 mm...

Страница 23: ...zonder slang verkrijg baar in gelakt staal roestvast staal AISI 304 AISI 316 20 bar 300 psi 100 bar 1400 psi 150bar 2000psi 200bar 3000psi 400bar 5800psi 600bar 6500psi APRESENTAÇÃO Enrolador de tubo fixos e orientá veis com e sem tubo disponíveis em aço envernizado aço inox AISI 304 AISI 316 20 bar 300 psi 100 bar 1400 psi 150bar 2000psi 200bar 3000psi 400bar 5800psi 600bar 6500psi PRESENTACIÓN E...

Страница 24: ...s vermeld is dient als verkeerd beschouwd te worden ATTENTIE Om veiligheidsredenen moet de verstelbare uitvoering van de haspel niet op het plafond ge monteerd worden HOSE REEL INSTALLATION Possible positions A B C wall mounted for single use or in banks D on bench or floor E ceiling mounted with rotation of swivel arms To go from position A to position B turn the arms 180 and turn the hose reel u...

Страница 25: ...o INSTALACIÓN DEL ENROLLATUBO Posiciones posibles A B C a pared para utilizarlo individualmente o en conjunto D para mesa de trabajo o para suelo E a techo con rotación de los brazos giratorios Para pasar de la posición A a la posición B hay que hacer girar los brazos de 180 y volcar el bo binador Cada modelo de enrollatubo es apto para el tránsito de uno de los siguientes fluidos Agua Aire Gasoil...

Страница 26: ... plafond MONTAGE VAN DE BEUGEL Maak beugel A aan de slanghas pel vast fig 1 Breng de 6 schroeven aan door ze op volgorde te bevestigen fig 2 Breng vervolgens de kunststof hoekdoppen C op de vrije gaten aan fig 3 PRESENTATION ENCLOSED HOSE REEL Fixed and swivel hose reels available in painted steel 20 bar 290 psi 150 bar 2175 psi 600 bar 8700 psi supplied with and without hose HOSE REEL INSTALLATIO...

Страница 27: ...a av plast C i de lediga hålen fig 3 PRESENTASJON AV DEN INNKAPSLEDE SLANGEOPPRULLEREN Fast og dreibar slangeoppruller tilgjengelig i Malt stål 20 bar 290 psi 150 bar 2175 psi 600 bar 8700 psi Med eller uten slange INSTALLASJON AV SLANGEOPPRULLEREN Mulige posisjoner A B festet til veggen til bruk alene eller installasjon i linje C festet til arbeidsbenken eller til gulvet D festet til taket HVORDA...

Страница 28: ...e gaten voor de pluggen afgetekend te hebben zie de bij uw haspel meegeleverde mal en gecontroleerd te hebben of zij niet op waterleidingen of elektrische bedrading terechtkomen kunt u overgaan tot het boren van de ga ten zie fig 4 Draai de moeren D alleen in de pluggen van de boven ste gaten 3 4 slagen aan Breng de haspel op de daarvoor bestemde plaatsen aan Draai de 4 bevesti gingsmoeren aan MON...

Страница 29: ... en dotación al enrollatubo mismo y comprobar que los agujeros no intercepten tubos hidráulicos o cables eléctricos hacer los aguje ros fig 4 Enroscar con 3 4 vueltas las tuercas D sólo en los tacos de los agujeros superiores Introducir el enrollatubo en sus alojamientos Atornillar la 4 tuercas de sujeción APLICACIÓN A PARED CON ABRAZADERA OPCIONAL Tras elegir la posición ideal com probar la consi...

Страница 30: ...igheid en de dikte van de muur gecontroleerd te hebben de gaten voor de pluggen afge tekend te hebben zie de bij uw haspel meegeleverde mal en ge controleerd te hebben of zij niet op waterleidingen of elektrische be drading terechtkomen kunt u over gaan tot het boren van de gaten zie fig 6 Draai de moeren D alleen in de pluggen van de bovenste gaten 3 4 slagen aan Breng de haspel op de daarvoor be...

Страница 31: ...ujeros para los tacos véase plantilla en dotación del enrollatubo mismo y controlar que no intercepten tubos hidráulicos o cables eléctricos ha cer los agujeros fig 6 Atornillar con 3 4 vueltas las tuer cas D sólo en los tacos de los agu jeros superiores Introducir el enrollatubo en sus alojamientos Atornillar las 4 tuer cas de sujeción APLICACIÓN A PARED CON ABRAZADERA OPCIONAL Tras elegir la pos...

Страница 32: ...de slanghaspel op een niet wendbare plaats gemonteerd moet worden dan moeten de twee schroeven met de bijbehorende zelfborgende moeren bevestigd worden zoals getoond op fig 12 WALL MOUNTING OF SWIVEL OPEN HOSE REEL s 380 420 520 550 After choosing the ideal position verifying the consistency and thick ness of the wall and ensuring that the plug holes do not interfere with any plumbing pipes or ele...

Страница 33: ...12 APLICACIÓN A PARED ENROLLATUBO ORIENTABLE s 380 420 520 550 ABIERTO Una vez elegida la posición ideal comprobado la consistencia y el espesor del muro controlado que los agujeros para los tacos no intercepten tubos hidráulicos o cables eléctricos fijar la abrazade ra B del enrollatubo orientable fig 8 9 Enganchar el enrollador y aplicar los dos seegers de seguridad como indicado en fig 11 El en...

Страница 34: ...en gemon teerd moet worden dan moeten de twee schroeven D met de bij behorende zelfborgende moeren bevestigd worden zoals getoond op fig 19 WALL MOUNTING OF SWIVEL ENCLOSED HOSE REEL s 440 Fix bracket A to the hose reel pay ing attention to the exact position for installation with resepect to the wall bracket B see fig 13 Impress the 6 screws fixing them in sequence fig 14 Then fit the angular pla...

Страница 35: ...ar el estribo A al enrollador poniendo atención a la posición exacta de instalación respecto del estribo a pared B ver fig 13 Colocar los 6 tornillos fijándolos en secuencia fig 14 Aplicar luego a los orificios libres las tapas angulares de plástico C fig 15 Aplicar el estribo B a pared fig 16 Enganchar finalmente el enrolla dor al estribo B y aplicar los dos seegers de seguridad fig 18 Si el enro...

Страница 36: ...30 ø 35 mm ø 1 34 max 30 m max 100 IT SEZIONE TUBO CAPACITÀ TIPO GB TUBE SECTION CAPACITY TYPE FR SECTION TUYAU CAPACITÉ TYPE DE SCHLAUCHDURCHMESSER SCHLAUCHLÄNGE TYP ES SECCION TUBO CAPACIDAD TIPO PT SEÇÃO TUBO CAPACIDADE TIPO NL SLANGDOORSNEDE CAPACITEIT TYPE DK SLANGENS TVÆRSNIT KAPACITET TYPER NO SLANGENS TVERRSNITT KAPASITET TYPE SE SLANGENS TVÄRSNITT KAPACITET TYP FI LETKUN LÄPIMITTA KAPASIT...

Страница 37: ...ladores pueden ser sumi nistrados sin tubo IMPORTANTE El tipo de tubo para montar debe ser apto para soportar presiones superiores a aquellas de ejercicio indicadas para cada modelo de enrollador sobre la etiqueta ATENCION La empresa constructora renuncia a toda responsabilidad por eventua les anomalías inconvenientes o mal funcionamiento provocados por el tipo de tubo o por el modo con el cual el...

Страница 38: ...aan brengen en ze op volgorde aandraaien fig 27 Zie de op blz 24 vermelde handelingen om de slanghaspel te in stalleren DEMONTAGE VERVANGING VAN DE SLANG Herhaal de hierboven beschreven han delingen om de slang te monteren in omgekeerde volgorde HOSE FITTING OPEN HOSE REEL s 290 330 390 Undo the screw M and remove the nipple G fig 20 with a span ner Fix the chosen hose on the nipple fig 21 and sec...

Страница 39: ...rmeable Volver a montar el ni ple con el tubo utilizando una llave fig 22 Quitar los 3 tornillos F fig 23 Introducir en el alojamiento del perno central una llave hexagonal de 8 mm 5 16 fig 24 Girando la llave en sentido antihorario se hace girar el tambor que enrollará el tubo Durante esta operación el tubo tiene que ser desplazado alternativamente hacia la derecha y hacia la izquierda para que s...

Страница 40: ...leutel stevig op zijn plaats houdt moet u de 3 schroe ven F aanbrengen en deze ver volgens aandraaien fig 34 Zie blz 24 voor de installatie HOSE FITTING OPEN HOSE REEL s 430 530 540 560 Position the hose reel as shown in fig 28 fix nipple N using sealant and fix the chosen hose fig 29 to the nipple Turn the hose reel upside down remove the 3 screws F see fig 30 and with a 10 mm 3 8 hexa gon wrench...

Страница 41: ...e indica en la fig 28 sujetar el niple N utilizando masilla impermea ble y fijar al niple el tubo elegido fig 29 Volcar el enrollatubo quitar los 3 tornillos F véase fig 30 y con llave exagonal de 10 mm 3 8 enrollar el tubo fig 31 girando la llave en sentido antihorario y fijar la almohadilla bloqueatubo a la longitud deseada fig 32 eligien do la boquilla A B C adecuada al tubo montado Para cargar...

Страница 42: ... 1 2 met één hand stevig vasthoudt moet u de 4 schroeven F aanbrengen en ze op volgorde aandraaien fig 42 Zie de op blz 26 vermelde handelin gen om de slanghaspel te installeren HOSE FITTING ENCLOSED HOSE REEL s 440 Place the hose reel as shown in fig 35 and remove the hose inspec tion casing Screw the nipple N on the drum using a sealant fig 36 and fix the chosen hose fig 37 on the nipple Remove ...

Страница 43: ...asilla impermeable fig 36 y fijar al niple el tubo elegido fig 37 Quitar los 3 tornillos F fig 38 Posicionar el enrollatubo manteniéndolo saldamente firme según se indi ca en la fig 39 Introducir en el alojamiento del perno central una llave hexagonal de 10 mm 3 8 Girando la llave en sentido antiho rario se hace girar el tambor que enrollará el tubo fig 39 Durante esta operación hay que desplazar ...

Страница 44: ... Rol de slang af en draai hem van de nippel af fig 45 Verricht vervolgens de handelin gen om de slang te monteren zoals beschreven op blz 36 tot 42 HOSE REMOVAL HOSE REPLACEMENT Make sure all the hose is wound Insert a 12 mm 1 2 Allen key and holding it the position shown in fig 43 undo the screws F Then release the spring turning the 12 mm 1 2 Allen key clockwise Fol low the spring with the key w...

Страница 45: ...AJE TUBO SUSTITUCIÓN TUBO Cerciorarse de que todo el tubo esté enrollado Introducir una lla ve hexagonal de 12 mm 1 2 y teniéndola en la posición indicada en la fig 43 destornillar los torni llos F Luego descargar el resor te girando la llave hexagonal de 12 mm 1 2 en sentido horario Acompañar el resorte con la llave sin que se escape fig 44 Desen rollar el tubo y desenroscarlo del niple fig 45 Ef...

Страница 46: ... gestopt wordt bijv indien er een klep gesloten wordt ATTENTION It is recommended to install an overpressure valve X upstream the hose s winder in order to main tain the normal operation of the hose winder of the hoses installed in it and eventual equipment in stalled downstream the hose s winder in the presence of pressure fluctuations in the system e g wa ter hammering temperature rise etc fig 4...

Страница 47: ...mento de uma válvula ATENCIÓN Aconsejamos instalar a monte del enrollatubo una válvula de sobre presión X para así preservar el normal funcionamiento del en rollatubo de los tubos instalados en el mismo y eventuales aparatos instalados después del enrolla tubo en presencia de saltos de presión en el equipo ej golpes de ariete aumento de la temperatura etc fig 46 En efecto recordamos que la pre sió...

Страница 48: ...n die in het land waar de apparatuur opgesteld is gelden weggegooid worden ATTENTION Chaque partie qui constitue l équipement est facilement séparable des autres de façon à faci liter l élimination séparée des différents maté riaux au moment de la démolition Cette élimi nation doit être effectuée selon les normes en vigueur dans le pays d appartenance ATTENTION Tout l emballage de l équipement car...

Страница 49: ...o ATENCIÓN Cada una de las partes de las que se compo ne el equipo puede ser facilmente separada de las otras para así facilitar la eliminación por separado de los diferentes materiales en el momento en que se deje de utilizarlos Dicha eliminación se efectuará en conformidad con las normas vigentes en cada país ATENCIÓN Todo el embalaje del equipo es decir cartones bolsas de plástico espuma de pol...

Страница 50: ... serie vedi marcatura prodotto Anno costruzione vedi marcatura prodotto GB Serial number see product marking Year of construction see product marking FR N de série voir marquage du produit Année de construction voir marquage du produit DE Seriennummer siehe Typenschild Produkt Baujahr siehe Typenschild Produkt IT I modelli sono codici identificativi differenti dalle serie individuare l esatto mode...

Страница 51: ...g II del A i direktivet 2006 42 EF NL Beschermingswijze DK Beskyttelsesmåde II 2GD h IIB IIIC T4 T135 C Gb Db X Fecha Datum Dato El representante legal O representante legal De wettelijke vertegenwoordiger Juridisk representant 02 2021 ES Los modelos son códigos de identificación diferentes de las series identificar el modelo exacto del artículo en la etiqueta para estar seguro del grado de protec...

Страница 52: ...ienummer se produktets merke Byggeår se produktets merke SE Serienummer se märkningen av produkten Tillverkningsår se märkningen av produkten FI Sarjanro ks tuotemerkintä Valmistusvuosi ks tuotemerkintä RU N серии смотри маркировку изделия Год изготовления смотри маркировку изделия NO Modellene har ulike identifikasjonskoder avhengig av serien Finn den nøyaktige modellen på etiketten for å være si...

Страница 53: ...ppresentante The legal representative Le représentant légal Der gesetzliche Vertreter 02 2021 IT N di serie vedi marcatura prodotto Anno costruzione vedi marcatura prodotto GB Serial number see product marking Year of construction see product marking FR N de série voir marquage du produit Année de construction voir marquage du produit DE Seriennummer siehe Typenschild Produkt Baujahr siehe Typensc...

Страница 54: ...Modo de proteção NL EU VERKLARING VAN OVEREENSTEMMING volgens bijlage II deel A van de Richtlijn 2006 42 EG DK EU OVERENSSTEMMELSESERKLÆRING jf bilag II del A i direktivet 2006 42 EF NL Beschermingswijze DK Beskyttelsesmåde Fecha Datum Dato El representante legal O representante legal De wettelijke vertegenwoordiger Juridisk representant 02 2021 II 3 GD h Gc Dc X ES Los modelos son códigos de iden...

Страница 55: ...а Adm direktør Legal företrädare Laillinen edustaja Официальный Представитель 02 2021 NO Serienummer se produktets merke Byggeår se produktets merke SE Serienummer se märkningen av produkten Tillverkningsår se märkningen av produkten FI Sarjanro ks tuotemerkintä Valmistusvuosi ks tuotemerkintä RU N серии смотри маркировку изделия Год изготовления смотри маркировку изделия II 3 GD h Gc Dc X NO Mode...

Страница 56: ...mal and regular operation are not complied with as well as for any assembly installation and use which is not carried out in conformity with the directions and instructions provided Moreover the manufacturer reserves the right to make any technical functional and design change or improvement without any previous notice and with the utmost operational freedom Check out our website for updated docum...

Отзывы: