April 18, 2018
7080-166B
19
TREKKER
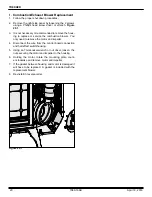
Figure 19.1
H. Convection Blower Replacement
1. Follow the proper shut down procedures
.
2.
Remove the left side panel by loosening the 2 screws
using a Phillips head screw driver or wrench.
Figure 19.1
3.
Remove two lower sheet metal screws from the back
panel to allow more clearance.
4. Disconnect the wire terminals
.
5.
Reach behind the blower and release the latch by pushing
the top of the latch towards the blower.
Figure 19.1
6.
Rock the top of the blower slightly and lift up. The blower
will pass out the left side of the appliance.
Note: You may need to loosen the surround to move it out
of the way.
7.
Install replacement blower by placing the bottom flange
into the opening first then rotate blower up into position.
8.
When the blower is properly positioned the latch will engage
the notch to hold the blower in place.
Figure 19.1
9.
Re-connect wire terminals to the new blower.
10.
Reposition and Re-secure the back panel.
Note: Make sure wires are connected prior to restarting the
appliance. Failure to do so will result in the (side-mounted)
safety thermal snap disc tripping resulting in cutting power to
the appliance feed system.
Содержание TREKKER-CSB
Страница 27: ...April 18 2018 7080 166B 27 TREKKER B Maintenance Log Date of Service Performed By Description of Service...
Страница 28: ...28 7080 166B April 18 2018 TREKKER Date of Service Performed By Description of Service...
Страница 29: ...April 18 2018 7080 166B 29 TREKKER Date of Service Performed By Description of Service...

