


6LQJOH,Q/LQH
0HPRU\
0RGXOHV
0HPRU\DQG6\VWHP6RIWZDUH
5
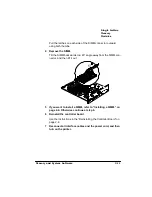
Tilt the SIMM up to a 90° angle until you feel it snap into
place.
When seated, the SIMM stands upright, firmly in place. If you
cannot snap the SIMM into place, do not force it. Reposition it,
making sure that the bottom of the SIMM is seated completely in
the connector.
6
Repeat steps 3-5 for each additional SIMM being installing.
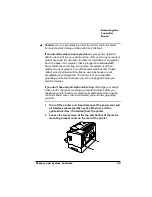
7
Insert the controller board in the printer.
Use the instructions in the “Reinstalling Controller Board” section,
earlier in this chapter.
.......................................
.......................................
Содержание 2060
Страница 1: ...406 3ULQW 6 VWHP 2SWLRQV...
Страница 9: ...QWURGXFWLRQ Q 7KLV KDSWHU About This Manual on page 1 2 Typographic Conventions on page 1 3...
Страница 126: ......
Страница 127: ...6HFXULW H DQG DUQLQJ X HU Q 7KLV KDSWHU Security Key on page 6 2 BuzzBox Lite on page 6 6...
Страница 146: ......
Страница 147: ...406 XVWRPHU 6XSSRUW Q 7KLV KDSWHU Sources of Support on page A 2 QMS World wide Offices on page A 5...
Страница 154: ......
Страница 160: ......


