


NAS System
96
User’s Manual
NOTE: The logical volume to be replicated from source proNAS
must not exist in the destination proNAS. If the destination
proNAS has the same logical volume, Replication cannot be setup.
3.
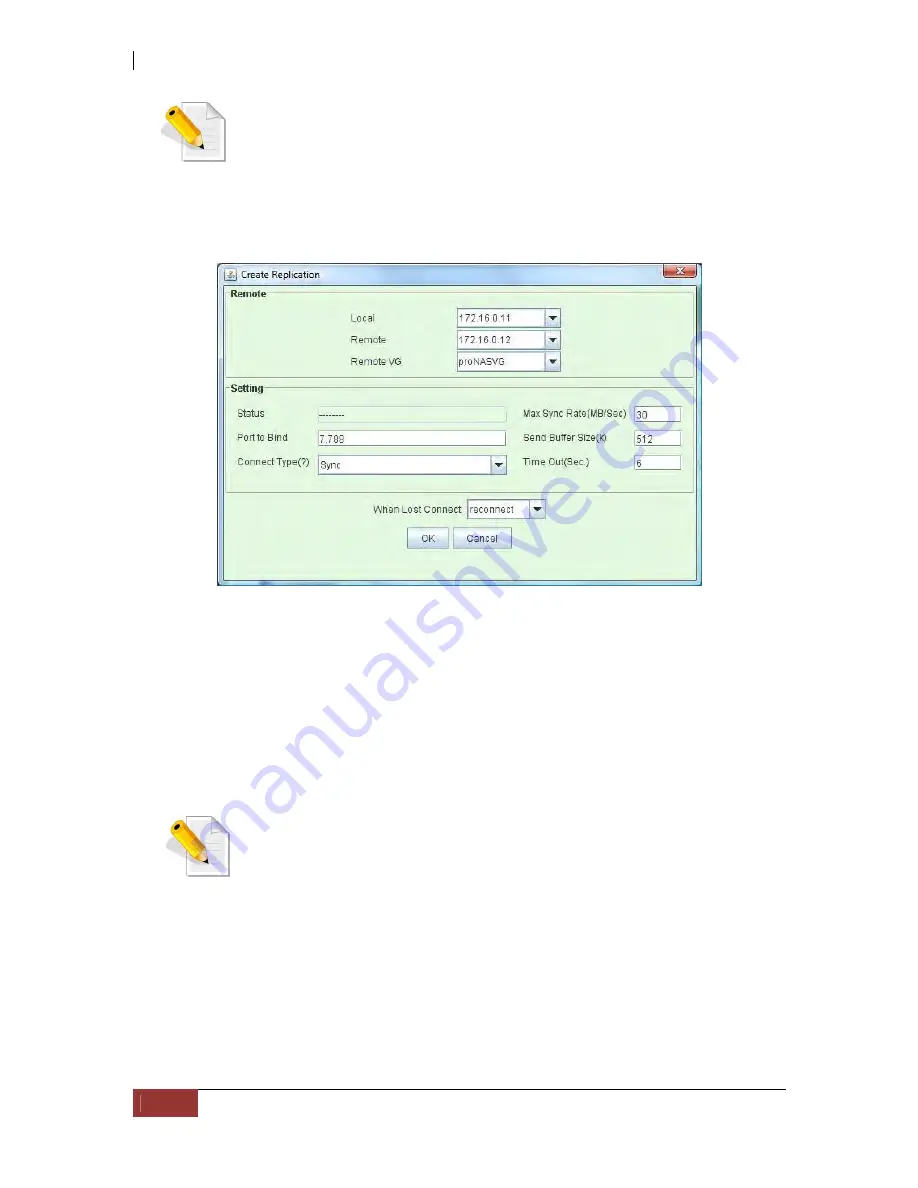
The Create Replication window will be displayed. Set the options below and click
“OK” when done.
Replication Options:
[Remote]
Local - Select the IP address of the local (source) proNAS that will be used for
replication.
Remote - Select or type manually the IP address of remote (destination) proNAS
that will be used for replication.
NOTE: The local and remote IP addresses serve as the channel
between the source and destination NAS servers. This is where the
replication of data takes place. Please be sure to have a good
connection on this medium. As much as possible, set this channel
as a dedicated or a private network. It is recommended to use
different Ethernet port for replication from the Ethernet port used
for data access. It is best to use a crossover network link between
the Ethernet ports involved. Refer to Network Manager Section for
configuring Ethernet port.
Remote VG - Select the VG on remote proNAS where the replicated logical volume
will be created.
Содержание 2126JS6H-SQX
Страница 1: ...NAS System User s Manual Revision 1 0...
Страница 7: ...NAS System User s Manual 7 PART I Hardware Components and RAID Controller...
Страница 38: ...NAS System 38 User s Manual 3 Choose the Make Global HSP option and click Go 4 Click Go...
Страница 41: ...NAS System User s Manual 41 PART II proNAS System...
Страница 51: ...NAS System User s Manual 51 2 To show the Raid Set List click the Raid Set List tab Raid Set List...
Страница 54: ...NAS System 54 User s Manual 4 The selected disk drive will become a Hot Spare drive...
Страница 56: ...NAS System 56 User s Manual 4 The selected disk drive will become a free or UN_USED disk drive...
Страница 81: ...NAS System User s Manual 81 5 The new Logical Volume will be shown...
Страница 83: ...NAS System User s Manual 83 4 Verify the new LV size...
Страница 91: ...NAS System User s Manual 91 7 After disabling the schedule the Enable Scheduled button will become available...
Страница 93: ...NAS System User s Manual 93 4 The deleted snapshot will no longer exist in the Snapshot List...
Страница 167: ...NAS System User s Manual 167 9 Copy a file 10 Right click the file and select Delete from the pop up menu...
Страница 168: ...NAS System 168 User s Manual 11 Notice that the file cannot be deleted It will be accessible as read only...
Страница 170: ...NAS System 170 User s Manual 2 Tick WebDAV Support 3 A warning message will be displayed Click OK...
Страница 174: ...NAS System 174 User s Manual 10 In Add Network Location click Next 11 Click Next...
Страница 176: ...NAS System 176 User s Manual 14 Enter a name for the network location Click Next 15 Click Finish...
Страница 212: ...NAS System 212 User s Manual 1 2 3 4 5...
Страница 236: ...NAS System 236 User s Manual 7 Click Save again 8 In the Confirm Dialog Box click Yes The backup plan will be saved...
Страница 248: ...NAS System 248 User s Manual 3 Click Save when done Select Yes to confirm 4 Scheduled backup has been configured...


