ProteOn XPR36 Скачать руководство пользователя страница 254

ProteOn XPR36 System | F Security Edition  Configuration Guide

236

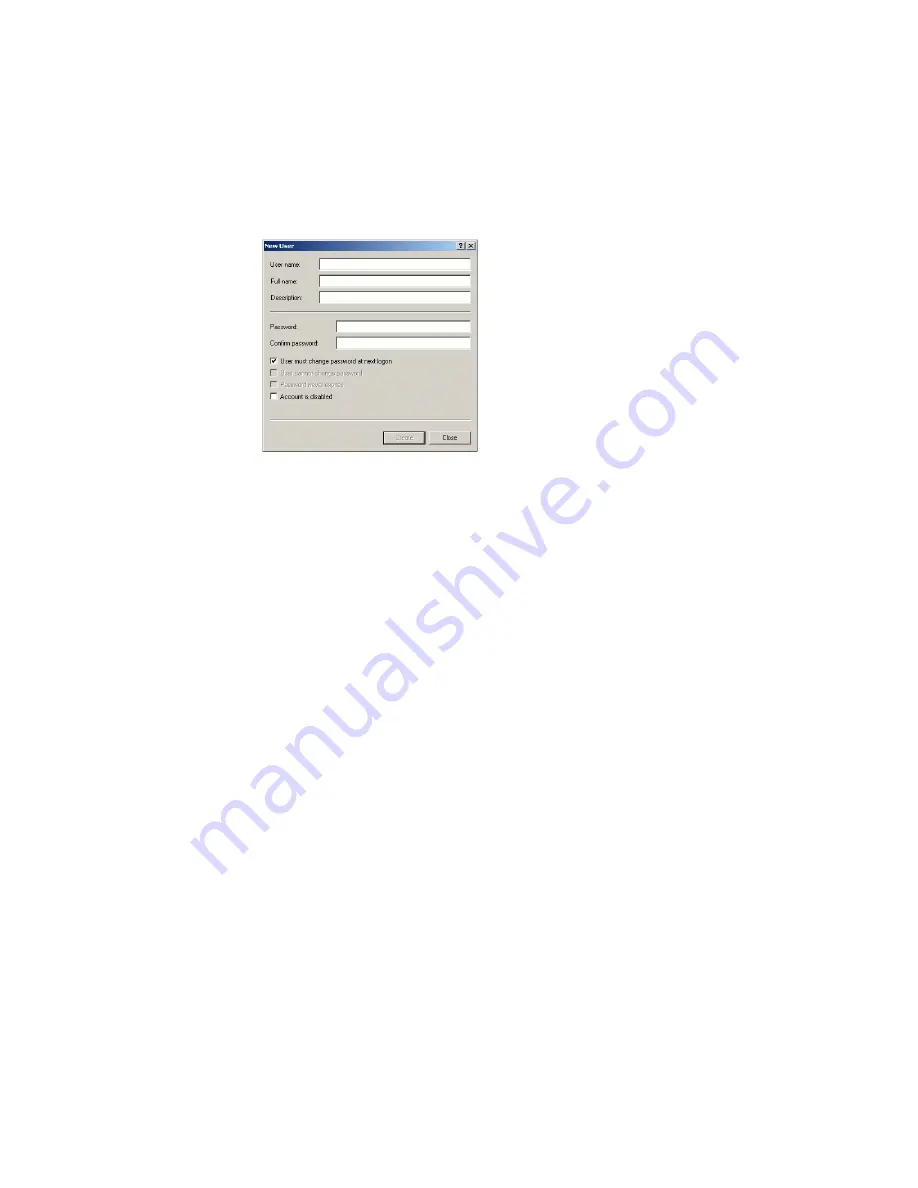
2. Fill out all the fields in the New User dialog box:

User Name

 —The user name must be unique. 

Full Name

 —The Full Name box must be filled out and unique. We 

recommend using the user’s actual full name, as this name will be 
shown in the audit trail and all the log reports. This is a requirement 
of 21 CFR 11.50a.

Description

 —This box must also be filled out. Bio-Rad 

recommends entering the user’s title as the description.

Password 


Enter and confirm a password for the user. Be sure to 

select the User must change password at next logon checkbox. 
This prevents the Windows system administrator from knowing the 
passwords of the users.

If you select the User must change password at next logon checkbox, 
the user must actually log on to Windows and change their password 
before using ProteOn Manager software, Security Edition. Otherwise, 
Security Edition will not recognize the user.

3. Click Create.

To create a new group on a local computer:

1. Open the Groups folder and select New Group on the Action


menu or 

on the right-click context menu.


Содержание XPR36

Страница 1: ...ProteOn XPR36 Protein Interaction Array System Protein Interaction Analysis User Manual...

Страница 2: ......

Страница 3: ...ProteOn XPR36 Protein Interaction Array System Version 3 1 User Manual...

Страница 4: ......

Страница 5: ...from Bio Rad When running ProteOn Manager software in regions of the world where decimals are expressed as commas an error reading floating point values might occur Please use U S English numeric and...

Страница 6: ...lecular interactions Cellular and Molecular Bioengineering Vol 1 pp 216 228 Bronner V et al 2010 Rapid assay development and optimization for small molecule drug discovery Bio Rad Bulletin 5797 Bronne...

Страница 7: ...plications of the ProteOn GLH sensor chip interactions between proteins and small molecules Bio Rad Bulletin 5679 SAFETY Your safety is important to us The ProteOn XPR36 protein interaction array syst...

Страница 8: ...FETY Use caution when handling the needle tips they are sharp Keep fingers clear of the autosampler during operation Shut down the instrument and turn off the power before handling the autosampler arm...

Страница 9: ...when moving the instrument If you must lift the instrument use proper lifting techniques Have two people lift the instrument and use the lifting points indicated below Caution Bio Rad strongly recomme...

Страница 10: ...ProteOn XPR36 System viii...

Страница 11: ...Software 11 Upgrading From Earlier Versions v 2 1 n v 3 0 or v 3 0 1 to v 3 1 14 Optimizing the Database 14 Reinstalling Version 3 1 18 Importing Example Chip Conditioning Protocols 19 Importing File...

Страница 12: ...s 42 Creating Protocol Steps from Sample Panels 44 Sample Panel Browser 45 Changing Sample Positions or Copying Samples 46 Autosampler Layout 47 Creating and Editing Protocol Steps 48 Setting Injectio...

Страница 13: ...onspecific Binding 83 Experiments with Highly Refractive Cosolvents DMSO 84 Saving and Exporting Experiment Data 86 Managing Experiments 87 Chapter 4 Analysis 89 Tools for Viewing Data 89 Sensorgram D...

Страница 14: ...ned Columns 113 Displaying and Hiding Markers 113 Remove Processing 114 Switching to Raw Dataset 114 Processing EV Correction Data 115 Working With EVC Calibration Plots 117 Creating a Dataset 118 Ren...

Страница 15: ...Reports 146 Exporting a Report 147 Chapter 5 Maintenance 149 Maintenance and Cleaning Chips 149 Maintenance Chips MNT 150 Cleaning Chips CLN 151 Instrument Maintenance 151 Safety 151 Scheduled Mainten...

Страница 16: ...78 Enabling and Disabling Secure Mode 179 Users Passwords and User Levels 180 User Level Restrictions 180 User Access by Function 180 User Authentication 181 File Security and Validation 182 Importing...

Страница 17: ...ter and Display 206 HASP Keys 207 B Specifications and Requirements 209 System Specifications 209 Detection System 209 Detection Limits 209 Working Ranges Typical Values 210 Fluidics 210 Physical 210...

Страница 18: ...E Ordering Information 227 How to Order 227 Payment 227 Phone in Hours 227 Information Needed 227 Materials and Supplies 228 F Security Edition Configuration Guide 233 Standard Mode vs Secure Mode 233...

Страница 19: ...Workflow ProteOn Manager software controls the operation data collection data analysis and maintenance of the ProteOn XPR36 instrument The software license permits its installation and use on both th...

Страница 20: ...s to racks or microplates page 44 Sample layout screen displays rack microplate position and required volume for each sample page 61 Sample layout report can be printed and used as a guide to fill rac...

Страница 21: ...e browser allows easy access and reuse of templates protocols or experiments page 32 Analysis Datasets Kinetic equilibrium and concentration data analysis wizards page 126 Report point creation to all...

Страница 22: ...o open the Instrument Log screen Click Log in the navigation panel The instrument log displays the following columns of data Date lists the date and time of logged events HH MM SS format Event display...

Страница 23: ...tore the default date and time settings click Reset STATUS BAR The status bar appears at the bottom of the Instrument Control screen and displays the following information Instrument State displays th...

Страница 24: ...ns the database browser to select an existing protocol experiment or template Continue Experiment opens the Run screen so you can choose an experiment Analyze Data opens the Select Experiment dialog b...

Страница 25: ...er and set the following defaults Instrument ID Sensor Chip Temperature Autosampler Temperature Default Buffer Valve Position and Buffer Names To set ProteOn Manager software options 1 On the Tools me...

Страница 26: ...on screen The Column Chooser retains the column head and all the data in the column when you drag a column into it Best Fit makes visible the contents of a column Best Fit all columns attempts to make...

Страница 27: ...A message displays the instrument s progress as it shuts down INSTRUMENT LOG EXTRACTION UTILITY Use this utility to capture a log file to send to Bio Rad Technical Support for use in troubleshooting...

Страница 28: ...ectory structure may also be located in another hard disk location of your choice To back up the database 1 Exit ProteOn Manager software 2 Copy the ProteOnManagerDatabase folder to a backup location...

Страница 29: ...you will also receive an additional Security Edition HASP key which enables the Security Edition features For details see HASP Keys on page 207 Installing ProteOn Manager 3 1 Software See the Release...

Страница 30: ...reement then click the button to accept it and then click Next The next screen shows default destination folders for the program files and the database The drive with the largest available space is se...

Страница 31: ...f you select the D drive the database is installed in the root directory Note The database can become as large as 40 50 GB Choose a location that has 100 GB free 7 After choosing a destination click N...

Страница 32: ...e 3 1 version The older version will be uninstalled for you during the installation process The data from earlier versions will be copied directly into ProteOn Manager 3 1 without needing to be import...

Страница 33: ...the database are running To run the Database Optimizer after the installation process select it on the Start menu under ProteOn Manager software To upgrade ProteOn Manager Version 2 1 n v 3 0 or v 3 0...

Страница 34: ...of the screen The ProteOn Manager Software Installation wizard appears 4 Click Next The License Agreement screen appears 5 Read the License Agreement click the button to accept it and then click Next...

Страница 35: ...zer dialog box appears 9 If you optimized your database earlier the database is already optimized Close the ProteOn Database Optimizer dialog box and skip steps 10 12 10 Optional Click Estimate to fin...

Страница 36: ...e the database that is already on disk To reinstall v 3 1 and use the same database 1 Insert the version 3 1 CD ROM into a CD drive 2 Double click the file CDBrowserStart exe The Proteon Manager softw...

Страница 37: ...n the installation ends Importing Example Chip Conditioning Protocols Once you have installed ProteOn Manager software you can import example chip conditioning protocols These protocols are located on...

Страница 38: ...Data from previous versions 2 1 3 0 3 0 1 can be imported into the new version ProteOn Manager software versions before 2 1 saved experiments and analysis data to folders instead of to a database No...

Страница 39: ...t ProteOn Manager software Select ProteOn Manager from the Windows Start menu or double click the ProteOn Manager desktop icon ProteOn Manager software opens and displays the Instrument Control screen...

Страница 40: ...nts See Shutdown Procedures on page 166 for information on shutting down the instrument Component Status LEDs All LEDs are amber as the system is powered on While the computer connects the instrument...

Страница 41: ...ager software If the software is started when the instrument is not connected or is powered down the state remains Inactive All instrument operations are disabled in the Inactive state When the instru...

Страница 42: ...ay require an additional step For example you may need to put glycerol in the correct autosampler location When a chip initialization error occurs a dialog box appears that lists possible reasons for...

Страница 43: ...ent has been in Ready state with no activity for 4 hr it enters Standby state During routine use Standby state is preferred to shutting down the instrument To transition the instrument to Standby stat...

Страница 44: ...9 SHUTTING DOWN STATE There are three types of shutdown immediate long term and software only See Shutdown Procedures on page 166 for more information on shutting down the instrument properly The shut...

Страница 45: ...process replaces the previous buffer in the fluidics with the new buffer and eliminates air bubbles in the system Flushing can be performed using either the buffer control buttons on the instrument o...

Страница 46: ...Instrument Control screen in ProteOn Manager software Flushing the System with Instrument Control Buttons The three buffer control buttons are active when the system is in Ready state In this state th...

Страница 47: ...automatically flushes the fluidics system filling everything except the flow cell with the selected buffer The color of the LEDs on the bottom of the buffer compartment indicates the status of the buf...

Страница 48: ...icating that it is active Wait 5 sec before going to the next stage Pumps are stopped Replace or fill the desired source bottle Press Buffer B to go to the next stage The Stop button LED is red indica...

Страница 49: ...previously created protocols templates or experiments Template a saved protocol intended for reuse ProteOn Manager software also includes templates optimized for many different applications Experiment...

Страница 50: ...ation screen opens and the default parameters for the selected template populate the screens in the Protocol tab Copy of appears before the name of the template you selected 4 Edit and rename the temp...

Страница 51: ...he Configuration screen 5 Click Instrument in the navigation panel to access the Instrument Control screen 6 Change the active buffer position initialize the chip and set the sensor chip and autosampl...

Страница 52: ...lyte concentrations must be added before performing an analysis Click Protocol in the navigation panel and then click Steps Edit the protocol in the Protocol Steps screen An empty sample panel is auto...

Страница 53: ...template 1 Select Open in the File menu to open the database browser 2 Select a protocol 3 Click Open and the parameters appear 4 Edit the new protocol as required 5 In the File menu select Save as Te...

Страница 54: ...s in this dialog box and click Create a cycle of the three steps in the order of the tabs is added to the protocol Steps list To repeat an injection or block You can change the number of times to repe...

Страница 55: ...ata are imported Sample Name Name of the individual sample Concentration A floating point number with a unit suffix this column can be blank Sample Type Standard Control Unknown or Blank Molecular Wei...

Страница 56: ...he Protocol Configuration screen In the navigation panel click Protocol and then click Configuration To configure a protocol 1 The Name box displays the current protocol name You can enter a new name...

Страница 57: ...nel to reflect what is currently in the instrument one rack or two microplates You can change the rack or microplates configuration only before an experiment is started Note Once you click Start on th...

Страница 58: ...n injection step type You can also set parameters for individual protocol steps by clicking the Advanced link for a step in the Step Details panel on the Protocol Steps screen You can change parameter...

Страница 59: ...l or vertical Editing Protocol Sample Details Click Samples in the navigation panel to access the Protocol Samples screen where you can enter review and edit sample details You can add sample details...

Страница 60: ...rea you can import add and delete racks and plates You can edit the Rack Plate ID in the sample panel browser A rack contains a collection of 12 sample panels of 6 samples each and each microplate con...

Страница 61: ...ere numbers are expected or vice versa Invalid concentration units Descriptive headers in the first row instead of sample information Sample groups that contain different sample types all six samples...

Страница 62: ...ps from Sample Panels If a plate rack is expanded at least one sample panel is selected within it If a plate rack is not expanded then no sample panels are selected within it To create protocol steps...

Страница 63: ...in each vial well of the panel The required volume is calculated as follows Where TubeDeadVol 25 l DeadVol 35 l InjectQual 1 2 or 3 PlugVol 8 l n WhereUsed or n the number of steps that use the sample...

Страница 64: ...ng or by copying and pasting a panel Either method overwrites the former panel Doing so enables you to duplicate a sample panel without having to recreate it Dragging changes the position of a sample...

Страница 65: ...CTRL key 3 Select Copy on the Edit menu 4 Select the sample panel or panels you want to overwrite 5 Select Paste on the Edit menu Note When copying multiple panels you must select the same number of...

Страница 66: ...ing protocol steps and step groups The Protocol Steps screen consists of the Protocol Editor panel and the Steps Details panel In the Protocol Editor panel you can view and link these steps together t...

Страница 67: ...the step list populates and you can edit the steps as needed To add a step or group to a Protocol Steps list do one of the following Drag the element from the step or group anywhere into the Protocol...

Страница 68: ...as Group shows four step groups that you can drag into the Protocol Steps list Each group consists of two or more protocol steps that are commonly used together Step lists individual steps that you ca...

Страница 69: ...p surface in amine coupling GLC GLM and GLH sensor chips only Regenerate Regeneration of the sensor chip surface Analyte Control of analyte flow across the sensor chip for interaction analysis Blank C...

Страница 70: ...t in the Edit menu 3 Select another step in the Step list and select Paste or Paste Replicate in the Edit menu The pasted step appears below the selected step 4 Drag the step up or down in the list ED...

Страница 71: ...t to be drawn from in the pull down list in the Step Details area on the Protocol Steps screen By default the direction of the injection is Analyte horizontal and Ligand vertical You can change these...

Страница 72: ...e the name in the Step Name box Flow Rate Rate at which fluid flows through the channels This parameter applies to all stages of a step If this value is changed contact time is recalculated using the...

Страница 73: ...for the Analyte Blank Regenerate and CoInject Analyte steps Ligands appear in the lower panel read only if they have been immobilized Setting the Buffer Step Use the Set Buffer step in the Step list t...

Страница 74: ...specified and the instrument goes through the flush operation When the instrument completes the flush operation a 15 sec delay takes place and the new buffer flows through the flow cell At the end of...

Страница 75: ...original protocol 3 You can enter a wait time of up to 24 hr The reference SPR curve is recalculated as soon as the Wait after temperature reached delay has timed out Once the temperature is reached...

Страница 76: ...sons To set a pause step 1 Drag Pause in the Step list into the Protocol Steps list The setting appears in the Protocol Steps list and the Step Details panel displays a dialog box in which you can ent...

Страница 77: ...y a protocol in tabular form Click Protocol Check in the navigation pane The protocol table appears To change the order of the columns Select a column and drag it to a new location in the table To exc...

Страница 78: ...click the column head and select Clear Filter The column displays the full list of values To edit a step in the table Right click the step name and select Edit Step in the pull down menu The Protocol...

Страница 79: ...panels associated with each step The sample layout report lists all samples used in the protocol and the quantity of material required in each vial or microplate well Review this report to ensure tha...

Страница 80: ...sample report In the Protocol panel click Protocol Report or Sample Report To print a protocol or sample report do one of the following Select Print in the File menu and then click the report you wan...

Страница 81: ...ter running ProteOn Manager software Ligand and analyte ProteOn sensor chip ProteOn amine coupling kit required for GLC GLM and GLH sensor chips Immobilization buffer for example ProteOn acetate buffe...

Страница 82: ...dissolve it and rinse it out of its bottle The final concentration will be 40 mM Divide it into aliquots based on your usage typically 0 5 to 1 ml each 3 Add 75 ml cold deionized or distilled water t...

Страница 83: ...trument ProteOn PBS buffer is available prefiltered in 2 L bottles that can be used directly as buffer reservoirs PBS with 0 005 Tween 20 PBST and 3 mm EDTA PBSTE is also available To prepare the buff...

Страница 84: ...sulting from the slow change in refractive index during the transition between buffers The system can be primed only using ProteOn Manager software Prime the system under the following conditions When...

Страница 85: ...es air bubbles in the system You can flush the system manually using the buffer control buttons on the instrument or in ProteOn Manager software See also Flushing and Priming the System on page 27 To...

Страница 86: ...vials for about 15 sec to ensure that all of the solution is at the bottom of the tubes Place the vials on ice if required 5 Print out a sample layout report for the experiment See To generate a prot...

Страница 87: ...sing a microplate cover the samples with microplate sealing film 5 Place the sample holder on the thermal platform inside the autosampler compartment 6 Close the autosampler compartment door Setting t...

Страница 88: ...maximize shelf life The chips should remain in the sealed pouch until use The label on the sensor chip cartridge contains the following information Chip type Catalog number Bar code Expiration date Ea...

Страница 89: ...ted for work with small molecules or other applications that require a very high ligand immobilization level NLC yellow NeutrAvidin layer attached to a GLC chip for binding of biotinylated ligand mole...

Страница 90: ...hip from its box and allow it to come to room temperature for 30 min to 1 hr Opening the Sensor Chip To open the sensor chip 1 Remove the aluminum pouch containing the ProteOn sensor chip from its box...

Страница 91: ...tocols You can load and save the protocols as templates by selecting File Save As Template in ProteOn Manager software The sample protocols can be used to condition sensor chips with Bio Rad s recomme...

Страница 92: ...e l 1 Regeneration H 0 5 SDS 30 2 Regeneration H 50 mM NaOH 30 3 Regeneration H 100 mM HCl 30 4 Regeneration V 0 5 SDS 30 5 Regeneration V 50 mM NaOH 30 6 Regeneration V 100 mM HCl 30 Solution Volume...

Страница 93: ...he NaOH injections Flow Rate 30 l min Default Injection Quality and Needles Washes Samples Layout HTG SENSOR CHIP CONDITIONING Buffer Use your preferred running buffer but when working with buffers co...

Страница 94: ...to change users This button is disabled once a chip is replaced with a different chip until a new air or glycerol initialization is performed Inserting and Ejecting the Sensor Chip To insert the chip...

Страница 95: ...screen set the chip temperature and sample temperature See To edit a protocol or template on page 32 To eject the chip Note You can eject the chip only when the instrument is in Ready state Click Ejec...

Страница 96: ...Chip edit box between 15 and 40 C the difference between room and chip setting temperature must not exceed 15 C The default sensor chip temperature is 25 C 2 Click Set to apply the temperature settin...

Страница 97: ...ect on the chip s optical surfaces will add noise to the data and may result in the MCM needing to be cleaned To run an experiment on a previously used chip 1 Insert the chip into the instrument 2 Ini...

Страница 98: ...an collect on the optical faces of the chip making the chip unusable and potentially contaminating the instrument Using a chip on multiple instruments is not supported Viewing Chip Information To view...

Страница 99: ...oing at the time execution may not be stopped instantly because the instrument s tubes and autosampler needles have fluid in them that must be cleared When an experiment has been aborted the instrumen...

Страница 100: ...ent stops when it reaches the end of the last protocol step The Run screen shows data in progress Following is an example of a protocol in progress with sensorgrams showing 4 Optional Click Stop to su...

Страница 101: ...ent on a used chip 1 Select a new protocol to run using the Selected Protocol Experiment pull down list in the Run tab 2 In the Run tab click Start A message informs you that the previous experiment r...

Страница 102: ...bration curve must be generated by injecting three to six different concentrations of cosolvent in running buffer that are less than equal to and greater than the samples cosolvent concentration An EV...

Страница 103: ...ent The cosolvent should be at a concentration that is known to keep the analyte soluble 4 Prepare running buffer with the same concentration of cosolvent as the stock analyte solution 5 Use the runni...

Страница 104: ...les and running buffer Place them in the rack or microplate to be used 10 Start the experiment by clicking Start on the Run screen See Processing EV Correction Data on page 115 for information on proc...

Страница 105: ...ently removes it from the database Purging experiments can take some time and you cannot exit ProteOn Manager software while experiments are being purged Purged experiments cannot be restored Note You...

Страница 106: ...ProteOn XPR36 Experiments 88 4 Click Yes to confirm purging the experiments The deleted experiments are purged from the database...

Страница 107: ...save results The report point tools enable you to collect report points on processed datasets and to perform calculations on report point data It is possible to perform data processing and analysis of...

Страница 108: ...r click Interaction in the Data tab Maximize or minimize each data window by double clicking its title bar Double click the header bar to maximize the view Double click the header bar again to return...

Страница 109: ...h one line from another Changing line thickness can also improve print quality or emphasize data Changes you make to color and thickness of sensorgram lines are applied globally to all displays of the...

Страница 110: ...of a fit line 1 In the Sensorgram Appearance Settings dialog box select a fit line thickness from 1 to 4 points 2 To change the color of the fit line select Specify fit color and select a color from...

Страница 111: ...ose Set Sensorgram Appearance in the menu that appears The Color Chooser appears 3 Optional To select colors for each step individually clear the Apply for all steps checkbox 4 In the Color Chooser ri...

Страница 112: ...ve the data table You can change the sensorgram view with the Expand Collapse buttons below the sensorgram display To view only the data table Click Expand To view all sensorgram data windows without...

Страница 113: ...howing point minimized data strips out data points to view fewer data points on the computer screen Sensorgrams display more quickly when this option is chosen To show point minimized data On the View...

Страница 114: ...e bottom of the graph You can also change the title using the Title box at the bottom of the graph You can select input data for the isoaffinity graph from multiple datasets and analyses within the cu...

Страница 115: ...essing or spreadsheet application of your choice VISUALLY COMPARING TABULAR DATA IN SCREENING GRAPHS Screening graphs enable you to visually compare values from the Data tab or Analysis tab tables Suc...

Страница 116: ...a data column and select Screening Graph The graph appears in a separate window To view a screening graph from the Analysis tab 1 Open an experiment 2 In the navigation panel click Analysis Dataset an...

Страница 117: ...and then click Apply To copy a screening graph to another application 1 Right click the context menu and then click Copy Graph to copy the graph to the clipboard 2 Paste the graph into the word proces...

Страница 118: ...ure that a dataset is unprocessed is to remove processing select Remove Processing in the Process menu COMPARING DATA IN MULTIPLE SENSORGRAM DATA WINDOWS MANUAL ZOOM Zooming the sensorgram data in eac...

Страница 119: ...n you maximize a data window and then copy it only the displayed contents of the sensorgram window are copied To copy sensorgram data windows 1 Select the data windows you want to copy 2 In a selected...

Страница 120: ...port points in the Data screen However if data on the data table are replaced any report points associated with the data on the data table are also replaced The data are saved only when a dataset is c...

Страница 121: ...ged and Apply is selected When experimental data is saved in the database raw sensorgrams are always saved Raw data cannot be deleted from a saved experiment CHOOSING A PANEL TYPE Click Panel Type to...

Страница 122: ...s sensorgrams associated with their steps Only one window grouping option can be chosen at one time Analysis Grouping checkbox options combine datasets for analysis as follows Do Not Combine displays...

Страница 123: ...Tools for Viewing Data 105 Across Steps groups these data into six data windows each showing a composite of all three protocol steps...

Страница 124: ...and Deactivator panel types and their associated protocol steps are selected Combine and Concatenate Steps displays these immobilization steps from left to right in each window This view is useful fo...

Страница 125: ...s one analyte per row and ligands one ligand per column in an experiment based on the protocol steps selected in the Steps list Each square represents one interaction spot and is color coded to match...

Страница 126: ...ssing history of each dataset is saved with each experiment Any processing step can be undone Automatic processing operations referencing auto alignments and auto artifact removal are performed on all...

Страница 127: ...age 121 SELECTING ALL GRAPHS Choose Select All Graphs on the View menu to select all graphs on the Data screen This option applies zoom selected baseline alignment and selected artifact removal to all...

Страница 128: ...line Alignment on the Process menu to align the y axis and set the baseline for the sample The baseline of each sensorgram is aligned automatically within a specified period of time before the injecti...

Страница 129: ...nment click in an empty area in the data window and drag all sensorgrams PERFORMING REFERENCE SUBTRACTION The two main types of reference subtraction are channel referencing and double referencing Cha...

Страница 130: ...matically uses it as your row double reference It s a good idea for the analyte sample panel to contain only one sample with the blank sample type The row reference data are subtracted from the analyt...

Страница 131: ...s they do in the Data tab except as follows Selecting Copy Graph or Copy Data copies only data collected at the time of copy When fully zoomed out the screen includes all data collected in the current...

Страница 132: ...l state SWITCHING TO RAW DATASET You can navigate between different datasets in the following ways Toggle between datasets in the Analysis Datasets tab after running an analysis wizard click the saved...

Страница 133: ...ing calibration steps Note that each sample name reflects the calibration step number To apply excluded volume correction 1 Select Channel Reference on the Process menu and the type of channel referen...

Страница 134: ...calibration steps list select a minimum of three excluded volume correction EVC calibration steps if they are not already selected and click Apply 6 Click Finish to subtract the corrected reference da...

Страница 135: ...factor of 0 8 on both scales Zoom Out returns the selected charts to the default scale Copy Graph copies the selected charts to the clipboard Copy Data copies to the clipboard the x and y values from...

Страница 136: ...a dataset 1 In the Data tab click Create Dataset 2 Enter a name in the Create New Dataset dialog box 3 Click Create The dataset name appears in the Analysis Dataset tab where you can perform kinetic...

Страница 137: ...oves the affected data permanently The following rules apply to deleting a dataset Owners can delete their own datasets An administrator can change experiment ownership but cannot delete a dataset Del...

Страница 138: ...ouped or local multiple fit operations can be performed simultaneously On the Analysis Datasets tab hovering over a dataset name displays the dataset or analysis set name owner modification date and t...

Страница 139: ...performed reference subtraction and baseline alignment to zero You can generate report points from raw or processed data Creating a report point adds columns to the results table Report point columns...

Страница 140: ...from the beginning of the concatenated set of steps corresponding to the x values on the axis Note Unless they have been saved in a dataset report points collected in concatenated mode are deleted wh...

Страница 141: ...r datasets into a dataset table to normalize the analysis data or to compare results Only report point values not time or range are imported into the table You cannot add report points to a signed ana...

Страница 142: ...olumns you can delete them To delete report point columns 1 In the results table select the report point columns you want to delete 2 Right click RU in the results table and choose Delete Report Point...

Страница 143: ...ression box turns red 4 When you are finished click OK The user defined column appears in the analysis table with the calculations between the selected values expressed DELETING A USER DEFINED COLUMN...

Страница 144: ...e through different experiments The following rules apply to deleting an analysis set Owners can delete their own analysis sets An administrator can change an experiment s ownership but cannot delete...

Страница 145: ...model Other models are used under special circumstances In the pull down list select a kinetics calculations model from the following options and then click Next Langmuir simple 1 1 biomolecular inte...

Страница 146: ...ncentration at different flow rates If the binding curves are dependent on the flow rate then mass transfer is limiting and this model should be applied In contrast if the binding curve is independent...

Страница 147: ...alyte complex and 3 conformational change of the ligand analyte complex It is equal for the ligand analyte complex to form the conformational change or to return to free molecules in solution However...

Страница 148: ...al or Grouped pull down list Select the Fit Type on the Fitted or Constant pull down list The following table shows how setting Scope and Fit Type affects calculations When the type is Global or Group...

Страница 149: ...for theoretical Rmax calculation Step 3 Results Preview When you click Next the wizard calculates the fit Once the fit is calculated the following table appears with the Report tab open Analyzed data...

Страница 150: ...n for Req Calculation and Analysis Parameters Select sensorgram regions to be used to calculate KD If necessary use the Zoom In tool to examine each sensorgram in more detail To select a sensorgram re...

Страница 151: ...ect the Scope on the Global Local or Grouped pull down list Select the Fit Type on the Fitted or Constant pull down list When finished click Next to advance to the next step in the wizard Step 2 Resul...

Страница 152: ...alyzed to determine its slope at the start of the injection Slopes are plotted as a function of the known concentrations to generate a standard curve from which concentrations of the unknown samples c...

Страница 153: ...ncentration will be calculated from the standard curve To perform a concentration analysis of selected sensorgrams use the Concentration Analysis wizard To begin the wizard select a processed dataset...

Страница 154: ...cking a sensorgram and moving the vertical bars in the graph The parameters are calculated for groups Parameters include Rlow and Rhi the lowest and highest response respectively A1 mid range concentr...

Страница 155: ...he standards and controls When you are satisfied with the selections click Next to continue the Concentration Analysis wizard Step 2 Results Preview Preview the results of the analysis Expanding an it...

Страница 156: ...s results Right click in the column head row and select Ungroup data in the context menu that appears The data is ungrouped and appears in a flat view that you can export Filtering Analysis Results Yo...

Страница 157: ...Filter Editor opens The column heading is already filled in 2 Right click Equals in the query shown to open a list of operators 3 Select an operator and then click the enter a value box and enter a v...

Страница 158: ...views sorting applies only within the groups To sort analysis data in ascending or descending order Right click in a column heading and select Sort Ascending or Sort Descending The data in the column...

Страница 159: ...mage into a presentation program Types of data you can export Raw data saved as rdat Processed data saved as pdat Processing operations data saved as pexpr Analysis data saved as adat Results file con...

Страница 160: ...data folder contains a processed dataset as a pdat file which can be loaded into Excel This file contains x y sensorgrams with no fitted data This file can also be loaded into a third party tool for a...

Страница 161: ...lect Copy Data to copy sensorgram data and select Copy Graph to copy the graph Copying data from the graph copies only the data points shown in the graph not points that have been sampled out by choos...

Страница 162: ...ment file includes all data and all protocol settings and injection steps connected with the experiment To export an experiment to a file 1 Choose File Export Experiment protocol file The Export dialo...

Страница 163: ...t number and the logged in person s name The basic report layout features a graphs section The orientation of the graphs differs for ligands and analytes Ligands appear oriented vertically Analytes ap...

Страница 164: ...to include in it in the Report Options dialog box Appropriate report options appear for each type of analysis kinetic equilibrium or concentration To customize and print a report 1 Select an analysis...

Страница 165: ...eview select View Report Options and add or remove sections of the report The system displays a preview of your selections 5 When you are finished modifying the report click OK 6 Select File Print to...

Страница 166: ...ProteOn XPR36 System Analysis 148...

Страница 167: ...ng place You can also export or import experiments at this time Chip initialization buffer switches and running an experiment are disabled during maintenance operations Similarly other instrument rela...

Страница 168: ...intenance chip into the ProteOn XPR36 instrument it should be removed from its cartridge and inspected to ensure it is clean Never insert a dirty maintenance chip into the instrument When an MNT chip...

Страница 169: ...ds for maintaining the instrument The maintenance controls are disabled whenever an initialized GLC GLH or GLM sensor chip is in use Maintenance wizards cannot be run as part of an experiment Safety T...

Страница 170: ...en Prime Weekly Cleaning Postexperiment Cleaning Clean MCM Syringe Maintenance Replacement Optional OQ refer to OQ manual Click Maintenance in the Instrument tab to open the Maintenance screen The Mai...

Страница 171: ...United States at most scientific or medical supply houses DDW means your choice of deionized or distilled water Maintenance Cleaning Protocols Purpose Chip Used Solutions Used Prime Pumps selected bu...

Страница 172: ...ly wizard removes stubborn residues from the entire fluidics system The Weekly wizard takes approximately 2 5 hr to run Use an MNT chip To run the weekly wizard 1 Click Weekly on the Instrument Mainte...

Страница 173: ...s If using sample racks 2 Contrad 70 520 L at position L1 L6 20 mM HCl 520 L at position K1 K6 DDW 520 L at position J1 J6 If using microplates 2 Contrad 70 520 L at position H7 H12 20 mM HCl 520 L at...

Страница 174: ...d Inspect the syringes once a month and replace them if necessary A syringe replacement software wizard guides you through the cleaning and or replacement process It lowers the syringe plungers at the...

Страница 175: ...NG THE SYRINGE WIZARD The Syringe Maintenance wizard is accessed on the Maintenance screen 1 Click Syringe to start the wizard The first screen appears 2 Click Next to continue The instrument lowers t...

Страница 176: ...pump compartment cover and inspect the syringes Note Your system may have hex nuts instead of thumbscrews If so your accessory kit contains the proper hex wrench to remove the hex nuts Buffer syringes...

Страница 177: ...Instructions 159 3 Click Next to continue The next screen displays instructions on how to remove the syringes Refer to this illustration for part names Knurled thumbscrew Metal Luer Lok fitting Glass...

Страница 178: ...o look for and displays instructions for replacing worn syringes You can also choose to clean the syringes that do not require replacement Note Bio Rad recommends that you do not remove the plunger fr...

Страница 179: ...RINGES Refer to Appendix E Ordering Information on page 227 for information on ordering syringes To reinstall an existing or replacement syringe 1 Place the opening at the end of the plunger onto the...

Страница 180: ...1 Click Next to continue the wizard Choose which buffer bottle to use for priming 2 Verify that the syringes have been cleaned and or installed that the buffer bottles contain sufficient buffer and th...

Страница 181: ...s Make sure all of the air in the syringes is replaced by fluid 4 If you see leakage from any syringe correct it by tightening the metal Luer Lok Note If troubleshooting runs past the six minute primi...

Страница 182: ...t Slide the right edge of the cover into the rear of the instrument first then slide the left edge of the cover into the side of the instrument so that the slots align 8 Tighten the thumbscrews to sec...

Страница 183: ...the pharmaceutical industry Bio Rad requires weekly post experiment and MCM cleaning maintenance procedures and recommends running the OQ protocol twice a year as shown in the table The OQ protocol ca...

Страница 184: ...activity long term shutdown For short periods of inactivity such as a few days the instrument should be primed with DDW and placed in standby mode rather than shutting it down This ensures that the in...

Страница 185: ...rompts in the Shutdown wizard 4 At the end of the wizard manually power down the instrument Long Term Shutdown Use long term shutdown to shut down the instrument for longer than 3 days or to prepare t...

Страница 186: ...On Manager Software and the Instrument The last option enables you to choose whether to close the software Select the box to close ProteOn Manager software after any of the preceding shutdown procedur...

Страница 187: ...res 169 Emptying the Collection Tank After shutting down the instrument it is a good idea to check the collection tank When the collection tank is full dispose of the contents according to the rules o...

Страница 188: ...ProteOn XPR36 Maintenance 170...

Страница 189: ...ilibration Dirty buffer lines Run maintenance procedure Buffer buttons appear grayed out Sensor chip is not initialized Retry chip initialization Buffer or sample syringes leaking Syringes are worn Ru...

Страница 190: ...g to nanoscopic areas of exposed gold on the surface These are called Non electrostatic NSB Compounds with a propensity for NSB include Positively charged proteins pl pH of the running buffer Compound...

Страница 191: ...e channel like BSA Increase salt concentration in the sample and running buffers to reduce electrostatic interactions Elevate the pH of the analyte and running buffers to reduce positive charge contri...

Страница 192: ...ations in the marketplace The files that must be able to run in order for ProteOn to Manager software to communicate with its computer controller are ProteOn exe TCPCommunicationService exe and MySQLd...

Страница 193: ...n report points are measured Analyze up to 100 steps and or analytes together when disassociation steps are longer than 1 hr Analyzed datasets can be exported under the File menu Datasets are chosen f...

Страница 194: ...ProteOn XPR36 System ProteOn System Troubleshooting 176...

Страница 195: ...ords Electronic Signatures of Title 21 of CFR This rule states that the conditions under which the FDA considers electronic signatures and electronic records to be trustworthy reliable and equivalent...

Страница 196: ...software Security Edition has the same system requirements as the Standard Edition except that the security functions are not supported under the Windows XP Home Edition operating system The software...

Страница 197: ...ox Contact your Windows system administrator if you are unsure of your domain Note that only users set up on the domain you specify are able to use the software 4 When you click OK a ProteOn Administr...

Страница 198: ...of the software except that they cannot enable or disable Secure mode or sign electronic records User Users can delete their own experiments and have full access to all features and functions of the s...

Страница 199: ...nticate different operations For example one user may be logged in to the software but a different user or a reviewer may enter his or her user name and password to authenticate an experiment Note tha...

Страница 200: ...ord of all Installation Qualification Operation Qualification IQ OQ software and instrument events You can view copy export and print the data from these logs They are available on the Instrument scre...

Страница 201: ...you want the experiment to continue to be signed you must re sign it To sign an experiment 1 Go to the Security menu and select Sign Experiment The Electronic Signature dialog box opens 2 Do one of t...

Страница 202: ...ed datasets and analysis sets have the notation signed appended to them You can revise only the lowest level signed element For example if a dataset and an analysis set under it are both signed you ca...

Страница 203: ...cumented in the Change Justification dialog box The information in this dialog box is used to generate the audit trail The dialog box opens automatically whenever you make a change and either save the...

Страница 204: ...t s audit log The audit trail notes the date and time of each action the user the access level a description of the action automatically generated by the software the reason for the action entered by...

Страница 205: ...tem administrator may set up protected directories on your computer or computer network for the secure storage of exported ProteOn Manager software transfer files or other data These protected directo...

Страница 206: ...for specific data moves to another user it is necessary to change the permissions connected with the secure data Choose File Take Ownership to transfer ownership An Administrator must approve the tran...

Страница 207: ...at sustain stable temperatures and facilitate the implementation of an experiment The instrument contains four compartments that house the autosampler buffer bottles chip and syringe pumps Autosampler...

Страница 208: ...36 System A ProteOn XPR36 Instrument and Peripherals 190 Instrument Front View All components of the ProteOn XPR36 instrument that must be accessed during an experiment are located at the front of the...

Страница 209: ...Instrument Side View 191 Instrument Side View The right side of the instrument contains the two sets of syringe pumps See Syringe Pumps on page 204 for more information...

Страница 210: ...LEDs indicate from top to bottom instrument status chip temperature autosampler temperature autosampler status and experiment status Different colors flashing or steady indicate different conditions f...

Страница 211: ...er to all channels at the default flow rate Shown above is the Chip Eject button with LED indicator left and chip loader right A cartridge containing a sensor chip is shown in the chip loader The sens...

Страница 212: ...m the buffer A bottle to the buffer B bottle This button is not active when an experiment is in progress Note You can also control the buffer bottle valve selection through ProteOn Manager software Se...

Страница 213: ...bove the power cord connection for the custom communication cable to the controller Ventilation An air intake unit is located on the bottom of the instrument Avoid locating the instrument near vibrati...

Страница 214: ...n XPR36 System A ProteOn XPR36 Instrument and Peripherals 196 Warning Do not put papers or other materials underneath the instrument because they may be sucked up against the intake unit and block air...

Страница 215: ...following components Two 2 L buffer bottles with tubing fitted screw caps The bottles are housed in the buffer compartment and can hold either identical or different fluids Two selection valves that...

Страница 216: ...the sensor chip The primary microfluidics components are the autosampler to store and load samples and the syringe pumps and valves for injecting samples and running buffer over the chip through the...

Страница 217: ...nt screen the light is on only when the autosampler door is closed When On is chosen the light remains on whether the door is open or closed Thermal Platform The thermal platform accommodates two type...

Страница 218: ...ing of sample vials in the ProteOn sample rack Note Rack plates must match the needle holder type If there is a mismatch the instrument will go into Fault state Changing the Needle Holder and Needles...

Страница 219: ...needle safety guard 2 With the 3 0 mm hex wrench remove the two screws on the crosspiece of the needle holder and then remove the middle screw 3 With the fitting wrench unscrew the fittings on the ne...

Страница 220: ...he wash station between successive sample injections Buffer pumped through and around the needles washes residual sample out of the wells and off the external needle surfaces The wash station is desig...

Страница 221: ...mple Rack removable rack that fits on the thermal platform and holds ProteOn sample vials The rack is labeled A L left to right along the front It is labeled 1 6 front to back along the left side Prot...

Страница 222: ...syringe pump left Each pump contains a set of six 500 l glass syringes The buffer syringe pump mediates the flow of buffer from the buffer bottles into the multichannel module The sample syringe pump...

Страница 223: ...illuminates the sensor chip at successive angles of incidence It generates an image of the light reflected at each incident angle and segments the images into the regions of interest corresponding to...

Страница 224: ...scanning without moving parts For more information about Surface Plasmon Resonance see Appendix C Reservoir Overflow Sensor and Drain Pump A small reservoir is located beneath the wash station to col...

Страница 225: ...HASP key s determines the software mode If no HASP key is detected at program startup the software starts up in Demo mode and is subject to Demo mode restrictions If a Standard Edition license HASP ke...

Страница 226: ...ProteOn XPR36 System A ProteOn XPR36 Instrument and Peripherals 208...

Страница 227: ...20 000 40 000 RU Baseline drift 1 RU min 15 40 C Experiment temperature range 15 40 C Temperature accuracy 0 2 C Temperature difference No more than 15 C from ambient temperature CCD 12 bit digital c...

Страница 228: ...le injection volume 25 449 l Required sample volume m25 l Minimum injected volume 35 l System dead volume 25 l Vial dead volume n8 l x Number of bubbles used as separators 93 l Minimum amount of sampl...

Страница 229: ...nductors a molded plug rated 250 V 15 A a minimum length of 1 5 m 5 ft and a maximum length of 4 5 m 15 ft For a European power connection use a power cord that is internationally harmonized and marke...

Страница 230: ...sing any of the protocols described in this manual Please comply with the following instructions and avoid the use of Highly acidic pH 1 or highly basic pH 13 solutions Organic solvents except for wat...

Страница 231: ...ex of the liquid near the surface within less than 1 m This bulk effect in turn is proportional to the concentration of molecules in the liquid and the refractive index of the liquid Any bound molecul...

Страница 232: ...p surface and the other interactant the analyte is passed in solution over that surface The analysis consists of a series of steps and the requirement for each of these steps depends on sensor chip ch...

Страница 233: ...c functional groups on the sensor chip surface This method requires no ligand modification but usually results in a random orientation of the ligand which may limit the accessibility of the binding si...

Страница 234: ...m esters that interact with amine groups on the ligand EDAC activates carboxylic groups easily and because it generates a good leaving group it also detaches rapidly Sulfo NHS assists coupling in the...

Страница 235: ...coupling the ligand is immobilized in a buffer that ensures a net positive charge on the ligand so that it is attracted to the negatively charged chip surface Thus the buffer must be of low ionic str...

Страница 236: ...ble For repeatable and efficient immobilization reach ligand adsorption saturation plateau level during the last part of the ligand injection Flow rate Use slow flow rates 25 30 l min to allow reagent...

Страница 237: ...ptimum pH for immobilization 1 Prepare 100 l of ligand at 20 50 g ml in pH 5 5 5 0 4 5 and 4 0 buffers A pH of 6 8 is optimal for sulfo NHS 2 Inject the samples typically at 30 l min and observe the b...

Страница 238: ...step is performed to wash nonspecifically bound molecules from the chip surface Stabilization of the sensor chip surface can be accomplished by performing one or more blank injections or by using rea...

Страница 239: ...ation levels are determined by the signal and measured in response units RU observed as the difference between the level before ligand injection and the level after deactivation is complete The illust...

Страница 240: ...are appropriate buffer conditions analyte concentration flow rate contact time interaction time and dissociation time buffer running time Running buffer Analyte is prepared in a buffer of appropriate...

Страница 241: ...results are obtained by using a 100 fold range of analyte concentrations 0 1 10x KD For concentration determinations a standard curve of known analyte concentrations must also be analyzed The best res...

Страница 242: ...ation to occur If this is insufficient or removal takes too long to be practical the remaining analyte is removed using a regeneration step in which acidic basic ionic or detergent containing buffer i...

Страница 243: ...different levels on a sensor chip The immobilization level depends on the degree of surface activation This process is followed by injection of an analyte IL 2 concentration series in six orthogonal c...

Страница 244: ...c anhydrase II CBS interaction not only demonstrates the ability of the ProteOn XPR36 system to detect low molecular weight analytes but it also highlights the methodology for optimizing system perfor...

Страница 245: ...Drive Hercules CA 94547 USA Payment Bio Rad accepts Visa MasterCard American Express procurement cards or purchase orders with a valid Bio Rad account Phone in Hours Representatives are available to t...

Страница 246: ...r and display CPU and monitor 176 0310 ProteOn computer CPU 176 0320 ProteOn display monitor 176 0315 ProteOn communication cable 10009748 ONEAC power conditioner for ProteOn XPR36 System ProteOn Mana...

Страница 247: ...ine coupling kit includes EDAC sulfo NHS ethanolamine HCI instructions 176 2450 ProteOn Ethanolamine HCI pH 8 5 1M 40 ml 176 2510 ProteOn HTG reagent kit includes sufficient reagents for 80 activation...

Страница 248: ...ottle 2 L capacity 176 4114 ProteOn XPR36 System buffer inlet filters 2 ProteOn Autosampler Accessories 176 6000 ProteOn sample rack holds 72 sample vials 176 6001 ProteOn microplate needle holder 176...

Страница 249: ...1 each ProteOn Syringe 176 6050 6 each ProteOn Syringes ProteOn Installation Qualification Operational Qualification IQ OQ 176 4200 ProteOn XPR36 System Installation Qualification Operational Qualific...

Страница 250: ...ProteOn XPR36 System E Ordering Information 232...

Страница 251: ...es and policies must be implemented by the software user and are the user s responsibility The policies that your facility uses to ensure compliance with 21 CFR Part 11 may also determine your configu...

Страница 252: ...create new Windows user accounts or add existing user accounts to the user groups specified in the previous section Note the following Name Permissions ProteOnAdministrator This user can enable or dis...

Страница 253: ...p and the Service group An error is displayed if a user is assigned to more than one group Configuring Users and Groups on the Local Computer To set up users and groups on a local computer 1 In Window...

Страница 254: ...he user s title as the description Password Enter and confirm a password for the user Be sure to select the User must change password at next logon checkbox This prevents the Windows system administra...

Страница 255: ...on box The group does not require any special operating system level privileges To add a user to a group on a local computer 1 Do one of the following In the New Group dialog box click Add Alternative...

Страница 256: ...l computer 4 Click a user name in the list to select it or hold down CTRL and click multiple users to select them 5 Click OK and click OK again to close the Select Users dialog box 6 Do one of the fol...

Страница 257: ...t is impossible to describe every network configuration it is necessary for the network administrator to know how users and groups are set up using their particular server software The following examp...

Страница 258: ...R 11 50a Description This box must also be filled out Bio Rad recommends entering the user s title as the description Password Enter and confirm a password for the user Be sure to select the User must...

Страница 259: ...ified You can also enter a description in the Description box The group does not require any special operating system level privileges To add a user to a group on a Windows server 1 Do one of the foll...

Страница 260: ...d click OK again to close the Select Users dialog box 6 Click Create to close the New Group dialog box and create the group or click OK to close the existing group s Properties dialog box and accept t...

Страница 261: ...Policy Setting Examples Enforce password history 12 passwords remembered Minimum password age 5 days Maximum password age 30 days Minimum password length 8 characters Password must meet complexity re...

Страница 262: ...nd reconfigure the Event Properties log 1 Go to Administrative Tools and click Event Viewer 2 Right click on each log and select Properties 3 Select Do Not Overwrite Events and substantially increase...

Страница 263: ...Windows L As a backup measure it is also recommended to configure the screen saver to require a password Note that this setting applies only to the current user and should be set for every user who l...

Страница 264: ...ProteOn XPR36 System F Security Edition Configuration Guide 246...

Страница 265: ...oride EDAC and N hydroxysulfosuccinimide Sulfo NHS Affinity Measurement of the strength of a binding interaction the attractive force between substances particles or interactants for example biomolecu...

Страница 266: ...iomolecule for one binding partner relative to other potential binding partners Biosensor Detection system that is sensitive to a physical or chemical stimulus reflecting measuring a biomolecular proc...

Страница 267: ...channels Critical Angle Angle of incident light propagating from a more optically dense medium to an optically less dense medium experiences an angle of refraction of 90 At the critical angle the lig...

Страница 268: ...ation constant characteristic of a reversible chemical reaction measured in units of molarity or M It relates the concentrations of all reactants and products at equilibrium It is calculated from the...

Страница 269: ...module is pressed onto the chip surface Flow Rate Rate of fluid flowing through channels in units of volume per unit time Flush Pumping the selected buffer at the maximum flow rate through the instru...

Страница 270: ...n Array Arrangement in 6 x 6 format of 36 interaction spots formed when six analyte samples flow orthogonally over six channels of immobilized ligand on the surface of the sensor chip in the ProteOn X...

Страница 271: ...eraction is said to be mass transport limited if the analyte binds to the ligand on the chip surface faster than it can diffuse from the bulk solution to the chip surface Matrix Effect Change in the m...

Страница 272: ...ion through the microfluidics system and across a chip Prime performs a fluidics system flush see Flush at the maximum flow rate and then pumps buffer through the flow cell at a flow rate compatible w...

Страница 273: ...laces Rmax kinetic constants ka kd and analyte concentration Residual Difference between the processed interaction data sensorgrams and the calculated regression curve of the data Response Any change...

Страница 274: ...tandby State ProteOn XPR36 instrument mode entered after it has been in the Ready state for four hours with no activity Standby may be requested from the Instrument Control screen also In this mode bu...

Страница 275: ...r optical density is totally internally reflected for all angles greater than the critical angle Verification Calibration of the SPR response using a set of solutions of known refractive indices Wash...

Страница 276: ...ProteOn XPR36 System Glossary 258...

Страница 277: ...Analysis parameters concentration calculation 130 kinetic calculation 130 Analysis results filter query form 139 sorting 140 ungrouping 138 Analysis wizard concentration 134 equilibrium 132 kinetic 12...

Страница 278: ...7 Cleaning chip 149 multichannel module 155 pump 161 syringe 161 CoInjection step 51 Collection tank 169 Color changing sensorgram lines 91 sensorgram changing 91 Combine data across steps 106 Communi...

Страница 279: ...te constant 133 Dissolving and aliquoting EDAC and Sulfo NHS 64 DMSO data processing 115 Double referencing 112 E EDAC and sulfo NHS aliquoting and dissolving 64 Editing a protocol 32 Editing protocol...

Страница 280: ...ols 107 Grouping by analyte 104 by ligand 104 by spots 104 by steps 104 data for analysis 103 Guidelines of experiment 218 H Hand tools 200 HASP key 11 171 178 207 and software mode 207 Heterogeneous...

Страница 281: ...ate 26 Standby state 25 Stop to Ready 25 Instrument tab 1 Interaction analysis 214 analyte process 222 analyte steps 214 changing display state 107 display chooser 107 kits 225 viewer 55 Interrupting...

Страница 282: ...shot kinetics 213 kit 225 Opening a sensor chip 72 Ordering information 227 Orientation menu 41 P Panel type 45 103 Parameters analysis 120 130 in equilibrium wizard 132 protocol values 54 scopes 120...

Страница 283: ...146 protocol 61 sample layout 61 Req calculation 132 Required materials 63 Residual tab 131 Restoring processed dataset 114 raw data 114 Restoring an experiment 87 Restoring database 10 Resuming abor...

Страница 284: ...copying data 109 excluding from processing 99 injection alignment 110 report points 121 selecting a range 108 selecting all 109 showing or hiding 89 Serial cable 195 numbers 194 Setting autosampler te...

Страница 285: ...04 System flushing 27 priming 27 specifications 209 T Tabs 4 taking ownership 87 Taking ownership of experiment 87 Temperature autosampler 69 sensor chip 78 step 56 Template defined 31 Templates creat...

Страница 286: ...nings v vi Weekly maintenance 154 Window grouping 104 Windows Event Logs 244 Wizards concentration analysis 134 equilibrium analysis 132 kinetic analysis 127 Workflow experiment 1 Working ranges 210 W...

Страница 287: ......

Страница 288: ...9 31 884 0 Greece 30 210 777 4396 Hong Kong 852 2789 3300 Hungary 36 1 459 6100 India 91124 4029300 Israel 03 963 6050 Italy 39 02 216091 Japan 03 6361 7000 Korea 82 2 3473 4460 Malaysia 60 3 2117 526...

Отзывы: