background image


USING THE OPTIONAL SETUP MODULE 

INTRODUCTION 

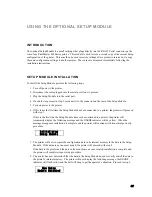
The optional Setup Module is a small cartridge that plugs directly into the RS-232 Serial connector on the 
rear of any PrintMaster 860 Series printer.  This module is used to store a second copy of the current Setup 
configuration of the printer.  This may then be used to restore settings after a printer is serviced or to copy 
the same configuration settings to another printer.  These uses are discussed immediately following the 
installation instructions. 


SETUP MODULE INSTALLATION 

To install the Setup Module, perform the following steps. 

  1.  Turn off power to the printer. 

  2.  Disconnect the cable plugged into the serial port if one is present. 

  3.  Plug the Setup Module into the serial port. 

  4.  If a cable was present in step 2, reconnect it to the connector on the rear of the Setup Module. 

  5.  Turn on power to the printer. 

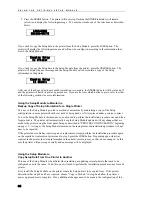
  6.  If this is not the first time the Setup Module has been connected to a printer, the printer will proceed 

with step 7. 


  If this is the first time the Setup Module has ever been attached to a printer, the printer will 

temporarily display the following message and the 

ONLINE

 indicator will be yellow.  When the 

message disappears, installation is complete and the printer will continue with its normal power up 
procedure.   

Initializing 
Setup Module 

  7.  The printer will now compare the configuration data in its internal memory to the data in the Setup 

Module.  If the data are not an exact match, the printer will proceed with step 8. 


  If the data in the printer and the data in the module are an exact match, installation is complete and 

the printer will complete its power up procedure. 

  8.  The printer has now determined that the data in the Setup Module does not exactly match the data in 

the printer’s internal memory.  The printer will now display the following message, the 

ONLINE


indicator will flash yellow and the bell will beep to get the operator’s attention.  Proceed to step 9. 

New Setup 

Module Detected 

47 

Содержание PrintMaster 860

Страница 1: ...PrintMaster 860 Series Operator s Manual Printek Inc 2002 1517 Townline Road Benton Harbor MI 49022 800 368 4636 www printek com Part Number 6809 Rev B...

Страница 2: ...dio noise emissions as set out by the ICES 003 standard of the Canadian Department of Communications Cet appareil num rique n met pas de bruits radio lectroiques depassant les limites de Classe A pres...

Страница 3: ...treiben Sie den Drucker nicht in einem kleinen geschlossenen Raum es sei denn dieser wird Betreiben Sie den Drucker nicht in einem kleinen geschlossenen Raum es sei denn dieser wird ordnungsgem bel ft...

Страница 4: ......

Страница 5: ...s 14 Selecting a Form Already Loaded in the Tractors 14 Loading a New or Different Form In the Tractors 14 Ejecting and Tearing Off a Form 15 Aligning Print 16 Common Error Conditions 17 PRINTER CONFI...

Страница 6: ...ULE 47 Introduction 47 Setup Module Installation 47 PRINTER RESET CONDITIONS 51 CONTROL CODE AND ESCAPE SEQUENCE SUMMARIES 53 Genicom 3840 and 3410 Emulation 53 ANSI x3 64 Emulation 54 Epson FX Emulat...

Страница 7: ...g or loading new forms ejecting forms changing the ribbon cartridge aligning print with preprinted forms and causes for common error conditions PRINTER CONFIGURATION provides detailed information on h...

Страница 8: ......

Страница 9: ...IFICATIONS on page 63 Once a site has been selected the printer should be placed on a countertop desk or Printek Printstand The printstand should be located in an area large enough to provide easy acc...

Страница 10: ...that the interface settings match those required by your computer proceed to the next section Installing a New Ribbon Cartridge on page 6 RS 232C Serial Interface This interface uses a 25 pin D connec...

Страница 11: ...ly Printek brand ribbons will automatically extend the printhead warranty to two years instead of one year The reason this is possible is that Printek brand ribbons are manufactured to much higher qua...

Страница 12: ...hands and pulling straight up and out of it s detented seat Lift the ribbon cover Unload form Push noseshield to forward detent Take up slack in the ribbon by turning the blue knob counter clockwise H...

Страница 13: ...ts please refer to the printer Configuration chapter on page 19 and review the Introduction To Setup and Forms Menu sections Please refer to the appropriate section below for loading paper in the Prin...

Страница 14: ...o tight that the holes in the paper are distorted Lock the tractor in place by returning the lever to the forward position Informing the Printer That the New Form is Loaded 1 Press the LOAD FEED butto...

Страница 15: ...to the right so that there is no buckle in the paper between the two tractors but not so tight that the holes in the paper are distorted Lock the tractor in place by returning the lever to the up posi...

Страница 16: ...the UP DOWN ARROW buttons until Barber Pole is displayed on the bottom line 5 Close the front lid and press the ONLINE button 6 The printer will now exit Setup and begin printing a rotating character...

Страница 17: ...nditions describes errors that may occur during normal printing operations Control Panel Features The following picture shows the printer s control panel The control panel consists of a two line LCD d...

Страница 18: ...button after the desired changes have been made For more information see the chapter on PRINTER CONFIGURATION Audible Alarm This device produces various tones to alert the operator when different err...

Страница 19: ...configured with the Setup menus see the chapter on PRINTER CONFIGURATION for more information When this button is pressed one of two functions will be performed UNLOAD If a form is currently in posit...

Страница 20: ...Selecting a Form Already Loaded in the Tractors To select a form that is already physically in the tractors take the printer off line and press the UNLOAD CHANGE button until that form is displayed a...

Страница 21: ...ction on positioning and proceed with Tearing off a Form Positioning the Form for Tear Off 1 If your print job has completed and the form is not positioned as shown above take the printer off line by...

Страница 22: ...Invoices the display would now show the following Aligning Print On INVOICES After a short time the display would change to ALIGN ITEM MENU On INVOICES Press ALIGN ITEM Be sure to remember that you a...

Страница 23: ...ut 0 08 inches The display should look as follows Down Up 0 08 Now when the form is printed again the text will be printed in the box as shown here 12345 Common Error Conditions Whenever the printer d...

Страница 24: ...ar beyond the tear bar This error serves as a warning that you may be putting forms that have already been printed on back into the printer Tear off any printed forms past the tear bar and press UNLOA...

Страница 25: ...same physical button serves as a Down Arrow button allowing you to modify the settings of various printer parameters The following sections give detailed descriptions of the buttons and the different...

Страница 26: ...ect which form Form 0 through Form 9 is to be set up Note that not all menus have submenus If no submenu is available the bottom line will be blank and the SUBMENU button will not be used Using the AL...

Страница 27: ...he printer s display Forms Menu Items Form Name Form Name FORM 0 Possible Values Up to 16 characters of A through Z Space 0 through 9 When shipped from the factory the Form Names will be set to FORM 0...

Страница 28: ...changing where printing begins on a form should be accomplished with ALIGN ITEM rather than with a top margin Adding a top margin may cause some programs to print the first form correctly and then pri...

Страница 29: ...ine Any text which would print before the right margin but beyond the usable right edge of the platen will be wrapped around also Text characters that would have printed to the right of the margin or...

Страница 30: ...character substitutions are shown in the following table Char Value 35 36 64 91 92 93 94 96 123 124 125 126 USA France Germany England Denmark Sweden Italy Spain PTS Japan Zero Style Zero Normal Possi...

Страница 31: ...e SUBMENU button until that interface is displayed on the bottom line Note that when the Lan Setup option under the Parallel LAN item list is set to On the serial Interface is not available and will n...

Страница 32: ...cts whether certain control character symbols will be printed or be treated as control characters The effect of this is dependent upon the Emulation selected Minimum Buffer Minimum Buffer No Possible...

Страница 33: ...nal Polarity Busy Polarity Low Possible Values Lo Hi This item selects the polarity of the busy signal pin 11 of the RS 232C interface Busy is set whenever the printer is offline the serial input buff...

Страница 34: ...ge this parameter to ON This may apply especially to older Host systems using Full duplex communications Parallel LAN Interface Items Since the optional LAN interface goes into the Parallel port these...

Страница 35: ...k Subnet Mask 255 255 255 0 Possible Values 000 000 000 000 255 255 255 255 To set the Subnet Mask use the SUBMENU key to select which digit group you wish to change and then use the UP DOWN ARROW key...

Страница 36: ...ze Setting this to Yes may decrease performance but is useful when using the printer with operating systems that try to keep track of which page is currently being printed by the printer OPTIONS MENU...

Страница 37: ...Out Fault Finish Page Possible Values Finish Page Reprint Page Break Page This item selects what action is to be taken when a paper out condition occurs The action taken for each of the possible valu...

Страница 38: ...er for example Values are in decimal with printable characters displayed to the left of the decimal value To use this feature 1 Press the UP DOWN ARROW keys to select the desired character decimal val...

Страница 39: ...but may not be large enough to hold more complex or graphic filled pages If the page size selected is not large enough the page will be broken as described under Paper Out Fault Action item above If...

Страница 40: ...ed the value of this item will automatically return to No Note that once printing begins taking the printer off line for any reason ONLINE button pressed ribbon lid opened or a paper fault will cause...

Страница 41: ...ke is in the quality of carbon paper used or in the way carbonless inks are applied If the back copies of your form are too light request a quick release carbon or a higher quality carbonless inking m...

Страница 42: ......

Страница 43: ...ce Center see Obtaining Service later in this section Error Message Possible Solution Head Blocked Check print head carriage area for obstructions Head Gap Usually a result of a bad paper jam Check fo...

Страница 44: ......

Страница 45: ...ntil SECURITY MENU is displayed on the top line Next press the ALIGN ITEM button to begin setting security ALIGN ITEM ALIGN ITEM Edit Allowed Possible Values Edit Allowed View Only Initialize This ite...

Страница 46: ......

Страница 47: ...ins with a semicolon ignored 3 A heading line which is enclosed in square brackets 4 An item setup line of the format item value Each item setup line must appear under the appropriate heading line The...

Страница 48: ...9 99 MovePrintDown 0 00 9 99 FormName UPTO16CHARACTERS Tractor Path Rear Bottom Bottom Rear 862 only LinesPerInch 6 8 FormLength 1 227 TopMargin 0 226 BottomMargin 0 226 CharactersPerInch 10 12 13 3 1...

Страница 49: ...up three forms Before the forms are set up AlignPrint and all Forms will be reset to their factory default values so that only the non default values have to be set The first form will begin printing...

Страница 50: ...U S I N G R E M O T E S E T U P 44...

Страница 51: ...E M O T E S E T U P 45 Form1 MovePrintRight 0 20 MovePrintDown 0 33 FormName INVOICES Font Epson_FX_DF Form2 MovePrintDown 0 25 FormName REPORTS LinesPerInch 8 FormLength 68 CharactersPerInch 12 EndP...

Страница 52: ......

Страница 53: ...first time the Setup Module has been connected to a printer the printer will proceed with step 7 If this is the first time the Setup Module has ever been attached to a printer the printer will tempora...

Страница 54: ...need to be repaired or if it is replaced under a service contract To use the Setup Module in this manner you only need to perform the installation procedure once and then forget about it The printer w...

Страница 55: ...serial cable if one was attached Now perform the installation procedure on each of the printers that are to be configured the same as the first In step 9 be sure to press the LOAD button to copy data...

Страница 56: ......

Страница 57: ...setup line pitch according to current form setup form length according to current form setup top margin according to current form setup bottom margin according to current form setup font according to...

Страница 58: ......

Страница 59: ...Vertical and Horizontal Position Absolute ESC Ps g Clear Tabs ESC p h Set Auto CR on LF ESC p j Horizontal Position Backwards ESC p k Vertical Position Backwards ESC p l Reset Auto CR on LF ESC p1 pn...

Страница 60: ...r All Horizontal Tab Stops ESC 3 g Clear All Horizontal Tab Stops ESC 4 g Clear All Vertical Tab Stops ESC 20 h Select Automatic Carriage Return ESC 20 l Cancel Automatic Carriage Return ESC n m Selec...

Страница 61: ...Feed ESC K n1 n2 data 60 DPI Graphics ESC L n1 n2 data 120 DPI Graphics ESC M Select 12 CPI ESC N n Set Perforation Skip ESC O Cancel Perforation Skip ESC P Select 10 CPI ESC Q n Set Right Margin ESC...

Страница 62: ...ce n ESC F Cancel Emphasized Mode ESC G Select Double Strike Mode ESC H Cancel Double Strike Mode ESC I n Select Print Mode ESC J n Variable Distance Line Feed ESC K n1 n2 data 60 DPI Graphics ESC L n...

Страница 63: ...rinter Identification ESC n d Absolute Vertical Tab ESC n e Relative Vertical Tab ESC g Clear Horizontal Tab Stop ESC 0 g Clear Horizontal Tab Stop ESC 1 g Clear Vertical Tab Stop ESC 2 g Clear All Ho...

Страница 64: ...n Select Software Interface n ESC F n Select Font ESC FF n Set Form Length in Lines ESC G n Modify Print Head Gap ESC H n1 n2 Set Left and Right Margin ESC HT n1 n2 nx NUL Set Horizontal Tab Stops ESC...

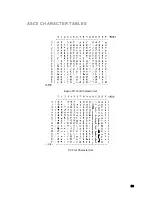
Страница 65: ...ASCII CHARACTER TABLES Epson FX Font Character Set PC Font Character Set 59...

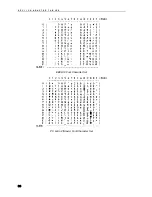
Страница 66: ...A S C I I C H A R A C T E R T A B L E S EBCDIC Font Character Set PC Latin 2 Slavic Font Character Set 60...

Страница 67: ...A S C I I C H A R A C T E R T A B L E S OCR A Font Character Set OCR B Font Character Set 61...

Страница 68: ...A S C I I C H A R A C T E R T A B L E S ML Euro 858 ML 850 62...

Страница 69: ...l Optical Quality 27x18 in 36x18 cell Graphics Density 60 to 240 dpi horizontally x 72 dpi vertically Character Sets Epson FX fast draft draft and letter quality IBM Proprinter fast draft draft and le...

Страница 70: ...mum thickness Easy access to tractors Front panel and host form selection Automatic head gap Paper out sensing Paper motion sensing Page reprint Automatic path switching for same form in more than one...

Страница 71: ...0 duty cycle Print head life of 500 000 000 draft mode or equivalent characters Printer life excluding print head of 1 000 000 pages Warranty Printer One year limited warranty for defects in materials...

Страница 72: ......

Страница 73: ...nt dpi Dots per inch Generally used to refer to graphics density or resolution draft Refers to the draft font EBCDIC Extended Binary Coded Decimal Interchange Code escape sequence String of characters...

Страница 74: ...om the host computer OQ Optical Quality parity A method used for detecting errors within a single character transmitted or received via an interface reset Initialization of various operating parameter...

Страница 75: ...69...

Отзывы: