


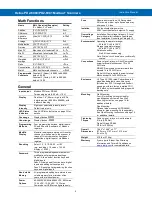

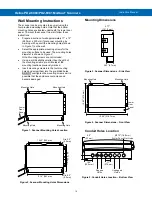
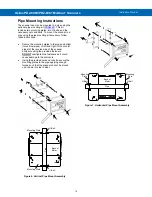


Helios PD2-6080/PD2-6081 Modbus
®
Scanners
Instruction Manual
16
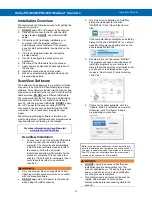
Installation Overview
We recommend the following sequence for getting the
scanner into service:
1.
DO NOT
apply AC or DC power to the scanner.
2. Connect the scanner to the PC with the USB
cable provided.
DO NOT
use a different USB
cable.
3. If ScanView (SV) is already installed in your
computer, then the program will launch
automatically in most systems. If the program
does not start automatically, double-click on the
SV icon.
4. If SV is not installed, follow the instructions
provided below.
5. Use SV to configure the scanner for your
application.
6. Disconnect the USB cable from the scanner.
7. Apply power and signal and check operation of
the scanner.
8. Install the scanner and put into service.
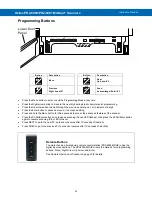
9. Make any programming adjustments using the
programming buttons.
ScanView Software
The easiest and quickest way to program your Helios
scanner is to use the FREE ScanView programming
software. This software is loaded into the scanner and
connects and installs directly to your PC with the USB
cable provided.
DO NOT
use a different USB cable.
We recommend that the first thing you do after taking
the scanner out of the box is connect the Helios to
your PC with the provided USB cable.
DO NOT
apply
AC or DC power to the scanner while your PC is
connected to the scanner as it will disrupt the USB
connection. It is not necessary to apply an input
signal.
ScanView programming software is intuitive, and
most customers can get their scanner programmed as
they like without even looking in the manual.
For more information on ScanView visit
ScanView Installation
1. Connect one end of the provided USB cable
to the scanner and the other end to the
computer. The computer will automatically
install the driver software it needs to talk to
the scanner. Follow the on-screen
instructions and allow sufficient time for the
process to complete. This can take a few
minutes. If the process is interrupted, then it
could leave the system in an unstable
condition.
•
Only one scanner may be connected at a time.
Attaching multiple scanners will cause a conflict
with the scanner software.
•
DO NOT
apply AC or DC power to the scanner
when using the USB
connection.
2. Once the driver is installed, an AutoPlay
dialog should appear for the drive
“MAINSTAL.” Click “Open folder to view
files.”
If the computer does not display an AutoPlay
dialog for the d
rive “MAINSTAL,” you should
open My Computer and double-click on the
drive labeled “MAINSTAL.”
3. Double-click on the file named
“MSStart.”
The program will open a few windows and
install two programs on your computer.
Simply follow the on-screen instructions until
you see one of the dialogs below. If you
receive a “User Account Control” warning,
click “Yes.”
4. If there is an update available, click the
“Update” button to install the new version.
Otherwise, click “Configure” to begin
programming your scanner.
Note:
If you decide to update your ScanView software,
once the installation has completed, you will be asked if
you want to update the setup files located on the scanner
itself. This way, you will always have the most current
version on the scanner for future installs.
•
DO NOT
unplug the scanner while the new
installation files are being written to it. The
scanner will display
uwrite
during the process
and you will receive an on-screen notification
once the process is complete.
•
Do not disconnect and reconnect the scanner
rapidly. Allow at least 10 seconds from
disconnection before reconnecting USB to the
scanner.


