background image


13 

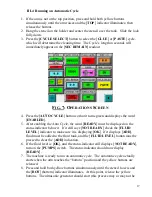
The [

SEC REMAIN

] readout displays the number of seconds left to go in the 

current automatic cleaning cycle.  It counts down as the cycle progresses.  If the 
machine is not running a cycle, it displays the programmed length of the cycle as 
selected on the [

CYCLE SELECT

] button.  This gives a convenient way to make 

sure the selected cycle is set to the desired length. 
 
The [

SHUTDWN TMR

] indicator displays [

PUMPS STOPPED

] if the machine 

has entered the Shutdown mode.  In this mode, the pumps are stopped, waiting for 
the beginning of a new cleaning cycle.  It displays [

RUN

] if the machine is not in 

shutdown.  See Section 

III.6 

for additional information. 


NOTE:

  The pumps will not run if the fluid level is low (this is to prevent the 

possibility of running the pumps dry).  If the pumps fail to run, check the      
[

FLUID LEVEL

] indicator first, and add fluid if necessary.  See Section

 III.4, 

Step 

12

 for information on adding fluid.  It is also possible that the system is in the 

Shutdown Mode.  Check the [

SHUTDWN TMR

] indicator.  If it says [

PUMPS 

STOPPED

] briefly touch both yellow buttons to turn the pumps on again.  The 

[

SHUTDWN TMR

] indicator will then indicate [

RUN

]. 

 
The DRYER [

START

] button is used to start the Dryer.  It displays [

RUNNING

while the dryer is running. 
 
The DRYER [

STOP

] button stops the dryer.  The dryer will run for the full period 

as set on the [

DRYER TIME

] button on the “Timer Setup” Screen unless this 

[

STOP

] button is pressed to stop it earlier. 

 
The readout below the DRYER [

STOP

] button displays the number of seconds 

remaining in the current dryer cycle.  It is color coded the same as the [

SEC 

REMAIN

] readout so as to indicate its similar function.  If the dryer is not running, 

it displays the programmed length of the dryer cycle in seconds. 
 
The three remaining indicators report the position of the lift arm.  There are separate 
indicators to show when the arm is at either the TOP or bottom (BOT).  If the arm is 
not at either of these points, the MIDWAY indicator will light. 


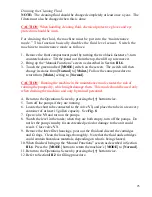
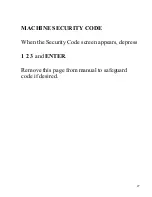
Machine Security Code 

 
The machine’s Security Code is shown on Page 26.  That page may be removed 
from the manual to secure the code if desired. 

Содержание PPC-N29TP

Страница 1: ...NIC STENCIL CLEANING SYSTEM Operator s Manual Rev 3 September 2008 PresSure Products Company Inc 4540 Washington Street West Charleston WV 25313 2010 800 624 9043 304 744 7871 Fax 304 744 6705 www pre...

Страница 2: ...200 25 Premix 9 Measuring Solution Concentration 9 III 3 Starting the Machine 10 Machine Security Code 14 Timer Setup Procedure 15 III 4 Running an Automatic Cycle 16 III 5 Dryer Cycle 17 III 6 Manual...

Страница 3: ...Schematic Diagram 4 2 Operator Control Panel 6 3 Safety Disconnect Switch 7 4 Operations Screen 10 5 Fluid Temperature Screen 13 6 Timer Setup Screen 15 7 Operations Screen 16 8 Manual Functions Scre...

Страница 4: ...stencils for silkscreen printing in the electronics industry where adhesive or solder cream is used The machine may also be used to clean tools or circuit boards without components Certain boards with...

Страница 5: ...e PPC N29TP has two filtration systems The fluid from the larger tank may contain particles of adhesive or heavy residues soldering cream alloys The alloy particles will fall out in a gravity pre filt...

Страница 6: ...consists of a powerful cross flow fan and a resistance heating element The dryer which has an adjustable timer is activated by control buttons on the touch screen panel The dryer is equipped with a ma...

Страница 7: ...tton should be pushed only in an emergency when it is necessary to deenergize the entire machine When pushed it removes power from the Programmable Logic Controller PLC Removal of PLC power will cause...

Страница 8: ...ion III 1 Recommended Cleaning Fluid Zestron Corporation s Vigon SC200 stencil cleaning product is recommended for use in the PPC N29TP This product has the advantage of entering the microphase above...

Страница 9: ...on the long housing under the top housing Seat the filter on the boss in the top housing raise the filter housing rotate to the right to thread it into the top housing and tighten securely hand tight...

Страница 10: ...ventually seat itself on the boss in the lower housing Repeat for the other long filter Open the tank valves V1 and V2 fully Again using the siphon pump dispense the stirred SC200 premix into the rear...

Страница 11: ...ppear FIG 4 OPERATIONS SCREEN This screen shows the machine s operational status at a glance and contains all necessary controls to run automatic cleaning cycles The TEMP F indicator reports the measu...

Страница 12: ...If it is displays CHANGE the filter cartridge should be replaced This condition does not prevent operation The state of this indicator is controlled by pressure switch PS1 The indicator will not be v...

Страница 13: ...in the Shutdown Mode Check the SHUTDWN TMR indicator If it says PUMPS STOPPED briefly touch both yellow buttons to turn the pumps on again The SHUTDWN TMR indicator will then indicate RUN The DRYER ST...

Страница 14: ...re is outside of preset limits To set the minimum fluid temperature level take the following steps 1 Touch the SET TEMP button on the screen 2 Enter the desired temperature in whole numbers e g 78 Thi...

Страница 15: ...ems being cleaned This parameter is set using the ABORT TEMP button Enter the maximum allowable temperature in the same manner as for the SET TEMP button If the fluid temperature reaches the maximum p...

Страница 16: ...the proper setting may need to be determined by running a few cycles This timer determines the position where the arm will pause on its way back to the top position 6 The Dwell timer is also set in th...

Страница 17: ...the word READY must be displayed on the status indicator below it If it still says NOT READY check the FLUID LEVEL indicator to make sure it is displaying OK If it displays ADD fluid must be added to...

Страница 18: ...mps and ultrasonic generator are locked out under this condition The user must then add sufficient fluid at the proper dilution to bring the level in the front tank to within three inches of the top o...

Страница 19: ...essary to reverse the direction of travel for the lift arm For these reasons a password protected Manual Functions screen is provided and can be accessed from the Operations screen Simply press the bu...

Страница 20: ...n at about 115 F until the ultrasonic generator is returned to AUTO and the fluid is allowed to cool Do not leave the ultrasonics operating while unattended for extended periods this can lead to erosi...

Страница 21: ...urn off On the Operations screen the SHUTDWN TMR indicator will turn red and read PUMPS STOPPED indicating that the shutdown is in effect The filter indicators will be hidden To run another cleaning c...

Страница 22: ...RSET Filter Change Procedure Remove the front compartment panel by turning the two black fasteners turn counterclockwise Tilt the panel out from the top then lift up to remove it NOTE The three O ring...

Страница 23: ...d tight 6 Repeat for the other long housing 7 Unscrew the smaller filter housing and empty the fluid Use the supplied filter wrench if necessary 8 Thoroughly clean the bowl and scrape out any residue...

Страница 24: ...ly close valve V2 at the bottom rear of the compartment to restrict the flow and simulate filter loading At the exact point when visible reduction in flow is noted stop 9 Turn the thumbwheel on pressu...

Страница 25: ...ates the risk of running the pumps dry which might damage them This mode should be used only when draining the machine and only by trained personnel 4 Return to the Operations Screen by pressing the b...

Страница 26: ...ons Power supply 220 240 volt 1 phase 50 60 Hz Current 20 amperes max Electrical Plug NEMA Type 6 20P 250 V 20 A Mating Recept NEMA Type 6 20R 250 V 20 A Filters Spun Polypropylene 5 micron 20 Size 2...

Страница 27: ...27 MACHINE SECURITY CODE When the Security Code screen appears depress 1 2 3 and ENTER Remove this page from manual to safeguard code if desired...

Отзывы: