background image

20 - 80 kVA parallel UPS systems

User’s and Installation Manual

1018390
Revision  C

41

It is possible to shut down a single UPS module and still get maximum protection for the
critical load. This operation requires that the parallel system to be in the N+1 redundancy
mode.  In capacity mode, the system bypass switch should be used to transfer the system to
bypass power.

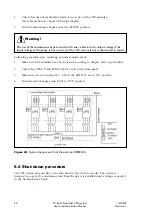
Use the following procedure when you want to do service for a redundant UPS module:

1.

Check that the UPS module is in the operational condition (open front door):
– Main switch, main circuit breaker, and battery breakers are in the ‘ON’ position
– Output breaker in the ‘ON’ position and has not been tripped.
– No critical alarms or “Loss of redundancy” message in the control panel display.

2.

Check that the parallel UPS system is in the N+1 redundancy mode.
(Press Menu button, choose UPS parameters display P31.)

The system bypass switch must be used first to transfer to ‘BYPASS’ if the system is in
the N capacity mode. The critical load must be disconnected if system does not
contain the system bypass switch.

3.

Turn the main switch S1 to the ‘OFF’ position

4.

Turn off the battery circuit breakers F2 and F4 (20/30 kVA UPS modules with ext. BAT
cabinets).

5.

Turn off the main circuit breaker F1 to the ‘OFF’ position.

6.

Check that UPS ON or BATTERY LED’s are not lit.
– It has now stopped the supply of output power and is disconnected from the
batteries.

7.

Disconnect the appropriate service switch (S1…S4) to ‘OFF’ position at the optional
SPM9305 or local tie panel. This prevents high voltage to be present in the output
terminals of the UPS module because of the parallel configuration.

Warning!

Be careful because there are still be high voltages and live parts inside of the UPS module.

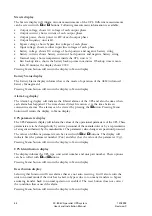
8.5 Control panel operation

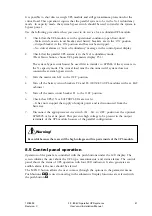
Operation of the panel are controlled with the push buttons under the LCD display. The
screen informs the user about the UPS type, measurements, and status alarms. The control
panel shows the status of UPS operation with four LED indicators. It also generates an
audible alarm if the user should be alerted.

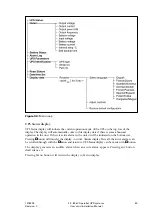
The ‘MENU’ button allows the user to move through the options in the parameter menu.
Push buttons 

↑↑↑↑↑


↓↓↓↓↓

 are used to moving in the submenus. Display functions are selected with

the push button 

↵↵

↵↵

.

Содержание 9305 HS Series

Страница 1: ...User s and Installation Manual 20 80 kVA parallel UPS systems...

Страница 2: ......

Страница 3: ...4 5 1 Overview 14 5 2 Placing UPS modules 15 5 3 Placing battery cabinets 17 6 Electrical installation 18 6 1 Overview 18 6 2 Location of terminals 18 6 3 Input and output power cables 19 6 4 Parallel...

Страница 4: ...her and may not be reproduced even extracts unless permission granted Every care has been taken to ensure the accuracy of the information contained in this manual but no liability can be accepted for...

Страница 5: ...e fuses from the selected line for extra safety precaution Make absolutely sure that there is no power connected to UPS modules Warning The parallel UPS system must be installed according to the instr...

Страница 6: ...umes Operation of the electrical equipment in such an environment constitutes a safety hazard The only user operations permitted are Starting up and shutting down the UPS unit not the initial start up...

Страница 7: ...e 1 A parallel configuration constructed with four UPS modules Always remember that the parallel UPS system is connected to the AC mains power and contains internal high current batteries for back up...

Страница 8: ...PS modules of the parallel system share equally the load with Hot Sync technology The parallel outputs are combined in a System Parallel Module or cabinet It is the system component containing the obl...

Страница 9: ...ery bank The UPS will start up again automatically providing power to the critical load and charging the battery bank when the mains voltage is restored Figure 3a Block diagram of UPS module A double...

Страница 10: ...ine when the inverter is overloaded or the inverter is not able to feed the load The output is protected with a tripping circuit breaker to separate the faulty UPS module from the parallel load bus Th...

Страница 11: ...shipping and packing materials should be stored for further investigation if damage has occurred during the transportation The equipment must be inspected for shipping damage A claim must be filed im...

Страница 12: ...rson shall perform the following procedure and tests during the start up the new parallel UPS system 1 Visual inspection Make a visual inspection of the equipment for signs of damage or foreign materi...

Страница 13: ...continuously controls the condition of the battery bank Battery failure alarm is activated when the capacity of the battery bank has decreased remarkable from the default value Scrapping Before scrapp...

Страница 14: ...Revision C 14 5 Mechanical installation 5 1 Overview Environmental requirements and restrictions described in the technical specification shall be met to guarantee the proper function and safety of th...

Страница 15: ...t n i o P m c g k 2 g n i d a o l d e t u b i r t s i D m g k 2 s e i r e t t a b o w S P U A V k 0 3 0 2 0 1 2 1 3 0 2 5 s e i r e t t a b s c p 2 3 x 2 h t i w S P U A V k 0 3 0 2 0 0 4 9 5 5 6 2 1...

Страница 16: ...e 6b Ventilation and space requirements for 40 80 kVA UPS Power cables shall be routed from the bottom or rear side of the UPS modules The cables shall be protected with a casing tube The size and loc...

Страница 17: ...hall have the external battery cabinets on the left or right side External battery cabinets shall be connected together by using narrow metal plates provided with external battery cabinets The externa...

Страница 18: ...ltage and current that can injure or kill personnel and damage equipment Input and output power cables must be selected according to local regulations and installation environment The recommendations...

Страница 19: ...nd the rated current of the UPS module An internal circuit breaker is used to protect the input bridge and power semiconductors Table 2 Recommended input output cables and fuses of parallel UPS module...

Страница 20: ...late 40 80 kVA 6 5 Battery cables Located behind the door the external battery connection N and PE is used with BAT D BAT E and BAT F cabinets Each shipment of external battery cabinets includes 16 mm...

Страница 21: ...0 kVA parallel UPS systems User s and Installation Manual 1018390 Revision C 21 Figure 12 Wiring diagram of the external battery cabinets D and E Figure 13 Wiring diagram of the external battery cabin...

Страница 22: ...configurations with 40 80 kVA UPS modules Power cables should be connected to the battery terminals of the UPS modules See the battery wiring diagrams and chapter Location of terminals for the correct...

Страница 23: ...o i t p i r c s e D 2 5 8 9 1 0 1 2 0 3 1 0 4 3 9 5 0 3 9 M P S s e l u d o m A V k 0 3 1 0 8 S P U x 2 1 r o f t e n i b a c M P S g n i d n a t s r o o l F 0 5 8 9 1 0 1 4 0 8 5 0 3 9 M P S s e l u...

Страница 24: ...r the shared load bus It also enables the make before break transfer of the load to the system bypass This can be used for service or test purposes The available SPM tie cabinets have the following ma...

Страница 25: ...kVA parallel UPS systems User s and Installation Manual 1018390 Revision C 25 Figure 17 Cable routing of SPM9305 9340 130 2 and SPM9305 80 4 tie cabinets Figure 18 Cable routing of SPM9305 60 4 tie ca...

Страница 26: ...20 80 kVA parallel UPS system User s and Installation Manual 1018390 Revision C 26 Figure 19 Wiring diagram with SPM9305 9340 130 2 tie cabinet...

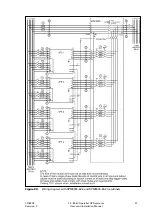
Страница 27: ...20 80 kVA parallel UPS systems User s and Installation Manual 1018390 Revision C 27 Figure 20 Wiring diagram with SPM9305 60 4 and SPM9305 80 4 tie cabinets...

Страница 28: ...ground Notice UPS modules should get a minimum of 10 ms leading closed contact signal when the system bypass switch is turned from UPS to BYPASS position e p y T g n i t a r S P U g n i t a r s s a p...

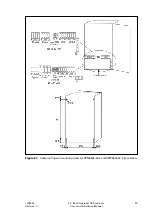
Страница 29: ...20 80 kVA parallel UPS systems User s and Installation Manual 1018390 Revision C 29 Figure 21 Cable routing and mounting holes for SPM9305 60 2 and SPM9305 30 2 tie cabinets...

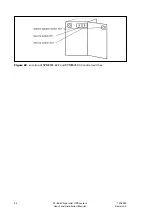
Страница 30: ...20 80 kVA parallel UPS system User s and Installation Manual 1018390 Revision C 30 Figure 22 Location of SPM9305 60 2 and SPM9305 30 2 control switches...

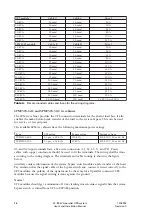
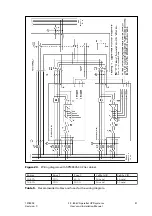
Страница 31: ...90 Revision C 31 Figure 23 Wiring diagram with SPM9305 30 2 tie cabinet Table 5 Recommended cables and fuses for the wiring diagram r e w o P 1 e s u F 2 e s u F B A e l b a C D C e l b a C A V k 0 2...

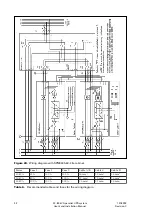
Страница 32: ...e cabinet Table 6 Recommended cables and fuses for the wiring diagram r e w o P 1 e s u F 2 e s u F 3 e s u F B A e l b a C C e l b a C D e l b a C A V k 0 4 A 3 6 A 0 0 1 A 5 2 1 m m 6 1 m m 0 5 m m...

Страница 33: ...ition 2 Auxiliary contacts provide 10 ms leading signal with a closed contact 3 One should check from the LCD panels that UPS modules are not unsyncronised and the signal wiring polarity is correct 4...

Страница 34: ...ng configuration Cables are delivered with the UPS modules 6 Since the UPS does not have automatic backfeed isolation a warning label must be added on all primary power isolators installed remote from...

Страница 35: ...to the UPS modules Software can control or monitor UPS modules individually not as a parallel system Check from the software documentation that the platform running on your computer is supported Use n...

Страница 36: ...h a maximum rating of 1A 30VAC or 0 2A 60VDC They have a complete galvanic isolation from the other UPS circuits according to IEC60950 and EN50091 1 It is recommended that the relay output signals run...

Страница 37: ...nnected to all parallel UPS modules The terminal X219 is a normally open type of connection Hence the logic circuitry will prevent the transfer to unstable power source when the connection is closed U...

Страница 38: ...unit will function properly can not be guaranteed During commissioning the manufacturer representative will train the users to operate the parallel UPS system 8 2 Start up procedure Check that the pa...

Страница 39: ...modules have started 8 Check that service switches of the SPM9305 or local tie panel are in the ON position 9 Transfer the critical load to UPS modules by turning the system bypass switch to UPS posi...

Страница 40: ...ronised to mains Following procedure does returning to normal online mode 1 Make sure UPS modules have been started according to chapter Start up procedure 2 Check that UPS ON and BYPASS LED s are lit...

Страница 41: ...es not contain the system bypass switch 3 Turn the main switch S1 to the OFF position 4 Turn off the battery circuit breakers F2 and F4 20 30 kVA UPS modules with ext BAT cabinets 5 Turn off the main...

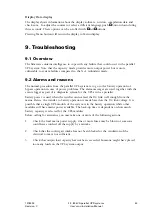
Страница 42: ...it when a situation in the UPS requires immediate action Figure 29 Control panel and LED status indications 8 6 Control panel displays Normal display The Normal display shows the UPS type The panel au...

Страница 43: ...if there is some abnormal operation in the unit If there is active alarm in the unit it will be indicated on the bottom row Pressing button will transfer the display to Active Alarms display Here all...

Страница 44: ...cate the 8 latest alarms of the UPS and also the time when each alarm has happened The time showed days hrs min sec is the time between consecutive alarms The alarms can be viewed by pressing the butt...

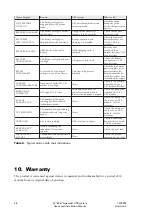
Страница 45: ...ion in case of power problems The alarm messages are used together with the events logger as part of a diagnostic system for the UPS service specialist Battery power is used when the rectifier cannot...

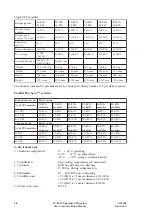
Страница 46: ...C r o e n O y l p p u s r e w o p e b y a m s e s u f e r o m y d o b e m o s r o n w o l b e v a h t n e d i c c a y b d l u o c y l p p u s e h t f f o d e h c t i w s T E N I B A C E R U T A R E P...

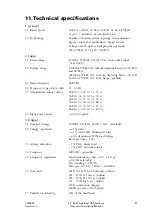
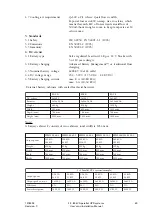
Страница 47: ...Hz 2 4 Frequency range for rectifier 45 65 Hz 2 5 Nominal max input current 20 kVA 3 x 21 A 3 x 30 A 30 kVA 3 x 36 A 3 x 45 A 40 kVA 3 x 47 A 3 x 65 A 50 kVA 3 x 60 A 3 x 80 A 60 kVA 3 x 70 A 3 x 93...

Страница 48: ...P U f o r N A V k 0 2 s e l u d o m A V k 0 3 s e l u d o m A V k 0 4 s e l u d o m A V k 0 5 s e l u d o m A V k 0 6 s e l u d o m A V k 0 8 s e l u d o m S P U x 2 A V k 0 4 A V k 0 6 A V k 0 8 A V...

Страница 49: ...2 x 2 s e i r e t t a B h A 4 2 x 4 2 x 2 h A 8 3 x 4 2 x 2 h A 5 6 x 4 2 x 2 t h g i e W g k 0 5 5 g k 5 1 8 g k 0 9 3 1 h t d i W m m 2 8 3 m m 0 2 5 m m 4 3 0 1 m m h t p e D m m 8 8 7 m m 8 8 7 m...

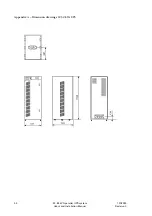
Страница 50: ...20 80 kVA parallel UPS system User s and Installation Manual 1018390 Revision C 50 Appendix A Dimension drawings 20 30 kVA UPS...

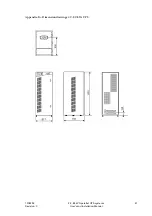
Страница 51: ...20 80 kVA parallel UPS systems User s and Installation Manual 1018390 Revision C 51 Appendix B Dimension drawings 40 80 kVA UPS...

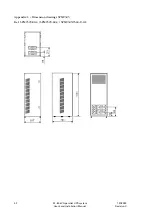
Страница 52: ...20 80 kVA parallel UPS system User s and Installation Manual 1018390 Revision C 52 Appendix C Dimension drawings SPM9305 Ref SPM9305 80 4 SPM9305 60 4 SPM9305 9340 130 2...

Отзывы: