background image

4 - ENG

OPERATING INSTRUCTIONS

TYPICAL INSTALLATION

To begin using the tool:

1. 

As a standard practice, drain water from the air  


compressor tank and air lines prior to use each day  


(reference your compressor operators manual for  


detailed instructions).

2. 

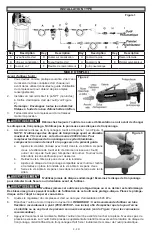
Install a 1/4” NPT male connector (not included)  


into the air inlet port on the tool (see Figure 2).  


Note: Use Teflon® Tape on all threaded 

 connections.

3. 

Turn on the air compressor and allow it to build up  

 pressure.

   Always disconnect the tool from the air source before changing cut-off disks. Do not  

operate the tool if the cut-off disk is not tightened to the cut-off tool.

4.   Assemble the cut-off disk to the cut-off tool (see Figure 3):


NOTE: Use only 3” maximum diameter cut-off disks rated at no less than 20,000 RPM. For 


replacement aluminum oxide cut-off disks, call the number listed on  


the back page of this manual. 


a. 

Place the allen wrench (included with tool) in the allen head screw at  


the end of the tool and the spanner wrench (included with tool) on  


the body of the tool to hold it from turning. Turn the allen wrench  


counterclockwise to loosen.


b. 

Remove the allen head screw and washer.


c. 

Place a cut-off disk, rated for the tool, onto the arbor and replace the  


washer and allen head screw.


d. 

Tighten the allen head screw clockwise with the allen wrench.


Never use a damaged disk! Inspect the cut-off disk  

for cracks or chips before using.


Never operate this tool without the guard attached  

or if the guard is damaged. Serious injury may occur if used without the guard in place. Position the guard 

between yourself and the part being cut.

5. 

Adjust the air compressor’s regulator or the supply line regulator to 90 PSI.


6. 

Connect the tool to the air hose quick coupler. 

NOTE: It is recommended that a whip hose with a swivel  


(P012-0079SP - not included) be used to prevent twisting, kinking, and excessive wear to the air hose  


(see figure 1 for recommended connections).


7. 

Squeeze trigger gently. Start the tool off the work. Do not put extreme pressure on the tool. This slows down  


the speed of the cut-off disk, reducing cutting efficiency and puts additional burden on the air tool motor.

8. 

When finishing cutting, lift the tool off the work before releasing the trigger.


This tool will produce sparks when cutting metal. Always wear ANSI Z87.1 approved  

safety goggles when using this tool.

Key

Description

Key

Description

Key

Description

Key

Description

A Air hose

D In-line Oiler

G Quick Coupler

J Female Connector

B In-line Filter

E Air Hose 

H Male Connector

K Spray Gun

C Tee Fitting

F Whip Hose 

I Air Tool

Figure 1

Figure 2

Figure 3

Содержание 024-0089

Страница 1: ...endre toutes les consignes de s curit de ce manuel avant d utiliser l appareil Toute d rogation aux instructions contenues dans ce manuel peut entra ner l annulation de la garantie causer des blessure...

Страница 2: ...ss of control of the tool PERSONAL SAFETY RISK OF INJURY Stay alert Watch what you are doing and use common sense when operating the tool Do not use the tool while tired or under the influence of drug...

Страница 3: ...K OF BURSTING AND OR INJURY Check for misalignment or binding of moving parts breakage of parts and any other condition that affects the tool s operation If damaged have the tool serviced before using...

Страница 4: ...arbor and replace the washer and allen head screw d Tighten the allen head screw clockwise with the allen wrench Never use a damaged disk Inspect the cut off disk for cracks or chips before using Nev...

Страница 5: ...l to the air supply cover the exhaust port end with a towel and run in forward and reverse directions for approximately 30 seconds Follow the air motor lubrication instructions above after cleaning is...

Страница 6: ...irs replacements or adjustments to the equipment or any costs for labor performed by the purchaser without the Company s prior written approval The effects of corrosion erosion and normal wear and tea...

Страница 7: ...on ce que vous faites et faites preuve de bon sens lorsque vous utilisez l outil N utilisez pas l outil lorsque vous tes fatigu en tat d bri t intoxiqu par une drogue ou lorsque vous avez pris des m d...

Страница 8: ...NT ET OU DE BLESSURE V rifiez l alignement et le d gagement des pi ces mobiles l tat des pi ces et toute autre condition pouvant influer sur le fonc tionnement de l outil Si un outil est endommag fait...

Страница 9: ...vec l outil dans la vis t te six pans creux l extr mit de l outil et la cl tricoise incluse avec l outil autour du corps de l outil pour l emp cher de tourner Tournez la cl Allen dans le sens antihora...

Страница 10: ...de lubrification du moteur pneumatique ci dessus pour lubrifier l outil nouveau Apr s la lubrification ou le nettoyage de l outil couvrez l orifice d chappement d une serviette et faites fonctionner l...

Страница 11: ...un remplacement d aucun r glage de l quipement ni d aucun frais de main d uvre de l acheteur sans avoir mis une autorisation crite au pr alable Les effets de la corrosion de l rosion et de l usure nor...

Страница 12: ...utilice el sentido com n mientras utiliza la herramienta No utilice la herramienta si est cansado o bajo los efectos de f rmacos alcohol o medicamentos Un momento de distracci n mientras utiliza la h...

Страница 13: ...ramienta es peligrosa en manos de usuarios sin capacitaci n RIESGO DE ESTALLAR Y O DE LESI N Verifique que no haya partes movibles mal alineadas o atascadas partes rotas y cualquier otra condici n que...

Страница 14: ...re el tornillo de cabeza hexagonal del extremo de la herramienta y la llave de tuercas incluida con la herramienta en el cuerpo de la herramienta para evitar que gire Gire la llave Allen en el sentido...

Страница 15: ...e motores de aire m s arriba luego de finalizar la limpieza para lubricar nuevamente la herramienta Luego de engrasar o limpiar cubra el orificio de escape con una toalla y ponga en funcionamiento la...

Страница 16: ...ULO POR LA PRESENTE SE ANULAN TODAS LAS GARANT AS IMPL CITAS INCLUSO TODA GARANT A DE COMERCIALIZACI N Y APTITUD PARA UN OBJETIVO EN PARTICULAR LA RESPONSABILIDAD POR DA OS CONSIGUIENTES E INCIDENTALE...

Отзывы: