


of flatness, where for example it’s twice as thick in one direction as the other, then the nozzle is
probably clogged and will have to be cleaned or replaced.)
The standard nozzle diameter of .35 mm seems to produce about .40 mm measured diameter
for this test. We have seen distinct problems with printing when the nozzle is worn to the point
where this test gives measurements of .60 mm. Slight problems can be seen sometimes with a
measurement of .50 mm. It does depend a lot on just what settings are being used. The
numbers given are for .25 mm layer height and .35 mm extrusion width. To keep using a nozzle
that measures oversize, you can increase the track width (Kisslicer Style, Extrusion Width
setting). This will give a bit less horizontal resolution in your prints, but probably better overall
quality, especially the exterior.
Replacing the Nozzle
This requires using two wrenches (supplied) to loosen the old nozzle, and tighten the new one.
Warning: Failing to use a second wrench to counter the nozzle wrench torque can result in
loosening or failure of the filament tube. If after reading this section, you do not feel confident
that you can do this yourself, find someone who is more “handy” and whom you can blame if
there is trouble afterwards.
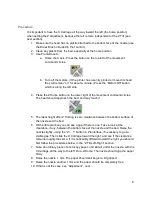
Required Items:
● 10 mm wrench (open-end is used to counter torque)
● 7 mm nut driver
● 1 Paper towel
● Optionally, one or two disposable gloves (to avoid skin irritation from glass fibers)
Steps:
Removing the nozzle
● Let the head and the bed cool down to 45 C or lower.
● Raise the head most of the Z travel, e.g. at least 150 mm so that there is room for the
nut driver below the nozzle.
● Move the X Carriage to roughly the center of its left-right travel.
● Place the paper towel so that it covers the whole print bed.
● Whenever you move the “sock” - the black silicone-covered insulator that wraps around
the Hot End, small bits of glass fiber will fall down. The paper towel is to cover the bed in
the hope of catching them all. They can cause skin irritation, so don’t lean on the paper
towel during these next steps. Do NOT blow them off the bed, because glass fiber
particles are much worse when breathed in than when just touching skin. Wipe with a
damp, slightly soapy cloth. (You’ll need to acetone or retape the bed afterwards.)
● (Here’s where you need the head temperature to be low.) Push the black “sock” that
surrounds the heated aluminum block (the “head”) up to make enough room to be able
to slide the 13 mm wrench onto it. You may need to pull it up on each corner in turn,
because it tends to hang on the corners of the block. You may be able to maneuver the
16


