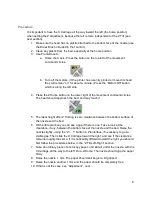
perform, so if there is no gap at all, create a very small one now, by pressing the “+Z .1”
button in the top half of the vertical set of buttons to the right of the main circular controls
in Pronterface. Press it one or more times, enough to get a small visible gap between the
nozzle and the bed. It doesn’t much matter what the size of the gap is, as long as it’s
small enough for you to see whether it changes significantly, in the next steps.
● Press the "Motors Off" button on the left upper side of Pronterface. Also make sure that
the Heater and “Off” button is pressed so you don’t get burned while doing this
procedure.
● Then move the head to right manually and see whether the bottom of the nozzle moves
away from or toward the bed as you move to the right.
● Perform the same “piece of paper” test on the right and left sides. What matters first of
all is that it grip it the same left and right, Use the “.01 mm “ to find a good height for this
test. It doesn’t matter whether it’s correct overall, yet, as long as it’s the same left and
right.
● When the clearance is the same left and right, go back and perform the overall height
adjustment described above in “Adjustment”.
You will need to loosen the two setscrews that couple the right hand Z rod to the belt drive
assembly at the top of the printer. They are a bit hard to see. They are opposite each other, so if
one is easy to see, the other will be harder to see. Use the 1.5mm (smallest) sized hex driver
tool.
Once you do that, you can make fine adjustments by slightly rotating the Z rods (most easily
done down at the motor shaft). Hold the left threaded rod so that it doesn’t turn, and turn the
right side one.
● Twist the right-hand threaded rod counter-clockwise to decrease clearance
● Twist the right-hand threaded rod counter-clockwise to increase clearance
You should feel little “steps”. Generally, you should only need a handful of steps. That is only a
few degrees of rotation. Do a few, test, and decide if it’s enough or too much. Take your time.
After you have made any adjustments, slide the head back and forth to check how the
clearance changes. If you can’t see it change, your alignment is good.
Tighten the two setscrews.
Rarely Needed Adjustments:
● X Belt Tension
● Y Belt Tension
Each tension adjustment is an easy turn of the respective screw adjuster. Righty-tighty.
The belts should certainly have no slack at all, and should have enough tension to make a
11


