background image

- 38 -

1901-DE Maintenance _2860

MAINTENANCE

EN

•  If  the 

distance (A) is greater than 4 mm then the 

bushes (B) on the inside of the tine arms are to 

changed. Otherwise subsequent damage may occur 

to the machine.

Rotor unit

Curved track

Interval:   

50 h

Implementation:

-  Put the grease gun on the grease nipple (1)
-  Turn the rotor to ensure that the grease is evenly 

distributed

-  Pump grease gun 3-4 times during a full rotation
-  Make 3-4 full rotations

1

TOP 662

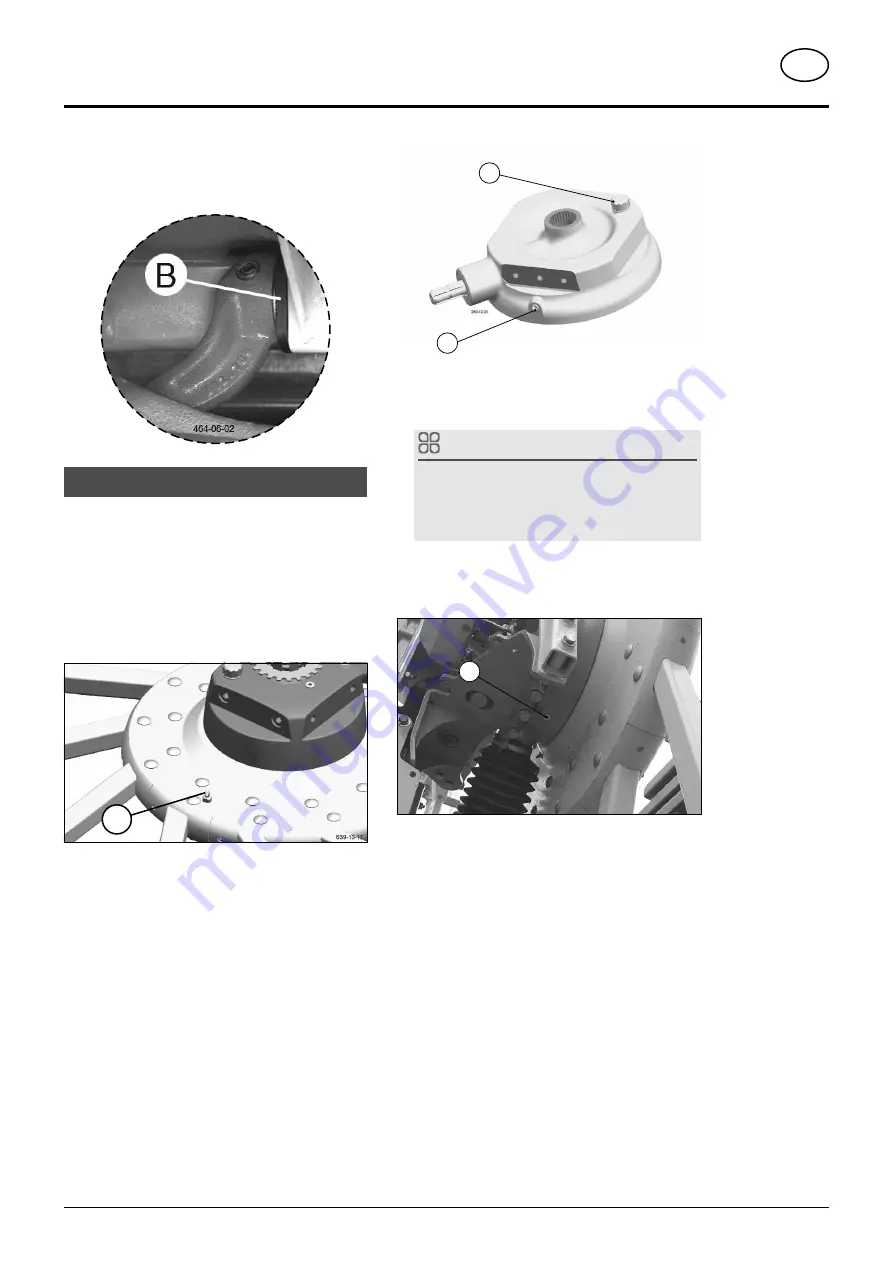
Drive of the rotary unit Refill grease

1.  Interval:  


if needed

  The gearbox of the rotary unit is greased for lifetime. 

Nevertheless, check once a year whether the cogs still 

are covered.

2. Implementation:

1.  Open oil filling screw (1). The crown wheel toothing 

is easily visible when the filling screw is open.

2.  Pour fluid grease in through the filling plug (1) until 

the crown wheel is almost completely covered.

3.  Close filling screw (1)
4.  Distribute the grease by turning on the pto.
5.  Check the oil level with the drain plug open. The 

crown wheel should be almost completely covered.

6.  Continue filling with liquid grease if appropriate, or 

reduce the amount of liquid grease via the drain plug 

(2).

1

2

Change liquid grease: 

1.  Interval:  

if needed

 TIP

Only change the grease when the oil is at operating 

temperature.
Draining the grease takes about 3-4h. Maybe do this 

overnight or suck it away.

2. Implementation:

1.  Bring the machine to transport position
2.  Open the drain plug (2)

2

3.  Drain the liquid grease.
4.  Close the drain plug (2)
5.  Continue as in section "Filling with Liquid Grease" 

Содержание TOP 662

Страница 1: ...Operator s manual Translation of the original Operating Manual Nr 99 2860 EN 80U 0 Double Rotary Swather TOP 662 Type SK 2860 00001...

Страница 2: ...highest quality standards to our products which are constantly monitored by our in house quality management and our management board Because the safety perfect function highest quality and absolute re...

Страница 3: ...in the hand over declaration online Machine checked according to delivery note All attached parts removed All safety equipment drive shaft and operating devices at hand Operation commissioning and mai...

Страница 4: ...ersion from transport to working position 23 Settings on rotor chassis 24 1 Set the lateral incline 24 2 Readjusting tine wear 24 3 Adjusting rake height 24 4 Setting the distance of the outer feeler...

Страница 5: ...EU guidelines EU Declaration of Conformity By signing the EU Declaration of Conformity the manufacturer declares that the machine being brought into service complies with all relevant safety and healt...

Страница 6: ...s in such text sections must be followed CAUTION If you do not observe the instructions marked this way there is the risk of an injury All instructions in such text sections must be followed NOTE If y...

Страница 7: ...shed or cut exists in the Pick up cutting unit tailgate and upper extension areas d Before driving the vehicle the driver must ensure that nobody will be endangered and that no obstructions are presen...

Страница 8: ...ever reach into the crushing danger area as long as parts can move there 495 171 2 2x Never reach into the crushing danger area as long as parts can move there 495 154 060 19 003 7 7 12 10 11 12 12 2...

Страница 9: ...gthedeliverydeclaration 495 713 6 2x Do not enter the rotating rotors danger area Wait until they have come to a complete standstill 495 173 7 2x Vehicle jack lifting point 495 787 8 1x 494 695 Nach d...

Страница 10: ...ing signs_2860 Warning signs EN 10 2x Tyre pressure 495 668 11 2x bsb 449 567 495 166 Do not enter the rotor arms swivel range 495 166 12 18x A grease nipple position 494 646 13 1x Cut cardan shaft to...

Страница 11: ...ions 1 Chassis 2 Rotor unit right rear 3 Swath apron 4 Rotor unit left front 5 Spare wheel attachment for rotor chassis 6 Lower linkage attachment with support stand 7 Inner jockey wheel 8 Outer jocke...

Страница 12: ...ing capacity of the tractor trailer unit 20 Kg Lifting unit three point linkage 371 08 16 371 08 16 The tractor s lifting unit three point linkage must be designed for the occurring load See technical...

Страница 13: ...ction Double acting hydraulic connection Standard Raising and lowering the rotor units X Hydraulic swath apron X Floating Neutral position required Power connections required Design Consumer Pin Volt...

Страница 14: ...to the tractor s lifting gear 1 Couple the headstock on the tractor Switch off PTO shaft Attach headstock to the lower link of the tractor Properly secure coupling pin Position chassis frame correctl...

Страница 15: ...her and mark Shortest possible operating position L2 1 Lower hoist completely 2 Steering turned to lock see adjacent illustration For details see Chapter Adapting the cardan shaft in supplement B of t...

Страница 16: ...lines and the drivetrain Pull the cardan shaft off and place it on the support 6 Uncouple the hydraulic lines and place them in the hosesupport 7 Ifproblemsoccur bringthecontrol unit to floating posit...

Страница 17: ...Life threatening danger exists through unsecured rotor arms Check the transport safety device before each transport run The gyro arms must be locked with the hook The locking hooks of the transport l...

Страница 18: ...th rotors 2 Driving on public roads Only transport the machine in the transport position Observe the statutory regulations for your country Driving on public roads may only be carried out as described...

Страница 19: ...actor 3 Pull steering rod up and away 4 Turn the spindle 2 until the required steering axle position is reached 1 2 3 5 Re fit ball joint A Spindle 2 must be screwed in B Spindle 2 must be screwed out...

Страница 20: ...Fold in swath apron Transport height 3 5m retract swath apron The following steps are to be performed to reduce by approx 450mm theimplementheightintransportposition 1 Release bolt using linchpin bel...

Страница 21: ...completely Then re secure using the spring linchpin opening 2 1 2 6 Go to transport position Operation of the tine holder 1 Pull the handle 3 of the lock in driving direction backwards a and then tow...

Страница 22: ...nd clearance can lead to the loss of the tine cover while driving In this context also pay attention to the dis tance between the tines and the front wheel of the rotary undercarriage If the distance...

Страница 23: ...r stand alone operation TIP Select a driving speed that ensures the entire crop is harvested cleanly Conversion from transport to working position 075 09 05 DANGER Life threateningdangerthroughmachine...

Страница 24: ...entric bolt 2 and a size 36 open end spanner c Re tighten the nuts 3 Tightening torque 280 Nm 3 2 a1 b1 b2 c a2 NOTE Propertydamagethroughoperationwithoutaninner feeler wheel Always operate the machin...

Страница 25: ...tting the distance of the outer feeler wheel 1 Loosen both clamps 1 2 2 Push the stop over the desired anchor 3 4 5 3 Tighten both clamps torque 1 2 3 4 5 5 Aligning the indicators Requirement Rake he...

Страница 26: ...approx 1 1 5 cm can be measured on the first triggered tines start raking TIP Equally adjust the eccentric screws which are located on the same side of the rotor unit a1 and a2 and or b1 and b2 639 13...

Страница 27: ...ng screws TS The rotor should be inclined slightly towards the swath to ensure clean raking The tines on the opposite side to the swath should be approx 10 15 mm higher than on the swath facing side S...

Страница 28: ...r With a mechanical swath apron only a transport and parking height of 4 00 m can be reached Hydraulic swath apron Adjusting the swath apron hydraulically 1 Set the required swath with width the dual...

Страница 29: ...rotor TIP Set the single rotor control unit lever to centre position to alsolowerthesecondrotor Becausethetractorhydraulic system is already in float position the second rotor will be lowered TIP Adju...

Страница 30: ...shut off valve 3 2 Lowering without the middle swath curtain without double swath function The implement is in working or transport position 1 Close the shut off valve 2 Lower rotor arm by means of t...

Страница 31: ...ven firm ground Switch the tractor engine is off and remove the key Wait until the motor and the moving parts come to a standstill Secure the machine against rolling using wheel chocks Do not work und...

Страница 32: ...openings on the underside of the rotor unit to gain access to the screws 2 on the curved track system 1 3 Loosen the three screws 2 on the cam track 4 Adjusting the cam track Turn the rotor unit by t...

Страница 33: ...anoeuvre The driving characteristics of the tractor are influenced by theweight G oftherotaryunit Thiscanleadtodangerous situations especially on inclines Danger of tipping exists when hydraulically l...

Страница 34: ...r the relevant protective clothing NOTE Material damage due to impurities that have penetrated into the hydraulic system Clean the couplings of the oil hoses and the oil sockets prior to each connecti...

Страница 35: ...re tighten bolt connections Prior to every startup Check hydraulic hoses for wear Replace any worn or damaged hydraulic hoses immediately The replacement hoses must meet the manufacturer s technical...

Страница 36: ...em before working on it Transmission 1 2 Oil quantity 0 3 litre SAE 90 Oil level check The oil level is correct if the gear oil reaches the level screw 3 Oil change At first after 50 h then after 500...

Страница 37: ...ning torque 160 Nm PositiontheNordlockwasherswiththeroughmilling inside on top of one another This means that both washers have the fine milling outside Attach cover to the new tine arm fit it between...

Страница 38: ...oil filling screw 1 The crown wheel toothing is easily visible when the filling screw is open 2 Pour fluid grease in through the filling plug 1 until the crown wheel is almost completely covered 3 Cl...

Страница 39: ...Lubrication chart 50 2x 3x 2x 2x 2x 244 14 27 0 8 kg GREASE V 20 h 20 h 0 8 kg GREASE V FETT FETT FETT FETT FETT FETT FETT FETT FETT FETT FETT FETT 2x See Operating Materials supplement for more detai...

Страница 40: ...gainst rolling Spring tines Check the fixing bolts S of the spring tines after the first 10hoursofoperationandre tightenifnecessary tightening torque 100 Nm The outer tines are shorter and thicker If...

Страница 41: ...once a year 100 ha every 100 hectares BB if necessary FETT GREASE Oil Number of grease nipples Number of grease nipples III IV see supplement Lubrificants l Litre Variation See manufacturer s instruct...

Страница 42: ...m Length 8 1 m Transport length 8 9 m Transport height rotors swivelled up 3 99 m Drive output required from 44KW 60 PS Weight with cardan shaft maximum 2220 kg Bearing load 900 kg p t o speed max rpm...

Страница 43: ...olely for customary operation in agricultural work To rake green and coarse fodder wilted silage and straw Any other uses outside of these are regarded as not in accordance with the designated use The...

Страница 44: ...TOP 662 Erstellt am 17 04 2013 Michael E A 445 537 445 537 P A P 1 2 3 4 5 442 525 442 525 448 095 448 095 T adapter Angle Hose pipe Straight hose end Angled hose end 0 90 Explanation 1 Lift 2 Lower...

Страница 45: ...Erstellt am 17 04 2013 Michael E 445 526 Y1 Y2 445 295 A 445 537 445 537 P A P 1 2 2 1 3 1 2 3 4 5 6 442 525 442 525 448 095 448 095 T adapter Angle Hose pipe Straight hose end Angled hose end 0 90 Ex...

Страница 46: ...1 22 123 0 442 560 442 121 A B 448 095 448 095 445 537 B A 442 567 442 567 445 537 1 2 3 4 5 6 244 14 26 T adapter Angle Hose pipe Straight hose end Angled hose end 0 90 Key 1 Raise lower rotor 2 Swat...

Страница 47: ...GB Anhang Titelblatt _BA Allgemein EN Supplement...

Страница 48: ...heap buy can sometimes be very expensive Be sure you purchase the Original with the cloverleaf sym bol Quality and precise fitting Operating safety Reliable operation Longer lasting Economy Guaranteed...

Страница 49: ...on brakes a After each repair of the brakes a functional check or a test drive must be carried out to ensure that the brakes function properly New drums or brake linings only have optimum braking effe...

Страница 50: ...vellinginacurvewithattachedorsemi mounted implements take into account the working range and swing mass of the implement 13 General a Before attaching implements to the three point linkage movesysteml...

Страница 51: ...den t Do not stay in the turning or swivelling area of the machine u Crushing and cutting points are found on externally operating parts e g hydraulics v Secure the machine before leaving the tractor...

Страница 52: ...manufacturer e Whenlookingforleaks usesuitablemeansthatprotect from injury f Fluids hydraulic fluid escaping under high pressure can penetrate the skin and cause serious injury Call a doctor immediate...

Страница 53: ...ngle for operation and at standstill 70 Standard joint Maximum angle at standstill 90 Maximum angle for operation 35 DANGER Mortal danger due to worn covers Replace the worn covers immediately Adaptin...

Страница 54: ...hafts with friction clutch Torque is limited with overloading and brief torque peaks and evenly transferred during slipping Prior to initial operation and after long periods out of use check friction...

Страница 55: ...east once a year Take out oil drain plug let run out and duly dispose waste oil Before garaging winter season an oil change and greasing of all lubricating points has to be done Unprotected blanc meta...

Страница 56: ...L B 85W 90 GETRIEBE L C 85W 90 LORENA 46 LITORA 27 RHENOX 34 GETRIEBE L B 85W 90 GETRIEBE L C 85W 140 ELF OLNA 32 46 68 HYDRELF 46 68 PERFORMANCE 2 B SAE 30 8000 TOURS 20W 30 TRACTORELF ST 15W 30 TRAN...

Страница 57: ...2 46 68 SUPER TRAC FE 10W 30 ULTRAMAX HVLP 32 ULTRAPLANT 40 SUPER HPO 30 STOU 15W 30 SUPER TRAC FE 10W 30 ALL FLEET PLUS 15W 40 HP GEAR OIL 90 oder 85W 140 TRANS GEAR OIL 80W 90 MULTILUBE EP 2 VAL PLE...

Страница 58: ...r see price list and or instruction handbook of the implement to be measured Rear hitched implement resp front rear combinations 1 CALCULATION OF MINIMUM BALLASTING AT THE FRONT GV min Record the calc...

Страница 59: ...ent must be increased to the minimum ballasting Front Record the calculated real front axle load and the permissible front axle load of the tractor into the table 4 CALCULATION OF THE REAL TOTAL WEIGH...

Страница 60: ...on to this the manufacturer also declares adherence to the other following EU directives and or relevant provisions Source of applied harmonised norms EN ISO 12100 EN ISO 4254 1 EN ISO 4254 10 Source...

Страница 61: ...ghts are given as anindicationonly Responsibilityforerrorsoromissions not accepted Reproductionortranslationofthispublication inwhole orpart isnotpermittedwithoutthewrittenconsentofthe P TTINGER Landt...

Страница 62: ...riegel nde 1 A 4710 Grieskirchen Telefon 43 7248 600 0 Telefax 43 7248 600 2513 e Mail info poettinger at Internet http www poettinger at P TTINGER Deutschland GmbH Servicecenter Deutschland Nord Stei...

Отзывы: