~
70
~
NOTICE!
Depending on model, you must connect the cable bundle of
the hob to the control panel of the oven before finally fixing the oven.
All dimensions in the following figures are given in
millimetres.
Use the embedded handles or wire handles
17
on both sides of the oven to move
the appliance.
The built-in furniture must stand in a stable position and need to be securely
fastened.
The power cord must not be trapped or kinked.
If the oven will be installed
above
a drawer
of the built-in furniture, a fixed
intermediate shelf
must
be mounted between the oven and the drawer.
I
NSTALLATION OF THE OVEN
1.
Switch off the power supply (fuse box of your household power supply)!
2.
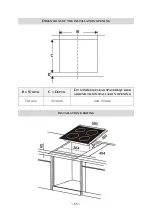
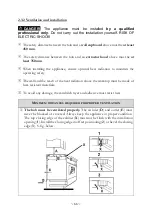
Provide an installation opening meeting the dimensions on the following drawing
(s. below,
fig. 2
).
3.
Install the hob in the built-in opening (s. chapter 2.3 I
NSTALLATION OF THE HOB
et seq.).
4.
Place the oven near the built-in opening.
5.
Connect the oven to the mains; see also chapter 2.5 E
LECTRICAL CONNECTION
:
HOB
/
OVEN
et seq. Proceed as follows.
a)
Partially insert the oven into the opening and connect the oven to the hob
properly.
In doing so, it is essential to observe the instructions referring
to the electrical connections given in the chapters
2.5 E
LECTRICAL
CONNECTION
:
HOB
/
OVEN
,
2.5.1
C
ONNECTION DIAGRAM
and
2.5.2
E
LECTRICAL CONNECTION
(
CONNECTION
:
OVEN AND HOB
).
b)
The appliance must be grounded. Connect the grounding cable of the hob
(yellow-green) to the ground terminal of the oven (marked).
6.
Insert the oven into the installation opening carefully. Ensure that the power
cable will not be trapped or kinked.
7.
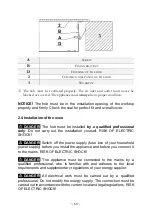
Complete the installation of the appliance and fix the oven using the 4
corresponding screws (s. below,
fig. 3
).
All dimensions in fig. 1, fig. 2 and fig. 3 are given in
millimetres.
17
Depending on model.


