background image

78

 ~


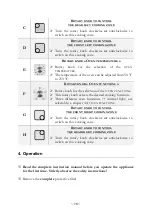
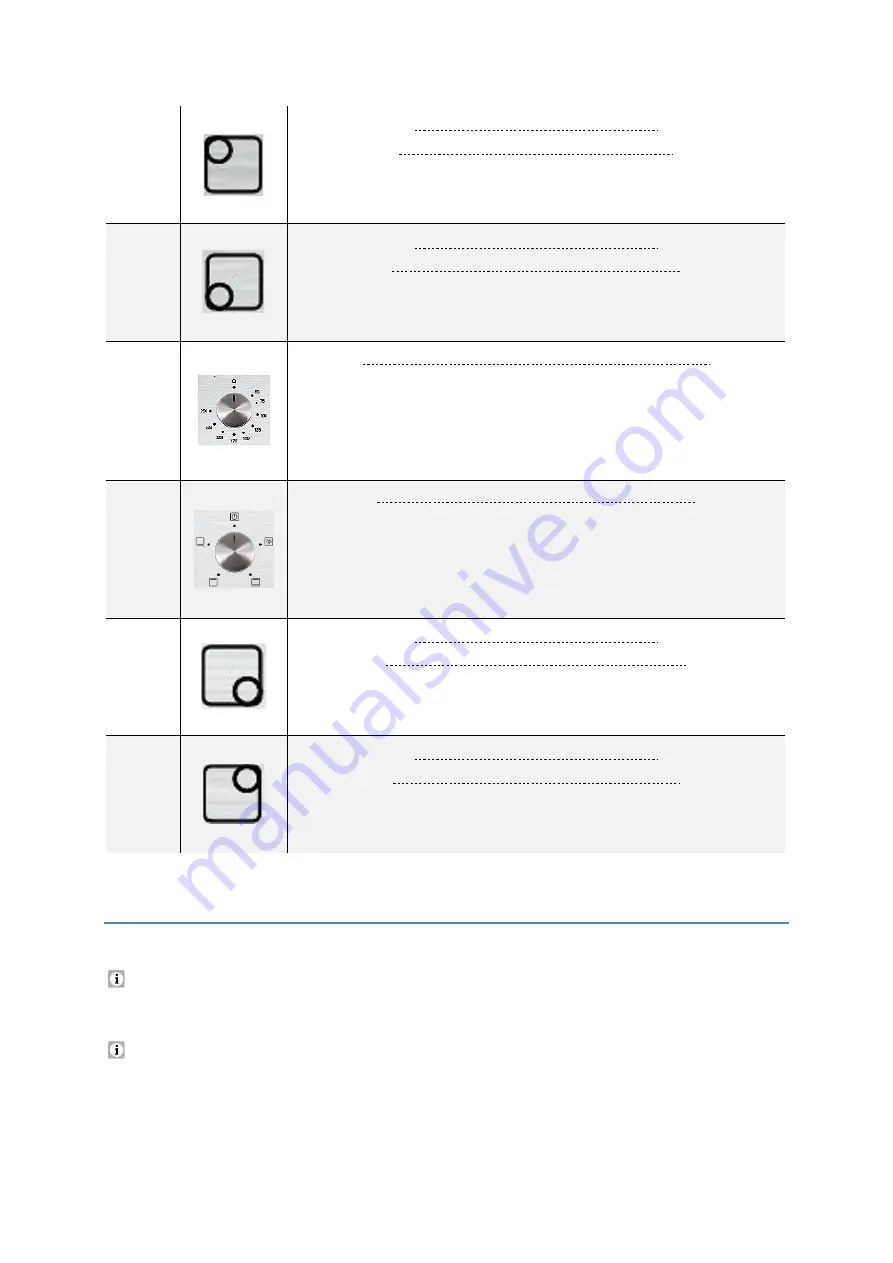
R

OTARY KNOB TO CONTROL 


THE REAR LEFT COOKING ZONE


Turn  the  rotary  knob  clockwise 

or

  anticlockwise  to 

switch on this cooking zone. 


R

OTARY KNOB TO CONTROL 


THE FRONT LEFT COOKING ZONE


Turn  the  rotary  knob  clockwise 

or

  anticlockwise  to 

switch on this cooking zone.


R

OTARY KNOB 

« O

VEN TEMPERATURE

 » 


Rotary  knob  for  the  selection  of  the 

OVEN 

TEMPERATURE


The temperature of the oven can be adjusted from 50 °C 

to 250 °C. 


R

OTARY KNOB 

« O

VEN FUNCTIONS

 » 


Rotary knob for the selection of the 

OVEN FUNCTIONS


This rotary knob selects the desired cooking function. 


Three  different  oven  functions  (+  internal  light)  are 

selectable; s. chapter 4.4 O

VEN


FUNCTIONS


R

OTARY KNOB TO CONTROL 


THE FRONT RIGHT COOKING ZONE


Turn  the  rotary  knob  clockwise 

or

  anticlockwise  to 

switch on this cooking zone. 


R

OTARY KNOB TO CONTROL 


THE REAR RIGHT COOKING ZONE


Turn  the  rotary  knob  clockwise 

or

  anticlockwise  to 

switch on this cooking zone.


4. Operation 


Read the complete instruction manual before you operate the appliance 

for the first time. Strictly observe the safety instructions! 


Remove the 

complete

 protective film! 


Содержание BIC3 I GK IX5

Страница 1: ...GIE FÜR DEN HAUSHALT TECHNOLOGY FOR DOMESTIC USE 09 08 2021 Bedienungsanleitung Instruction Manual EINBAU BACKOFEN MIT KOCHFELD BUILT IN OVEN HOB BIC3 I GK IX5S Deutsch Seite 2 English Page 53 www pkm online de ...

Страница 2: ...rheitsanweisungen 5 2 Installation 12 2 1 Entpacken und Wahl des Standorts 13 2 2 Anforderungen vor der Installation 14 2 3 Installation des Kochfelds 14 2 3 1 Maßangaben Abmessungen 15 2 3 2 Belüftung und Installation 17 2 4 Installation des Backofens 20 2 5 Elektrischer Anschluss Kochfeld Backofen 23 2 5 1 Anschlussdiagramm 25 2 5 2 Elektrischer Anschluss Verbindung Backofen und Kochfeld 26 3 Ge...

Страница 3: ...men Einsetzen der Backofentür 46 8 Problembehandlung 47 9 Technische Daten 49 10 Entsorgung 51 11 Garantiebedingungen 52 Entsorgen Sie dieses Gerät nicht zusammen mit ihrem Hausmüll Das Gerät darf nur über eine Sammelstelle für wiederverwendbare elektrische und elektronische Geräte entsorgt werden Entfernen Sie nicht die Symbole Aufkleber am Gerät Die in dieser Bedienungsanleitung enthaltenen Abbi...

Страница 4: ...NWEISUNGEN GRÜNDLICH DURCH Die darin enthaltenen Informationen dienen dem Schutz Ihrer Gesundheit Die Nichtbeachtung der Sicherheitshinweise und Sicherheitsanweisungen kann zu schweren Beeinträchtigungen Ihrer Gesundheit und im schlimmsten Fall zum Tod führen Bewahren Sie diese Bedienungsanleitung so auf dass sie bei Bedarf jederzeit griffbereit ist Befolgen Sie sorgfältig alle Hinweise um Unfälle...

Страница 5: ...weist auf eine Gefahrensituation die wenn sie nicht abgewendet wird eine unmittelbare Gefährdung für Leben und Gesundheit zur Folge hat WARNUNG verweist auf eine Gefahrensituation die wenn sie nicht abgewendet wird eine mögliche bevorstehende Gefährdung für Leben und Gesundheit zur Folge hat VORSICHT verweist auf eine Gefahrensituation die wenn sie nicht abgewendet wird zu mittelschweren oder klei...

Страница 6: ... Falls Ihr Gerät nicht ordnungsgemäß funktioniert kontaktieren Sie den Kundendienst oder das Geschäft in dem Sie das Gerät erworben haben 1 Lassen Sie nur Original Ersatzteile einbauen 9 Sollte es zu irgendeiner Fehlfunktion aufgrund eines technischen Defekts kommen trennen Sie das Gerät umgehend von der Stromversorgung entsprechende Haussicherung abschalten Kontaktieren Sie den Kundendienst oder ...

Страница 7: ...n 5 Falls Sie sich nicht sicher sind ob das Gerät ordnungsgemäß an die Stromversorgung angeschlossen ist lassen Sie den elektrischen Anschluss von einer qualifizierten Fachkraft Elektrotechniker in überprüfen keine Garantieleistung 6 Sämtliche Arbeiten die zum Anschluss des Gerätes an die Stromversorgung notwendig sind dürfen nur von einer qualifizierten Fachkraft Elektrotechniker in durchgeführt ...

Страница 8: ...felds Risse aufweisen sollte schalten Sie es umgehend aus und trennen Sie es von der Stromversorgung STROMSCHLAGGEFAHR 20 Dunstabzugshauben müssen entsprechend den Anweisungen ihrer Hersteller angebracht werden 21 Der Sicherheitsabstand zwischen der Kochoberfläche und einem sich darüber befindenden Schrank muss mindestens 450 mm betragen 22 Der Sicherheitsabstand zwischen der Kochoberfläche und ei...

Страница 9: ...en Kontaktieren Sie den Kundendienst oder das Geschäft in dem Sie das Gerät erworben haben 3 31 Erhitzen Sie niemals Lebensmittel und Flüssigkeiten in geschlossenen Behältern da diese Explosionen verursachen können 32 Benutzen Sie das Gerät nicht zum Heizen oder zum Trocknen von Wäsche 33 Lagern Sie keine Gegenstände im Backofen BRANDGEFAHR 34 Die zugänglichen Bereiche und Teile des Backofens werd...

Страница 10: ...etc da diese die Oberfläche verkratzen und somit Risse im Glas verursachen 3 Stellen oder legen Sie kein Kochgeschirr und keine Backbleche direkt auf den Boden des Backofeninnenraums Decken Sie den Boden des Backofeninnenraums nicht mit Aluminiumfolie ab 4 Halten Sie die Backofentür beim Betrieb des Backofens immer geschlossen 5 Stellen Sie kein Kochgeschirr direkt auf den Boden des Backofens Nutz...

Страница 11: ...lten Sie es immer am unteren Ende fest und heben Sie es vorsichtig an Halten Sie das Gerät dabei aufrecht 2 Benutzen Sie niemals die Tür selbst zum Transport des Gerätes da Sie dadurch die Scharniere beschädigen 3 Das Gerät muss von mindestens zwei Personen transportiert und angeschlossen werden 4 Merken Sie sich die Positionen aller Teile des Gerätes wenn Sie es auspacken für den Fall es noch ein...

Страница 12: ...r Gerät für einen Einbau geeignet ist müssen immer frei und unbedeckt sein 17 Das Typenschild darf niemals unleserlich gemacht oder gar entfernt werden Zuwiderhandlungen führen zum Garantieausschluss LESEN SIE DIESE ANLEITUNG GRÜNDLICH DURCH UND BEWAHREN SIE DIESE SICHER AUF Bei Nichtbeachtung dieser Anweisungen wird keinerlei Haftung für Personen oder Materialschäden übernommen 2 Installation GEF...

Страница 13: ...en die Verbundschichten und Kleber hitzeresistent sein Die Installation liegt in der Verantwortung des Kunden Falls die Hilfe des Herstellers zur Korrektur von Fehlern die auf Grund einer unsachgemäßen Installation entstanden sind benötigt wird ist eine solche Hilfeleistung nicht durch die Garantie abgedeckt Eine unsachgemäße Installation kann zu erheblichen Verletzungen von Personen oder Tieren b...

Страница 14: ...er Installation Die Arbeitsplatte muss aus hitzeresistentem Material bestehen Es dürfen keine Bauteile die Installationsfläche beeinträchtigen Die Stärke der Arbeitsplatte zur Installation des Kochfelds muss mindestens 30 betragen Verwenden Sie hitzeresistente und leicht zu reinigende Wandabschlüsse wie Keramikfliesen für die das Kochfeld umgebende Wandoberfläche Angrenzende Möbelstücke und alle z...

Страница 15: ...eiten Sie die Einbauöffnung entsprechend den Angaben auf den Abbildungen in Kapitel 2 3 1 MAßANGABEN ABMESSUNGEN vor Stellen Sie für die Installation und Benutzung einen Mindestfreiraum von 50 mm um die Einbauöffnung herum bereit Die Stärke der Arbeitsplatte muss mindestens 30 mm betragen Verwenden Sie für die Arbeitsplatte ausschließlich hitzeresistentes Material um Deformationen aufgrund der Wär...

Страница 16: ... 16 MAßE DER EINBAUÖFFNUNG B BREITE C TIEFE D MINDESTFREIRAUM UM DIE EINBAUÖFFNUNG HERUM 564 mm 494 mm mind 50 mm INSTALLATIONSZEICHNUNG Alle Abmessungen sind in Millimetern angegeben ...

Страница 17: ...abstrahlung zur Aufrechterhaltung der Betriebssicherheit ermöglicht wird Die Wand und die Einflussbereiche der Wärmeabstrahlung oberhalb der Arbeitsplatte müssen hitzeresistent sein Zur Vermeidung von Schäden müssen die Verbundschichten und Kleber hitzeresistent sein MINDESTABSTÄNDE FÜR EINE ORDNUNGSGEMÄßE BELÜFTUNG Das Kochfeld muss unbedingt ordnungsgemäß belüftet werden Der Lufteinlass D und Lu...

Страница 18: ...ren müssen Sie die selbstklebende Dichtung4 ordnungsgemäß an der unteren Kante des Kochfelds befestigen s Abb unten Die Dichtung muss ordnungsgemäß befestigt werden Die Dichtung muss fest an der Unterkante des Kochfelds anliegen keine Überlappungen keine Lücken etc um zu verhindern dass später Flüssigkeit etc in die Einbauöffnung eindringen kann Abb ähnlich 1 DICHTUNG 2 KOCHFELD 3 ARBEITSPLATTE 4 ...

Страница 19: ...Gerätes aus c Befestigen Sie die Halteklammern mit den dazugehörigen Schrauben an den Seiten des Kochfelds indem Sie das eine Ende der Halteklammern in die vorgebohrten Löcher einschrauben wie auf der unteren Abbildung gezeigt A SCHRAUBE B HALTEKLAMMER C SCHRAUBENLOCH D GEHÄUSE 3 Setzen Sie das Kochfeld in die Installationsöffnung ein und richten Sie es korrekt aus Drücken Sie es vorsichtig nach u...

Страница 20: ...splatte befinden Die Dichtung muss ordnungsgemäß anliegen 2 4 Installation des Backofens GEFAHR Der Backofen muss von einer qualifizierten Fachkraft installiert werden Führen Sie die Installation niemals eigenständig aus STROMSCHLAGGEFAHR GEFAHR Schalten Sie vor der Installation und Anschluss des Gerätes unbedingt die Stromversorgung ab entsprechende Haussicherung abschalten STROMSCHLAGGEFAHR GEFA...

Страница 21: ...de des Einbaumöbels installiert wird muss zwischen der Schublade und dem Backofen ein fester Zwischenboden montiert werden INSTALLATION DES BACKOFENS 1 Schalten Sie den Strom mittels der entsprechenden Sicherungen in Ihrem Haussicherungskasten ab 2 Die Öffnung des Einbaumöbels muss über die auf der folgenden Abbildung s unten Abb 2 genannten Abmessungen verfügen 3 Setzen Sie das Kochfeld ein s Kap...

Страница 22: ...en komplett in die vorbereitete Öffnung ein und richten Sie ihn aus Die Kabel dürfen nicht eingeklemmt oder geknickt werden 7 Beenden Sie den Einbau des Gerätes und befestigen Sie den Backofen mit den 4 entsprechenden Schrauben s unten Abb 3 Alle Abmessungen in Abb 1 Abb 2 und Abb 3 sind in Millimetern angegeben ABB 1 MAßE DES BACKOFENS ABB 2 MAßE DER EINBAUÖFFNUNG ...

Страница 23: ...nehmen genau kennt und sorgfältig beachtet GEFAHR Die Stromspannung und die Leistungsfrequenz der Stromversorgung muss den auf dem Typenschild angegebenen Werten entsprechen HINWEISE FÜR DIE QUALIFIZIERTE FACHKRAFT ELEKTROTECHNIKER IN Das Gerät ist für den Anschluss an 3 Phasen Wechselstrom 380 415 V 3N 50 Hz ausgelegt Als Netzanschlussleitung muss ein entsprechend ausgelegter Leistungstyp unter B...

Страница 24: ...rätes erforderlich ist muss bei der Installation eine Trennvorrichtung für jeden Pol eingebaut werden Als Trennvorrichtung werden Schalter mit einer Kontaktöffnung von mindestens 3 mm bezeichnet Dazu gehören LS Schalter Sicherungen und Schütze EN 60335 Kontaktschutz muss bei Installation des Gerätes gewährleistet sein Anschlussdose öffnen Zum Entriegeln Schraubenzieher ansetzen 1 und leicht nach u...

Страница 25: ...R L Stromführende Leitung Netzleiter L 1 L 2 L 3 1 5 mm2 ROT N Nullleiter N 1 N 2 1 5 mm2 BLAU PE Schutzleiteranschluss GELB GRÜN 1 5 mm2 Der Hausstrom muss mit einem Sicherungsautomaten zur Notabschaltung des Gerätes ausgestattet sein Das Gerät muss geerdet werden Die technischen Daten der elektrischen Versorgung müssen den auf dem Typenschild angegebenen Werten entsprechen ...

Страница 26: ... 26 2 5 2 Elektrischer Anschluss Verbindung Backofen und Kochfeld KLEMMLEISTE RICHTIGE VERBINDUNG FALSCHE VERBINDUNG ...

Страница 27: ...N Die RESTWÄRMEANZEIGEN leuchten nach dem Abschalten bei heißen Kochzonen auf und erlöschen sobald die entsprechende Kochzone abgekühlt ist 3 1 1 Zubehör Abhängig vom Modell sind ein Grillrost eine Tropfschale Backofenpfanne und oder ein Backblech tiefe Backofenpfanne im Lieferumfang Ihres Gerätes enthalten Bevor Sie das Gerät zum ersten Mal benutzen reinigen Sie das im Lieferumfang enthaltende Zu...

Страница 28: ...FAHR HINWEIS Verwenden Sie beim Grillen immer die Tropfschale oder das Backblech um das von dem Grillgut abtropfende Fett aufzufangen GRILLROST Der Grillrost ist zum Grillen zum Braten und zum Backen von Lebensmitteln geeignet ebenso ist er zum Garen von Speisen in Auflaufformen und zum Backen von Kuchen in Kuchenformen geeignet TROPFSCHALE BACKOFENPFANNE Die Tropfschale bzw Backofenpfanne ist zum...

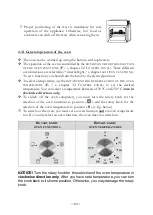
Страница 29: ...ech ebenso wie die Tropfschale dazu geeignet um das von dem Grillgut abtropfende Fett aufzufangen 3 2 Bedienfeld Abb ähnlich Modifikationen sind möglich A BETRIEBSANZEIGE des BACKOFENS ROT B BETRIEBSANZEIGE des KOCHFELDS ORANGE C DREHSCHALTER ZUR STEUERUNG DES KOCHFELDS HINTEN LINKS Drehen Sie den Drehschalter mit oder gegen den Uhrzeigersinn um diese Kochzone einzuschalten 6 Optionales Zubehör Au...

Страница 30: ...rei verschiedene Backofenfunktionen Beleuchtung sind wählbar s Kapitel 4 4 BACKOFENFUNKTIONEN G DREHSCHALTER ZUR STEUERUNG DES KOCHFELDS VORNE RECHTS Drehen Sie den Drehschalter mit oder gegen den Uhrzeigersinn um diese Kochzone einzuschalten H DREHSCHALTER ZUR STEUERUNG DES KOCHFELDS HINTEN RECHTS Drehen Sie den Drehschalter mit oder gegen den Uhrzeigersinn um diese Kochzone einzuschalten 4 Bedie...

Страница 31: ...en Sie die Ausstattungselemente heraus Blech etc und reinigen Sie diese mit warmem Wasser und etwas Spülmittel 4 Schalten Sie die Raumbelüftung ein oder öffnen Sie das Fenster 5 Lassen Sie den Backofen mit Ober und Unterhitze oder ähnliche Backofenfunktion 7 auf 250 C für 30 Minuten laufen s Kapitel 4 3 BENUTZUNG DES BACKOFENS ff Entfernen Sie anschließend Verunreinigungen und säubern Sie den Inne...

Страница 32: ...Glaskeramik geeigneten Boden aufweist Der Boden des Kochgeschirrs sollte einen Mindestdurchmesser entsprechend der verwendeten Kochzone aufweisen Verwenden Sie kein Kochgeschirr mit zackigen oder scharfen Kanten und rauen oder gekrümmten Böden Der Boden Ihres Kochgeschirrs sollte gerade sein flach auf der Glaskeramik aufliegen und denselben Durchmesser wie die ausgewählte Kochzone aufweisen Zentri...

Страница 33: ...öglich 0 Kochzone ist ausgeschaltet 1 LEISTUNGSSTUFE 1 Geeignet zum Warmhalten von Speisen etc Niedrigste Einstellung 2 LEISTUNGSSTUFE 2 Geeignet zum Schmoren Dämpfen von Gemüse und zum langsamen Kochen 3 LEISTUNGSSTUFE 3 Geeignet zum Kochen von Suppen und größeren Gerichten 4 LEISTUNGSSTUFE 4 Geeignet zum langsamen Braten 5 LEISTUNGSSTUFE 5 Geeignet zum Grillen von Fleisch und Fisch 6 LEISTUNGSST...

Страница 34: ...bald die entsprechende Kochzone auf eine sichere Temperatur abgekühlt ist Sie können die Restwärme auch als Energiesparfunktion nutzen indem Sie weitere Kochvorgänge auf Kochzonen beginnen die noch heiß warm sind 4 3 Benutzung des Backofens WARNUNG Während des Betriebs können zugängliche Teile des Gerätes heiß werden Berühren Sie die heißen Bereiche nicht und halten Sie Kinder vom Gerät fern VERBR...

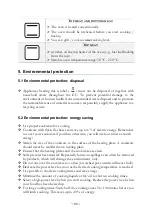
Страница 35: ...ofenfunktionen sind wählbar Beleuchtung s Kapitel 4 4 BACKOFENFUNKTIONEN Bewegen Sie den Drehschalter hierbei auf die gewünschte Einstellung Zur Einstellung der Temperatur bewegen Sie den DREHSCHALTER ZUR AUSWAHL DER BACKOFENTEMPERATUR E s Kapitel 3 2 BEDIENFELD auf die gewünschte Einstellung Sie können hierbei eine Temperatur zwischen 50 C und 250 C auswählen mit dem Uhrzeigersinn drehen Sie scha...

Страница 36: ...Backofen seine voreingestellte Temperatur erreicht Falls ein Kochrezept das Vorwärmen von Tellern empfiehlt sollten diese erst in den Backofen gestellt werden wenn das rote Licht zum ersten Mal erloschen ist Während eines Koch Backvorgangs geht das rote Licht gelegentlich an oder aus um die voreingestellte Temperatur im Inneren des Backofens aufrechtzuerhalten 4 4 Backofenfunktionen DREHSCHALTER Z...

Страница 37: ...iesem Zeichen dürfen innerhalb der gesamten EU nicht zusammen mit dem Hausmüll entsorgt werden Führen Sie das Gerät verantwortungsbewusst einer Wiederverwertungsstelle zu um mögliche Schäden an der Umwelt oder menschlichen Gesundheit bedingt durch unkontrollierte Abfallentsorgung zu verhindern und die nachhaltige Wiederverwendung materieller Ressourcen zu fördern 5 2 Umweltschutz Energie sparen Be...

Страница 38: ...en Sie die Backofentür nicht unnötig oft Schalten Sie den Backofen rechtzeitig ab und nutzen Sie die Restwärme Benutzen Sie den Backofen nur zur Zubereitung größerer Mengen Fleisch mit einem Gewicht von unter 1 kg kann in einem Kochgeschirr auf dem Kochfeld wirtschaftlicher zubereitet werden Nutzen Sie die Restwärme des Backofens Falls die Garzeit mehr als 40 Minuten beträgt schalten Sie den Backo...

Страница 39: ...it Ihrem Essgeschirr Kochgeschirr HINWEIS Benutzen Sie ausschließlich für Glaskeramik geeignetes Kochgeschirr da Sie ansonsten das Gerät beschädigen 6 1 Hinweise für das Kochen und Braten auf einem Kochfeld AUF KLEINER FLAMME KOCHEN REIS KOCHEN Auf kleiner Flamme kochen bedeutet köcheln bei ca 85 C wenn gerade Bläschen gelegentlich an die Oberfläche der Kochflüssigkeit aufsteigen Köcheln ist die i...

Страница 40: ...f 3 Heißen Sie den Wok die Pfanne kurz vor und geben Sie 2 Esslöffel Öl dazu 4 Bereiten Sie Fleisch zuerst zu Legen Sie es an die Seite und halten Sie es warm 5 Schwenken Sie das Gemüse an Wenn das Gemüse heiß aber immer noch knackig ist stellen Sie die Leistungsstärke niedriger ein Geben Sie nun das Fleisch wieder hinzu und gegebenenfalls eine Sauce 6 Schwenken Sie alles nochmals vorsichtig an da...

Страница 41: ...ege WARNUNG Schalten Sie das Gerät vor dem Reinigen unbedingt aus und lassen Sie es vollständig abkühlen Trennen Sie das Gerät vor allen Wartungsarbeiten von der Stromversorgung entsprechende Sicherung im Sicherungskasten der Hausstromversorgung ausschalten WARNUNG Benutzen Sie kein Dampfreinigungsgerät Der Dampf kann in Kontakt mit elektrischen Teilen kommen und so einen Kurzschluss auslösen STRO...

Страница 42: ...ist zum Schutz der Glaskeramik am geeignetsten ART DER VERUNREINIGUNG VORGEHENSWEISE SICHERHEITSHINWEISE ALLTÄGLICHE VERUNREINIGUNGEN DER GLASKERAMIK FINGERABDRÜCKE FLECKEN DURCH LEBENSMITTEL ODER NICHT ZUCKERHALTIGE SPRITZER 1 Trennen Sie das Gerät von der Stromversorgung Haussicherung 2 Verwenden Sie einen geeigneten Glaskeramik Reiniger während die Glaskeramik noch warm aber nicht heiß ist 3 Mi...

Страница 43: ... sein und auch die Glaskeramik Oberfläche dauerhaft beschädigen Verwenden Sie den Glaskeramik Schaber äußerst vorsichtig damit Sie sich nicht an der Klinge schneiden besonders dann wenn Sie die Sicherheitsabdeckung zurückgeschoben haben 7 2 Reinigung des Backofens WARNUNG Benutzen Sie niemals einen Dampfreiniger STROMSCHLAGGEFAHR HINWEIS Wenn Sie einen speziellen Backofenreiniger anwenden überprüf...

Страница 44: ...7 Wischen Sie nach der Reinigung das Innere des Backofens trocken 7 3 Reinigung der Backofentür Reinigen Sie die Glasscheibe der Backofentür äußerst vorsichtig Verwenden Sie keine Scheuermittel da Sie ansonsten die Scheibe zerkratzen oder zerbrechen können Verwenden Sie etwas Spülmittel und warmes Wasser 7 4 Austausch des Leuchtmittels WARNUNG Schalten Sie das Gerät unbedingt aus und lassen Sie es...

Страница 45: ...ch ein neues Hochtemperatur Leuchtmittel 300 C gleicher Art Volt 230 V Leistung 25 W Benutzen Sie keinen anderen Leuchtmittel Typ 5 Setzen Sie das neue Leuchtmittel ein und überprüfen Sie sorgfältig ob dieses sich ordnungsgemäß in seinem Sockel befindet 6 Schrauben Sie die Lampenabdeckung wieder an 7 Entfernen Sie das Geschirrtuch und schalten Sie die entsprechende Sicherung im Sicherungskasten de...

Страница 46: ...an und ziehen Sie diese vorsichtig in Ihre Richtung heraus 4 Um die Tür wieder einzusetzen verfahren Sie in umgekehrter Reihenfolge 5 Vergewissern Sie sich bei der Montage dass die Kerbe des Scharnierhalters sicher in der Führung sitzt 6 Nachdem die Tür wieder in den Backofen eingepasst ist schließen Sie wieder vorsichtig den Sicherheitsbügel 7 Falls der Sicherheitsbügel nicht ordnungsgemäß geschl...

Страница 47: ...ft in dem Sie das Gerät erworben haben Überprüfen Sie die Angaben der Tabelle bevor Sie den Kundendienst oder das Geschäft kontaktieren in dem Sie das Gerät erworben haben FEHLER MÖGLICHE URSACHE MAßNAHMEN EINIGE PFANNEN TÖPFE ERZEUGEN KRACKENDE ODER KLICKENDE GERÄUSCHE 1 Diese können durch die Herstellungsart Ihres Kochgeschirrs verursacht werden Schichten aus verschiedenen Metallen 1 Das ist bei...

Страница 48: ...auf trennen Sie das Gerät von der Stromversorgung und kontaktieren Sie den Kundendienst DIE INNENBELEUCHTUNG FUNKTIONIERT NICHT 1 Das Leuchtmittel ist locker oder beschädigt 1 Das Leuchtmittel festdrehen oder ersetzen VENTILATIONSGERÄUSCHE DRINGEN AUS DEM GERÄT 1 Der eingebaute Ventilator12 schützt die Elektronik vor Überhitzung und kann auch nach dem Abschalten des Gerätes noch eine Zeit lang wei...

Страница 49: ...Sie sich bitte mit dem Kundendienst in Verbindung 9 Technische Daten TECHNISCHE DATEN Geräteart Einbaubackofen mit Kochfeld Bedienfeld Edelstahlblende Material Kochfeld Glaskeramik Energieeffizienzklasse A Energieeffizienzindex 94 90 Energieverbrauch konventionell 0 80 kW h Energieverbrauch Umluft Heißluft Nettovolumen Backröhre in Litern 63 00 Anzahl Wärmequellen pro Garraum 1 Elektro Anzahl der ...

Страница 50: ...hfeld 8 00 kW Max Nennleistung Kochfeld 6 0 kW Max Nennleistung Backofen 2 0 kW Stromspannung Frequenz 220 240 V AC 50 Hz Maße Kochfeld H B T in cm 5 20 59 00 52 00 Maße Backofen H B T in cm 59 50 59 50 50 00 Kochfeld Gewicht netto brutto in kg 8 60 10 00 Backofen Gewicht netto brutto in kg 28 00 30 00 Technische Änderungen vorbehalten Gemäß Verordnung EU Nr 65 2014 A höchste Effizienz bis D gerin...

Страница 51: ...t abschneiden und direkt mit dem Netzstecker entfernen und entsorgen Demontieren Sie immer die komplette Tür damit sich keine Kinder einsperren und in Lebensgefahr geraten können 4 Entsorgen Sie Papier und Kartonagen in den dafür vorgesehenen Behältern 5 Entsorgen Sie Kunststoffe in den dafür vorgesehenen Behältern 6 Falls es in Ihrem Wohnumfeld keine geeigneten Entsorgungsbehälter gibt bringen Si...

Страница 52: ... Beschaffenheit die auf den Gebrauchswert des Produkts keinen Einfluss haben 3 Schäden infolge Betriebs und Bedienungsfehler 4 Schäden durch aggressive Umgebungseinflüsse Chemikalien Reinigungsmittel 5 Schäden am Produkt die durch nicht fachgerechte Installation oder Transport verursacht wurden 6 Schäden infolge nicht haushaltsüblicher Nutzung 7 Schäden die außerhalb des Gerätes durch ein PKM Prod...

Страница 53: ...acking and positioning 62 2 2 Pre installation requirements 63 2 3 Installation of the hob 64 2 3 1 Dimensions 64 2 3 2 Ventilation and installation 66 2 4 Installation of the oven 69 2 5 Electrical connection 72 2 5 1 Connection diagram 73 2 5 2 Electrical connection connection oven and hob 74 3 Description of the appliance 75 3 1 Oven and hob 75 3 1 1 Accessories 76 3 2 Control panel 77 4 Operat...

Страница 54: ...ce together with your domestic waste The appliance must be disposed of at a collecting centre for recyclable electric and electronic appliances Do not remove the symbol from the appliance The figures in this instruction manual may differ in some details from the current design of your appliance Nevertheless follow the instructions in such a case Delivery without content Any modifications which do ...

Страница 55: ...incl wires inside a wall must be checked by a qualified professional All modifications to the electrical mains to enable the installation of the appliance must be performed by a qualified professional The appliance is intended for private use only The appliance is intended for cooking in a private household only The appliance is intended for indoor use only The appliance is not intended to be oper...

Страница 56: ...e carried out by a qualified professional Do not modify the energy supply The connection must be carried out in accordance with the current local and legal regulations 4 Switch off the power supply fuse box of your household power supply before you install the appliance and before you connect it to the mains RISK OF ELECTRIC SHOCK 5 Do not connect the appliance to the mains if the appliance itself...

Страница 57: ...he mains before you clean or maintain it 3 Connect the appliance to a properly grounded socket only Use a safety socket to minimise any risk of electric shock 4 The technical data of your energy supply must meet the data on the rating label The main current circuit must be equipped with a safety shut down device 5 If you are in doubt as to whether the appliance is connected to the mains properly l...

Страница 58: ...ass ceramic switch off the appliance and disconnect it from the mains fuse box RISK OF ELECTRIC SHOCK 20 Cooker hoods should be installed according to their manufacturers instructions 21 The safety distance between the hob and a wall cupboard above must be at least 450 mm 22 The safety distance between the hob and an extractor hood above must be at least 760 mm 23 Do not store any objects on the h...

Страница 59: ...e hot oven or the hob as the insulation material is usually not heat resistant 36 Never use a steam cleaner to clean the appliance The steam will cause serious damage to the electric components of the appliance RISK OF ELECTRIC SHOCK 37 Children must not play with the appliance 38 Always supervise children if they are near the appliance 39 Only allow children to use the appliance without supervisi...

Страница 60: ... hob should be clean at every time Soiled cooking zones do not transfer the heat correctly 12 Protect the hob from corrosion 13 Switch off soiled cooking zones 14 Switch off the complete hob if any damage or malfunction occurs 15 Cooking utensils may become hot because of the heat transferred by the heated food Potholders or oven gloves may be needed to handle such utensils 16 The blades of scrape...

Страница 61: ...onnect your appliance to the mains unless all packaging and transit protectors have been removed Do not use any aggressive detergents to remove the transit protectors 12 When the seal of the oven door is damaged it must be replaced by the manufacturer or an authorised aftersales service or a qualified professional only Original spare parts should be used only 13 Regularly cleaning and maintenance ...

Страница 62: ...the packaging materials polythene bags polystyrene pieces etc should be kept away from children and pets CHOKING HAZARD RISK OF INJURY CAUTION When installing the appliance ensure optimal heat radiation to maintain the operating safety CAUTION The wall and the reach of the heat radiation above the worktop must be made of heat resistant materials CAUTION To avoid any damage the sandwich layer and a...

Страница 63: ... the room door or a window to ensure proper ventilation 10 The nameplate is situated inside the appliance or at the back 2 2 Pre installation requirements The worktop must be made of heat resisting material Structural elements should not interfere with the installation area The thickness of the worktop for the installation of the hob must be at least 30 mm The wall sat the hob should be covered wi...

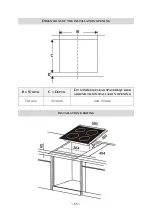
Страница 64: ... heat resistant materials To avoid any damage the sandwich layer and adhesive must resist heat Provide an installation opening relevant to the dimensions on the drawings in chapter 2 3 1 DIMENSIONS For installation and use a minimum of 50 mm space shall be preserved around the hole The thickness of the worktop must be at least 30 mm Choose heat resistant materials for the work top only to avoid an...

Страница 65: ... 65 DIMENSIONS OF THE INSTALLATION OPENING B WIDTH C DEPTH D MINIMUM CLEAR SPACE REQUIRED AROUND THE INSTALLATION OPENING 564 mm 494 mm min 50 mm INSTALLATION DRAWING ...

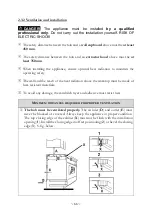
Страница 66: ...al heat radiation to maintain the operating safety The wall and the reach of the heat radiation above the worktop must be made of heat resistant materials To avoid any damage the sandwich layer and adhesive must resist heat MINIMUM DISTANCES REQUIRED FOR PROPER VENTILATION The hob must be ventilated properly The air inlet D and outlet E must never be blocked or covered Always keep the appliance in...

Страница 67: ... the hob you must fix the adhesive seal16 on the bottom edge of the hob properly s fig below The seal must be fitted tightly on the bottom edge of the hob no overlaps no gaps etc to prevent liquids etc from entering the installation opening subsequently Fig similar 1 SEAL 2 HOB 3 WORKTOP 4 OUTER EDGE OF THE HOB 5 OUTER SIDE OF THE SEAL 6 BOTTOM OF THE HOB 2 Install the fixing brackets on the housi...

Страница 68: ...onding screws screw one end of the fixing brackets into the pre drilled holes as shown in the fig below A SCREW B BRACKET C SCREW HOLE D HOUSING OF THE HOB 3 Insert the hob into the installation opening and align it correctly Push the hob down carefully until the hob and the seal are in firm contact to the worktop s fig below The hob must be in the installation opening of the worktop properly and ...

Страница 69: ...al only Do not carry out the installation yourself RISK OF ELECTRIC SHOCK DANGER Switch off the power supply fuse box of your household power supply before you install the appliance and before you connect it to the mains RISK OF ELECTRIC SHOCK DANGER The appliance must be connected to the mains by a qualified professional who is familiar with and adheres to the local requirements and supplementary...

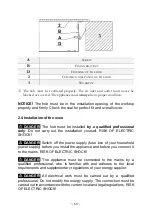
Страница 70: ...b in the built in opening s chapter 2 3 INSTALLATION OF THE HOB et seq 4 Place the oven near the built in opening 5 Connect the oven to the mains see also chapter 2 5 ELECTRICAL CONNECTION HOB OVEN et seq Proceed as follows a Partially insert the oven into the opening and connect the oven to the hob properly In doing so it is essential to observe the instructions referring to the electrical connec...

Страница 71: ... 71 FIG 1 DIMENSIONS OF THE OVEN FIG 2 DIMENSIONS OF THE INSTALLATION OPENING ...

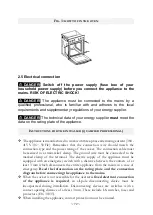
Страница 72: ...he connection type and the power rating of the cooker The connection cable must be secured in a strain relief clamp The ground wire must be connected to the marked clamp of the terminal The electric supply of the appliance must be equipped with an emergency switch with a distance between the contacts of at least 3 mm which disconnects the entire appliance from the mains in a case of emergency Read...

Страница 73: ...elow You may need to release two locks on both sides of the connection box WARNING Any damage caused by an appliance that is not connected to the mains properly is not subject to the guarantee 2 5 1 Connection diagram WARNING Any kind of connection the safety wire must be connected to the PE terminal ...

Страница 74: ...UE PE Protective earth terminal YELLOW GREEN 1 5 mm2 Your domestic circuit must be equipped with an automatic circuit breaker The appliance must be grounded The technical data of your energy supply must meet the values on the rating plate 2 5 2 Electrical connection connection oven and hob TERMINAL BLOCK RIGHT CONNECTION WRONG CONNECTION ...

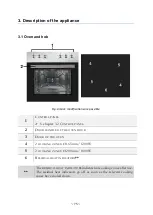
Страница 75: ...3 2 CONTROL PANEL 2 DOOR HANDLE OF THE OVEN DOOR 3 DOOR OF THE OVEN 4 2 COOKING ZONES Ø 165 mm 1200 W 5 2 COOKING ZONES Ø 200 mm 1800 W 6 RESIDUAL HEAT INDICATORS The RESIDUAL HEAT INDICATORS indicate hot cooking zones after use The residual heat indicators go off as soon as the relevant cooking zones have cooled down ...

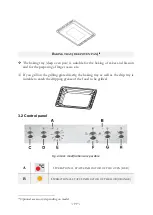
Страница 76: ...g grate drip tray baking tray are fully inserted into the oven so they do not collide with the oven door when closing it NOTICE If you grill on the grilling grate directly always use the drip tray or the baking tray to catch the dripping grease of the food to be grilled GRILLING GRATE The grilling grate is suitable for the grilling roasting and baking of food it is also suitable for the cooking of...

Страница 77: ... etc If you grill on the grilling grate directly the baking tray as well as the drip tray is suitable to catch the dripping grease of the food to be grilled 3 2 Control panel Fig similar modifications are possible A OPERATIONAL STATUS INDICATOR OF THE OVEN RED B OPERATIONAL STATUS INDICATOR OF THE HOB ORANGE 18 Optional accessory depending on model ...

Страница 78: ...ONS Rotary knob for the selection of the OVEN FUNCTIONS This rotary knob selects the desired cooking function Three different oven functions internal light are selectable s chapter 4 4 OVEN FUNCTIONS G ROTARY KNOB TO CONTROL THE FRONT RIGHT COOKING ZONE Turn the rotary knob clockwise or anticlockwise to switch on this cooking zone H ROTARY KNOB TO CONTROL THE REAR RIGHT COOKING ZONE Turn the rotar...

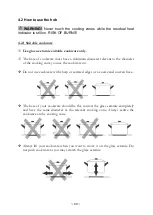
Страница 79: ...hem with warm water and washing up liquid 4 Switch on the room ventilation or open a window 5 Let the oven operate for 30 minutes top and bottom heat or similar oven function19 250 C s chapter 4 3 USE OF THE OVEN et seq A little bit of smoke and odour may be generated for approx 15 minutes This is normal They are generated by the substance that protects your appliance against damage caused by the ...

Страница 80: ...t to the diameter of the cooking zone you use the cookware on Do not use cookware with sharp or serrated edges or a coarse and uneven base The base of your cookware should be flat contact the glass ceramic completely and have the same diameter as the relevant cooking zone Always centre the cookware on the cooking zone Always lift your cookware when you want to move it on the glass ceramic Do not p...

Страница 81: ...odifications are possible 0 Cooking zone is switched off 1 POWER LEVEL 1 Suitable for keeping dishes warm Lowest setting 2 POWER LEVEL 2 Suitable for stewing the steaming of vegetables and slow cooking 3 POWER LEVEL 3 Suitable for the cooking of soups and larger dishes 4 POWER LEVEL 4 Suitable for slow frying 5 POWER LEVEL 5 Suitable for the grilling of meat and fish 6 POWER LEVEL 6 Suitable for q...

Страница 82: ...has cooled down You can use the residual heat for saving energy when starting a new cooking procedure on a cooking zone which is still warm hot 4 3 How to use the oven WARNING The accessible parts of the appliance become hot during operation so keep children away from the operating appliance Touching the appliance while it is operating can cause serious burns CAUTION The interior parts of the appl...

Страница 83: ...ON OF THE OVEN TEMPERATURE E s chapter 3 2 CONTROL PANEL to set the desired temperature You can select a temperature between of 50 C and 250 C turn in clockwise direction only To switch off the oven completely you must turn the rotary knob for the selection of the oven functions to position and the rotary knob for the selection of the oven temperature to position 0 s fig below To switch on the ove...

Страница 84: ...ne off for the first time During a cooking baking process the red light of the oven will go off and on temporarily to maintain the set temperature 4 4 Oven functions ROTARY KNOB FOR THE SELECTION OF THE OVEN FUNCTIONS SYMBOLS DESCRIPTION OF THE FUNCTIONS INTERNAL LIGHT Turn the rotary knob to this symbol to switch on the internal light The oven does not heat BOTTOM HEAT Switches on the bottom heat...

Страница 85: ...t bases can save up to1 3 of electric energy Remember to cover your cookware if possible otherwise you will use four times as much energy Match the size of the cookware to the surface of the heating plate A cookware should never be smaller than a heating plate Ensure that the heating plates and the cookware are clean Soils prevent heat transfer Repeatedly burnt on spillages can often be removed by...

Страница 86: ...Otherwise the energy consumption increases unnecessarily 6 Cooking guidelines WARNING Be very careful when frying because oil and fat heat up very fast especially when operating a high power level Extremely hot oil and fat inflame spontaneously and represent a serious fire risk WARNING NEVER try to extinguish a fire with water but switch off the appliance and then cover flame e g with a lid or a f...

Страница 87: ...zzle a small amount of oil into the hot pan and place the steak into the pan 4 Turn the meat just once while cooking The exact cooking time depends on the size of your steak and your individual preferences medium medium rare etc So the cooking time of each side may vary from 2 to 8 minutes Press the steak to check the cooking result a firm steak is well done 5 Leave the steak on a warm plate for a...

Страница 88: ...ven Cook smaller pieces of food on the hob Use oven proof cookware only Check that their handles also are oven proof When you cook meat on a grilling grate insert a drip tray with a small amount of water in the oven minimum rack height Turn over meat at least once Pour hot gravy or hot salted water over the meat Never pour cold water over the meat 7 Cleaning and maintenance WARNING Switch off the ...

Страница 89: ... KIND OF CONTAMINATION STRATEGY SAFETY GUIDELINES DAILY CONTAMINATION OF THE GLASS CERAMIC FINGERPRINTS STAINS CAUSED BY FOOD NON SUGARY SPILLAGES 1 Disconnect the appliance from the mains fuse box 2 Use a suitable detergent for glass ceramic while the glass ceramic is still warm but not hot 3 Clean with a soft cloth kitchen paper and water then dry carefully 4 Connect the appliance to the mains a...

Страница 90: ...ceramic permanently Be very careful when using the scraper so that you do not cut yourself especially when you have removed the safety cover 7 2 Cleaning of the oven WARNING Never use a steam cleaner RISK OF ELECTRIC SHOCK NOTICE If you use a special oven detergent check that the detergent is suitable for your appliance instructions on the packaging of the detergent NOTICE Any damage that is cause...

Страница 91: ... and warm water 7 4 Replacing of the illuminant WARNING Switch off the appliance and let it cool down completely Disconnect the appliance from the mains before maintenance fuse box of your household power supply RISK OF ELECTRIC SHOCK NOTICE When you replace the illuminant always use a clean cloth or gloves Never touch the new illuminant with your bare hands NOTICE Never use a screwdriver to remov...

Страница 92: ... supply again According to the EU regulation No 244 2009 your appliance is classified as a household appliance in accordance with the eco design requirements for non directional household lamps This means that illuminants which are used in household appliances must not be used to illuminate domestic establishments 7 5 Removing installing of the oven door HOW TO REMOVE INSTALL THE OVEN DOOR 1 Open ...

Страница 93: ...r the shop you purchased the appliance at 21 EMERGENCY MEASURES 1 Switch off the entire appliance 2 Disconnect the appliance from the mains fuse box of your household power supply 3 Contact your aftersales service or the shop you purchased the appliance at Check the schedule below before you contact your aftersales service or the shop you purchased the appliance at MALFUNCTION POSSIBLE CAUSES MEAS...

Страница 94: ...HE TIMER DISPLAY 1 Technical malfunction 1 Note the complete error code23 disconnect the appliance from the mains and contact the shop you purchased the appliance at THE APPLIANCE DOES NOT HEAT 1 You have not set a temperature 1 Set a temperature 2 The heating element is defective 2 Please contact the aftersales service THE INTERNAL LIGHT DOES NOT WORK 1 The illuminant is loose or damaged 1 Tighte...

Страница 95: ...ice 9 Technical data TECHNICAL DATA Model Built in oven with hob Control panel Stainless steel cover Material hob Glass ceramic Energy efficiency category A Energy efficiency index 94 90 Energy consumption conventional 0 80 kW h Energy consumption fan hot air Net volume oven in l 63 00 Number of heat sources per cooking chamber 1 electric Number of cooking chambers 1 Size of the appliance Extra la...

Страница 96: ... 8 00 kW Max rated power hob 6 00 kW Max rated power oven 2 00 kW Voltage frequency 220 240 V AC 50 Hz Dimensions hob H W D in cm 5 20 59 00 52 00 Dimensions oven H W D in cm 59 50 59 50 50 00 Hob weight net gross in kg 8 60 10 00 Oven weight net gross in kg 28 00 30 00 Technical modifications reserved According to Regulation EU No 65 2014 A highest efficiency to D lowest efficiency ...

Страница 97: ...ower cord and the plug immediately Remove the door completely so children are not able to get into the appliance as this endangers their lives 4 Dispose of any paper and cardboard into the corresponding containers 5 Dispose of any plastics into the corresponding containers 6 If suitable containers are not available at your residential area dispose of these materials at a suitable municipal collect...

Страница 98: ...heir authorised condition if they do not influence the utility value of the product 3 damage caused by handling errors or false operation 4 damage caused by aggressive environmental conditions chemicals detergents 5 damage caused by non professional installation and haulage 6 damage caused by non common household use 7 damages which have been caused outside the appliance by a PKM product unless a ...

Страница 99: ...finden alle Informationen zum Kundendienst auf der Einlage in dieser Bedienungsanleitung Aftersales service information on the leaflet inside this instruction manual Änderungen vorbehalten Subject to alterations STAND UPDATED 19 01 2022 01 19 2022 PKM GmbH Co KG Neuer Wall 2 47441 Moers ...

Отзывы: