background image

Other connections

09

50

En

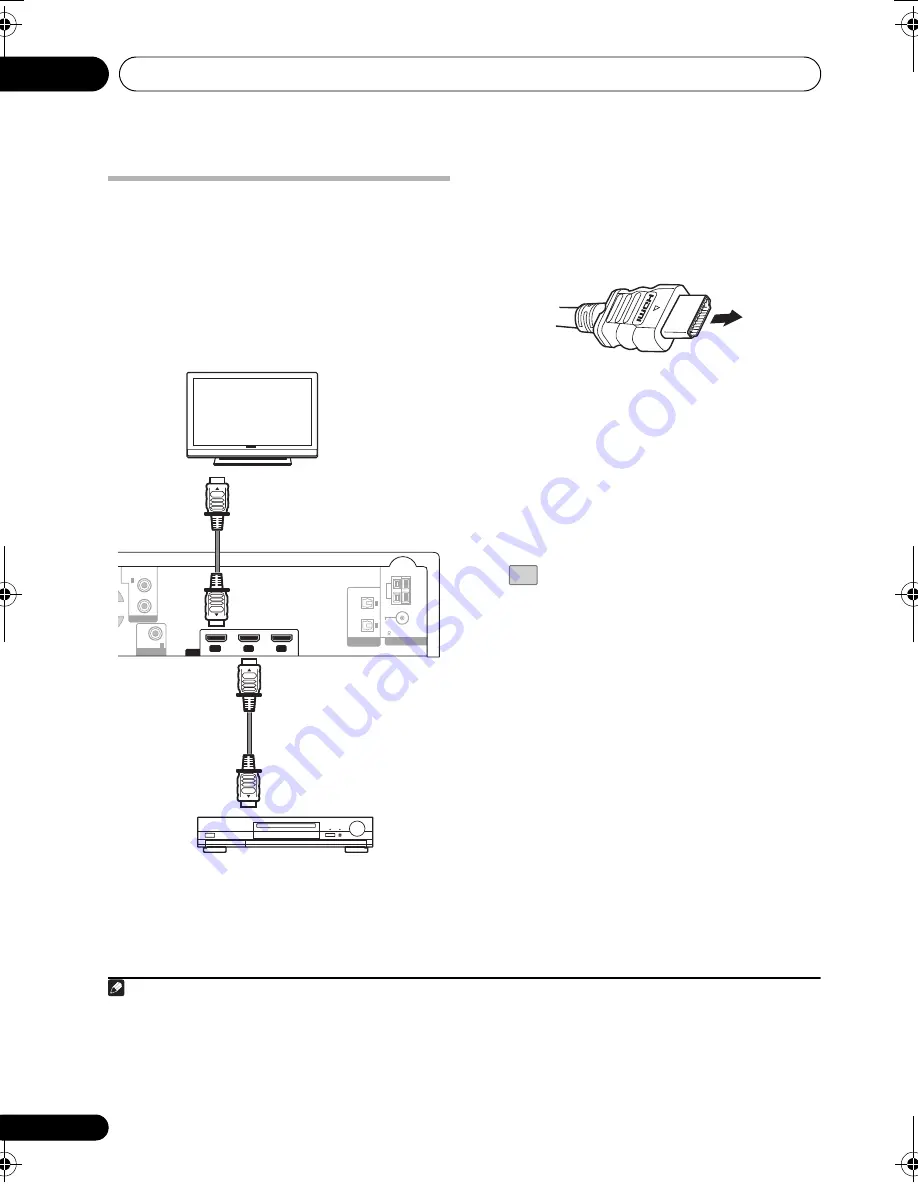
Connecting using HDMI

If you have a HDMI or DVI (with HDCP) 
equipped monitor or display, you can connect 
it to this system using the supplied (or 
commercially available) for high quality digital 
video.

1

See 

About HDMI

 on page 52 for more about the 

HDMI connection.

1

Use the supplied HDMI cable to connect 

the HDMI IN 1/2 interconnect on this system 
to an HDMI output on your HDMI component.

• With the arrow on the cable plug facing up, 

connect the plug to the player’s connector. 

Once this system is properly connected to your 
HDMI component, the 

HDMI

 indicator (red) 

lights up on the front panel when you watch 
HDMI contents.

2

Use the supplied HDMI cable to connect 

the HDMI OUT interconnect on this system to 
an HDMI interconnect on an HDMI-
compatible display.

3

 Press repeatedly to select the HDMI 

input you’ve connected to (for example, 
HDMI 2).

You can also use the front panel 

INPUT

 to carry 

out this operation. 

• Set the HDMI Audio setting to 

TV

 in 

Switching the HDMI audio setting

 below if 

you want to hear HDMI audio output from 
your TV or Flat Screen TV (no sound will be 
heard from this unit).

• If the video signal does not appear on your 

TV or Flat Screen TV, try adjusting the 
resolution settings on your component or 
display. 

Note

1 • An HDMI connection can only be made with DVI-equipped components compatible with both DVI and High Bandwidth 

Digital Content Protection (HDCP). If you choose to connect to a DVI connector, you will need a separate adaptor (DVI

HDMI) 

to do so. A DVI connection, however, does not support audio signals. Consult your local audio dealer for more information.
• This system has been designed to be compliant with HDMI (High-Definition Multimedia Interface).
• When HDMI Audio is set to 

TV

, sound is output from this unit to the TV connected to the HDMI connectors in for audio format 

supported by that TV.
• Depending on the component you have connected, using a DVI connection may result in unreliable signal transfers.

L

ANALOG

COAX

R

AUDIO IN

DIGITAL IN

DIGITAL IN

ANTENNA

HDMI

OUT

IN 2

IN 1

1

3

OPTICAL

AM

LOOP

FM

UNBAL
75

2

1

TV

To HDMI input

From HDMI output

HDMI/DVI-equipped component

1/2

HDMI

LX03BD_1.book  Page 50  Monday, July 28, 2008  2:12 PM

Содержание LX03BD

Страница 1: ...Audio Multi channel Receiver Blu ray Disc Home Cinema System SX LX03 SSP LX03 Audio Multi channel Receiver Speaker System ...

Страница 2: ...net are provided for ventilation to ensure reliable operation of the product and to protect it from overheating To prevent fire hazard the openings should never be blocked or covered with items such as newspapers table cloths curtains or by operating the equipment on thick carpet or a bed D3 4 2 1 7b_A_En Operating Environment Operating environment temperature and humidity 5 ºC to 35 ºC 41 ºF to 9...

Страница 3: ...ent and used batteries These symbols on the products packaging and or accompanying documents mean that used electrical and electronic products and batteries should not be mixed with general household waste For proper treatment recovery and recycling of old products and used batteries please take them to applicable collection points in accordance with your national legislation By disposing of these...

Страница 4: ...peaker cables 22 02 Speaker Setup Guide SX LX08 Safety precautions when setting up 24 Home theater sound setup 24 Connect the speakers 24 03 Connecting up Basic connections 26 04 Getting started Using the Auto MCACC setup for optimal surround sound 29 05 Listening to your system Auto listening mode 31 Listening in surround sound 31 Dolby Pro Logic II Music settings 32 Using Advanced Surround 32 Us...

Страница 5: ...e HDMI audio setting 51 Setting the Auto Delay 51 Resetting the HDMI connection 52 About HDMI 52 10 HDMI Control Making the HDMI Control connections 53 Setting the HDMI options 55 Setting the HDMI Control mode 55 Before using synchronization 55 Synchronized amp mode 55 Synchronized amp mode operations 55 Canceling synchronized amp mode 55 11 Additional information Optional system settings 56 Setti...

Страница 6: ...er cables x7 Brackets x2 Screws for brackets x4 Speaker stands x2 Non skid pads for satellite speakers x24 Non skid pads for subwoofer x4 Non skid pads for speaker stands x8 Spiral wrap x2 SX LX08 model Remote control AA R6 dry cell batteries to confirm system operation x2 AM loop antenna FM antenna Microphone for Auto MCACC setup Power cords x2 HDMI cables x2 Speaker cable adaptors x5 Cleaning cl...

Страница 7: ...Sound controls SURROUND Selects a Surround mode page 31 or switches to stereo playback page 33 ADV SURR Selects a Pioneer original surround mode page 32 5 SOUND RETRIEVER Press to restore CD quality sound to compressed audio sources page 33 6 Number buttons Use to enter a track number or radio station 7 FL DIMMER Press to switch the brightness of the Blu ray disc player s display The FL OFF indica...

Страница 8: ...reen 17 T EDIT Memorizes stations for recall page 40 OUTPUT RESOLUTION Use to switch the output video resolution from the player s HDMI OUT or COMPONENT VIDEO output terminals 18 SOUND Accesses the sound menu to adjust the tone bass and treble etc page 32 34 VIDEO SELECT Press to switch the player s terminal from which the video signals are output Use to switch between digital output HDMI OUT term...

Страница 9: ...nd minus ends of each battery match the indications in the battery compartment Remove batteries from equipment that isn t going to be used for a month or more When disposing of used batteries please comply with governmental regulations or environmental public instruction s rules that apply in your country area Do not use or store batteries in direct sunlight or other excessively hot place such as ...

Страница 10: ...udio source for playback page 36 4 PHONES jack Connect headphones 5 MCACC jack Use to connect the supplied microphone for the Auto MCACC setup page 29 6 IR remote sensor 7 Front panel display See Display below for details 8 Motion sensor When the front panel display is off if Display Mode is set to Auto Display the display will automatically turn on when movement is detected by the motion sensor p...

Страница 11: ...ensor detects movement in the left right and up down directions within a distance of 2 5 m and an angle of 40º 20º only in the upper direction Walking towards the unit will reduce the sensing range to 0 7 m Display 1 DIRECT Lights when Direct Sound is selected i e Effective Sound is off page 42 2 Listening mode indicators STEREO Lights when the Stereo mode is selected or when a stereo source is be...

Страница 12: ...C Lights when listening mode is set to A L C page 31 S RTRV Lights when Sound Retriever is active page 33 DIALOG Lights when Dialogue Enhancement is active page 34 5 MCACC Lights when Acoustic Calibration EQ is active page 34 Blinks during Auto MCACC Setup page 29 6 iPod indicators Lights during playback and flashes during pause mode Lights during shuffle play Lights during repeat play Lights duri...

Страница 13: ...evision that has an HDMI terminal 8 HDMI IN1 2 connectors Use high quality audio video connection with compatible HDMI devices Connect the Blu ray disc player to HDMI IN 1 To select this input choose HDMI 1 or HDMI 2 9 DIGITAL IN1 2 OPTICAL jacks To listen to optical digital audio change the input to Digital 1 or Digital 2 10 AM LOOP antenna terminal 11 FM antenna socket 12 SUBWOOFER PREOUT jack S...

Страница 14: ...ht 3 HDMI indicator This lights when an HDMI compatible device is connected page 76 4 Disc tray 5 FL OFF indicator This lights when Off is selected with FL DIMMER 6 Front panel display 7 STOP Press to stop playback 8 PLAY Press to start playback 9 OPEN CLOSE Press to open and close the disc tray Display 1 Lights during playback 2 Lights when playback is paused 3 PQLS Lights when the PQLS function ...

Страница 15: ... HDMI IN 1 jack of the receiver with the supplied HDMI cable 6 DIGITAL OUT OPTICAL Connect with the digital audio input terminal on the other audio component 7 CONTROL IN terminal Use to control this player from the remote sensor of another Pioneer component with a CONTROL OUT terminal and bearing the mark Connect the CONTROL OUT of the other component to the CONTROL IN of this player using a mini...

Страница 16: ... this system Standard surround setup This is a standard multichannel surround sound speaker setup for optimal 5 1 channel home theater sound The front left and right speakers should be about 1 8 m to 2 7 m apart Front surround setup This setup is ideal when rear surround speaker placement isn t possible or you want to avoid running long speaker cables in your listening area The surround left and r...

Страница 17: ...ovided with a color coded indicator on the label on the rear side to assist identification Refer to the color indicators and install the speakers correctly As shown in the illustration stack the speakers Align the brackets with the screw holes on the back of the two speakers and use the two screws to fix in place Standard surround setup Front speaker Center speaker Surround speaker Non skid pads f...

Страница 18: ...erything place the speakers as shown in the diagram above for optimal surround sound After placing the speakers run the Auto MCACC setup page 29 to complete your surround sound setup Using the supplied speaker stands When setting up the front surround the supplied accessory speaker stand can be used Apply the non skid pads for speaker stand to the four corners of the speaker stand and set the spea...

Страница 19: ...stance from the TV When using the Standard surround setup install the surround speakers slightly above ear level for optimum effect Precautions When installing the center speaker on top of the TV be sure to secure it with tape or some other suitable means Otherwise the speaker may fall from the TV due to external shocks such as earthquakes endangering those nearby or damaging the speaker The front...

Страница 20: ...cket WARNING Pioneer bears no responsibility for accidents resulting from faulty assembly or installation insufficient mounting strength of walls mounting fixtures or other building fixtures misuse or natural disasters OUT L ANALOG R AUDIO OUT L ANALOG COAX R IN CONTROL AUDIO IN DIGITAL IN 3 R L R FRONT 4 L SPEAKERS SURROUND 8 SUBWOOFER 4 CENTER 4 Surround right Grey Front right Red Front left Whi...

Страница 21: ...icator provided on the rear surface label Match the color coded wire with the color indicator on the label then insert the color coded wire into the red side and the other wire into the black side When connecting the center speakers connect the Y cable dual end to the two center speakers in the same way Connect the other end to the color coded speaker terminals on the rear of the receiver Make sur...

Страница 22: ...the amp Using your own speaker cables When connecting the speakers you can purchase and use your own speaker cables if desired in place of those furnished In this case perform the following procedures to attach the speaker cable adaptor to your own cables 1 While holding down the two buttons on the adaptor insert the wire ends of your own cable into the adaptor White Red Blue Grey and Purple speak...

Страница 23: ...wer cords to the wall socket WARNING Pioneer bears no responsibility for accidents resulting from faulty assembly or installation insufficient mounting strength of walls mounting fixtures or other building fixtures misuse or natural disasters OUT L ANALOG PREOUT R L R FRONT L R AUDIO OUT SUBWOOFER L ANALOG COAX R IN CONTROL SURROUND CENTER AUDIO IN DIGITAL IN 3 SPEAKERS 4 8 Surround left Surround ...

Страница 24: ...nds of speaker cable into the adaptor White Red Blue Grey and Green speaker cable adaptors are provided as accessories Use these to attach your own cables for the front left right speakers surround left right speakers and center speaker The speaker cable adaptors are color coded to their matching speakers Insert the proper cable into its adapter of designated color Confirm the polarity indicated o...

Страница 25: ... or disconnecting the speaker cables disconnect the power cord before touching any uninsulated parts Do not connect any speakers other than those designated for this system After connecting the plugs pull lightly on the cables to make sure that the ends of the cables are securely connected to the terminals Poor connections can create noise and interruptions on the sound If the cable s wires happen...

Страница 26: ...r cords to the wall socket WARNING Pioneer bears no responsibility for accidents resulting from faulty assembly or installation insufficient mounting strength of walls mounting fixtures or other building fixtures misuse or natural disasters AUDIO OUT 7 1 ch VIDEO OUT HDMI OUT TAL UT Y PB PR CAL COMPONENT VIDEO SURROUND CENTER VIDEO S VIDEO SUB WOOFER SURROUND BACK AC IN Receiver Blu ray disc playe...

Страница 27: ... audio output to DIGITAL IN1 OPTICAL on the receiver 4 Use a coaxial audio cable to connect to a TV with no optical digital audio input see Using this unit for TV audio on page 46 To use the HDMI Control function when you are connected to a supported Pioneer Flat Screen TV you must connect via HDMI You must first set TV Input to switch the input source of this unit to TV audio or to switch the aud...

Страница 28: ...r s power cord in the same way Note 1 Do not use any power cord other than the one supplied with this system Do not use the supplied power cord for any purpose other than connecting to this system After connecting this unit to an AC outlet a 15 second initialization process begins You cannot carry out any operations during initialization The HDMI indicator on the display unit blinks during initial...

Страница 29: ...re not moved during the MCACC setup 1 Connect the microphone to the MCACC jack on the front panel Open the front panel door to access the MCACC jack 2 Place the microphone at your normal listening position Place it about ear height and make sure it is level by using a table or chair Make sure there are no obstacles between the speakers and the microphone 3 If the system isn t already on switch it ...

Страница 30: ...Calibration EQ is activated 4 Be sure to disconnect the microphone from this unit upon completion of the Auto MCACC setup Note 1 If the room environment is not optimal for the Auto MCACC setup too much ambient noise echo off the walls obstacles blocking the speakers from the microphone the final settings may be incorrect Check for household appliances air conditioner fridge fan etc that may be aff...

Страница 31: ...ng modes LX03BD model only If you set up the system for Front surround page 16 the Front Stage Surround modes will give the best results page 33 Press repeatedly to select a listening mode 1 The choices that appear in the display will vary according to the type of source that s playing With two channel sources you can select from Auto See Auto listening mode above 2PL II Movie Dolby Pro Logic II M...

Страница 32: ...ource for a variety of additional surround sound effects These modes are designed to provide optimum listening effect when using the Standard surround setup described on page 16 23 Press to select an Advanced Surround mode The ADV SURR indicator lights when one of these modes is chosen You cannot switch between modes for some audio streams 1 Press repeatedly to select Action Designed for action mo...

Страница 33: ...el varies with the music source recorded in a portable audio player Press repeatedly to select Stereo or A L C mode Stereo The STEREO indicator will light and ordinary stereo sound will be produced A L C Listening in Auto level control stereo mode The STEREO and ALC indicators will light Listening with headphones When headphones are connected only the Stereo A L C and PhonesSurround modes are avai...

Страница 34: ...ss to open the sound menu 2 Select Dialogue then press ENTER 3 Select the amount of Dialogue Enhancement then press ENTER to confirm Select between Off Mid Max or Auto When Dialogue is set to Auto the amount of Enhancement is selected automatically to optimally match the audio signal The DIALOG indicator lights when Dialogue Enhancement is active Using Midnight and Quiet listening modes The Midnig...

Страница 35: ...etting then press ENTER to confirm Select between Off Music Cinema or Auto When Bass Mode is set to Auto the setting Music or Cinema is selected automatically to optimally match the audio signal The BASS MODE indicator lights when Bass Mode is active Adjusting sound delay Some monitors have a slight delay when showing video so the soundtrack will be slightly out of sync with the picture By adding ...

Страница 36: ...with the audio of iPod nano iPod fifth generation iPod classic iPod touch not supported iPod shuffle and iPhone However that some of the functions may be restricted for some models Note however compatibility may vary depending on the software version of your iPod Please be sure to use the latest available software version iPod is licensed for reproduction of non copyrighted materials or materials ...

Страница 37: ...s by a particular artist Basic playback controls The following table shows the basic playback controls for your iPod Press iPod to switch the remote control to the iPod operation mode Note 1 If you re in the song category you can also press ENTER to start playback ENTER ENTER Button What it does Press to start playback If you start playback when something other than a song is selected all the song...

Страница 38: ...ed Update the software being used with the iPod please use the latest iPod software versions later than the iPod updater 2004 10 20 Error I3 The iPod that is not supported is connected Check whether the iPod was supported by this unit page 36 When the iPod software version is too old update the iPod software to the latest version Error I4 When there is no response from the iPod update the iPod sof...

Страница 39: ...and hold TUNE until the frequency display starts to move rapidly Keep the button held down until you reach the frequency you want If necessary fine tune the frequency using the manual tuning method Improving poor FM reception If you re listening to an FM station in stereo but the reception is weak you can improve the sound quality by switching to mono 1 Press after tuning to an FM radio station 2 ...

Страница 40: ...ion FM or the Noise Cut mode AM as necessary These settings are saved along with the preset 2 Press T EDIT 3 Press to select one of the three classes then press ST to select the station preset you want You can also use the number buttons to select a preset 4 Press ENTER After pressing ENTER the preset class and number stop blinking and the system memorize station Listening to station presets You w...

Страница 41: ... News Affairs Current Affairs Info General Information Sport Sport Educate Educational Drama Radio plays etc Culture National or regional culture theater etc Science Science and technology Varied Usually talk based material such as quiz shows or interviews Pop M Pop music Rock M Rock music Easy M Easy listening Light M Light classical music Classics Serious classical music Other M Music not fittin...

Страница 42: ...y inherent in movies and music Turn on the Effective Sound mode under normal circumstances to maximize the capabilities of this unit 1 Dynamic Range Compression Resuscitates detailed sound susceptible to ambient noise to create an acoustic environment where you feel as if you are right in the action Frequency Characteristic Correction LX03BD model only Realizes the playback characteristic optimize...

Страница 43: ...d sound setup However you may find that by further adjustment of the speaker distance settings you can improve the surround sound in your listening room Set the distance of each speaker from your normal listening position 1 Open the Sound Setup menu 2 Select Distance then press ENTER 3 Use to select a speaker or to adjust the distance Each speaker can be adjusted from 0 1m to 9 0m 4 Press ENTER wh...

Страница 44: ... recorded in bilingual audio and external inputs with bilingual audio HDMI and optical coaxial digital inputs 1 Open the Sound Setup menu 2 Select Dual Mono then press ENTER 3 Select a setting Select one of the following CH1 Mono Only channel 1 is played CH2 Mono Only channel 2 is played CH1 CH2 Both channels are played through the front speakers Virtual Surround Back This mode allows you to use y...

Страница 45: ... Open the Sound Setup menu 2 Select LFE ATT then press ENTER 3 Select a setting Select one of the following 0dB The LFE is not limited which is the recommended value 10dB The LFE is limited by the respective degree LFE Off No sound is output from the LFE channel 4 Press to exit DTS CD setting If you play a DTS encoded CD you will need to change this setting to hear the decoded signal 1 Open the So...

Страница 46: ...essary to adjust the digital audio output settings on the TV For details consult the operating instructions for your TV Audio input settings from the TVs TV Input To listen to audio from a Flat Screen TV on this device you will need to connect an audio cable other than an HDMI cable From this menu set the audio input to that which you would like to connect Press TV on the remote control to switch ...

Страница 47: ...en digital connections are used it may be necessary to adjust the digital audio output settings on the connected component For details consult the operating instructions for the component involved Connecting an analog audio component You can use the ANALOG AUDIO IN jacks to connect an analog audio component such as a VCR or tape player Listening to an external audio source To listen to audio from ...

Страница 48: ...tput suitable for playback on a two channel stereo system or on headphones Lt Rt A surround compatible downmix left total right total or Lt Rt of Dolby multichannel sources is output suitable for Dolby Surround Pro Logic or other matrix decoding The L OUT indicator lights 5 Press to exit LINE Digital 1 OPT Digital 2 OPT Digital 3 COAX Analog OUT L ANALOG R AUDIO OUT IN CONTROL AC IN R L R FRONT 4 ...

Страница 49: ...st one component When you use a remote control the control signal is passed along the chain to the appropriate component If you choose to use this feature you must make sure that you also have at least one set of HDMI or analog audio jacks connected to another component for grounding purposes Using a cable with a mono mini plug on either end connect the CONTROL IN jack on another Pioneer component...

Страница 50: ...in Switching the HDMI audio setting below if you want to hear HDMI audio output from your TV or Flat Screen TV no sound will be heard from this unit If the video signal does not appear on your TV or Flat Screen TV try adjusting the resolution settings on your component or display Note 1 An HDMI connection can only be made with DVI equipped components compatible with both DVI and High Bandwidth Dig...

Страница 51: ...ing on the operational status of the display connected with an HDMI cable The audio delay time is automatically adjusted according to the video delay time 1 Press SETUP 2 Select HDMI Setup then press ENTER 3 Select Auto Delay then press ENTER 4 Select A Delay On or A Delay Off then press ENTER to confirm Tip This feature is only available when the connected display supports the automatic audio vid...

Страница 52: ... with DVD players DTV set top boxes and other AV devices HDMI was developed to provide the technologies of High bandwidth Digital Content Protection HDCP as well as Digital Visual Interface DVI in one specification HDCP is used to protect digital content transmitted and received by DVI compliant displays HDMI has the capability to support standard enhanced or high definition video plus stan dard t...

Страница 53: ...s that do not support HDMI Control We cannot guarantee this unit will work with HDMI Control compatible components other than those made by Pioneer Making the HDMI Control connections You can use synchronized operation for a connected Flat Screen TV and up to two other components including a recorder or player Be sure to connect the Flat Screen TV s audio cable to the audio input of this unit HDMI...

Страница 54: ...to the wall socket After connecting this unit to an AC outlet a 15 second initialization process begins You cannot carry out any operations during initialization The HDMI indicator on the front panel blinks during initialization and you can turn this unit on once it has stopped blinking To get the most out of this function we recommend that you connect your HDMI component not to a Flat Screen TV b...

Страница 55: ...ization Once you have finished all connections and settings you must 1 Put all components into standby mode 2 Turn the power ON for all components with the power for the Flat Screen TV being turned on last 3 Choose the HDMI input to which the TV is connected to this unit and see if video output from connected components displays properly on the screen or not Synchronized amp mode Synchronized amp ...

Страница 56: ...m Setup menu then press ENTER 2 Adjust the setting then press ENTER to confirm the settings and exit Sleep On Switches off after about an hour The indicator lights Sleep Off Cancels the sleep timer After selecting Sleep On you can press SLEEP again to check how much time is left Each line indicates approximately 12 minutes remaining Dimming the display You can adjust the brightness of the text in ...

Страница 57: ...ensing range to 0 7 m Key lock setting 1 Select Key Lock from the System Setup menu then press ENTER 2 Adjust the setting then press ENTER to confirm the settings and exit Lock On Makes the front panel buttons and controls inoperative Lock Off Restores regular use of the front panel buttons and controls Setting up the remote to control your TV You can use the supplied remote to control your TV To ...

Страница 58: ...ion to the format features above Dolby Digital decoders offer downmixing for compatibility with mono stereo and Dolby Pro Logic audio from a number of bit rates and channels Another feature called Dialog Normalization attenuates programs based on the average level of dialog in a program relative to its peak level also known as Dialnorm in order to achieve uniform playback level Dolby Pro Logic II ...

Страница 59: ...icense under U S Patent s 5 451 942 5 956 674 5 974 380 5 978 762 6 487 535 other U S and worldwide patents issued pending DTS and DTS Digital Surround are registered trademarks and the DTS logos and Symbol are trademarks of DTS Inc 1996 2007 DTS Inc All Rights Reserved Installation and maintenance Hints on installation We want you to enjoy using this system for years to come so please bear in min...

Страница 60: ...ers are connected correctly Make sure there is enough space for ventilation around the unit Make sure the voltage of the mains power source is correct for the model Try reducing the volume level If the problem persists take it to your nearest Pioneer authorized service center or your dealer for servicing Do not block the air intake opening on the bottom as well as the air exhaust opening on the ba...

Страница 61: ...eer component connected to the CONTROL OUT jack of this unit make sure that the control cable and either an HDMI or analog audio cable are connected page 49 If an object is placed on top of the touch sensor the sensor will be activated thus disabling the remote control unit operations If the action indicator remains continuously lighted remove any object sitting on the touch sensor panel The front...

Страница 62: ... that it will not work with this unit even if it is HDCP compatible If the problem still persists when connecting your HDMI component directly to your monitor please consult the component or monitor manual or contact the manufacturer for support No sound or sound suddenly ceases Check that the HDMI Audio is set to AMP If the component is a DVI device use a separate connection for the audio Check t...

Страница 63: ...patible with HDCP Some components that are compatible with HDCP still cause this message to be displayed but so long as there is no problem with displaying video this is not a malfunction Key Lock The key lock is enabled See Key lock setting on page 57 Line Out Mode Operation is disabled since Line Output is set to Lt Rt Muting When audio is muted display appears if Auto MCACC setup is performed N...

Страница 64: ...ng mode Auto Action etc Sound Retriever Retriever On or Retriever Off Sound Field Sound Field Tone controls Bass Treble Quiet Midnight Bass Mode Bass Mode Dialogue Enhancement Dialogue Acoustic Calibration EQ MCACC EQ Sound Delay Sound Delay Center Width Center Width Dimension Dimension Panorama Panorama Channel Level Channel Level Speaker Distance Distance Dynamic Range Control D R C Dual Mono Du...

Страница 65: ...tandby 0 7 W HDMI Control ON 0 4 W HDMI Control OFF Dimensions 420 mm W x 80 mm H x 364 mm D Weight 4 8 kg Speaker system Front speakers x2 Center speakers x2 Surround speakers x2 Subwoofer x1 Front speakers Enclosure Closed box bookshelf type magnetically shielded System 2 way system Speakers Woofer 5 2 cm cone type x2 Tweeter 2 6 cm semi dome type Impedance 4 Ω Frequency range 200 Hz to 20 kHz M...

Страница 66: ... pads for speaker stands 8 Spiral wrap 2 Note Specifications and design subject to possible modification without notice due to improvements Specifications SX LX08 model Amplifier section RMS Power Output Front Center 100 W per channel 1 kHz 10 T H D 4 Ω Surround 50 W per channel 1 kHz 10 T H D 8 Ω FM tuner section Frequency range 87 5 MHz to 108 MHz Antenna 75 Ω unbalanced AM tuner section Frequen...

Страница 67: ...nfirm system operation 2 AM loop antenna 1 FM antenna 1 Microphone for Auto MCACC setup 1 Power cords 2 HDMI cables 2 Speaker cable adaptors White Red Green Blue Grey 1 each Cleaning cloth 1 Warranty card 1 Setup Guide These operating instructions Note Specifications and design subject to possible modification without notice due to improvements ...

Страница 68: ... Section Two Blu ray Disc Player BDP LX08 ...

Страница 69: ... 87 04 Playback Playing discs or files 90 Forward and reverse scanning 91 Playing specific titles chapters or tracks 91 Skipping content 91 Playing in slow motion 92 Step forward and step reverse 92 Switching the camera angles 92 Switching the subtitles 93 Switching the audio streams channels 93 Switching the secondary audio 94 Switching the secondary video 94 Displaying the disc information 95 Us...

Страница 70: ...nging the password 116 Changing the Age Restriction for watching BD ROMs 117 Changing the Parental Lock level for watching DVDs 117 Changing the Country Area code 119 Changing the terminals for outputting video and audio signals Output Terminal Priority 119 Restoring all the settings to the factory default settings 120 About the audio output settings 121 07 Additional information Troubleshooting 1...

Страница 71: ...cs with the logo marks below indicated on the disc label package or jacket can be played Disc type Logo Application format BDMV1 1 Including the AVCHD format BDAV DVD Video DVD VR CD DA DTS CD DATA DISC2 2 Discs on which movie files or music files are recorded BD ROM BD R BD RE DVD ROM DVD R DVD R DL Dual Layer DVD RW DVD R DVD RW CD DA Music CD CD R CD RW CD ROM ...

Страница 72: ...ted on this player Dolby TrueHD Dolby Digital Plus Dolby Digital DTS HD Master Audio DTS HD High Resolution Audio DTS Digital Surround MPEG MPEG 2 AAC Linear PCM To enjoy the surround sound of Dolby TrueHD Dolby Digital Plus DTS HD Master Audio and DTS HD High Resolution Audio it is recommended to connect the player to an AV receiver or amplifier compatible with these audio formats using an HDMI c...

Страница 73: ...ta page 87 BDs BDAV compatible with the formats below can be played Blu ray Disc Recordable R Format Version 1 Blu ray Disc Rewritable RE Format Version 2 Dual Layer BDs can be played Movie and music files recorded on BDs cannot be played 8 cm BD ROMs cannot be played Playing DVDs DVD Video can be played DVD R RW R RW discs recorded in the DVD Video format can be played finalize them before playin...

Страница 74: ... The non DVD audio side of the disc is not compatible with this player It is possible that when loading or ejecting a DualDisc the opposite side to that being played will be scratched Scratched discs may not be playable For more detailed information on the DualDisc specification please refer to the disc manufacturer or disc retailer Playing discs created on computers It may not be possible to play...

Страница 75: ...VOD registration code can be checked at Initial Setup Options DivX VOD Registration Code page 113 DivX VOD files for which the player s DivX VOD registration code is not authorized cannot be played Authorization Error is displayed The number of views is restricted for some DivX VOD files When such files are played on this player the remaining number of views is displayed Files for which the remain...

Страница 76: ...ice being connected Note The HDMI indicator on the player s front panel lights when an HDMI compatible device is connected Depending on the connected device in some cases it may only light when the player is selected as the device s input 1080p video signals may not be output depending on the HDMI cable being used Caution Hold the plug when connecting and disconnecting the cable Placing a load on ...

Страница 77: ...o this receiver For details see About the audio output settings on page 121 About the HDMI high speed transmission This player outputs 1080 50p 1080 60p and Deep Color video signals If your TV supports 1080 50p 1080 60p or Deep Color signals use a High Speed HDMI cable or the supplied HDMI cable in order to take advantage of the maximum performance the player and TV can offer Also set HDMI High Sp...

Страница 78: ...lso refer to the operating instructions of the Flat Screen TV etc To use the HDMI Control function The HDMI Control function operates when HDMI Control is set to On for all devices connected with HDMI cables Once connections and the settings of all the devices are finished be sure to check that the player s picture is output to the Flat Screen TV Also check after changing the connected devices and...

Страница 79: ... 1 R R AUDIO OUT 2 ch AUDIO OUT 7 1 ch VIDEO OUT HDMI OUT DIGITAL OUT CONTROL IN L L Y PB PR FRONT OPTICAL COMPONENT VIDEO SURROUND CENTER VIDEO S VIDEO SUB WOOFER SURROUND BACK AC IN Direction of signal flow HDMI cable included TV Audio cable included Red White Yellow Video cable included An S Video cable commercially available can also be used for connection Component cable or three video cables...

Страница 80: ...onent Connect to the other audio component in order to enjoy the surround sound of Dolby TrueHD Dolby Digital Plus Dolby Digital DTS HD Master Audio DTS HD High Resolution Audio or DTS Digital Surround For instructions on connecting the TV and speakers to the audio component refer to the operating instructions of audio component Note Make the settings in the Setup Navigator menu according to the t...

Страница 81: ...VIDEO VIDEO OUT Y PB PR COMPONENT VIDEO R AUDIO OUT 7 1 ch L FRONT SURROUND CENTER SUB WOOFER SURROUND BACK DIGITAL OUT CONTROL IN OPTICAL Player s rear panel To multi channel audio input terminals AV receiver or amplifier Audio cable included Audio cable commercially available Audio cable commercially available Audio cable commercially available Red White Component cable or three video cables com...

Страница 82: ...s have been completed R R AUDIO OUT 2 ch AUDIO OUT 7 1 ch VIDEO OUT HDMI OUT DIGITAL OUT CONTROL IN L L Y PB PR FRONT OPTICAL COMPONENT VIDEO SURROUND CENTER VIDEO S VIDEO SUB WOOFER SURROUND BACK AC IN AC IN VIDEO OUT Y PB PR COMPONENT VIDEO VIDEO S VIDEO AC IN Player s rear panel Power cable included To wall outlet ...

Страница 83: ...splayed Press HOME MENU to display the Home Menu select Initial Setup Setup Navigator Start then press ENTER 3 Select the OSD language Use to select then press ENTER When you have this player connected to a Pioneer Flat Screen TV that is compatible with HDMI Control language settings are imported from the Pioneer Flat Screen TV s language settings before Setup Navigator begins 4 Select and set the...

Страница 84: ...nd sound may not be output properly if any other HDMI cable standard HDMI cable is used When HDMI is selected for Video proceed to step 8 When Component Video is selected for Video proceed to step 6 When S Video Video is selected for Video proceed to step 7 6 Select the output video resolution from the COMPONENT VIDEO output terminals Use to select then press ENTER For details on the resolution se...

Страница 85: ... saver The screen saver is automatically activated if there is no operation for over 1 minute after playback is stopped or paused The screen saver turns off when an operation is performed on the player or remote control The screen saver is automatically activated if there is no operation for over 1 minute after the Home Menu or Home Media Gallery is displayed while playing a BD or DVD With CDs and...

Страница 86: ...rt Play Mode Display the Play Mode screen page 95 Angle Switch the BD ROM DVD Video disc s camera angles page 92 Subtitle Switch the subtitles page 93 Audio Switch the audio streams channels page 93 Secondary Audio Switch the BD ROM s secondary audio streams channels page 93 Secondary Video Switch the BD ROM s secondary video Picture in Picture page 94 Original Play List Switch the DVD R RW s VR f...

Страница 87: ...below to switch the video output terminal Switch between the digital output HDMI OUT terminal and the analog output COMPONENT VIDEO S VIDEO or VIDEO output terminals Switch the terminal from which the video signals are output The video output terminal switches each time the button is pressed Caution The picture may not be displayed for a while when the video output terminal is switched When the HD...

Страница 88: ...i 576 50i 576 50i PAL 480 60i 480 60i 480 60i 5 576p or 480p 576 50p 576 50p 576 50i PAL 480 60p 480 60p 480 60i 5 1080i 1080 50i 576 50p 576 50i PAL 1080 60i 1080 60i6 480 60i 5 1080p2 1080 50p7 PAL 1080 60p7 5 Source Direct Resolution recorded on disc3 8 9 Resolution recorded on disc8 9 10 576 50i PAL 480 60i 5 1 Depending on the BD the pictures may not be output 2 Cannot be selected when the vi...

Страница 89: ...ayed If the picture is not displayed on the TV when a source with a different frame field frequency is played use the procedure below to switch the frame field frequency and TV system settings for the signal output from the player Eject the disc then press the OPEN CLOSE button on the front panel while pressing the PLAY button to switch to a different frame field frequency The frame field frequenc...

Страница 90: ...disc To pause press pause during playback To stop press stop during playback Note Some discs start playing automatically when the disc tray is closed DVD Video discs have parental lock features Input the password registered in the player s settings to unlock the parental lock For details see page 117 For some BD R RE playback protection is set for the disc or titles Input the code number set for t...

Страница 91: ...music files For some discs normal playback resumes automatically when the chapter switches To resume normal playback Press play Playing specific titles chapters or tracks Input the number of the title chapter or track you want to play Use the number buttons 0 to 9 to input the number then press ENTER Note For some discs it is not possible to specify and play titles chapters or tracks Press CLEAR t...

Страница 92: ... discs normal playback resumes automatically when the chapter switches Reverse step playback is not possible with movie files There are some discs for which step forward reverse playback is not possible To resume normal playback Press play Switching the camera angles For BD ROM and DVD Video discs on which multiple angles are recorded the angles can be switched during playback During playback pres...

Страница 93: ...ot switched when SUBTITLE is pressed switch them from the menu screen This player does not support the display of external subtitle files for DivX Turning the subtitles off Press SUBTITLE then press CLEAR Switching the audio streams channels For discs or files on which multiple audio streams channels are recorded audio streams channels can be switched during playback During playback press AUDIO Th...

Страница 94: ...he secondary audio may switch or the switching screen provided on the disc may be displayed immediately without the current secondary audio or the total number of secondary audio streams recorded on the disc being displayed The types of recorded audio streams channels depend on the disc and file Some BD ROMs do not include secondary audio Secondary audio mark is not displayed if Angle Secondary In...

Страница 95: ...icator is set to Off page 113 Displaying the disc information Press DISPLAY The disc information appears on the TV screen The information switches each time the button is pressed The information display differs during playback and when playback is stopped Using the Play Mode functions Playing from a specific time Time Search 1 Display the TOOLS menu During playback press TOOLS 2 Select and set the...

Страница 96: ...mber Use the number buttons 0 to 9 or to input the number Use to move the cursor 5 Starting playback from the specified title chapter or track Use to select Search then press ENTER To cancel the search Press RETURN Note To search for title 32 input 0 3 and 2 then press ENTER There are some discs for which searching is not available Press CLEAR to clear the values you have input Playing a specific ...

Страница 97: ...epeat Play Use this procedure to play the currently playing disc title chapter track or file repeatedly 1 Display the TOOLS menu During playback press TOOLS 2 Select and set the item Use to select Play Mode then press ENTER 3 Select Repeat Random Use to select then press ENTER 4 Select the type of Repeat Play Use to select then press ENTER See the table on page 99 for the types of repeat playback ...

Страница 98: ...splay the TOOLS menu During playback press TOOLS 2 Select and set the item Use to select Play Mode then press ENTER 3 Select Repeat Random Use to select then press ENTER 4 Select the Random Play Use to select then press ENTER To cancel Random Play Select Off from the Repeat Random screen then press ENTER During playback press stop or CLEAR Note There are some discs and files for which Random Play ...

Страница 99: ...le or track repeatedly A B Repeat Playing a title repeatedly Title Repeat Playing a chapter repeatedly Chapter Repeat Playing a track or file repeatedly Track Repeat Playing all the titles tracks or files on the disc repeatedly All Repeat 3 3 The original titles are played repeatedly However the playlist titles cannot be played repeatedly 4 4 The files in the folder are played repeatedly 5 5 The f...

Страница 100: ...A GALLERY or HOME MENU Note When playing a music CD CD DA or DTS CD the Now Playing screen is displayed Some BD R RE discs have playback protection To cancel the protection input the password set for the disc To play DVD R RW VR format playlists switch to the playlist using the Original Play List command on the TOOLS menu page 86 Playing movie files 1 Press HOME MEDIA GALLERY to display the Home M...

Страница 101: ... Use to select then press ENTER Playback starts Note It may take a few seconds before playback starts This is normal It may not be possible to play some files properly The number of views may be restricted page 75 ENTER Home Media Gallery BD PLAYER Search for the part you want to play from a list of the disc s content DVD RW HMG Playlist ENTER DVD RW View available movies Movies Music ENTER Movies...

Страница 102: ...ng the file you want to play Use to select then press ENTER A list of the files and or the sub folders in the selected folder is displayed 6 Select and set the file you want to play Use to select then press ENTER CLASS HOME MEDIA GALLERY ENTER Home Media Gallery BD PLAYER Search for the part you want to play from a list of the disc s content CD ROM HMG Playlist ENTER CD ROM View available music Mo...

Страница 103: ...le to be added Use to select 4 Press TOOLS to display the TOOLS menu 5 Select Add to HMG Playlist Use to select then press ENTER The track or file selected in step 3 is added to the HMG Playlist To add more tracks or files repeat steps 3 to 5 Music 001 mp3 DATA DISC 0 05 34 0 02 33 Play Currently playing file Total file playing time Elapsed time CLASS HOME MEDIA GALLERY ENTER Home Media Gallery BD...

Страница 104: ...d Use to select then press ENTER Playback starts The Now Playing screen shown below is displayed Press stop to stop playback When playback of a music CD is stopped the Now Playing screen turns off When playback of a music file is stopped the HMG Playlist screen reappears Deleting tracks files from the HMG Playlist Select the track file to be deleted then press TOOLS to display the TOOLS menu Use t...

Страница 105: ...is when connected to a Pioneer plasma TV Projector Select this when connected to a front projector Professional With this setting video signal processing is restrained Select this when connected to a professional monitor Memory1 to 3 Picture quality settings with adjusted parameters can be stored in the memory For a description of the parameters see When Memory1 2 or 3 is selected below When Memor...

Страница 106: ...the dark colors are displayed in a uniform black due to the combination with the connected monitor select 7 5 IRE Gamma Correction Adjusts how the dark portions of the picture look Hue Adjusts the balance between green and red Chroma Level Adjusts the density of the colors Note Prog Motion and Pure Cinema have the effect only for pictures recorded in the interlaced scan format 576i 480i or 1080i s...

Страница 107: ... and Dolby Digital audio signals of BDs DVDs and movie files When Auto is selected the setting has the same effect as High or Off for Dolby TrueHD signals depending on the content For Dolby Digital Plus and Dolby Digital the setting has the same effect as Off Audio DRC affects the audio signals output from the following audio output terminals Analog audio signals output from the AUDIO OUT 2 ch or ...

Страница 108: ...OME MENU Note Items that cannot be changed are indicated in gray The items that can be selected depend on the player s status The factory default settings are indicated in bold RECEIVER iPod BD HOME MENU ENTER HOME MENU BD PLAYER Set up the player for use Home Media Gallery Initial Setup ENTER Setting Options Explanation Video Out TV Aspect Ratio 16 9 Widescreen Select this when connected to a wid...

Страница 109: ...layed Audio Out Dolby Digital Out Only valid for digital audio outputs Dolby Digital 1 Dolby Digital audio signals are output With BD ROMs the secondary audio and interactive audio are mixed for output Dolby Digital 2 Dolby Digital audio signals are output With BD ROMs the signals are output without mixing the secondary audio and interactive audio signals Dolby Digital PCM Select this when the con...

Страница 110: ...uts 2 Channel Select this when the TV s analog 2 channel stereo audio input terminals are connected to the player s AUDIO OUT 2 ch terminals Multi channel Select this when the multi channel audio input terminals of an AV receiver or amplifier etc are connected to the player s AUDIO OUT 7 1 ch terminals Speaker Setup Only valid for analog audio outputs When an AV receiver or amplifier etc is connec...

Страница 111: ...with as many audio channels as possible In cases when the number of channels does not decrease when the signals are output as such without converting them to linear PCM they are output as such page 121 PCM Select this when you want the secondary audio and interactive audio signals to be mixed for output or when you want to output prioritizing sampling frequency over the number of channels page 121...

Страница 112: ... is set one of the recorded languages is automatically selected and played BDMV DVD Video Menu Lang For some discs it may not be possible to change to the selected language w Subtitle Language Sets the language of BD ROM and DVD VIdeo menus to the same as that set for the subtitle language available languages Choose a language from the listed languages to set the default language for BD ROM and DV...

Страница 113: ...isc Playback BD The BD layer of hybrid discs with two or more layers BD and DVD or CD is played DVD The DVD layer of hybrid discs with two or more layers BD and DVD is played If there is no DVD layer the BD layer is played CD The CD layer of hybrid discs with two or more layers BD and CD is played If there is no CD layer the BD layer is played BDMV BDAV Playback Priority BDMV Select this to play t...

Страница 114: ...e Select Initial Setup from the HOME MENU then press ENTER 1 Select and set Speakers Use to select then press ENTER 2 Select and set Speaker Setup Next Screen Use to select then press ENTER Caution This cannot be selected when Audio Output Mode is set to 2 Channel Change the setting to Multi channel page 110 3 Select the speaker and change the setting Use to select then use to change the setting L...

Страница 115: ...tion This cannot be selected when Audio Output Mode is set to 2 Channel Change the setting to Multi channel page 110 3 Select and set the method for switching the speaker to be adjusted Use to select then press ENTER Auto Switch the speaker to be adjusted automatically Manual Switch the speaker to be adjusted manually Caution Test tones are output Lower the volume of the device connected to the pl...

Страница 116: ...he cursor To change the code number Input the previously registered password then input the new password Note We recommend making a note of the password If you forget the password reset the player to the factory default setting then register the password again page 120 BD Movie files DVD Music files AVCHD CD ENTER Set Password DVD Video Parental Lock BDMV Parental Lock Country Code Off 255 us Vide...

Страница 117: ...Lock level for watching DVDs Some DVD Video discs containing scenes of violence for example have Parental Lock levels check the indications on the disc s jacket or elsewhere To restrict watching these discs set the player s level to the level lower than the discs BD Movie files DVD Music files AVCHD CD ENTER Set Password DVD Video Parental Lock BDMV Parental Lock Country Code Off 255 us Video Out ...

Страница 118: ...or between Level1 and Level8 When set to Off watching is not restricted ENTER Set Password DVD Video Parental Lock BDMV Parental Lock Country Code Off 255 us Video Out Audio Out Speakers HDMI Language Parental Lock Options Setup Navigator Initial Setup BD PLAYER ENTER 1 2 3 4 5 6 7 8 0 9 ENTER Video Out Audio Out Speakers HDMI Language Parental Lock Options Setup Navigator Initial Setup BD PLAYER ...

Страница 119: ... used 1 Select and set Options Use to select then press ENTER BD Movie files DVD Music files AVCHD CD ENTER Set Password DVD Video Parental Lock BDMV Parental Lock Country Code Off 255 us Video Out Audio Out Speakers HDMI Language Parental Lock Options Setup Navigator Initial Setup BD PLAYER ENTER 1 2 3 4 5 6 7 8 0 9 ENTER Country Code Video Out Audio Out Speakers HDMI Language Parental Lock Optio...

Страница 120: ...utting audio signals Use to select then press ENTER HDMI HDMI OUT terminal Digital Audio DIGITAL OUT OPTICAL terminal Analog Audio AUDIO OUT 2 ch terminals or AUDIO OUT 7 1 ch terminals The optimum audio signals for the audio format and the player s settings are output from the output terminal s set here Caution Linear PCM 2 channel audio signals are output from the audio terminals other than the ...

Страница 121: ...olby TrueHD Dolby Digital Plus Dolby Digital DTS HD Master Audio DTS HD High Resolution Audio or DTS Digital Surround the secondary audio and interactive audio signals are not mixed BD ROM Dolby Digital Converted to 2 channel audio 5 1 channel audio Converted to 2 channel audio Dolby Digital 5 1 channel audio Dolby Digital Dolby Digital Plus 7 1 channel audio9 7 1 channel audio9 10 Dolby Digital P...

Страница 122: ... bitstream the signals are output in Dolby Digital bitstream If the connected HDMI device is not compatible with DTS HD Master Audio or DTS HD High Resolution Audio the signals are output in DTS Digital Surround bitstream If the connected HDMI device is not compatible with Dolby Digital or DTS Digital Surround bitstream the signals are output in linear PCM 9 Only compatible with 7 1 channel surrou...

Страница 123: ...ing instructions Is the disc properly set in the disc tray Set the disc with the printed side facing up Set the disc properly in the depression in the disc tray Is the region number correct The region numbers of discs that can be played on this set are as shown below page 74 BDs B or including B and ALL DVDs 2 or including 2 and ALL Is the player set in a humid place There could be condensation in...

Страница 124: ... is not supported the picture will not be displayed even when playback is stopped In this case use the procedure below to switch the frame rate of the video signals output from the player Eject the disc and close the disc tray Then press OPEN CLOSE while pressing PLAY on the player s front panel to switch to a frame rate supported by the connected TV Is NTSC on PAL TV properly set Set NTSC on PAL ...

Страница 125: ...Blu ray disc player s operating instructions Is the player properly connected to the other components AV receiver or amplifier etc Check that you connect the player to the audio output terminals of a different component etc Check that you connect the player to the PHONO input terminals of the AV receiver or amplifier etc Are the audio cables properly connected Insert the cables firmly and all the ...

Страница 126: ...io signals are output Is Audio Out set to audio formats supported by the connected AV receiver or amplifier Read the operating instructions of the connected AV receiver or amplifier and check the supported audio formats Set Audio Out properly page 109 Noise can be heard when outputting DTS Digital Surround signals Is the connected AV receiver or amplifier compatible with DTS Digital Surround If an...

Страница 127: ...lit If the HDMI indicator is not lit read the HDMI device s operating instructions and switch to the proper input If the HDMI indicator is lit use OUTPUT RESOLUTION to switch the output video resolution page 87 Are the terminals for outputting video signals properly set Press VIDEO SELECT to switch the HDMI OUT terminal Is the resolution properly set Depending on the output video resolution settin...

Страница 128: ...trol is set to On for all the devices connected by HDMI cable Once connections and settings of all the devices are finished be sure to check that the player s picture is output to the Flat Screen TV Also check after changing the connected devices and connecting and or disconnecting HDMI cables If the player s picture is not being output to the Flat Screen TV the HDMI Control function may not work ...

Страница 129: ...ER OFF has turned off from the player s front panel display before disconnecting the power cord Be particularly careful when the power cord is connected to the AC outlet on another device because the player turns off in conjunction with the device We recommend plugging the power cord into a wall outlet whenever possible After a disc is inserted Loading stays displayed and playback does not start A...

Страница 130: ...sh ji yid 1009 Javanese jw jav 1023 Georgian ka kat 1101 Kazakh kk kaz 1111 Kalaallisut kl kal 1112 Khmer km khm 1113 Kannada kn kan 1114 Kashmiri ks kas 1119 Kurdish ku kur 1121 Kirghiz ky kir 1125 Latin la lat 1201 Lingala ln lin 1214 Lao lo lao 1215 Lithuanian lt lit 1220 Latvian lv lav 1222 Malagasy mg mlg 1307 Maori mi mri 1309 Macedonian mk mkd 1311 Malayalam ml mal 1312 Mongolian mn mon 131...

Страница 131: ...pan 1016 jp Kazakhstan 1126 kz Korea Republic of 1118 kr Kyrgyzstan 1107 kg Latvia 1222 lv Liechtenstein 1209 li Lithuania 1220 lt Luxembourg 1221 lu Macedonia the Former Yu goslav Republic of 1311 mk Malaysia 1325 my Malta 1320 mt Mexico 1324 mx Moldova Republic of 1304 md Monaco 1303 mc Montserrat 1319 ms Netherlands 1412 nl New Zealand 1426 nz Norway 1415 no Pakistan 1611 pk Peru 1605 pe Philip...

Страница 132: ...tario L3R 0P2 Canada TEL 1 877 283 5901 905 479 4411 PIONEER EUROPE NV Haven 1087 Keetberglaan 1 B 9120 Melsele Belgium TEL 03 570 05 11 PIONEER ELECTRONICS ASIACENTRE PTE LTD 253 Alexandra Road 04 01 Singapore 159936 TEL 65 6472 7555 PIONEER ELECTRONICS AUSTRALIA PTY LTD 178 184 Boundary Road Braeside Victoria 3195 Australia TEL 03 9586 6300 PIONEER ELECTRONICS DE MEXICO S A DE C V Blvd Manuel Av...

Отзывы: